Review Journal Transactions
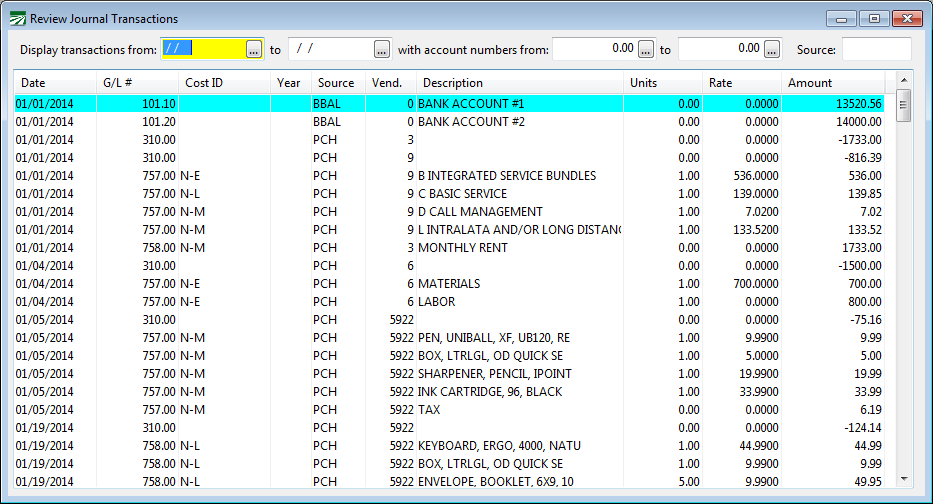
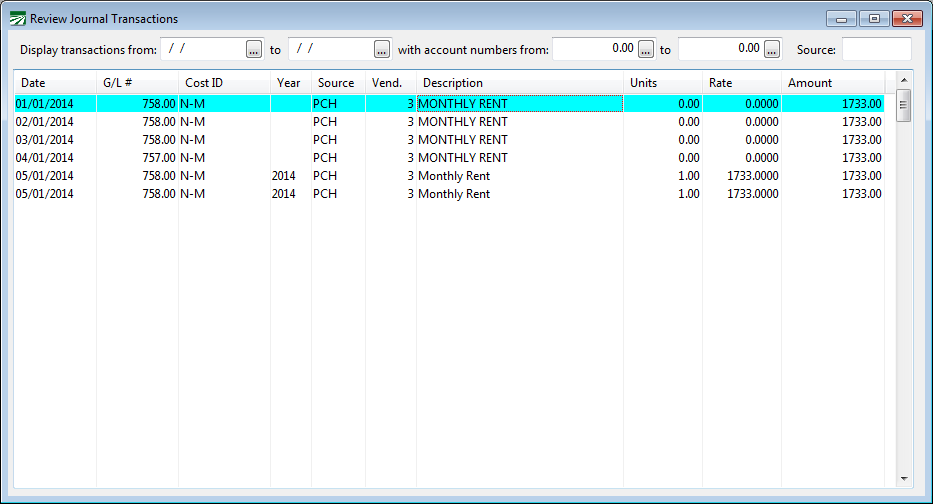
The Review Journal Transactions option can be used to view and edit some information on transactions in the General Ledger. You can also print a list of the transactions that are displayed in this window.
Go to General Ledger > Transactions > Review Journal Transactions.
Several options are available to help you zero in on the transactions you want to view.
Display transactions from ... to...
You can enter a date range to limit the transactions that are listed.
with account numbers from ... to ...
Enter a range of General Ledger account numbers to view.
If you place the mouse pointer over this entry and have entered an account number here, a "tool tip" will appear showing the account's description.
Source
When you enter a Source Journal here, the list will be filtered to only display transactions with a matching Source Journal.
You can also display transactions that do not match a specific Source Journal by entering a "~" before the Source Journal. For example, entering "~SJ" would display all transactions except those posted by the Sales Journal
The question mark can also be used as a "wildcard". The question mark will match any letter or number. So, for instance, you can type in "CD??" and all transactions that start with CD will be displayed. (The two question marks will match any other letters.) This means you'll see transactions for Source Journals CD, CD-T, and CD-M. Similarly, entering "JE??" would display all manual journal entries that have a source journal starting with "JE". (Some customers enter a two-digit number after the "JE" to identify different batches of manual journal entries, starting over with "01" each month.)
Additional Selection Criteria for Reviewing Journal Transactions
In addition to entering a date range, G/L # range, and Source Journal, you can also select transactions for display that are "related" to each other. You can do this by selecting a transaction in the list, right-clicking on it, and selecting an option on the View Transactions With Same: sub-menu.
For example, suppose you are looking at a cash-in-bank entry for a vendor check and want to see the expensing detail. If you've entered a lot of payables checks on that day, finding the expense transaction(s) for a single check could take a while. Instead of searching the list visually, you can just right click on that cash-in-bank entry and select the View Transactions With Same: Check # option. This list will be redisplayed with only transactions for that check #.
Or suppose you updated several different payroll journals on the same day (one for each crew). You are interested in viewing the transactions for one of these payroll journals. Each set of payroll journal transactions has a unique reference number. Find a transaction from the payroll journal you are interested in seeing, then select the View Transactions With Same: Reference # option. You will now see only the transactions you want.
To change the transaction list back to normal (so that it displays all transactions for the date range, G/L # range, and source journal) just go back to the View Transactions With Same: sub-menu. You will notice that the option you selected before has a check mark by it. Select the option again to turn that constraint off.
Options available on this menu include Reference #, Vendor #, Invoice #, and Check #. If you are using The Farmer's Office, there will also be options for Cost Center and Job Code If you are using The Shipper's Office, there will be options available for Grower # and Lot #.
There is a keyboard shortcut for displaying only the transactions that match a certain value in a particular column: Ctrl + =. For example, if there is a transaction displayed with an amount of 100.00 and you want to limit the transactions displayed to any with the same amount, you can either click on the cell containing the amount or use the arrow keys to make it the current cell. (The current cell is always designated by a dotted outline surrounding a cell on the current line). Then hold down the Ctrl key while pressing the = key and the transaction list will be restricted to only those transactions with the 100.00 for the amount.
Once you’ve used the Ctrl + = to restrict viewing of transactions, you can press it again to turn off the restriction.
The pop-up menu also has a View option with a sub-menu that allows you to select only debits, only credits or all transactions (the default). This option also allows you to filter transactions by Accrual Basis or Cash Basis.
Note When you select Cash Basis from the pop-up menu, the transactions displayed will be the ones that have been manually posted to cash basis by using the Manual Journal Transactions window, right clicking, and selecting Cash Basis. These manual cash basis transactions have not yet been generated and moved to the Review Cash Basis Transactions window, so you will find them in the regular Review Journal Transactions window. Once you generate a Cash Basis report, these transactions will move to the Review Cash Basis Journal Transactions window.
Navigating Through the Review Journal Transaction List
You can use the scroll bar or the page up/down and arrow keeps to move up and down the list.
Double-click on any transaction to open a window with more detailed information on the transaction. You can also right click on a transaction and select the View Source to view the entry window where the transactions originated from. For instance, if you select View Source on a “CD” transaction, you can view the original check that the transaction belongs to.
Working with Multiple Review Journal Transaction Windows
At times you may want to view transactions lists for more than one account or date range side by side. Or you may be switching back and forth between different date ranges, General Ledger accounts, or Source Journals. You can open as many Review Journal Transaction windows as you need by right clicking on a transaction and using the Open New Window option. Or use the keyboard shortcut to open a new Review Journal Transaction window, Ctrl+W.
Each Review Journal Transaction window can have its own selection criteria and settings for printing transaction reports.
Viewing Different Columns
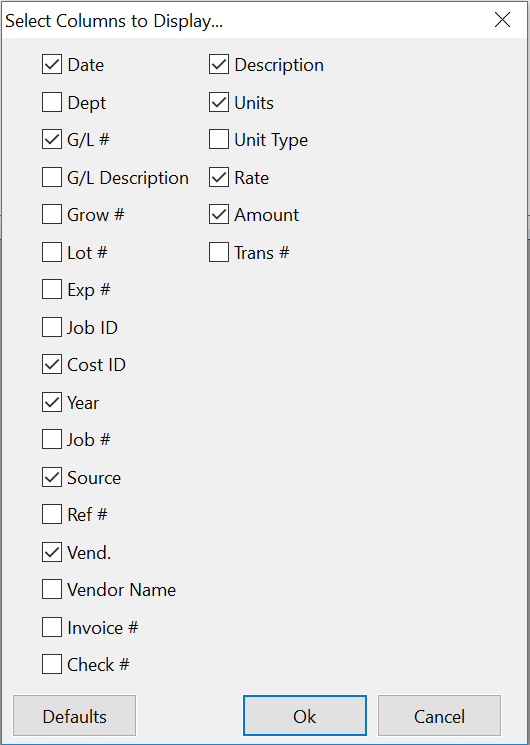
You can right click on the transactions and select the Select Columns... option on the pop-up menu to add additional columns. The following window will appear:
Select the box of any column that you want to see. Deselect the box of any column that you don't want to see. For example, if you are looking at vendor check transactions, you may want to enable the Check # column. To make room for it, you may want to deselect the Units and Rate columns.
Searching for Transactions
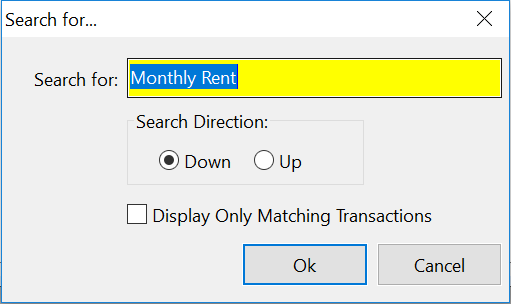
You can search for transactions that match a specific value by right-clicking on a cell and selecting Find from the pop-up menu. The cell that you right click on will be the column that the search will be performed on. For instance, if you want to search for a transaction that has a certain word in the description, right click on the description column.
When the Find window opens, it will contain the text of the cell that you right clicked on. You have the option of selecting the direction that you want to search in as well as whether to find partial or exact matches of the search text that you enter:
The Search Direction is relative to your current position in the transaction list.
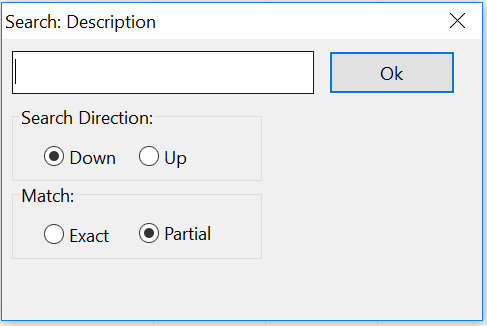
A similar option is provided for searching only the description field of the transactions that are listed. Right click on the transaction list and select Search Descriptions. A similar window will appear for you to enter a word or phrase to search for.
The search text is not case sensitive. The matching text can appear anywhere in the description (see screenshot below for examples of matching transactions).
When searching the description fields, you can also select the Display Only Matching Transactions box so that the window will filter transactions based on whether or not they include the word or phrase you type in:
Keep in mind that the search may take several seconds (or longer) especially if your date range and/or General Ledger account range is open ended. An hourglass will appear while the search is being done. The program could search through the entire transaction file if necessary to find matching transactions.
Printing Journal Transactions
To print a report of the transactions that you are viewing, right click on the journal transaction list and select the Print or Preview options. The keyboard shortcut for printing the transactions is Ctrl+P.
A Save to PDF option is also available on the popup menu if you want to create a PDF copy of the currently viewed transactions.
Custom Transaction Report Settings
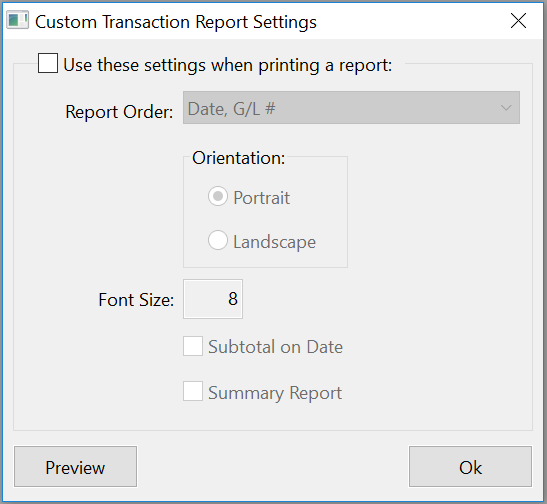
The options to print or preview the journal transactions will print a standard report in date and G/L # order. You can select the Custom Report Settings option on the popup menu to change how the report is generated. When you select this option, the following window will appear:
First, select the box at the top of the window to make changes to the custom report settings. You can select one of ten different pre-defined ordering sequences, whether the report is printed in portrait or landscape, the font size for the report, whether subtotals are printed (for the first field in the ordering sequence), and whether the report is summarized (only the subtotal lines are printed).
When the custom report settings are in effect, the columns that are printed on the report will be determined by the columns that are enabled on this window. Use the Select Columns option (explained in the next section) on the pop-up menu to control which columns are displayed (and thus printed).
Exporting Transactions to Excel
You can export all of the transactions that are currently displayed to Excel by right clicking on any transaction and selecting the Export Transactions to Excel option from the pop-up menu. You can also activate this option using the shortcut key [Ctrl]+[X].
The program will export all transactions that match the date range, General Ledger account number range, and Source Journal that you have entered at the top of the window. It will export the data for the columns that are currently displayed, so you can use the Select Columns option on the pop-up menu to enabled or disable columns that you want to be included in the export.
When you select the Export Transactions to Excel option, the program will prompt you for the folder and file name to save the spreadsheet as. Once the export has been completed, the program will ask you if you want to open the spreadsheet in Excel.
Creating a Transaction Batch
In some cases, you may want to create a set of manual journal entries that are based on a set of existing journal entries. For example, suppose you need to reverse a set of transactions that are posted to the G/L. Instead of manually entering reversing entries, you can create a set of entries based on the originals.
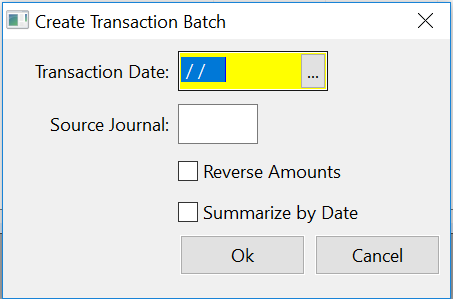
To do this, first use the selection criteria to narrow down the transactions that are displayed. Once you have only the transactions displayed that you want to base the new manual entries on, select the Create Transaction Batch option from the popup menu. The following window will open:
You can override the transaction date and/or Source Journal as well as select the box to reverse the amounts (debits will become credits and credits will become debits). All other data will be copied from the transactions that are currently displayed.
If you override the date, you must enter a date in the current fiscal year and general ledger accounting period.
After you click Ok, the Manual Journal Transaction window will open and display the batch of transactions that were created.
If you already had transactions in the batch waiting to be posted, the new transactions will be added to the existing transactions. Use the Delete All option on the Manual Journal Transaction entry window if you want to start with a blank file.
Deleting a Transaction Batch
A batch of manual journal transactions may be deleted from the Review Journal Transactions window. This option cannot be used to delete transactions that are generated by the program (for instance, a batch of payroll journal transactions).
To use this feature, the following rules apply:
-
You must enter both a starting and ending date at the top of the window.
-
You must enter a Source Journal for the manual journal transaction batch.
-
The Source Journal cannot match any of the codes used by the program to generate transactions (for instance, CD, SJ, CR, etc).
-
The transactions that are to be deleted must be in balance.
-
The transactions may not be in a fiscal year that has been closed.
-
The transactions may not be in a General Ledger accounting period that has been closed.
-
If a security setting has been set up to allow you to access the Review Journal Transactions window, the “Enable Delete Batch” permission must be enabled.
(If you want to restrict access to this option, add a permission record to the EVERYONE group for the Review Journal Transactions window that has this option disabled).
Deleting the transactions leaves no audit trail. If you want an audit trail, disable this option using the security setting described above and use the Create Transaction Batch option to create a set of manual journal entries to back out the entries that you don’t want.
The data for deleted transactions is saved in a file and can be restored using a G/L utility if necessary.
