Crews
Each employee account may be assigned to a different crew number. The Employee Crews window can be used to easily add, remove, and move employee between crews.
Go to Employees > Crews.
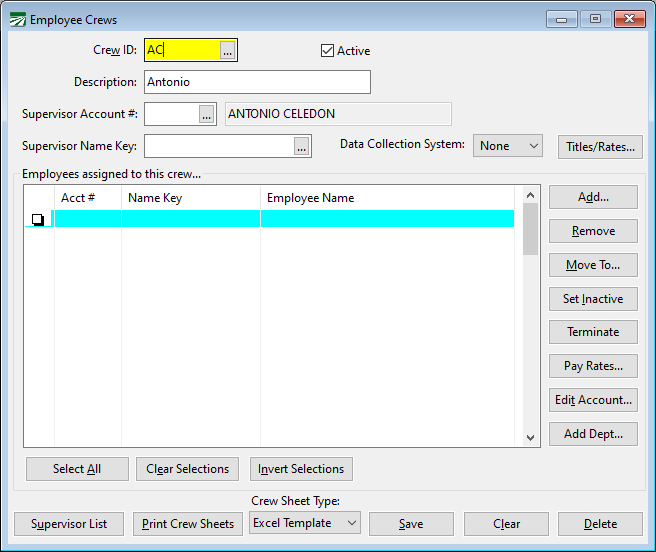
Crew ID
Each crew is assigned a number from 1 to 9999. Enter the crew number which you wish to create or edit.
Description
Add a description of the crew.
Supervisor Account # / Supervisor Name Key
Each crew may have a supervisor assigned to it. Enter either the account number or name key of the crew supervisor here. The employee's first and last names will be displayed next to the Name Key entry. Click on the lookup button or press [F4] to get the employee lookup.
Data Collection System
Select the Data Collection System used by the crew. This setting is used in conjunction with the option to Export Employees when you want to limit employees exported to those that are using a specific data collection system.
Example A farm labor contractor has crews working for growers that use a specific in-field time collection system. They also have crews using hand written crew sheets working for other growers. By assigning the data collection system to crews using field collection systems, the export will only include the employees on the crews using that system.
Titles/Rates…
Click on this button to set up additional employees that have specific jobs and pay rates that are different from the rest of the crew. A separate window will open for you to enter these employees. This window also allows you to enter a description and default Job ID for this crew. See the section titled ‘Employee Job Titles/Pay Rates/Crew Settings” for more information.
Add…
To add an employee to the crew, enter the name key or account number, or click on the lookup button to get a list of employees to select from. Once you have an employee account displayed, click on the Add button to add the employee to the list.
The following buttons will work on either a single employee account or multiple employee accounts:
Remove
This will set the crew number of the selected employee(s) to zero, removing them from this crew.
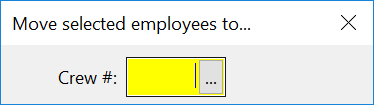
Move To…
Click on this button to move the employees that you have selected to a new crew number. A window will appear for you to enter the new crew number.
Set Inactive
This will set the account status of the selected employee(s) to inactive. They will disappear from the crew list, but they are still assigned to this crew. (Since the account status is inactive, they will not appear on the crew list or other reports that only list active employees.)
Terminate
This option will terminate the selected employees.
Pay Rates…
Use this option to set or change the pay rate for the entire crew.
Edit Account…
Selecting this will open the employee information for the selected employee.
Add Dept…
Add a department for the selected employees.
How to select multiple employee accounts:
Click on the account number of each employee account you want to select. The box in the left-hand column will be selected. Clicking a second time on an employee account will deselect it. Alternatively, you can press the space bar and use the arrow keys to select multiple employee accounts.
Once you have multiple accounts selected, the Remove, Set Inactive, and Move buttons will operate on the selected accounts. If you have not selected multiple accounts, this button will only operate on the highlighted account, whether it is selected or not.
The Invert Selections button will select the accounts that are not selected, and deselect the accounts that are selected. This is useful, for instance, if there are 30 employees on a crew, and you need to move 25 of them to another crew. Instead of selecting all 25 employees, you can select only the five that are staying on the crew, and then click on Invert Selections. The five will be deselected, and the other 25 will be selected. Then you can click on the Move button to move them to the other crew.
Supervisor List
This button will print a list of all employees that are assigned to be supervisors on crews.
Print Crew Sheets
This button will open the Crew Sheets report window. Click here for the help page for the Crew Sheets.
Crew Sheet Type Menu
-
Save: this button will save the crew to your files.
-
Clear: This button will clear the window of all information.
-
Delete: this button will delete the crew file.
Employee Job Titles/Pay Rates/Crew Settings
This window allows you to enter job titles and hourly pay rates for up to four members of the crew. On the Crew Sheet Wizard, these pay rates will be used instead of the pay rates specified for the entire crew. You can also enter a description for the crew, as well as a default job code that will be used for this crew.
The following window will open when you click Titles/Rates on the Employee Crews window:
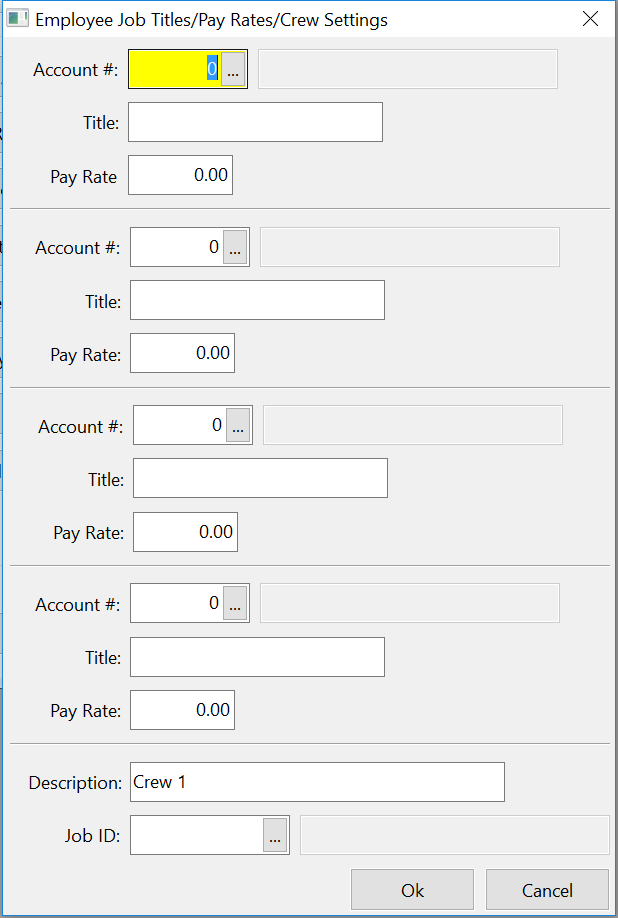
Enter the account number, title, and pay rate for up to four different employees.
The job title may appear next to the employee’s name on your crew sheet. Because there are several different crew sheet formats, some programmed for specific customers, the crew sheet you are using may not print the titles. Contact Datatech if you would like changes made to how your crew sheet is printed.
At the bottom of the window, you can enter a description for the crew (this is currently not used anywhere, so it can be entered solely for your reference) and a job code to use as a default when entering payroll for employees on this crew.