Medical Plans
Setting Up Medical Plans with Age-Rated Costs
Setting Up Medical Plans with Flat Rates
One plan may be designated as your default plan. This is the plan that employees will be enrolled in automatically, unless they make another election (either upgrading to a better plan, or declining coverage entirely).
Go to Health Insurance or ACA > Setup > Medical Plans.
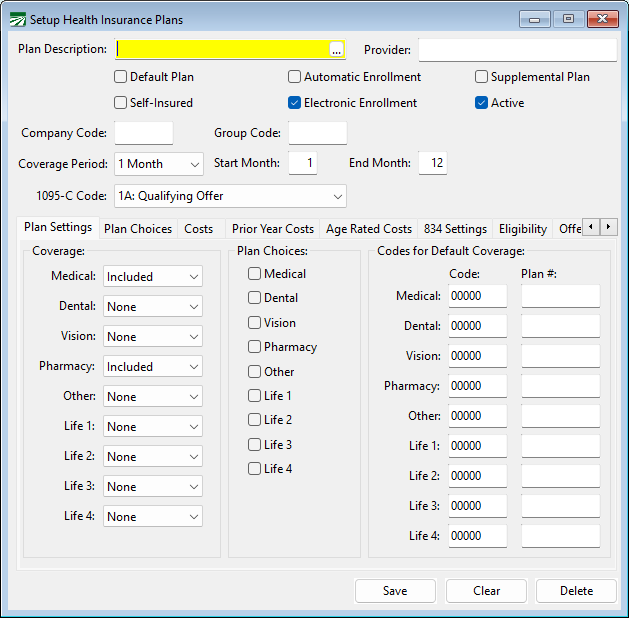
Plan Description
Enter the name or description for the plan.
Provider
Enter the name of the insurance company that is providing the plan.
Default Plan
One plan should be designated as the default plan. This is the plan that will be used for self-only coverage when the Eligibility Report determines that an employee is full time and the employee does not have an existing pre-enrollment record.
If an employee selects a plan other than the default, or opts for spouse and/or dependent coverage, this should be entered on the employee account on a pre-enrollment record. The employee will not be assigned to the default plan in this situation.
The Default Plan will often be paid for entirely by the employer (but this does not need to be the case).
Automatic Enrollment
Automatic Enrollment is not a requirement.
Select this box if employees will be automatically enrolled in this plan. At present, this box does not have any effect.
Supplemental Plan
If the plan you are setting up is a Dental or Vision plan, you will select Supplemental Plan.
Tip Never select Supplemental Plan and Default Plan together. Dental and Vision plans do not get reported to the IRS. Selecting Supplemental Plan is how the program will know this is not a Health Insurance Plan.
Self-Insured
If this is a self-insured plan, select this box. This will tell the program that Part III of the 1095-C will need to be filled out.
Electronic Enrollment
If you will be generating an electronic file with enrollment information for employees that are enrolling in this medical plan, select this box. If you will be enrollment employees through a manual process, either by submitting forms to the insurance company or entering data on the insurer’s web site, leave this box deselected.
Active
When you select Active, this plan will be available to use. If you are no longer using a plan, simply deselect this option.
Company Code
Enter the code provided to you by the insurance company. This code will be used in the electronic enrollment file that will be generated by the program.
Group Code
Enter the code provided to you by the insurance company. This code will be used in the electronic enrollment file that will be generated by the program.
Coverage Period
Select either Monthly or Yearly for this plan.
-
Monthly: This plan requires that employees be enrolled for each month that they qualify for coverage. Insurance companies normally “auto-terminate” employees on a monthly plan if enrollment data is not received for a subsequent month.
-
Yearly: This setting should be used for a plan where employees remain enrolled until terminated.
-
1 Month: Use this option only if you are using the 834 Settings. It was created for customers who want to create benefit records with future ending dates.
When you create enrollment files through the Benefit Eligibility Review window and are using the 1 Month option, you must use the Coverage As Of option to filter your records.
Start Month/End Month
Select the starting and ending month.
1095-C Code
Indicate the code that should be reported on the 1095-C for this plan. This code is provided to you by the insurance company.
Plan Settings
This tab page allows you to define what coverage categories are included in the plan and which ones may be optional.
This information is not used for ACA reporting purposes. It may be used to generate the electronic enrollment file.
Coverage
If employees have coverage choices that they opt for, you will need to select these options before generating and transmitting your enrollment file.
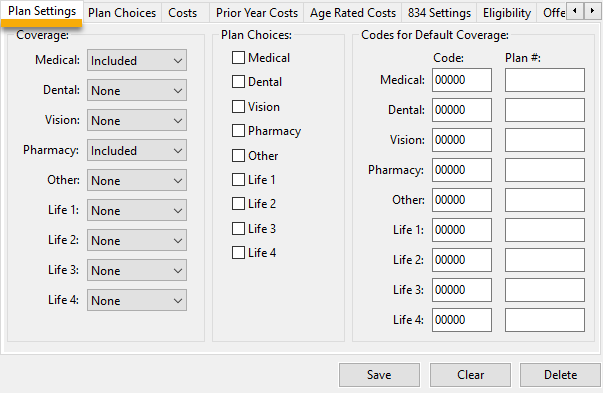
For each category, select either Included, None, or Optional.
Plan Choices
If a category has optional coverage, and there are different levels of coverage, then select the corresponding box in the Plan Choices group.
Codes for Default Coverage
Codes for Default Coverage allows you to define the codes that should be included in the electronic file.
Keep in mind that not all plans have optional coverage, and not all electronic enrollment files may support including optional coverage information. Check with your provider if you are not sure.
If the electronic enrollment file does not support transmitting the coverage options selected, you may need to manually submit enrollment forms or use some other method of providing this information to the insurance provider/TPA.
Plan Choices
This tab page is used to define what options are available for different levels of coverage for each coverage category.
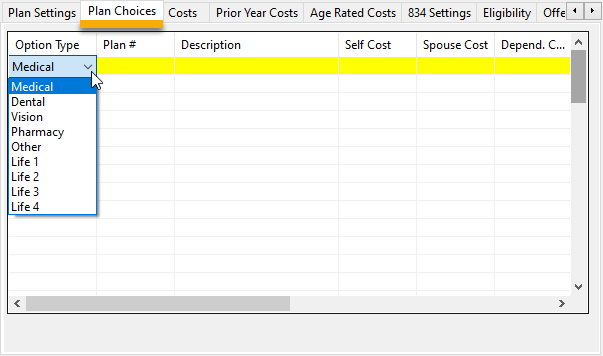
-
On the grid, first select the coverage category.
-
Then enter the code that applies for this option (this code will be used in the electronic enrollment file).
-
Enter a description for the option and any further details needed.
Costs
Enter the annual costs for adding spouse coverage, dependent coverage or family coverage on this tab page. When employees opt for additional coverage, the annual cost entered on this page will be converted to a monthly cost on the health insurance benefit record.
On the benefit record, you can then specify the employee’s share of the cost as a percentage, and the final number will be converted to a deduction amount that will be withheld on the employee’s paycheck based on the employee’s pay cycle.
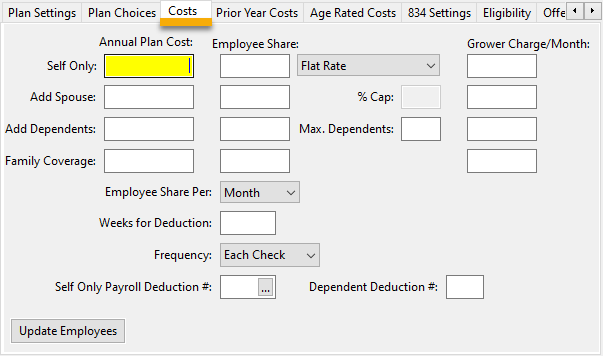
Note If you will be setting up Age Rated Costs, you do not need to set up flat rate costs here. However, you will need to set up Employee Share Per, Frequency, and Deductions.
Annual Plan Costs
Enter the cost for self-only coverage in the top entry. Enter the additional cost (on top of the self-only coverage cost) to add either spouse, dependent or family coverage.
Employee Share
Enter the employees share for each coverage tier (self, self + spouse, self + dependent, family). This share will be deducted from the employee’s check. The deduction amount may be entered as either a flat amount or a percentage of the plan cost.
Max Dependents
Enter the max number of dependents, if applicable.
Grower Charge/Month
This column corresponds with the coverage tiers (self, self + spouse, self + dependent, family) and applies if the cost will be the grower’s responsibility.
Employee Share Per
The employee share may be entered as either a Monthly or Weekly amount.
If the Weekly method is selected, then the share will be deducted on each weekly check that the employee receives. (For employees that are on a biweekly pay cycle, the weekly deduction amount will be doubled.)
If the Monthly method is selected, the amounts on the employee share are in a monthly format. The way the deduction is taken out is still affected by the weeks or the frequency settings. Therefore, you still have to enter the week numbers in the next entry. The total employee share will be divided by the number of weeks that the deduction is taken out.
Weeks for Deduction
This entry can be used to control which weeks of the month each deduction is taken. The pay period ending date is normally used to determine which week a check falls in. You can also base the week number determination on the check date. The Week of Month Calc Basis setting located under Tools > Program Setup > Payroll > Settings controls the logic used for the week ending date determination.
A week ending date from the 1st to the 7th is week one; from the 8th to the 14th is week two; from the 15th to the 21st is week three; from the 22nd to the 28th is week four, and from the 29th to the 31st is week five.
If you want the monthly amount to be taken out of two checks. You could enter two weeks, e.g. ‘13’ or ‘24’. This will result in the program dividing the monthly amount in half and deducting during each of these weeks.
Some months may have five pay checks, depending on what day of the week your checks are normally dated and when the month starts. If you want the monthly amount to always be divided by four and taken out of the employees checks on the first four weeks of the month (and not in the fifth week in months that have five checks) then enter ‘1234’ for the weeks.
This setting is only recommended to be used with employees that have a weekly or biweekly pay period. Other types of pay periods may not work well with the week number logic.
Keep in mind that if an employee doesn’t receive a check during a pay period when a deduction would normally be taken, the program may not take the deduction out on the next check.
Frequency
The Frequency setting controls how often a deduction is taken. The default setting is “Each Check” which means the deduction will be withheld on each check. The other settings are:
-
One Time: This will deduct the amount on the employee’s next check. After that, the program will not deduct it again unless the Last Deducted On date is cleared.
-
Weekly: This will deduct the amount each week. If the employee receives more than one check per week, then the deduction will only be taken out on the first check that the employees receive in the week.
-
Biweekly: This will deduct the amount every other week when the employee is receiving a weekly check. (Note: If the employee’s pay cycle is Biweekly, it is not necessary to select Biweekly for the Frequency.)
-
Monthly: The deduction will be taken out one per month.
-
Annually: The deduction will be taken out one per year.
Note Combining the Weeks and Frequency settings should be done carefully.
Self Only Payroll Deduction #
Enter the default deduction number to assign for health insurance deductions. This will be automatically used on the health benefit records for the self-only share. If you do not enter a deduction number for the dependent deduction, then this deduction number will be used for both the self-only portion and the dependent portion.
Dependent Deduction #
If you would like the dependent deduction amount to appear under a separate amount/deduction number, then you can enter a different deduction number to use.
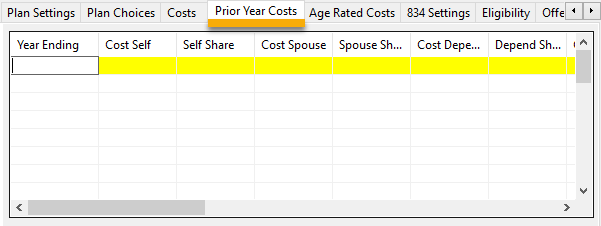
Prior Year Costs
Costs for prior years may be entered here. You will need to enter information about the insurance plan year dates and costs to create the 1095s, because the costs may be different for different plan years.
Example If a plan year ends in May 2022, the program would look at the information from April 2021- May 2022, and report the information from January - May for 2022. Then it would look at the information from April 2022 - May 2023 and report June - December for the rest of 2022.
Age Rated Costs
You will use Age Rated Costs if you are setting up an Age Rated Plan.
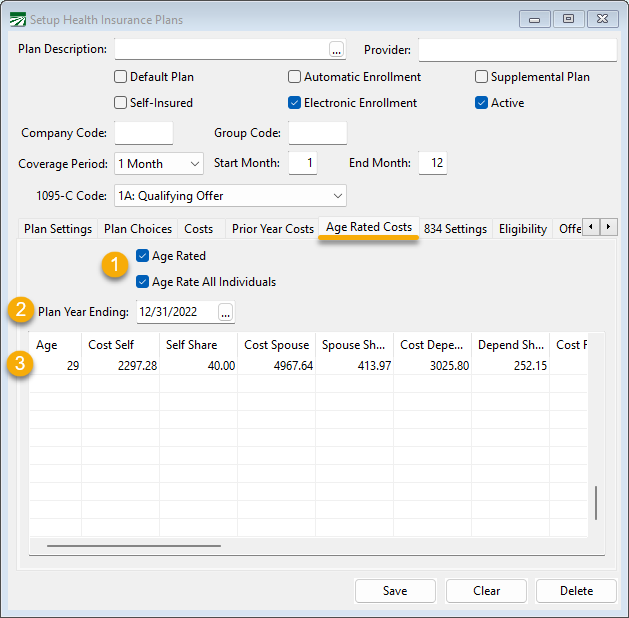
To set up an Age Rated Plan:
-
Select the boxes Age Rated and Age Rate All Individuals.
-
Plan Year Ending – since you are entering age related costs for one plan year, you do not have to enter Prior Year Costs like you do with flat rates. You must enter the correct plan year ending date to avoid errors in the costs on reports.
-
Enter Age and appropriate costs for that age under Cost Self, Self Share, Cost Spouse, Spouse Share, Cost Depend, Depend Share, Cost Family, and Family Share.
You can then assign this plan to an employee by going to their Health Benefits tab, clicking Add and choosing the Age Rated Plan.
834 Settings
This tab includes settings specific to the EDI 834 electronic enrollment file that is generated by the program and sent to your insurer or TPA (Third Party Administrator). These settings should be provided to you by your insurer/TPA.
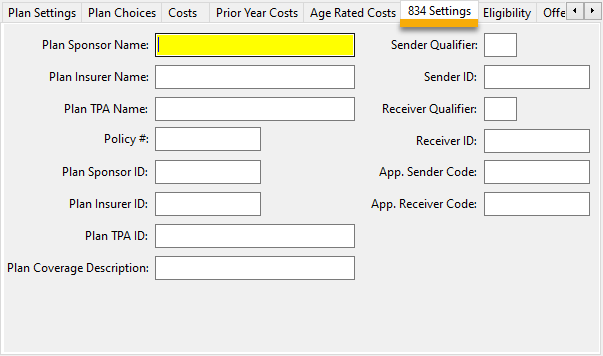
Additional information including entries required for specific insurance companies is provided in the Insurer Specific Export Settings section.
Eligibility
Eligibility is required to be set up as it is the second requirement to be eligible to health insurance along with hours.
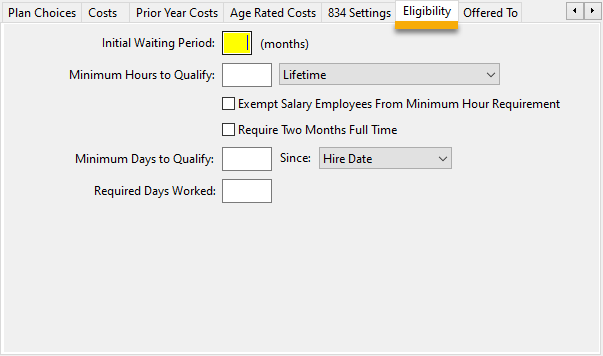
Note Some of the following features were custom-requested and, when used incorrectly, may cause you to be non-compliant with ACA. Work with your attorney to make sure that you are remaining ACA compliant while using these features.
Initial Waiting Period
If applicable, enter the waiting period for the employees to start coverage. This varies by insurance company.
Minimum Hours to Qualify
If applicable, enter the Minimum Hours to Qualify and select either Current Employment Period or Lifetime. You can also check Exempt Salary Employees From Minimum Hour Requirement or Require Two Months Full Time.
Minimum Days to Qualify
If applicable, enter the Minimum Days to Qualify and select if those days will count since the First Date Worked or the Hire Date.
Required Days Worked
If applicable, enter the Required Days Worked.
Offered To
This tab page allows you to define which categories of employees this plan is offered to.

When multiple plans are offered to an employee, the program will select the “best” code to print on the 1095-C. For instance, if the default plan that employees are automatically enrolled in is a MEC plan for the employee only (code 1B), but employees are also offered coverage under a Qualifying Offer plan (code 1A), then the 1095-C will print the 1A code on Line 14 of the 1095-C.
This Plan is Offered to All Employees
Selecting This plan is offered to all employees tells the program that this is the plan that should be reported on the 1095-C forms. This shows the IRS that an affordable plan was offered to all employees.
The Plan is Offered to a Limited Set of Employees
Select this option if this plan is exclusively offered to a limited set of employees and not ALL employees.