California Employer Pay Data Report
How to Edit + Export CA Pay Data
Cómo editar y exporter CA Pay Data
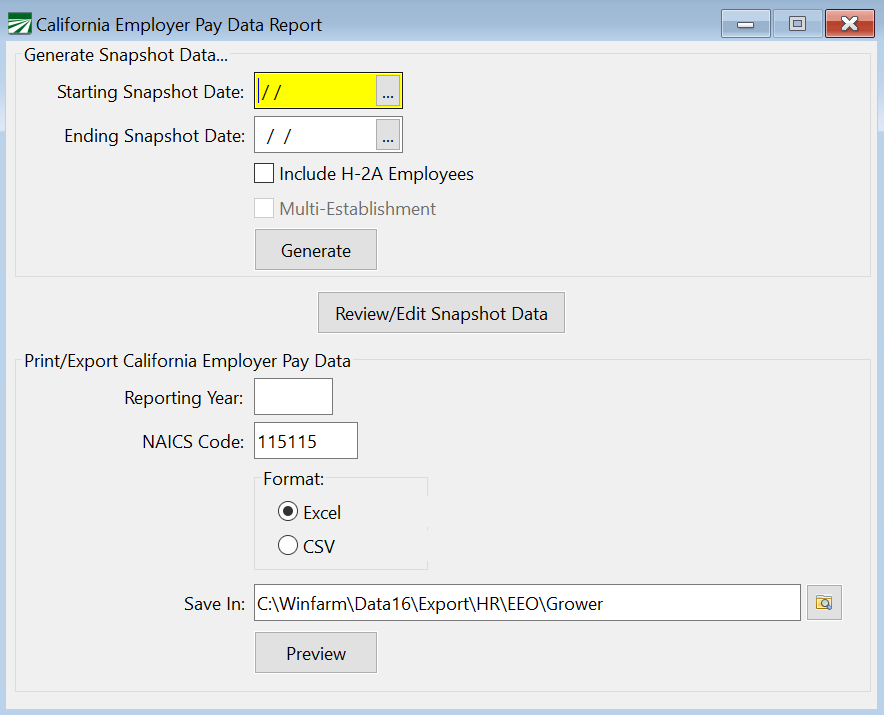
Go to Reports > California Employer Pay Data Report.
If you are required to file the California Employer Pay Data Report, you can use this window to
-
Generate an exception report and load your snapshot data into the Edit Employee EEO/California Pay Data Informationwindow.
-
Preview and Export final report data.
Run Report for Employees Missing Information
To get started, follow these steps:
1. Go to Reports > California Employer Pay Data Report.
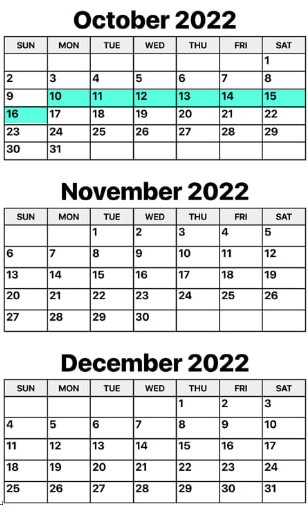
2. In the Starting Snapshot Date and Ending Snapshot Date entries, enter the starting and ending check dates for the year you want to print. (The “Snapshot Period” is a single pay period between October 1 and December 31 of the Reporting Year.)
Note Any employee that has a check with a pay period date that matches or overlaps the snapshot period will be included in your report.
The “Snapshot Period” is a single pay period between October 1 and December 31 of the Reporting Year. The Snapshot Period is not the period of time for identifying an employee’s pay or hours worked.
Instead, the Snapshot Period is used by an employer only to identify its payroll employees who must be reported on in the employer’s Payroll Employee Report; an employer must pick a fixed period of time to identify the employees to be reported on because an employer’s employees will usually change over the course of the year.
Note When identifying the employees to be reported on, it does not matter whether an employee was paid during the Snapshot Period; it only matters whether the employee was employed during the Snapshot Period.
Example An employer has the same 200 payroll employees for all of October 2022, and 100 employees are paid bi-weekly and 100 employees are paid at the end of the month. Assume further the employer picks October 1 to October 15 as its Snapshot Period. For its pay data report, the employer would report on all 200 employees because they were all employed by the employer during the Snapshot Period, even though 100 of them did not receive pay in the Snapshot Period selected.
Example The following image shows an EXAMPLE of a snapshot period. This is not necessarily the one you will use, but is simply here to show you that a Snapshot Period is just one pay period between October 1 and December 31 of the reporting year.
Warning Some interpret the law to mean H-2A employees must be included in the CA Pay Data report. Others say they should not. This is up to your company to decide and we cannot advise in this matter. The Include H-2A Employees option is there to give you the option to include them or not.
3. Click Generate. The California Pay Data Exception Report will preview. With this report, you can review what employee data you are missing. Quickly update employee information in Step 4 - 5.
Editing Employees with Missing Information
4. Click Review/Edit Snapshot Data.
In the Edit Employee EEO/California Pay Data Informationwindow, missing information will be listed as Not Defined or Undefined. That information can be quickly edited within this window.
Warning Do not use the SOC code column for 2025 reporting. This column will be used for the 2026 year being reported in 2027.
5. Add any missing data or correct any data necessary as needed before generating the final report.
Export Payroll Employee Data
6. When you are ready to generate the final report/export file, go back to the Reports > California Employer Pay Data Report window.
7. Under Export/Print California Employer Pay Data, enter the Reporting Year.
8. Select Excel or CSV.
Note Excel or CSV: Multiple customers reported issues with Excel that we could not correct. An option has been added to export to a CSV file format instead of Excel. The CSV file format does not rely on Excel so it will allow you to export your data if this issue arises.
9. Enter the NAICS Code for your company.
Tip If you are unsure of which code to use, you can use the following website for assistance:
https://www.census.gov/naics/
10. Select the location for the file to be saved and click Preview.
Setup/Edit Single EEO Establishment
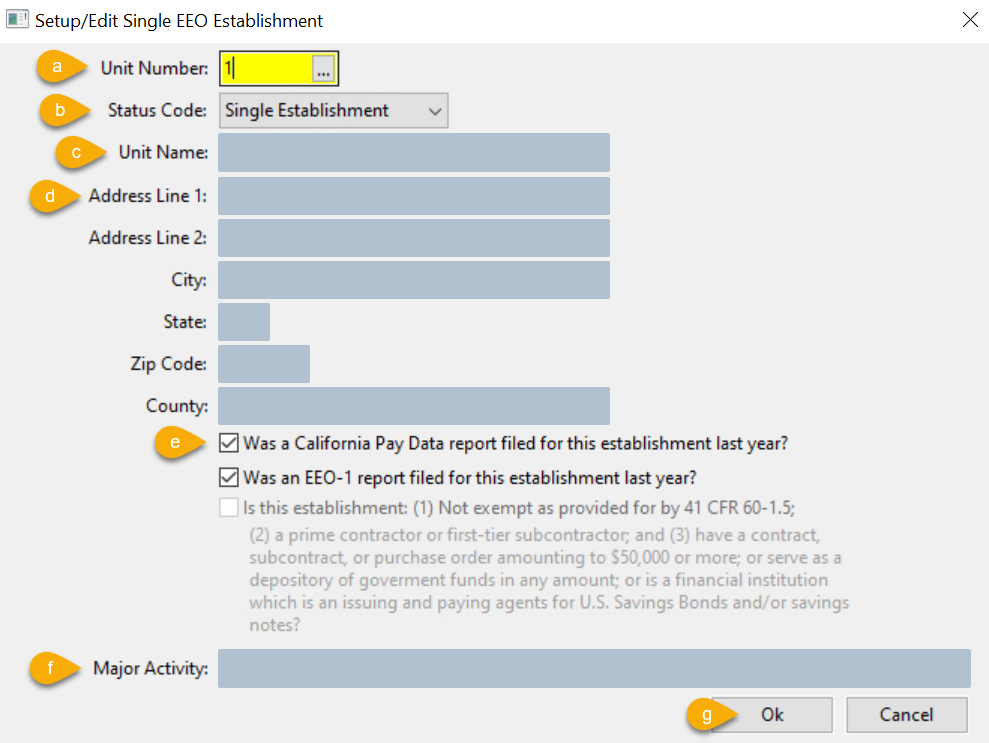
Enter the final details for your report in the Setup/Edit Single EEO Establishment window.
a. The Unit Number is not used for the CA Pay Data reports. Simply leave the default value of 1 in this entry.
b. The Status Code should be set to Single Establishment.
If you need to select a different status, please contact Datatech Support as adjustments will need to be made for this to work.
c. Confirm your Unit Name is correct, this is your business name.
d. Confirm your address and county.
e. Two questions will be listed, select the checkbox for any of the questions where the answer is Yes.
Note The template has one question not asked on this page, “Is this establishment the employer’s headquarters?” It is not listed because the program will automatically fill out that column for you. You can edit this information on the template if needed.
f. Enter the Major Activity that your company performs.
g. Click Ok. The program will export the information to the California Pay Data Template. If you have questions on the fields, you can click on the instructions tab to review what each field means and the information that is required.
Frequently Asked Questions
How do I select a category that an employee belongs to?
See the handbook found on the CRD's California Pay Data Reporting Page for guidance in selecting a category.
How should I report employment type for seasonal employees?
Datatech employees cannot advise what employment type you should select for seasonal employees. Please review the CA Pay Data Reporting FAQ's. That document says:
Covered employers should classify each California employee into one of three employment types: “Full-time,” “Part-time,” or “Intermittent.”
An employee who is assigned to regularly work full-time hours under the employer’s standard or alternative workweek schedule would fall under the “Full-time” employment type.
An employee who is assigned to regularly work less than full-time hours under the employer’s standard or alternative workweek schedule would fall under the “Part-time” employment type.
An employee who is assigned to periodically or irregularly work full-time or part-time hours, under the employer’s standard or alternative workweek schedule, would fall under the “Intermittent” employment type."
What is the snapshot period?
The snapshot period is a single pay period between October 1 and December 31 of the reporting year. It is used to determine which employees an employer must provide data about - including pay, race/ethnicity, sex, and job category.
Why do we need to find the total number of employees?
You are required to file a report if you have 100+ employees including your own and across all hired from Labor Contractors. Therefore, you need to know the total number of employees to know if you have 100+ employees.
Labor Contractors can use the total number of employees sent to a specific grower to tell growers how many employees they were provided with; growers can then determine if they need to report.
If my company has over 100 employees but no employees in the snapshot period, do I still have to report?
Yes, you would want to show you at least made an attempt to file. You may also want to submit the question directly to the Civil Right's Department.
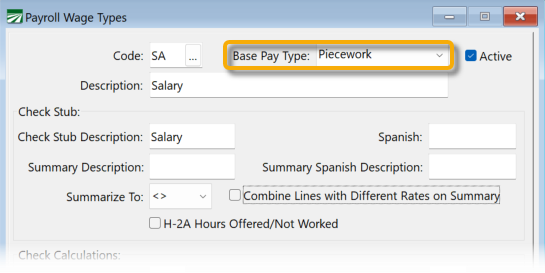
What if an employee is salaried and doesn't have any hours?
According to the 2025 California Pay Data Reporting FAQ's provided by the Civil Rights Department (CRD), salary employees should be reported with actual hours worked if time records are kept. If an employer does not keep record of hours actually worked by a salary employee, then hours should be calculated based on the number of days worked multiplied by the average number of hours worked per day by the employee.
We realize that many customers are not recording salary hours and/or days worked per paycheck. Therefore, the program has the option to automatically assign 40 hours to salary employees when there is no record of their time worked.
If you want to keep record of the hours worked for salary employees going forward, change the Base Pay Type to Piecework for your Salary Wage Type (see below); this will allow you to record hours in the P/W Hrs column during check entry. If there are hours entered on a salary check, then those will be used for reporting.
Are H-2A workers included in pay data reporting, including the employee count for total employees?
The CA Pay Data FAQ says the definition of an employee for the purposes of pay data reporting is “an individual on an employer’s payroll, including a part-time individual, and for whom the employer is required to withhold federal social security taxes from that individual’s wages.”
This definition does not apply to H2A workers since an employer is not required to withhold social security taxes from them. This definition is applicable when counting the total number of employees and when choosing who to report. Therefore, as we understand it, H-2A workers would not be included in the total employee number count or the reports.
If you want further clarification, please submit a question directly to the Civil Rights Department.
Do labor contractors generate/report both the Payroll Employee and Labor Contractor Employee Reports?
Labor Contractors generate and report to the Civil Rights Department their own Payroll Employee Pay Data Report if they have 100 or more employees.
Labor Contractors generate the Labor Contractor Employee reports to send to their growers if their growers have 100+ employees total. The growers can then report to the Civil Rights Department.
You can choose your own snapshot period for your own Payroll Employee Report; it doesn’t have to be the same as what you send to growers.
Is there an extension available to defer when reports are due?
A request can be submitted thru the Pay Data Reporting Portal to defer the due date to June 10th for the Labor Contractor Pay Data report only. This extension gives growers more time to compile information from LCs and make their report.
The Payroll Employee Report must still be filed by May 10th.
What may cause a mean hourly rate to be under minimum wage?
The mean hourly wage is calculated using the total wages and hours. Therefore, there may be problems with the calculation due to the difference in the way wages and hours are compiled (wages are compiled by check date; hours are compiled by work date).