Employees
Settings and Initial Setup
Before you can write payroll checks to a person, an employee account must be set up for them.
Go to Employees > Employee Entry.
This is where you will find and set up all of the information pertaining to an employee. This is very similar to the employee entry window in the payroll module, except that it has a number of additional entries. These entries are for things pertaining to HR management, such as injuries and litigation.
These additional entries are all customizable using the Selection/Validation Table Entries. See that section for more information on setting these up.
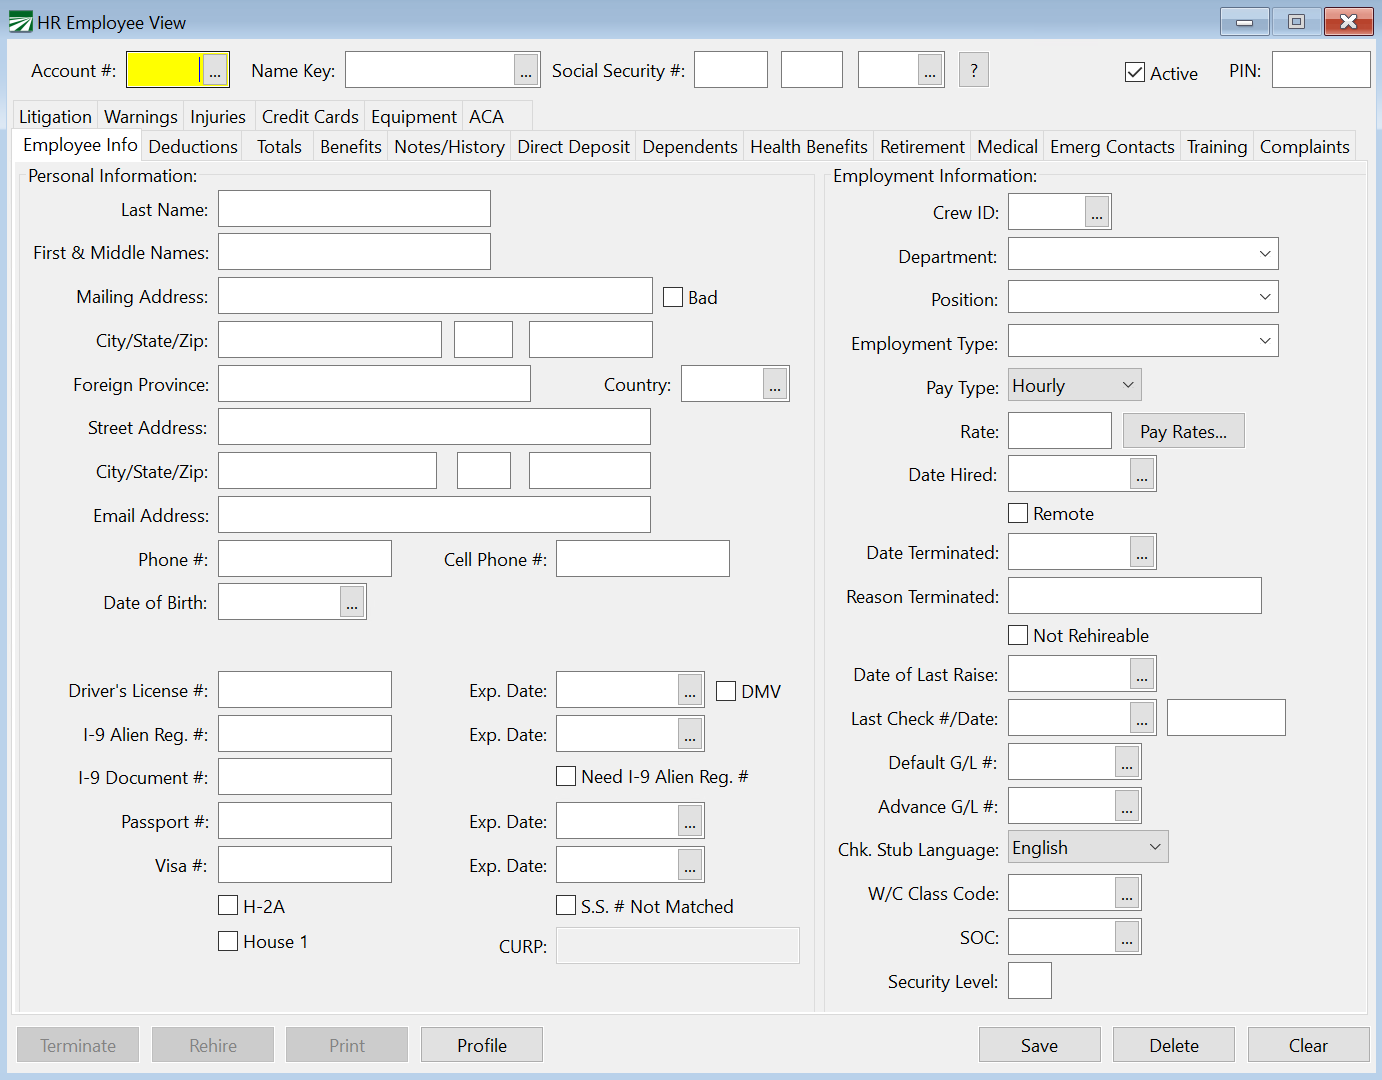
The Employee file accesses the same data as Datatech’s payroll system, so any existing employees can be accessed and viewed through the HRM software. Initial entry of employees may be done either through the payroll or HRM software. However the HRM has added fields that are not in the payroll software.
Account #
If you are editing an existing account, enter the account number, press [F4], or click on the look up button to get a look up list of employees.
When entering a new employee, the "Auto-Number Employees" option in the Program Setup determines whether you assign the employee account numbers yourself or the program will assign the next available number.
If the "Auto-Number Employees" box is selected, you can leave the Account # entry blank and the program will assign the next available number automatically for you. You may also assign the account number if desired. For example, you might want to reserve accounts 1-99 for your crew supervisors, and number employees that do field labor starting at 100. In this case, you would enter the first field labor employee with account # 100, and then every field labor employee after that will be automatically numbered from that point on. If you are entering a new crew supervisor, you can check to see what the next available account number is below 100, and assign his account number manually.
If the "Auto-Number Employees" box is not selected, the Account # is a required entry. You must enter a number for the new employee.
Name Key
The name key is used by the program to alphabetize employees. When entering checks, you can also use the name key instead of the account number to find employees. Because the name key can be used for finding employee accounts, each employee’s name key must be unique.
When entering a new employee, you can leave the name key entry blank and the program will create a name key automatically for you by taking the first six letters of the last and first names. If an employee already exists with the name key, the program will try using a different combination of letters and numbers from the employee's social security account until a unique name key is found.
Another option is to enter the name key yourself. For example, if you have few employees, you may wish to enter the employees with a shorter name key than the program would generate.
Social Security Number
The employee’s Social Security number must be unique. If you are entering a new employee's social security number and another employee’s name appears, then this number has already been entered under another name.
To find an employee by their Social Security number, enter the number and press [F9], press [F4], or click on the look up button to get a look up list of Social Security numbers.
If an employee has not supplied you with a social security number, or has supplied an invalid number, click on the button with the question mark just to the right of the social security number entry. This will generate a unique, temporary social security number for the employee account. The temporary number will be 000-00-xxxx, where the "xxxx" is replaced with a unique number starting at "0001". You can quickly and easily see which employees have invalid social security numbers, since they will appear at the beginning of any report printed in social security number order.
Note To help you keep track of employees without valid Social Security Numbers, the Employee Lists Report has an option to print a list of all employee accounts that have invalid social security numbers.
Active
If you are entering a new employee, the Active checkbox should be selected.
When an employee is no longer working with the company, the employee should be set to inactive so you can print reports and employee lists that have only active employees.
Deleting Employees
An employee with wages or checks on file cannot be deleted form the program. If you have issued a check to an employee and then voided the check, the employee cannot be deleted because the checks are still on file.
If wages were paid to the wrong employee and the checks issued to this account need to be moved to a different account, use the Move Payroll Check option. Once all checks have been moved to another account, you may delete the account.
To delete an account without wages, first display the employee account information by entering the account number or using one of the selection lists to choose the employee. When the employee account is displayed, click on the Delete button or press [Shift]+[F2]. The program will then confirm that you want to delete this employee; to delete the account, click on "Yes".
Terminate Employee
When an employee is terminated or laid off, several changes are typically made to the employee’s account. The Terminate button at the bottom left corner of the Employees window provides a shortcut for handling this. When you click on the Terminate button on the Employee entry window, the following window will appear for you to enter the termination info:
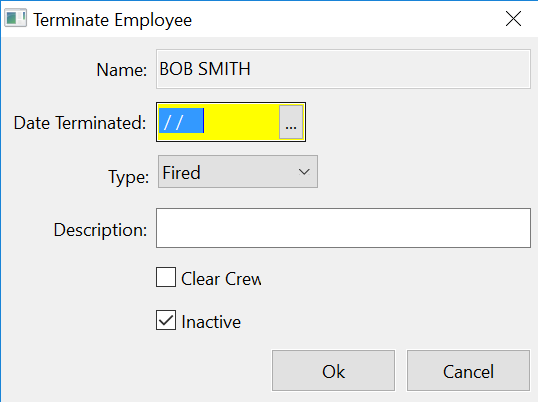
Date Terminated
Enter the date the employee was terminated.
Type
Select from the available options: Fired, Medical Leave, Laid Off, or Quit.
Description
Enter the reason the employee was terminated here.
Clear Crew
Select this option if you want to remove the employee from any Crews he is on.
Inactive
Normally you will want to this leave this checkbox selected so that the employee account will be set to inactive. If for some reason you want this account to remain active, deselect this box.
Click Ok to record the information. A record will be created in the Employee History file, and the date terminated and reason for termination fields will be updated on the employee account. Click on the Cancel button if you do not want to save this information.
Rehire Employee
When an employee comes back to work for your company, there are typically several changes that need to be made on the employee account. The Rehire button provides a shortcut for making these changes. The following window will open when you click on the Rehire button:
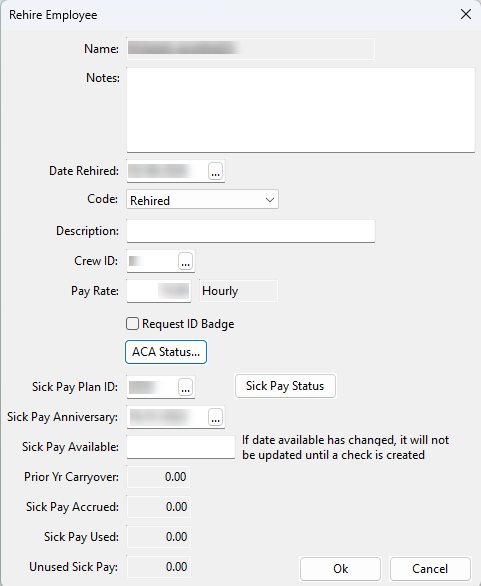
Date Rehired
Enter the date that the employee was rehired on. An entry will be made in the employee history file on this date showing the employee was rehired and the employee will appear on the next New Hire report that is printed.
Description
Enter any additional notes here.
Crew #
Enter the crew number, if any, that the employee is assigned to.
Pay Rate
The employee’s previous rate of pay will be displayed here. You can update this if needed.
Request ID Badge
Select this box if you want to request an ID badge for the employee.
ACA Status
Clicking this button will prompt the program to check the employee’s previous work dates and status to determine if they should be treated as a new employee or as a continuing employee. If the employee is confirmed to be a continuing employee (i.e. they worked full-time and were previously enrolled), then a health benefit record will be created to enroll them in coverage.
Sick Pay Plan ID
Enter the Sick Pay Plan ID that will apply to the rehired employee.
Sick Pay Anniversary
Enter the sick pay anniversary date for the rehired employee, whether that is a new date or returning to their old anniversary.
Sick Pay Available
Enter the date on which sick pay will be available to the employee.
Click on the Ok button to finish the rehire process. If the employee was set to inactive, the employee’s account status will be changed to active. Click on the Cancel button to close the window without recording the rehire information.
Security Options
Using custom security options, you can disable certain sections of the employee entry window. Create a line in the security grid for PR. EmployeeEntry, and click on the View Settings… button to set the custom permissions:
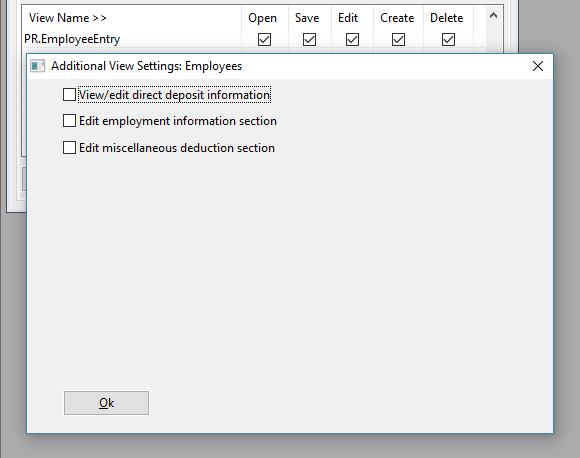
If deselected, the View/Edit direct deposit information will remove the Direct Deposit tab page from the employee entry window for this user or group completely. This allows you to prevent users from seeing the bank account information that has been set up for direct deposit.
The other two boxes will disable either the Employment Information or the Miscellaneous Deduction groups on the employee setup window. The information will still be visible, but users will not be able to edit it.
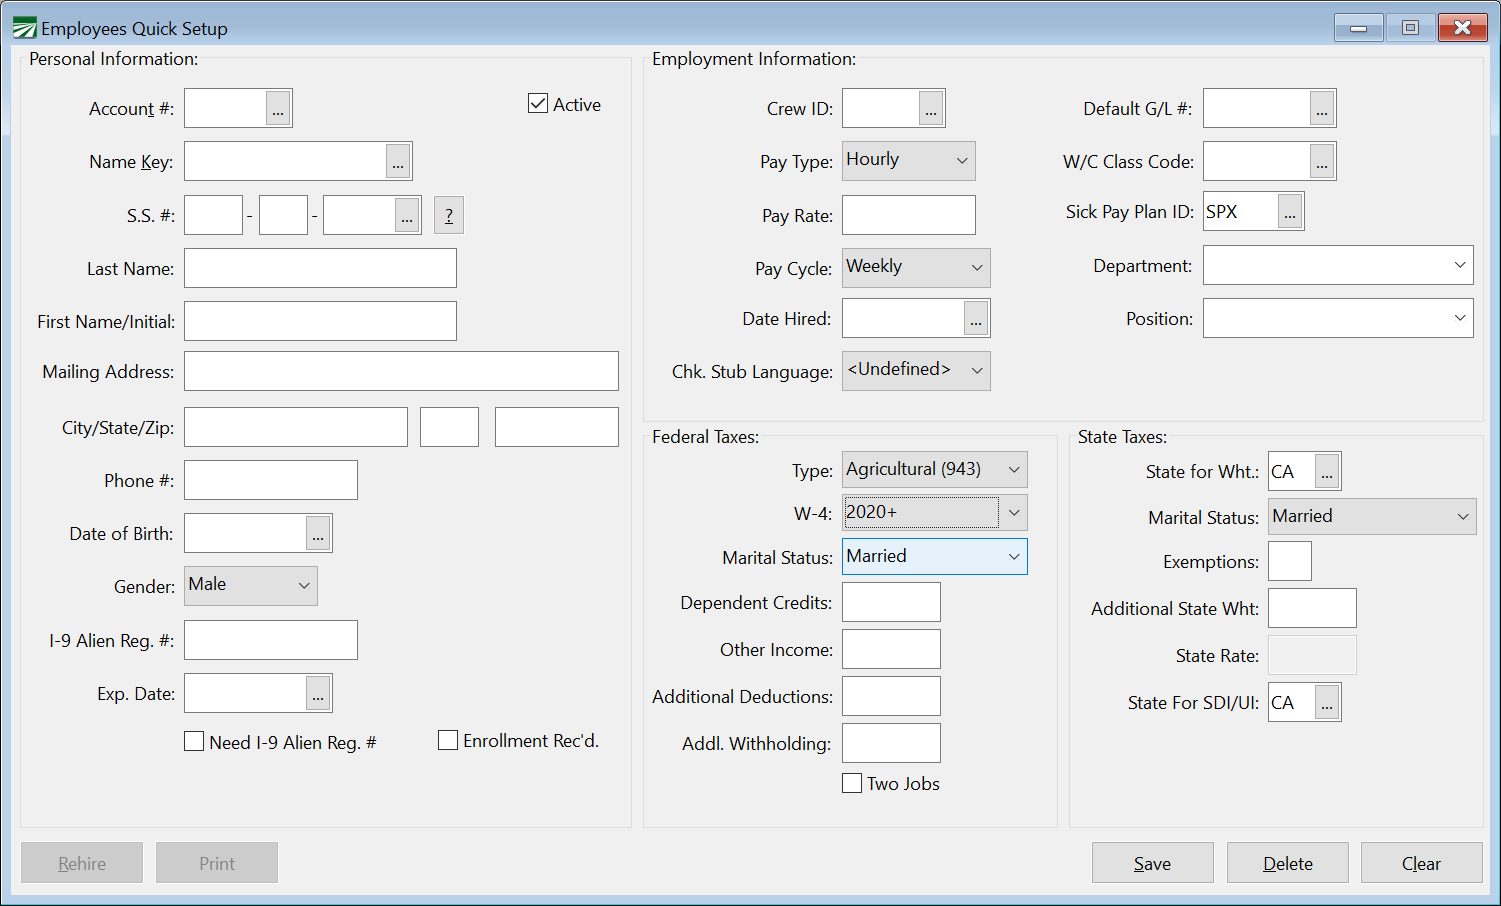
Quick Employee Setup
An employee setup window has been streamlined for quick entry of new employees. It only includes a minimum set of entries for the required information for new employees. To access the Employee Quick Setup window, right click on a blank area and select the Switch to Quick Entry Window option. The program will remember which employee setup window you have selected until you exit the program. That window will appear when you select the Employees option on the main Payroll menu. To switch back the regular employee setup window, right click on a blank area of the Employee Quick Setup window and select the Switch to Full Entry Window option.