Vendors
Vendor Setup
A Vendor is anyone that you pay. This can be suppliers, utility companies, or any other company or person that your business renders payment to.
A vendor account should be set up for anyone you write checks to. These accounts are set up on the vendor window.
If you sell product through brokers, you will need to set up broker accounts before you enter any customers, so that you can assign the customer account to the correct broker.
Brokers are set up through the Accounts Payable Vendor program, since they will usually be paid a commission. To access the Vendor Entry window, select Vendors from the Payables menu. A window similar to the following will appear.
To set up or edit a Vendor, go to Payables > Vendors.

When the window is first opened, it will be ready to add a new vendor account. If you want to edit an existing vendor account, enter the account number, or press [F4] or click on the lookup buttons of the account # or name key fields to select an account from the lookup.
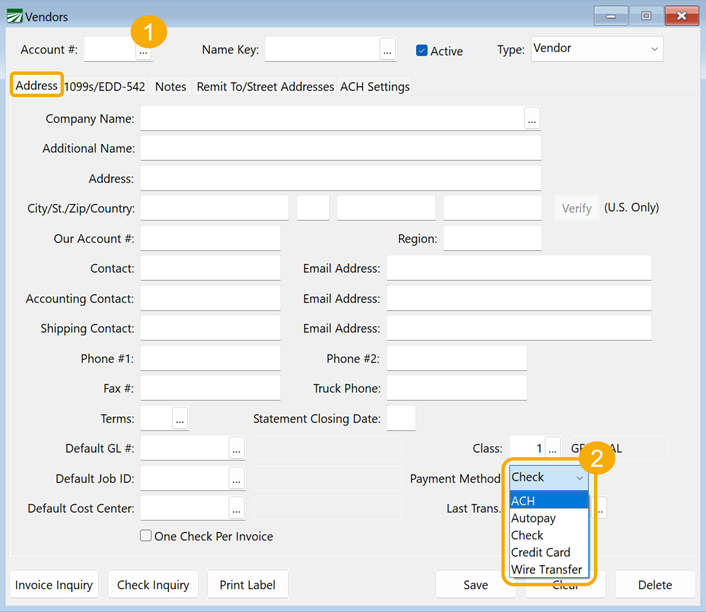
Address Tab
The first tab, Address, is the one you will probably use most often.
Account #
The Vendor Account Number is assigned sequentially by the program as you enter new vendors started with 1. If you delete a vendor account, the number will not be reused. The vendor account number cannot be changed once the vendor account has been set up.
Name Key
Enter an abbreviation of the vendor name here. The Name Key is used both for sorting vendor alphabetically and for accessing vendor accounts. (For instance, on checks and invoices, you have the option of entering either the vendor's account number or their name key. Many people don't memorize the number but it is easy to type in the name key)
While it is up to you to decide how to enter the Name Key, here are a few suggestions:
-
Be consistent in how you abbreviate the vendor name. This will make it easier for you to recall name keys.
-
If a company name starts with "The" or "A", leave this out of the name key.
-
For personal names, use the following format: last name, first name (or first initial).
Active
This check box indicates whether or not a vendor is currently being used. When deselected, the vendor will not appear on lists or reports that only print currently active vendors.
Type
Note This entry is only used for The Shipper's Office, The Broker's Office and Datatech's Grower Accounting Software. For all other systems, this entry is disabled and set to its default of Vendors.
Enter the Type, either Broker, Grower, Shipper, Vendor, or Other.
Select a type from the drop-down list. Available options are Vendor, Shipper, Grower, Broker, and Other. Any companies that you purchase produce from must have their vendor account type set to Shipper.
Company Name / Add'l Name
Enter the vendor's name as you want it to appear on checks under the Company Name entry. If there is not enough room there, you can use Additional Name for the rest of the name.
Address
Enter the mailing address for the vendor. The complete mailing address will be printed on checks so that you can use them with window envelopes.
City/State/Zip/Country
Enter the city, state, zip code, and country for the mailing address.
Verify
Verify verifies U.S. addresses only.
Our Account #
Enter the account number this vendor has assigned to your company.
Contact
If there is a specific person you are to contact for your account enter their name here. Their email address can also be entered in the Email Address field to the right.
Accounting Contact
If there is a specific accounting contact for this vendor, enter their name here. Their email address can also be entered in the Email Address field to the right.
Shipping Contact
If there is a specific person you are to contact for your shipping enter their name here. Their email address can also be entered in the Email Address field to the right.
Telephone Numbers /Fax# / Truck Phone
Two entries are provided for telephone numbers, one for a fax number, and another for a truck/car/other phone.
Terms
If you are using the vendor invoicing program, you can enter the default terms to use for invoices from this vendor. Press [F4] or click on the lookup button to get a list of the entries in the terms file.
Note You do not enter the number of days for the terms of the vendor's invoices here. The Vendor Terms Table is where you enter the number of days, as well as the discount (if any) and indicate whether or not you are on statement terms. The terms number you enter here corresponds to an entry in the terms file.
Statement Closing Date
If the payment terms are based on paying from a monthly statement, enter the statement closing date here. For instance, if the vendor closes the statement on the last day of the month, enter "31". IF the statement closing date is the 25th of the month, enter "25".
Class
If you are using different class numbers to categorize vendors, enter the class number here. Press [F4] or click on the lookup button to get a lookup for the vendor classes.
Default G/L #
Enter the General Ledger account number to which this vendor's checks or invoices are normally expensed. If you are using different account numbers most of the time, you can leave this entry blank or enter the account number you use most often
Press [F4] or click on the lookup button to get a list of General Ledger accounts to select from.
Last Transaction
This entry displays the last transaction that this vendor was involved with. This is viewable only.
Default Job ID (optional)
Select a default Job ID for this vendor. The program will use this to automatically assign this Job ID when possible. This can be overridden when necessary.
Default Cost Center (optional)
Select a default Cost Center for this vendor.
Payment Method
Select the payment method for this vendor. Select from: Check, ACH, or Wire Transfer.
Note Selecting ACH will automatically set the Transaction Type for this Vendor to Electronic Transfer.
One Check per Invoice
Select this option if the vendor wants one check for each invoice they send out.
Invoice Inquiry
Clicking this button will bring up the vendor invoice inquiry. This inquiry is a list of all the invoices from that vendor.
Check Inquiry
Clicking this button will bring up the vendor check inquiry. This inquiry is a list of all checks paid to this vendor.
Print Label
Click this button to print a label with the vendors address on it.
1099’s/EDD-542
The 1099s/EDD-542 tab is applicable if you are paying a Vendor and need to issue them a 1099.
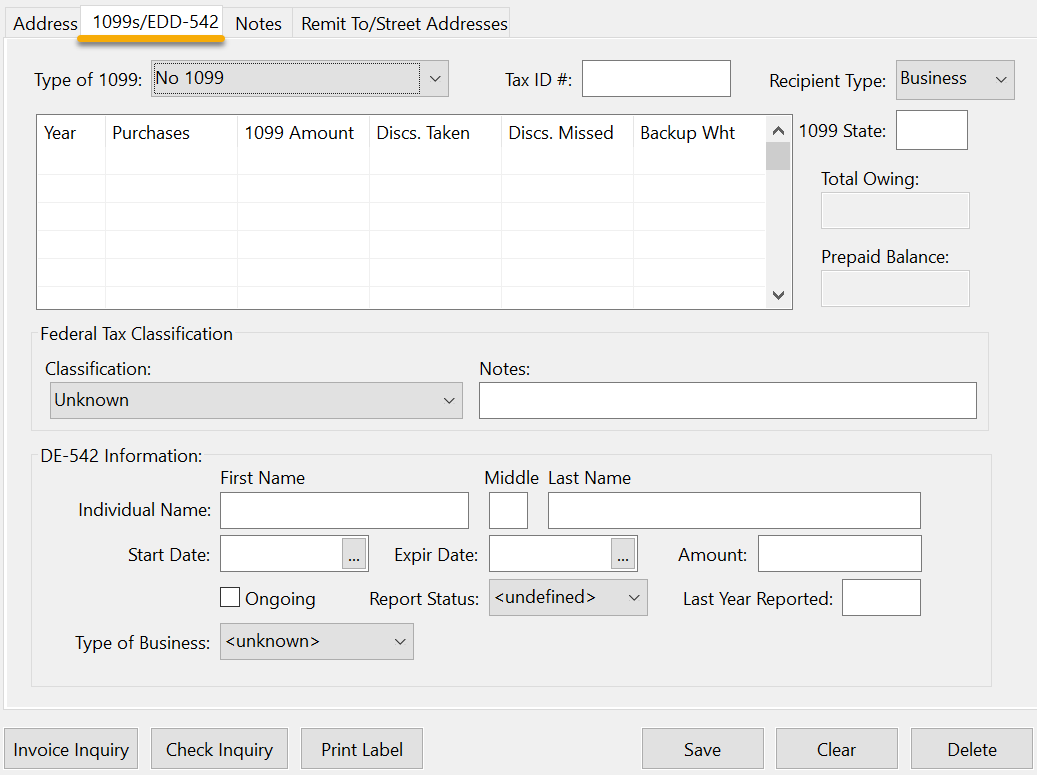
Type of 1099
Select the 1099 type from the drop down list. The default setting is No 1099.

Dividend: Prints a 1099-Div Form
Interest: Prints a 1099-INT Form
Nonemployee Compensation: Prints a 1099-NEC Form
Note All other types will print a 1099-MISC Form.
Tax ID
Enter the Tax ID Number for this vendor for printing on the 1099.
Recipient Type
By default, all vendors are set to Business. If the recipient is an individual, you will need to change this setting and enter the first and last name for the individual (which could be different than the company name).
-
If the vendor’s Tax ID is an EIN (format ##-#######) then the Recipient Type should Business.
-
If the Tax ID is a Social Security Number or an ITIN (format ###-##-####), then it should be set to Individual.
Note It is important for the Tax ID to have the dashes for electronic filing. There is another column in the electronic file where we identify the type of Tax ID that the vendor has. The program does this by looking for the dashes. If there are no dashes present or they are in the wrong position, the program will not be able to determine the type of Tax ID.
When the electronic 1099 CSV file is generated, there are separate columns for the Company Name and the Individual’s name (first/middle/last are all separate columns). So for a Business, the Company Name is exported for that 1099. For an Individual, the program needs to export the person’s first/middle/last names in separate columns. When a vendor is set to Individual, the program will use the Individual Name entries that are in the DE-542 group at the bottom of the 1099 tab.
(The DE-542 report is a California specific report, but companies outside California will still use this entry to put in the individual name information.)
When a user changes the Recipient Type from Business to Individual, the program will require the First and Last Name fields to be entered prior to saving.
State ID
By default, the program uses the state listed in the business address for the 1099. If a business needs the 1099 sent to a different state than the one used for checks, you can specify that state in the 1099 State entry.
See Topic: State Tax Rates to enter the State ID # (1099's).
Total Owing
If you are entering vendor invoices, this entry will show you the current amount due to this vendor.
Prepaid Balance
This entry will display any prepaid balance you have towards this vendor if there is any to display.
Federal Tax Classification
Classification + Notes: You can use these entries for personal reference. They do not impact the Vendor's record.
Prior Year Purchases
This grid will display prior year total purchases, 1099 amounts, discounts taken and missed, and the amount of backup withholding. If necessary, you may edit the amounts in the 1099 Amount and Backup Wht columns for print the 1099’s.
Current year totals will not appear here unless you have run a 1099 YTD Purchases Report.
DE-542 Information
The DE-542 is required if you are filing a 1099 for a service provided by an independent contractor.
Individual Name
Enter the individual’s first name, middle initial, and last name in the spaces provided. This may be different than the company name if the vendor is using a DBA.
If entered, the Individual Name entries will also be printed on 1099 as the first line in the Recipient’s Name box and the vendor name will be shown as the “dba”.
Start Date / Expir Date / Amount
If you have a contract with the vendor, enter the starting date, expiration date, and the amount of the contract. If you do not have a contract with the vendor, leave these entries blank. If entered, this information is printed on the DE-542 report.
Ongoing
If the contract with the vendor is ongoing, select this box.
Report Status
Choose the Report Status of either <undefined>, Immediately, No Report, or Over $600.
This entry controls when the vendor will appear on the DE-542 report. If you select Immediately, then the vendor will print on the next report that you run. If you select Over $600, then the vendor will not appear on the report until your payments to the vendor exceed $600. If you select No Report, then the vendor will not print on the DE-542. (If you know that the payments to the vendor will not exceed $600, then you would select the No Report option.)
Last Year Reported
Enter the Last Year Reported. The program uses this entry to track when the vendor was last reported on the DE-542. Vendors must be reported each year.
Type of Business
Select from either Sole Proprietorship, Corporation or Partnership. This entry is used by the program to determine if the vendor should appear on the California DE-542 report. Only Sole Proprietorships will print on the DE-542 report.
Vendor Notes
The Notes tab on the Vendor window can be used to keep track of any additional information about the vendor. This is also where any licensing or insurance information is kept.

Licensing/Insurance
These fields store information about Licensing/Insurance.
Ins. Co. Name
Enter the name of the insurance company.
Policy #
Enter the Policy #.
Expiration Date
Enter the Expiration Date.
License/Permit #
Enter the license or permit number.
FDR FFR #
Enter the FDA Food Facility Registration number for this vendor; this will be used for lot tracking purposes.
Remit To
In some cases you may need to write checks to a different name and/or address than what you entered on the Vendor account on the Address tab. The Remit To tab allows you to enter a different name and address that will be printed on checks only.
Note The Remit To tab will be disabled unless you have enabled the Remit-To address feature by going to Tools > Program Setup > Payables > Settings and selecting the Remit-To Addresses box.


Company Name
Enter the company name to remit to. You must enter a complete name and address to print on checks on the Remit To tab. If you have entered only a company name under Remit To, the program will not use the vendor’s mailing address entered on the Address tab; it will print only the company name on the check.
Additional Name
Enter an additional name, if applicable.
Address and City/State/Zip
Enter the address to remit to.
Street Address
Enter the street address for this vendor; this will be used for lot tracking purposes.
Shipping Locations
The Shipping Locations tab can be used to store a vendor’s shipping locations.

To enter a new shipping location, click New Location.

Location
This is the number that the program will automatically assign to each shipping location.
Ship 1-4
Enter any shipping / pickup addresses for this shipping location.
Phone # 1 and Phone #2
Enter phone numbers for this shipping location.
Contact Name
Enter the name of a contact for this shipping location.
Email Address
Enter an email address for this shipping location.
Pickup List Instructions
Enter any instructions you want to appear on the pickup list for the trucker.
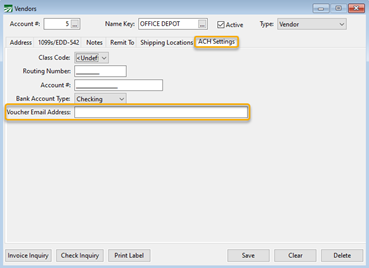
ACH Settings Tab
These settings are used when generating an ACH export file for electronic payments to vendors.

Class Code
Select either PPD or CCD.
Routing Number
Enter the routing number.
Account #
Enter the account number.
Bank Account Type
Select either Checking or Savings.
Voucher Email Address
Enter the email address where you would like this voucher to be sent.
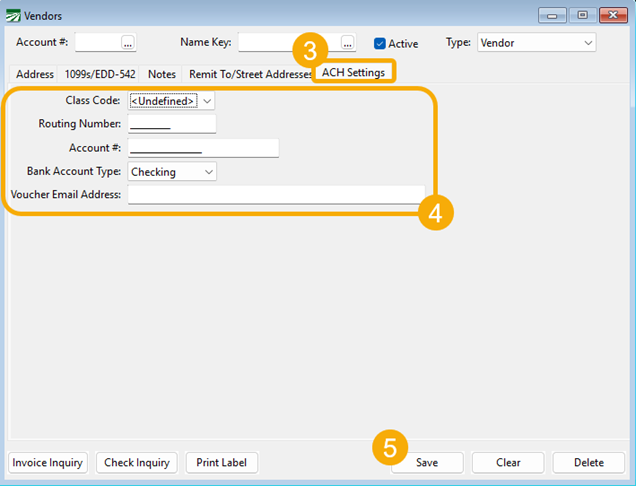
ACH Payables Workflow
-
Go to Payables > Vendors. Enter the account number of the vendor for whom you’re setting up ACH or select it using the look-up button.
-
Under the Address tab, go to the Payment Method entry and select ACH from the drop-down menu.
-
Click the ACH Settings tab.
-
In the Class Code entry, select either PPD for personal account or CCD for a business account from the drop-down menu. Then enter the rest of the information for electronically paying the vendor, including: Routing Number, Account Number, Bank Account Type, and an email address to where the voucher will be sent.
-
Click Save.
Creating ACH Payments for Vendors
To create payments for Vendors that are set to ACH:
-
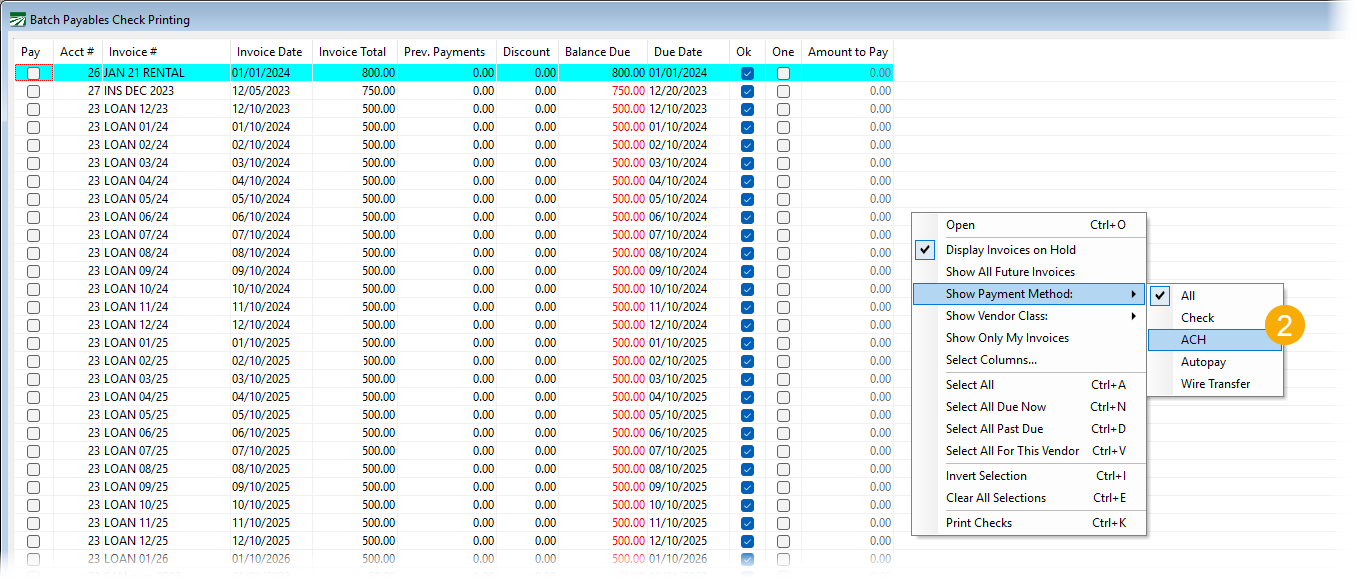
Go to Payables > Payable Reports/Checks > Batch Payables Check Printing.
-
Right-click anywhere within the grid. From the menu that opens, select Show Payment Method then ACH.
-
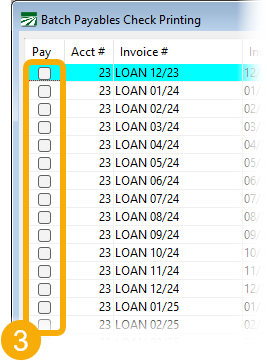
Select the Pay checkbox for the invoice(s) you want to pay.
-
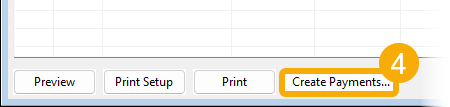
Click Create Payments.
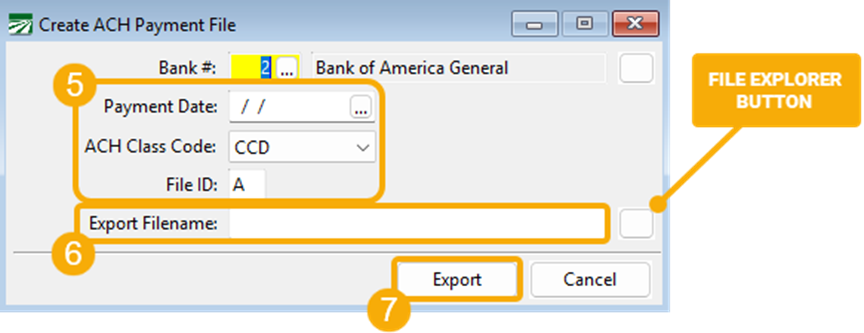
Creating an ACH Payment File
Once you have created the payments, you can create an ACH Payment file.
-
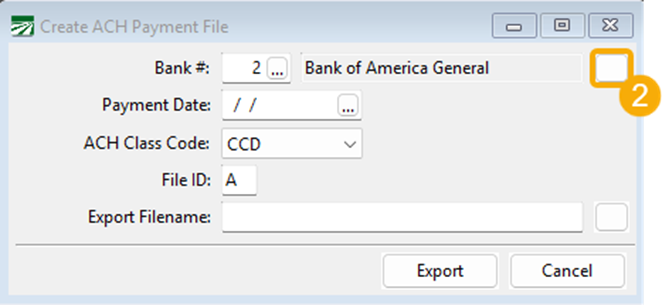
Go to Payables > Reports > Create ACH Payment File.
-
To set up the bank, click the Settings button.
When you click Settings, this will open a window where you will enter information for the Direct Deposit Settings.
Note The information required for the Direct Deposit Settings is specific to your bank and cannot be provided by Datatech. If you have any errors following the upload of your test file, please contact your bank to determine what corrections need to be made.
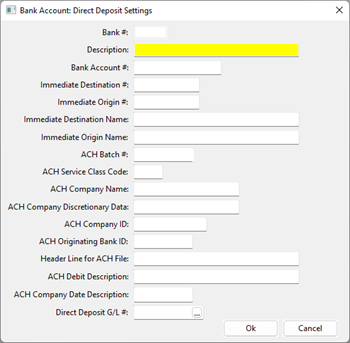
The typical entries needed for your bank are listed below; the entries not mentioned are usually not used. However, this can vary from bank to bank.
Description
Enter a Description for the Account.
Bank Account #
Enter your bank account number.
Immediate Destination
Enter your routing number for the account
Immediate Origin #
This number may be 1 + your federal ID, but the bank may also assign a different # for this.
Immediate Destination Name
Enter your bank's name.
Immediate Origin Name
Enter your company name as it appears in your online banking.
ACH Company Name
Enter your company name.
ACH Company ID
This is typically entered as 1 followed by your Federal ID, or the bank can assign their own.
ACH Originating Bank ID
This is usually the first 8 characters of the Immediate Destination #, but this could vary by the bank.
-
Once you have entered the Direct Deposit settings, click Ok.
-
In the Create ACH Payment File window, enter the Payment Date, ACH Class code and File ID.
-
In the Export Filename entry, name the file. Then click the file explorer button to select a location to where the file will be saved.
-
Click Export.
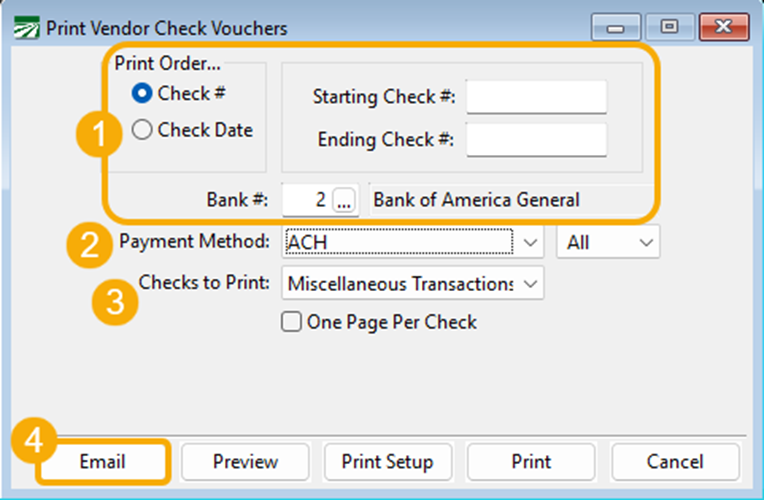
Vendor Check Vouchers
To email Vendor Check Vouchers, go to Payables > Reports > Vendor Check Vouchers.
-
Select the Print Order, Starting and Ending Check Date, and Bank.
-
Select ACH for the Payment method.
-
For Checks to Print, select Miscellaneous Transactions.
-
Click Email.
The vouchers will be sent to the email set up under the vendor’s ACH Settings. To verify or change the email, go to Payables > Vendors and enter the vendor’s account # or select it using the look-up button. Then click on the ACH Settings tab to see what’s entered in the Voucher Email Address entry.