Import Payroll Data
Importing Payroll Data Overview
Datatech’s Payroll system can import payroll data into the Daily Payroll file, eliminating the need for you to manually enter the employees that worked along with their time and pieces. The payroll data that is imported may be generated by a time clock or a data collection system from a third-party vendor.
Note The Payroll Import feature is an optional cost module. If you have not purchased this option, it will not appear on your menu.
Warning Data Collection systems are often set up to automatically apply rules based on Jobs. Instead of sending the employee’s hours worked as Straight Time, the Data Collection Systems send the employee’s time worked already split between OT and RH based on Jobs. (You may also be entering time manually this way.) This means our program cannot accurately calculate the Overtime due since the Data Collection System has already determined the OT rate to pay (which does not include multiple rates).
Instead, by entering/importing all time as Regular Hours, the software can accurately calculate the Overtime Premium Due.
An important thing to remember is that the import process only adds to the existing entries in the Daily Payroll file. This means that if you have entered some payroll manually for employees, and they also have time or pieces imported into the Daily Payroll file, the manual and imported entries will be combined. It also means that if you import the same file twice, the payroll information will be duplicated.
Note If for some reason there is a problem with the data that is imported, you must delete the entries that are imported before re-importing the data.
When data is imported, it is saved under the username that you logged into the program under. This means that the imported data may be separated from any data entered manually by other operators by the username. If you import data and need to delete it, you can use the Delete All option from the Daily Payroll right-click menu to delete all the imported data.
However, if you have also entered anything manually under your username, the Delete All option will delete your manual entries as well. In this situation, the only way to safely use the Delete All option is if the imported entries are all for the same crew number, and you did not manually enter anything for that crew. In this case, you can enter the crew number at the bottom of the Daily Payroll window and use the Delete All option to delete only the entries for your username and that crew #.
If you manually enter data into the Daily Payroll window and import data, you may find it easier to create a username to use specifically for importing payroll data (e.g. username “IMPORT”). This way, you can always keep the imported daily payroll entries separate from your manual entries.
There are two different import options available. The first is used solely for importing from the Handtrak data collection system. The other is used for importing from all other data collection systems, including DataTrack, PET TIGER, PhytoTrack, and all other time clock systems. When the data collection option is enabled, you will need to select the system that you are using:

Datatech will normally supply you with a configuration file for the system that you are using that will tell the program how to interpret the data contained in the file exported by your data collection system.
If you are using multiple data collection systems that produce files in different formats, you may use multiple configuration files to import the data from each system.
To import data into the Daily Payroll file, go to the Payroll > Daily Payroll Entry > Import Data. You can also select it from the right-click menu on the Daily Payroll Entry window. (Your menu option may read “Import Data from ADS” or “Import Data from Handtrak” if your program is configured to import from a specific vendor.)
The following window will appear:
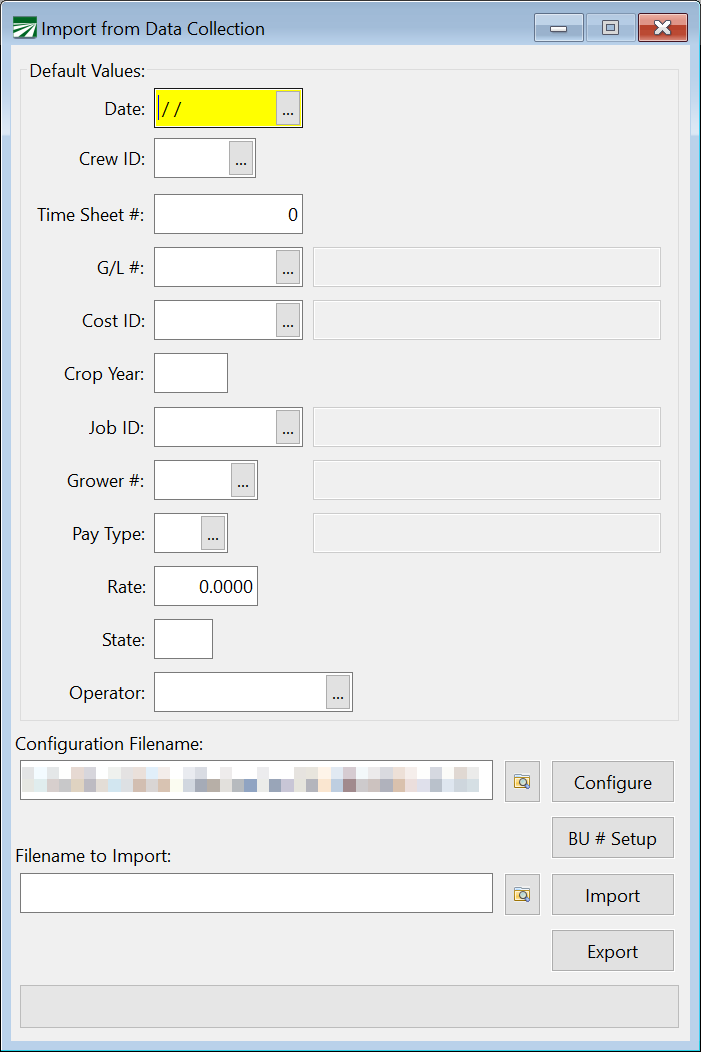
The top section allows you to specify default values in case the payroll data that you are importing does not include certain information. For instance, if you are importing data that does not include a data worked field, then you would want to supply a default date to use on the entries that are being imported. This would of course change from week to week, as you would pick a date that is in each week’s pay period.
After entering any default entries that are needed, you must select the configuration file that will control the import of the data. Normally, the configuration file is supplied by Datatech and is customized for the data that you will be importing. The default filename for the configuration file is “PRIMPORT.INI” and it is located in the Data directory by default.
If you need to import payroll data from more than one system, each one will have its own configuration filename. You must remember to select the appropriate configuration file depending on which system generated the data that you are importing. If you are importing payroll data from only one system, use the default filename.
If you need to edit the configuration file, you can click on the Configure button next to the filename entry. This will display the configuration file in a text editor where you can view the settings and make changes if necessary.
Finally, you will need to enter the path and name of the file to import. In many cases, the file will always be located in the same place, and it may be the same name from week to week. In other cases, a filename is created that identifies which week’s payroll the file contains. In any case, you must tell the program the path and filename of the file that you want to import. Click on the button with the yellow folder to select the file using the Windows File Open dialog.
Once you have supplied any required default values, selected the configuration file, and entered the path and filename of the file to import, you can click on the Import button to begin the process. The progress bar at the bottom of the window will show the progress of the import operation, and when it is done, the program will display a message indicating how many records were entered.
Payroll data is always imported directly into the Daily Payroll file. The entries will be imported with the operator name of the person who imported them. This means that if one person imported entries and someone else needs to view or edit them, the other person will need to enter the operator name of the person who did the import in the Viewing entry at the bottom right corner of the Daily Payroll window.
Once in the Daily Payroll file, you can run all of the standard reports to check the entries, and you may use the Create Checks option on the imported entries just as you would entries that are entered manually. If there is a problem with the entries that have been imported, you may use the Delete All option when viewing them to remove them from the Daily Payroll file and import them again after the problem has been corrected.
Importing Multiple Files At The Same Time
You can select multiple files to import at the same time as long as they are located in the same folder. Click on the Browse Folder button next to the Filename to Import window to open the file selection dialog. Navigate to the folder where the files are located, and click on the first file to import, and then hold down the Ctrl key while clicking on each of the other files that you want to import. Each file will remain highlighted as you click on it as long as you hold the Ctrl key while you are clicking. You can also click on a file, and then Shift + Click on another file to select the two files plus all of the files listed in between them.
Once you have finished selecting the files you want to import, click on the Open button. The file names will appear in the Filename to Import entry, but you cannot edit them once they have been selected. If you want to clear or change the files that you have selected, click on the Browse Folder button again.
Export
Click Export to export data. This will open the Export Setup Files window:
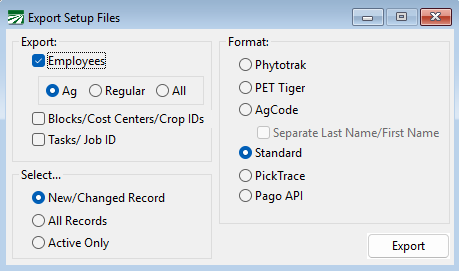
Make your selections under Export, Select..., and Format. Then click Export.
Click here for instructions on exporting employees to Pago through the API.
Configuration File Setup
This section details what settings may appear in the configuration file. Some settings have default value (primarily True/False type settings) and the default values are underlined for those settings. You only need to include these settings if you need a different setting other than the default value.
[DAILY_IMPORT] (This must appear on the first line of the configuration file, or the program will not recognize this as an import configuration file.)
FileType=CSV | EXCEL | FIXED
Type=[dc_wage_type]->[wage_type] (Replace [dc_wage_type] with the wage type used by the data collection system. Replaced [wage_type] with the equivalent wage type code used in the payroll system.
Header=TRUE | FALSE (Set this to true if your import file contains one or more header lines. Header lines will be ignored.)
HeaderLines=[# of lines] (The default is one header line. Typically the names of the fields appear on the first line of the import file. If you need to skip over multiple lines, add this line to your configuration file with the number of lines to skip specified.)
Footer= TRUE | FALSE
CreateEmployeeAccounts= TRUE | FALSE
DefaultGL=[gl_acct_num]
DefaultGLOT=[gl_acct_num]
JobLength=1-8
CropLength=1-8
ArchiveDir=[path]
ImportFile=[path/filename]
PayTypeFix=TRUE | FALSE
SubtractHours= TRUE | FALSE
ValidateCrew= TRUE | FALSE
ValidateEmployeeName=TRUE | FALSE
UseEmployeeCrew= TRUE | FALSE
UseJobGLNum= TRUE | FALSE
DisallowInactive=TRUE | FALSE
WarnInactive= TRUE | FALSE
WarnTerminated= TRUE | FALSE
WarnNotRehirable= TRUE | FALSE
BaseHourlyWageType=
IncentiveWageType=
AllocateSalaryHours= TRUE | FALSE
AllowZeroRate= TRUE | FALSE
SkipZeroUnits= TRUE | FALSE
AllowZeroUnits= TRUE | FALSE
ImportZeroIncentiveRates= TRUE | FALSE
CustomWageType=
DefaultWageType= ‘RH’
BonusGrower= TRUE | FALSE
BonusJob= ‘ ’
BonusWageType= ‘BO’
UpdateEmployeeRate=TRUE | FALSE
DefaultHoursOffered = TRUE | FALSE
PutUnitsInMemo=TRUE | FALSE
CostCenterLeadingZero= TRUE | FALSE
SkipZeroAccounts=TRUE | FALSE
AssignCrewSheetNumbers=TRUE | FALSE (Set this true to assign all the next available time sheet number to all of the entries that are imported from a single file.)
AssignTimeSheetByCrew=TRUE | FALSE (Set this to true to assign a unique time sheet number to the entries for each crew that is contained in the import file. The program will start assigning time sheets using the next available time sheet #.)
CombineHours=TRUE | FALSE
MultipleDays= TRUE | FALSE
CreateCrewIDs=TRUE | FALSE (This setting can be set to true if you want the program to automatically create a Crew ID records when using alphanumeric Crew ID’s. If you are using numeric only crew numbers, this setting has no effect.)
TrailingSign=TRUE | FALSE (This setting is used when importing a fixed width column file. It can be included after each numeric field to indicate that the last character in the field should be used as the sign of the number. In other words, if the number should be negative, a minus sign will appear in the last position of the field.)
MultipleDays=TRUE | FALSE (This setting indicates each line in the import file contains hours or time for multiple days in a single pay period. When this option is used, you must enter a date worked in the Default Values group so that the program knows the first date in the pay period/week.)
PhytotrakBreakCode= ‘ ’
PhytotrakBreakJob= ‘ ’
PhytotrakBreakWageType= ‘ ’
PTHourlyRateOverride=TRUE | FALSE
(PhytoTrak Only) This setting controls whether the import will override the hourly rate that is calculated with the rate from the employee file if the employee file rate is higher. The default behavior is to substitute the higher rate from the employee file if it is entered. You can prevent this by setting this option to FALSE.
Field=
PRDAILY.DAY (Date worked in “MM/DD/YY” or “MM/DD/YYYY” or “MMDDYYYY” formats.)
PRDAILY.YEAR
PRDAILY.ROW_NUM
PRDAILY.UNITS
PRDAILY.RATE
PRDAILY.MEMO_HRS
PRDAILY.CREW_NUM
PRDAILY.SEQUENCE
PRDAILY.DED_AMT
PRDAILY.MEMO (Text memo field up to 20 characters)
PRDAILY.STATE
PRDAILY.JOB_NUM
PRDAILY.EQ_UNITS
PRDAILY.SHEET_NUM
PRDAILY.H2A_HRS_OFFERED
PRDAILY.EQRATE1
PRDAILY.EQRATE2
PRDAILY.EQRATE3
PRDAILY.EQRATE4
PRDAILY.STATE_FOR_WHT
PRDAILY.YYYYMMDD (handle date worked in non-standard U.S. format, including “YYYY-MM-DD”, “YYYY/MM/DD” and “YYYYMMDD”)
If we get the start time from the data collection import, then customers can automatically have the overtime premium applied to the last hours worked rather than having it prorated across.
PRDAILY.START_TIME (required for the allocation by start time)
PRDAILY.STOP_TIME (optional for allocation by start time)
PRDAILY.TOTAL_TIME (optional for allocation by start time)
Adding them to a data collection import config files is as simple as:
Field=PRDAILY.START_TIME
PREMPL.ACCT_NUM
PREMPL.PIN
CROP.CROP_ID
PRLABJOB.JOB_ID
PRGROWER.ACCT_NUM
PRWAGTYP.CODE
PRCREWS.CREW_ID
GL.ACCT_NUM
EQUIP1.CROP_ID
EQUIP2.CROP_ID
EQUIP3.CROP_ID
EQUIP4.CROP_ID
Setting Default Values:
FieldDefault=
DefaultValue=
These lines can be used to set any of the fields listed above to a default setting. This is typically used when a value is not present in the import file, but a default value needs to be used on every record that is imported. On the “FieldDefault=” line, use the FILE.FIELD to specify which field will have a default value. Then on the “DefaultValue=” line, supply the default value that you want to use on each record that is imported.
Virtual Fields:
PRDAILY.HR_RATE/PRDAILY.RATE2 (Hourly pay rate; use if a single line may include the hours worked and hourly rate and/or the piece total and piece rate (use PRDAILY.RATE for the piece rate field). This is commonly used for base hourly + incentive pay types, where two units and two rates are includes on one line. For backwards compatibility, PRDAILY.RATE2 may also be used, but PRDAILY.HR_RATE is the recommended field name.)
PRDAILY.UNITREG (Regular hours, will import using “RH” wage type, this field can be used on multiple columns as can UNITOT and UNITDT. If MultipleDays=TRUE is in the config file, each instance of the column (and the UNITOT/UNITDT columns) will be for a different day; the first column will be assigned the date entered under the Default Values group and each occurrence after will be assigned the next date.)
PRDAILY.UNITOT (Overtime hours; use this and the next five field names if a single line includes fields for these specific pay types)
PRDAILY.UNITDT (Doubletime hours)
PRDAILY.UNITBO (Bonus hours/units)
PRDAILY.UNITVA (Vacation hours)
PRDAILY.UNITHO (Holiday Hours)
PRDAILY.UNITSP (Sick Pay Hours)
PRDAILY.GRIMMWAY_CREW (This field will import the crew #, ignoring any letters, resulting in a numeric crew #)
PRDAILY.GRIMMWAY_PREMIUM (This field specifies an “override” pay rate to use. It will only override the standard pay rate if a non-zero value is provided in this field.)
PRDAILY.GRIMMWAY_EMPL_NAME (This field is used during the validation process. If a line in the import file contains an error, the error message on the validation report will include the employee name for that line.)
PRDAILY.PT_REG_AMT (Fields with the “PT” prefix are used for the Phytotrak import. This format includes pay information on a single line that combines regular, overtime, doubletime and piecework wages. This field is used in conjunction with the PT_REG_HOURS field to calculate the pay rate.)
PRDAILY.PT_OT_AMT (This field is used in conjunction with the PT_OT_HOURS field to calculate the pay rate.)
PRDAILY.PT_DT_AMT (This field is used in conjunction with the PT_DT_HOURS field to calculate the pay rate.)
PRDAILY.PT_PIECE_COUNT (Piecework units. This will be used with the PT_PIECE_AMT field to determine the piece rate.)
PRDAILY.PT_PIECE_AMT (Piecework wages.)
PRDAILY.PT_REG_HOURS (Number of regular hours)
PRDAILY.PT_OT_HOURS (Number of overtime hours)
PRDAILY.PT_DT_HOURS (Number of doubletime hours)
PRDAILY.HOURLY_RATE (An amount in this field will update the employee’s default pay rate when “UpdateEmployeeRate=TRUE” is included in the configuration file.)
PRDAILY.BONUS_AMT (This field and the next are similar to the PT_* fields. This field will have the amount of the bonus to pay the employee.)
PRDAILY.BONUS_UNITS (Units for the bonus). Usually this is just one to pay the employee a flat amount, but if a bonus is paid for a specific number of pieces or hours worked you this field can be used for the quantity.)
PRDAILY.GL_ACCT1 (this field and the next are used to construct a general ledger account number in two parts. This field will have the digits to the left of the decimal point.)
PRDAILY.GL_ACCT2 (This field will have the two digits to the right of the decimal point for the general ledger account that the wages should be expensed to.)
PRDAILY.TIME (Regular hours worked in hh:mm format, program will convert to numeric unit.)
PRDAILY.TIMEOT (Overtime worked in hh:mm format, program will convert to numeric unit.)
PRDAILY.TIMEDT (Doubletime worked in hh:mm format, program will convert to numeric unit.)
PRDAILY.EFF_RATE (Rate including overtime factor, program will back calculate to normal hourly pay rate)
PRDAILY.TIMEOT (Amount of overtime in hh:mm format, import program will convert to numeric units)
PRDAILY.TIMEDT (Amount of doubletime in hh:mm format, import program will convert to numeric units)
PRDAILY.PIECE_RATE (A piece rate; this must be paired with a PRDAILY.PIECE_COUNT column, which has the number of units to pay at this rate. The PIECE_RATE and PIECE_COUNT fields can be used multiple times to import multiple pairs of rates/pieces)
PRDAILY.PIECE_COUNT (A piece count; this must be paired with a PRDAILY.PIECE_RATE column)
PRDAILY.PIECE_HOURS (The total piecework hours worked, for use with the PIECE_RATE and PIECE_COUNT fields. The first piece rate/units will include the total piece hours, additional lines will have no hours).
PRDAILY.WILBER_UNITS (This is the same as the Units fields, however if no value is provided in this column, the program will default to a 1.)
PRDAILY.SSN (Employee social security number, must be nine digits. May be nine digits only or nine digits plus dashes.)
PRDAILY.PAY_CODE (This is used when the job code is split between two different fields in the import file. The column for the second part of the job code should use this field. The second part of the job code should appear in the import file before the job prefix code.)
PRDAILY.JOB_PREFIX (This is used when the job code is split between two different fields in the import file. The column for the first part of the job code should use this field.)
PRDAILY.UNIT_CUSTOM (Use this field to specify a unit field that is tied to a custom wage type that you specify using the CustomWageType setting.)
PRDAILY.RATE_CUSTOM (Use this field to specify a rate field that is tied to a custom wage type that you specify using the CustomWageType setting.)
Translate=[file_value]->[datatech_value]
A translation table may be defined for any field that will change values supplied in the import file to values that correspond to entries defined in the payroll system. One or more “Translate=” lines may appear after each “Field=” line. Each of the translation pairs will apply to the field specified in the prior “Field=” line.
Example Field=CROP.CROP_ID
Translate=BL1->BLOCK1
Translate=BL2->BLOCK2
These lines will translate “BL1” to “BLOCK1” and “BL2” to “BLOCK2” for the Cost Center ID field. Any other values that appear in this column would be passed through unmodified.
ProfileLine=#### (This entry defaults the Cost Center and Job assigned to the payroll entries from the corresponding line in the Employee Profile.)
For use with fixed width file formats:
ColumnEndPos=
Decimals= (Indicates the number of digits that should be used for the decimal portion of a number. For use in fixed with formats that have an implied decimal.)
TrailingSign=TRUE (indicates that a negative number will have a minus sign in the last position of this field, instead of in front of the number)
Default Pay Rates
Normally the data collection software will supply the pay rates in the import file. In some cases, you may want to maintain the pay rates in the Datatech payroll system. When no pay rate is supplied in the file, the program will use three methods to determine a pay rate.
First, if the employee account has a pay rate, and the pay type on the employee account matches the pay type from the import file, the program will use the pay rate from the employee file. For instance, if you have an employee that has the Pay Type set to Hourly and the Pay Rate set to 7.75, when the import file contains a line with a piecework wage type, the program will not use 7.75 as the pay rate. If the import file has a line with an hourly pay type, then the program will use the 7.75 rate.
If the program cannot get the pay rate from the employee file, it will next check the Pay Rate table to find a rate to pay the employee. The pay rate file must have an entry that matches the Crop ID, G/L #, Job ID, and Pay Type that is in the import file. If these fields do not match, the program will not be able to choose a pay rate from the table.
Finally, if the program has not been able to determine a pay rate from either the employee account or the pay rate file, and the employee is being paid on an hourly basis, the program will use the minimum wage (the higher of either the state or federal minimum wage).
After the rate has been determined (from whatever source), the program will add the shift differential amount (if any) from the wage type file.
Diagnosing Import Problems
When importing a text or CSV file type, the validation process will make sure that the data can be imported. An exception report will be generated listing any errors. Correcting these errors may involve changing settings in the configuration file or setting up new cost centers, jobs, employees, etc. You may also need to look at the contents of the file that you are trying to import to verify the data that is being output by your data collection system.
Do not use Excel to view the contents of a text or CSV file! Excel does not display data as it appears in the text file, and worse, if you save the file from Excel, the file will be save d with the changes that Excel has made. This can include reformatting date fields and dropping leading zeros from fields that Excel considers to be numeric data.
Instead, always use a plain text editor such as NotePad (built into Windows) or NotePad++ (freely available) to view and verify the content of the text file. This will allow you to see the actual contents of the file the same way the program sees them.
Automating the Import Process
By using command line parameters, you can automate the import process. You can run the program from a batch or script file and include the configuration file to use as well as the file or files to import. The file(s) will be imported without any further user interaction.
The file(s) will be validated and imported if it passes the validation process. A log file records all activity and a printed report will be printed with the same information that is recorded to the log file.
The log file will either include errors or the total number of records processed and imported. If the file that you are trying to import contains validation errors, these errors will be included in the log file.
If you are importing multiple files in one operation, all files must pass the validation process, otherwise the program will not import any of the files. During an automatic import, the program will validate each file. If there are any validation errors, the program will record them in the log file. You must correct the validation errors for each file before you can complete the import process.
You can import either a single file or multiple files in one import operation. Since you may specify only one configuration file on the command line, all of the files that are imported must use the same configuration file. If you need to import multiple files that have different formats, you will need to do this in separate operations.
Command Line Parameters
Two command line parameters are supported. Both are required for the automatic import process. One parameter tells the program what import configuration file to use. The other parameter tells the program what file or files it should import.
-prconfig:[path/filename]
This parameter tells the program what import configuration file to use. If you are importing multiple files in one operation, this configuration file will be used for all of the files.
Important: There is no space between the “-prconfig:” and the path and file name. It should be all together with no spaces:
-prconfig:E:\Winlco\Data\PRImportTimeClock.INI
Important: If the path or file name includes spaces in it, you will need to enclose the entire parameter in double quotes:
“-prconfig:E:\Winlco\Data\Bolthouse Time Clock.INI”
-primport:[path/filename]
This parameter tells the program what file to actually import. Like the configuration file parameter, there is no space between the “-primport:” and the actual file name. Also, if the path or file name includes spaces, enclose the entire parameter in double quotes. You can include a single file name in this parameter to import. Examples:
-primport:E:\TimeClock\Crew#2.csv
This will import the file E:\TimeClock\Crew#2.csv.
To import multiple files, you can use the asterisk as a wildcard in the file name:
“-primport:E:\Time Clock\Crew*.csv”
This will import all of the files in the E:\Time Clock folder that start with “Crew” and end with a “.csv” extension.
Another way to import multiple files is to create a text file that contains a list of files that you want to import. This list file should have a “.LST” file extension. For example:
-primport:E:\Winfarm\Import\ImportFiles.lst
For this parameter, the program will read the contents of the ImportFiles.lst file. Each line of the file should contain a full path and filename of a file to import. Wildcards are not allowed in the list file. As an example, suppose the E:\Winfarm\Import\ImportFiles.lst file contained the following:
Example E:\TimeClock\Crew101.txt
E:\TimeClock\Crew102.txt
E:\TimeClock\Crew103.txt
These three file would then be imported in one operation.
How to Use Command Line Parameters
The automated import process can be started from a command line or from a batch file. You may also use any scripting language that provides the ability to run external programs and pass command line parameters to them. You can also set up a shortcut in Windows on your desktop that runs the program with the parameters to do the import.
If your data collection system provides for it, you may also be able to start the import process directly from your data collection system after exporting the payroll data to a file.
The general format of command line parameters is:
Example winfarm [action1] .. [actionN] [workspace] [username] [password]
The program name is “WINFARM”. Immediately following the program name, you may provide one or more “actions” which always start with a dash (“-”) as described in the prior section. Following the actions, you may supply the workspace file name, operator name and password.
You may need to supply additional parameters on the command line to eliminate any need for user interaction. For instance, if you have multiple companies, normally the Company Selection dialog window will appear when the program is started for the user to select which company to start in. To bypass this window, you can include the workspace file on the command line for the company that you want to import the data into. Example:
Example winfarm –primport: –prconfig: Hall.ws
(For the sake of brevity, we did not include the full path and filenames for the import and config files in the above example. Normally you would have the full path and file name included as shown in the prior section.)
This will start the program using the “Hall” workspace file, automatically starting the program in the set of files specified by that file.
If you are not sure what the workspace filenames are, you can look in the Programs folder for all files that have a “.ws” extension. Also, on the Company Selection dialog window, you can press Ctrl+P to get a list of the workspace files, the company names and the folder locations for all companies that are installed.
In addition to the company name, if you have multiple users you can supply a user name and password to log into the program under. Normally when you start the program the login window appears. This can also be bypassed by including a username and password on the command line.
We recommend that you set up a special user account that only has rights to access the import data collection option. This is because the user name and password will be known to anyone who has access to the shortcut, scripts, or batch files that contain this information. If you have limited access for other users, you do not want them using the IMPORT account to gain access to program features that they are not allowed to access.
Here is an example of an operator record set up for import-only access:
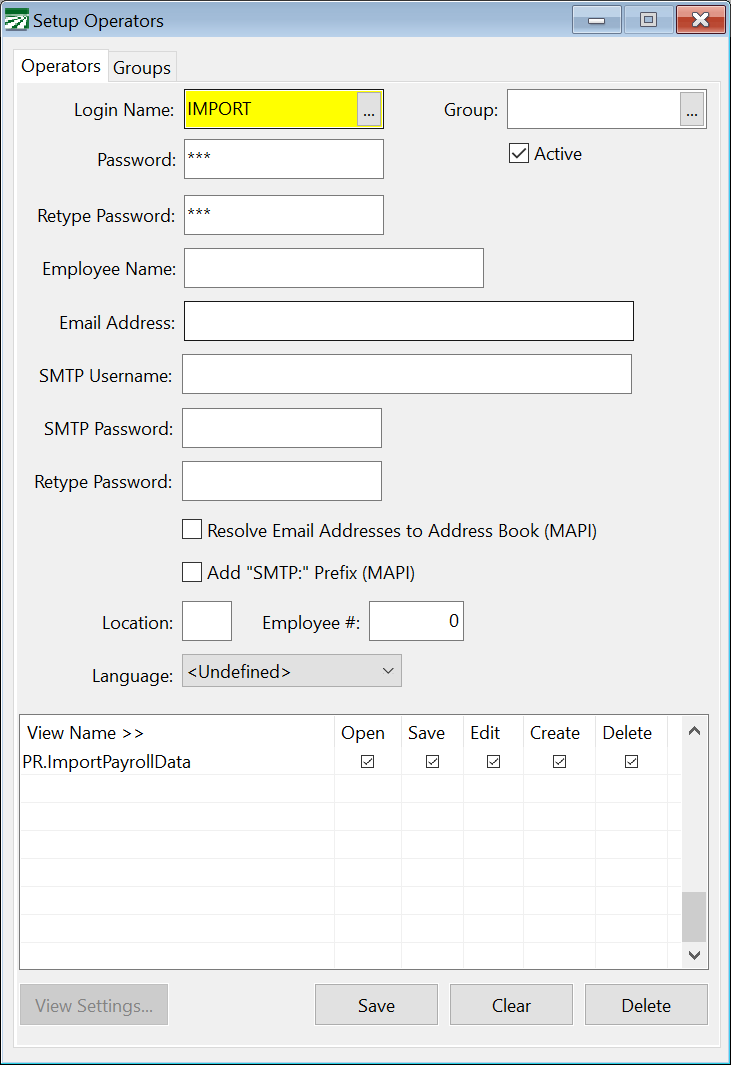
In this example, the IMPORT user is set up with the password “ABC123” and the security grid has blocked access to all options for each of the main modules (AP, AR, LC, PR, SYS) and a single line has been added to allow access to the Import Data Collection option.
On the command line, you may provide the user name and password after the workspace name:
Example winfarm –primport: -prconfig: Hall.ws IMPORT ABC123
Comamnd line parameters may be included in the “Target” setting for shortcut. As an example, suppose we have a time clock program that exports data for multiple crews (with each crew in a separate file) to the C:\TimeClock\Export folder. The files that are exported are named “Crew####.csv” where the “####” is replaced with the crew #. Here is an example of a shortcut that is setup to automatically import all of the files in that folder:
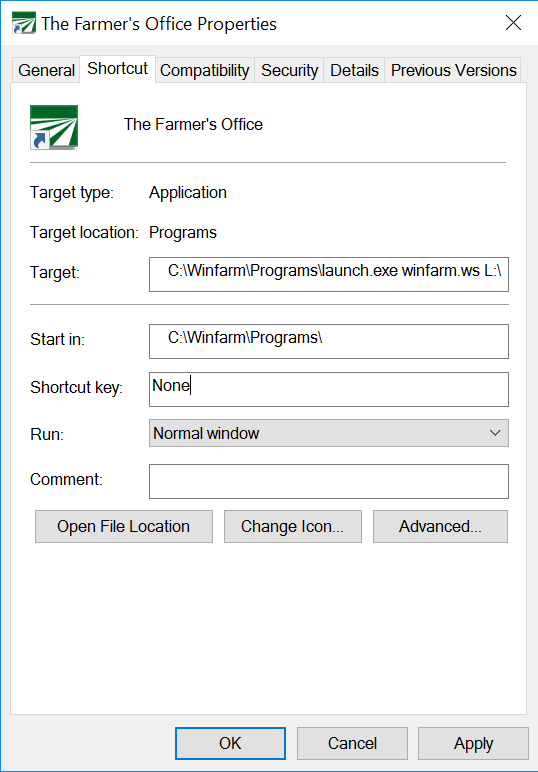
Since the Target entry in the above screenshot is too short, we will break down each part of the Target here. Each part is separated by a space.
C:\Winfarm\Programs\winfarm.exe This is the name of the program to run
-prconfig:C:\winfarm\data\primport.ini The configuration file to use for the import.
-primport:C:\TimeClock\Export\*.csv The files that are to be imported.
winfarm.ws The workspace file identifying the company to start in.
IMPORT The user name to log in under.
IMPORT The password for the IMPORT user account.
Once this shortcut has been set up, you can simply double click on it to import all of the .csv files that are currently in the C:\TimeClock\Export file. (Note: once the files have been imported successfully, it is up to you to delete, rename or move them from this folder so that they do not get imported again.)
Configuration File Parameters
The following settings can be included in the configuration file to control how the results of the automatic import process are logged.
AutomaticLogFile=[path/filename]
Add this line to your configuration file to specify the location and filename for the program to record the results of the import process. If you do not specify a filename, the program will use the default filename “AutomaticImport.log” and place the log file in the main data folder. The log file is a plain text file that can be viewed in any text editor or word processor.
AppendAutomaticLogFile=TRUE | FALSE
When the log file is created, the default behavior is to overwrite an existing file. You can use the setting to append the results to the end of an existing log file instead of overwriting an existing log file.
PrintAutomaticLogFile=TRUE | FALSE
If you want a printout of the results of the import operation, set the PrintAutomaticLogFile to true. The results will be printed to your default printer.
OpenDialogFilterString= ‘ ’
Example Log Files
The first line of the log file will show the date and time stamp, Windows user name and the computer name that the import operation was executed on. A successful import process will include a line for each file that is validated, and if all files pass validation, a line for each file that is imported. The total number of records for each file will also be listed. The final line will include the date and time stamp.
Here is an example of a successful import:
Example Starting Import Process @ 10/29/2013 11:43:26.708 AM by matt on MATT-PC
Validating: e:\winfarm\hall\crew#2.csv
Validating: e:\winfarm\hall\crew#3.csv
Importing: e:\winfarm\hall\crew#2.csv
Importing: e:\winfarm\hall\crew#3.csv
19 records imported to Daily Payroll file from: e:\winfarm\hall\crew#2.csv
13 records imported to Daily Payroll file from: e:\winfarm\hall\crew#3.csv
Ending Import Process 10/29/2013 11:43:28.45 AM
The same information is reported on the printed copy of the log.
If there is a validation error, the program will list all of the errors in the log (as well as on the printed copy of the log). Here is an example of an import operation where the files did not pass validation:
Example Starting Import Process @ 10/29/2013 11:45:25.169 AM by matt on MATT-PC
Validating: e:\winfarm\hall\crew#2.csv
Validating: e:\winfarm\hall\crew#3.csv
Errors in import file: e:\winfarm\hall\crew#3.csv
7 Invalid or missing value error in PRLABJOB.JOB_ID : Value=SHOP2
8 Invalid or missing value error in PRLABJOB.JOB_ID : Value=TRANC3
Cannot open 'E:\Winfarm\Hall\Crew#4.csv', check the path and file name
Ending Import Process 10/29/2013 11:45:26.22 AM
In this case, three files were specified in a list file to be imported. The second file had validation errors and the third file (“Crew#4.csv”) could not be opened. Even though the first file had no validation errors, the log shows that it was not imported because of the errors on the other two files.