Employee Check Detail Report
Employee Check Detail Report Overview
The Employee Check Detail report will print a summary of checks and totals by employee for a date range you specify.
Go to Payroll > Reports > Employee Check Detail Report.
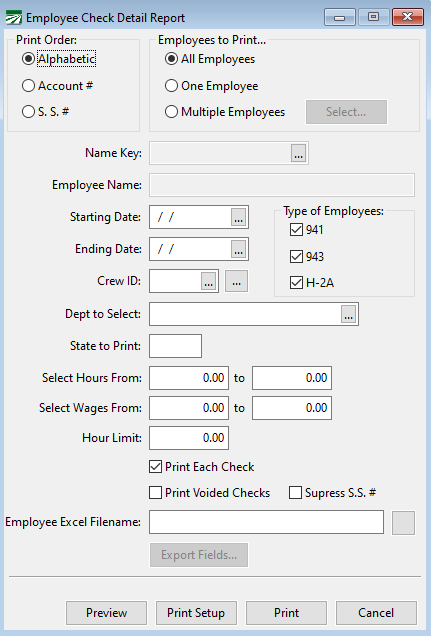
Print Order
When you are printing all employees, this will determine the order in which they appear on the report.
Employees to Print
Select whether you want to print all employees, a single employee, or select multiple employees to appear on one report. When you select the multiple employees’ option, click on the Select button. The employee lookup will open and you can select the employee accounts to include on the report.
Name Key
Enter the name key of the employee you want to print the report for, or click on the lookup button to select an employee. (You can also press [F4] to activate the lookup.)
Starting Date / Ending Date
Enter the date range to print the report for.
Crew ID
If you want to print all employees assigned to a specific crew #, enter the crew # here. Otherwise leave this entry blank.
State to Print
Leave this entry blank to print all employees, or enter the two letter abbreviation of the state you want to print. The report selects employees based on the State for Withholding entry, not the state in the employees’ mailing address.
Select Hours From
You can enter a range of total hours here. The report will only include employees whose total hours for the report fall within this range.
Select Wages From
You can enter a range of total wages here. The report will only include employees whose total wages for the report fall within this range.
Hour Limit
This entry allows you to specify an hour “cutoff”. A check will not print on the report if it exceeds the number of hours you enter here.
Print Each Check
Select this check box to print each check one a separate line. Deselect the box to print only a single total line for each employee.
Print Voided Checks
Select this check box to include voided checks in the report.
Suppress S.S.#
If you do not want employees' social security numbers to appear on the report, select this check box.
Employee Excel Filename
To export the report as an Excel or CSV file, enter a file name here and then click the button to the right of the entry to select a file type and location to where the file will be saved.
You can customize the spreadsheet that will be created by clicking on the Export Fields button. This allows you to select what information will be exported into the spreadsheet. See the section below for more information about customizing the Excel export.
Customizing the Excel Export
By entering a filename in the Insurance Report entry, the report will export a list of the employees that appear on the report to Excel. By default, the spreadsheet will include seven columns: Location, Last Name, First Name, SSN #, Address, City/State/Zip, and Hours. (The Location column is constant and will always be “01”.)
If you are using the export for other purposes or need additional information included, you can click on the Export Fields button to select which fields from the employee file will be added to the spreadsheet. This option also allows you to select in what order the columns will appear.
When you click Export Fields, the following window will appear:
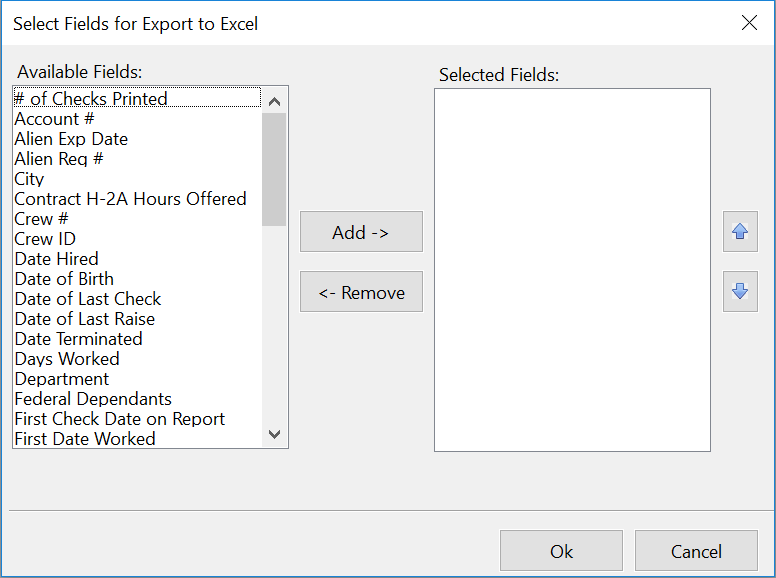
The list on the left side of the window will show what fields are available for export. The list on the right shows which fields have been selected to be exported. To change the order of the selected fields, highlight an entry in the list and click on the Move Up or Move Down buttons. Click on the Ok button when you are done selecting the fields or click Cancel if you do not want to use the changes that you have made.
The program will save the fields you have selected for export to Excel. The next time you use this option, you will not need to reselect the fields.
In addition to fields from the employee file, there are two fields calculated from the report that you can add to the spreadsheet: Hours Worked and Report Wages.