Export Checks to Positive Pay
Positive Pay is a system used by many banks to catch fraudulent checks sooner. After you have printed checks, you can generate a file to upload to your bank containing the check details, typically including the payee, check number, amount, and date.
Some banks have similar systems that go by different names. In general, this option is meant to work with any bank’s system, regardless of what they call it.
The Positive Pay Export is an extra cost option and will not appear on your menu unless you have purchased this option.
Each bank has their own format. Some banks have multiple formats. Formats typically differ in the ordering of the information, fixed vs. delimited columns, delimiters used, formats for dates, maximum size of certain columns, etc.
Some bank portals allow you (or require you) to define the format that you will use. If this is the case, and your bank is already listed, Datatech can provide you with details on how the file is formatted so that you can select the appropriate settings on your bank’s portal.
The program currently supports over forty different file formats. If your bank is not on the list of supported formats, we can work with your bank to create a format compatible with their systems.
Go to Payroll > Reports > Export Checks to Positive Pay.
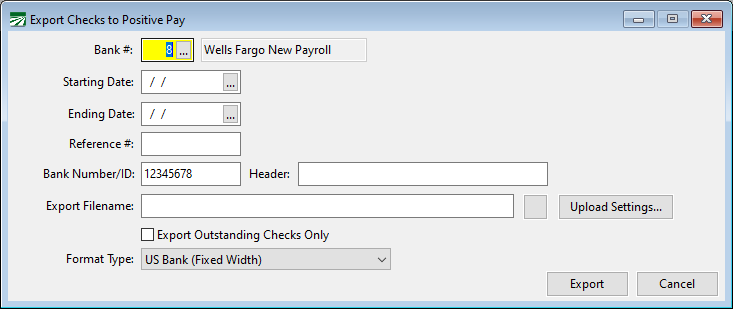
Bank #
The default payroll bank account will appear here automatically. Change this if you have issued checks from a different account.
Starting Date / Ending Date
Enter the starting and ending check dates for the checks that you want to export.
Bank Number/ID
Some banks require a bank number or ID code to be included in the file. If your bank needs this, enter it here. It will appear automatically the next time you generate a Positive Pay file.
Header
Some banks also require a specific header line to appear as the first line in the Positive Pay file. If your bank requires this, then the Header entry will appear next to the Bank Number/ID entry. Consult your bank’s instructions to see what you should enter for the header.
Export Filename
Enter the path and filename to export the Positive Pay information to. This is the file that you will upload to your bank.
If your bank has specific naming rules for the file that you upload, you must follow those rules. For instance, if you need to include a date or your account number in the filename, you must type that in. The filename will not be generated automatically for you.
The filename must also include the appropriate extension. If your bank is expecting the filename to end in a “.txt” or a “.csv”, you must enter the file extension as well.
Some banks may support exporting to different file types. In these cases, the extension will determine the file type. For instance, if a bank supports files in both native Excel format and in Comma Separated Value format, entering a “.xls” for the extension will result in an Excel file being generated while entering a “.csv” for the file extension will results in a Comma Separated Value file being generated.
Export Outstanding Check Only
When this box is selected, the program will only export checks that have not been cleared on the Bank Reconcilement window in Accounts Payable.
Format Type
Select your bank from the list. The program will remember your bank, so the next time you use the option it will be selected for you automatically.
Export
Click on this button to generate the file. After the file has been generated, the program will display a message telling you how many check were included in the file.
Bank Specific Setup Information
The following formats require a Bank Number/ID:
-
Wells Fargo, Wells Fargo (CSV)
-
Wachovia
-
Bank of America 2
-
PremierWest Bank
-
Westamerica Bank
-
Rabobank, RaboBank CIF_Fixed_04b
-
County Commerce
-
CoBANK
Viewing a Positive Pay File
After a Positive Pay file has been generated, you can view the file by clicking on the Export Filename entry and pressing either [F11] or [F12].
[F11] will open the file in your default text editor (normally NotePad).
[F12] will open the file using the default application for the filename (as indicated by the file’s extension). Typically, a “.txt” file will be opened by a text editor, while a “.csv” or “.xls” file will be opened using Excel. If a file does not have an extension, there will be no default application associated with the file and the [F12] key will fail to open the file.
It is not recommended to modify the file after it has been generated before you send it to your bank. Even small changes made to a file may change the format of the file and the bank will be unable to process it. Saving a file using Excel may also change date formatting and cause leading zeros that the bank is expecting on certain fields (account and check numbers, check amounts) to be dropped.
Automatic Uploading
Typically, positive pay files are uploaded to a bank by logging into your bank’s web portal using your Internet browser. After logging in, your bank should have an option to upload or submit a file.
Some banks may provide a way to automatically upload generated files instead. The program can upload files to a bank’s Secure FTP site (SFTP).
If this is supported by your bank, the Upload Settings button will appear next to the Export Filename. Click on this button to enter your login information. The login information will be remembered, so you do not need to enter it each time you generate a file.
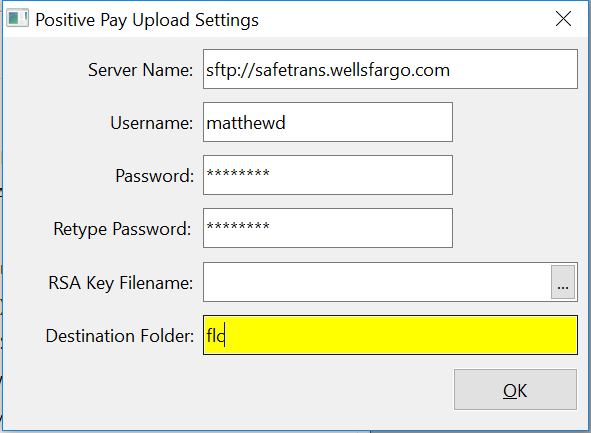
Server Name
Enter the server’s name, with the prefix “sfp://”.
Username
Enter the username that the bank has provided you. This may or may not be the same as your login name for the bank’s web portal.
Password
Enter the password for your username. If the bank has supplied you with an RSA Key that is encrypted, enter the password for the RSA key.
RSA Key Filename
If the bank has supplied you with an RSA key to use instead of a password to login to the Secure FTP server, select the filename for the RSA key here.
If multiple users will be uploading positive pay files, then you will need to either store the key file on a shared network drive that each user has access to or store the key file in the same location on a local drive on each workstation.
Destination Folder
Enter the destination folder to upload the file to.
If your bank has certain naming conventions or standard for the positive pay file itself, make sure to enter an appropriate name for the Export Filename before exporting the file. The program will upload the file with the same name that you enter in the Export Filename entry.