Cost Center G/L Accounts
When you sell product grown by your own company, this window can be used in conjunction with the “Income Method” setting in your Grower account to set up separate income accounts based on commodity. It can also be used to post income to assigned cost centers, based on the product codes used on the invoice.
Follow these steps to set up and use this method.
-
Go to Growers > Utilities > Cost Center G/L Accounts.
-
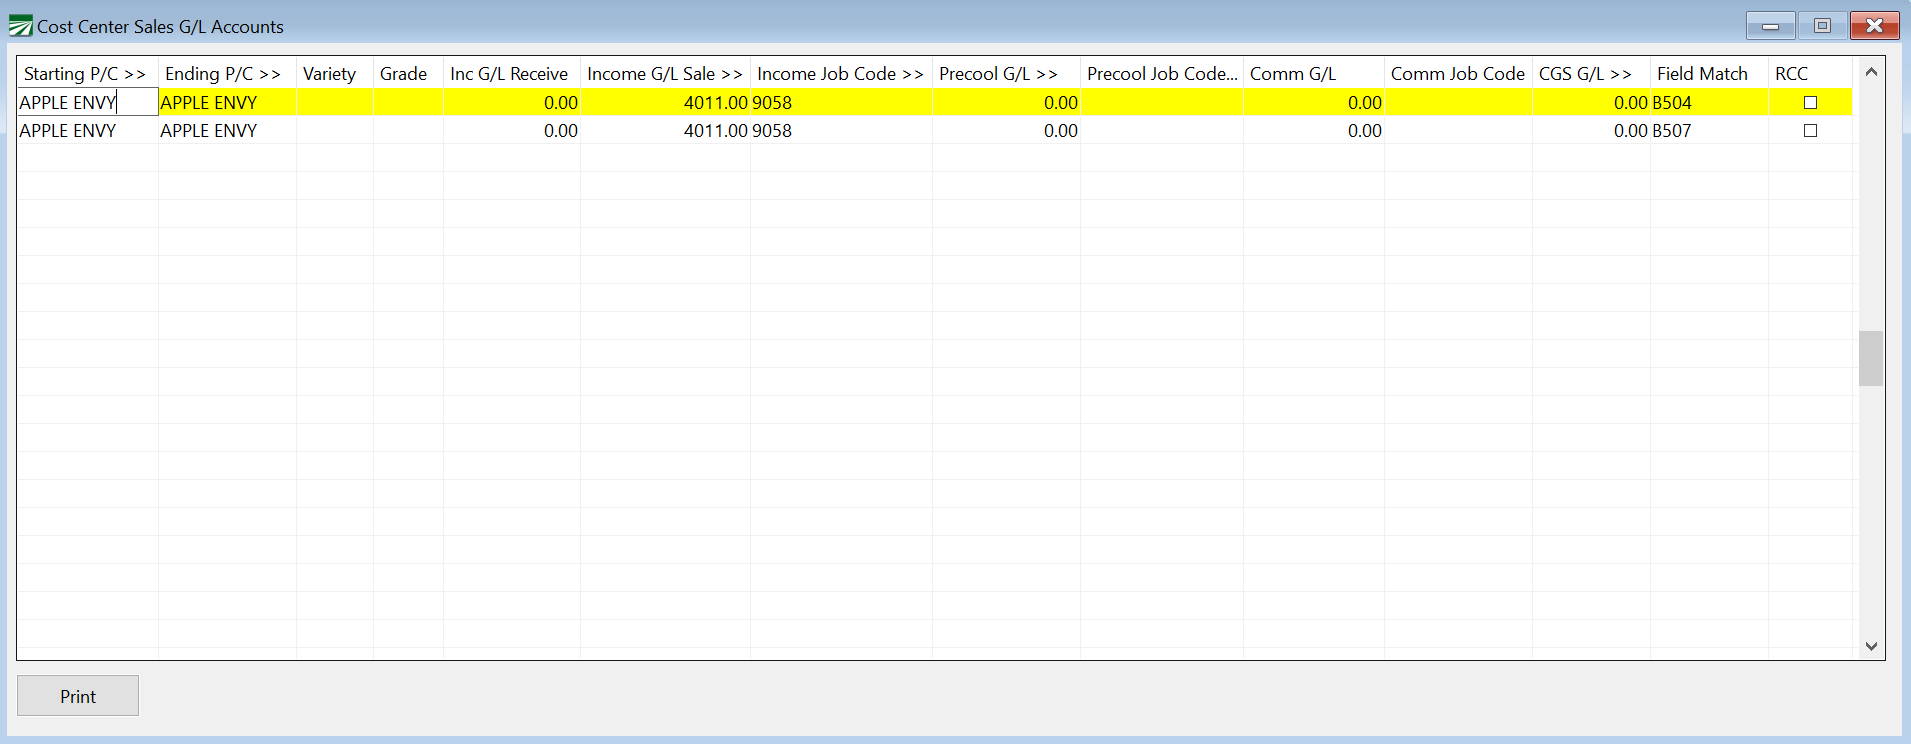
Start by entering the Starting and Ending Product Codes. (You can also specify the Variety and Grade if the G/L accounts are specific to them.)
-
Inc G/L Receive
-
Income G/L Sale
-
Income Job Code
-
Precool G/L
-
Precool Job Code
-
Comm G/L
-
CGS G/L
-
Field Match
-
RCC
-
Note When you have finished entering your lines by product codes, you can continue to Step 2.
-
Go to Growers > Grower Entry and open the grower account you are using for your company.
-
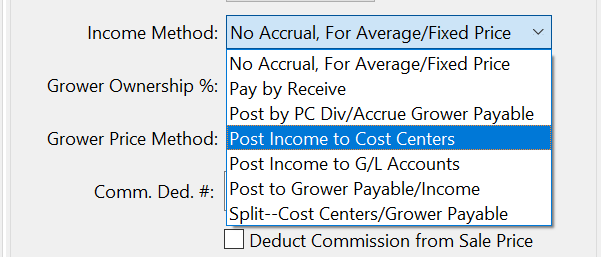
Select Post Income to Cost Centers on the Income Method drop-down menu.
-
Click Save and restart your Datatech Program. Now, whenever those product codes are finalized on a receivables invoice from your Grower account, the income for these product codes will post to the assigned accounts.
Additional Information and Examples
This table determines where income is posted to for product that your own company grows. In the simplest scenario, all income would be posted to a single General Ledger account in your Income section. A single entry would be needed in the table to do this.
In a more complex scenario, you might have multiple income accounts to which sales need to be posted. For instance, you might have separate accounts for different commodities, or separate accounts for organic produce vs. conventional produce.
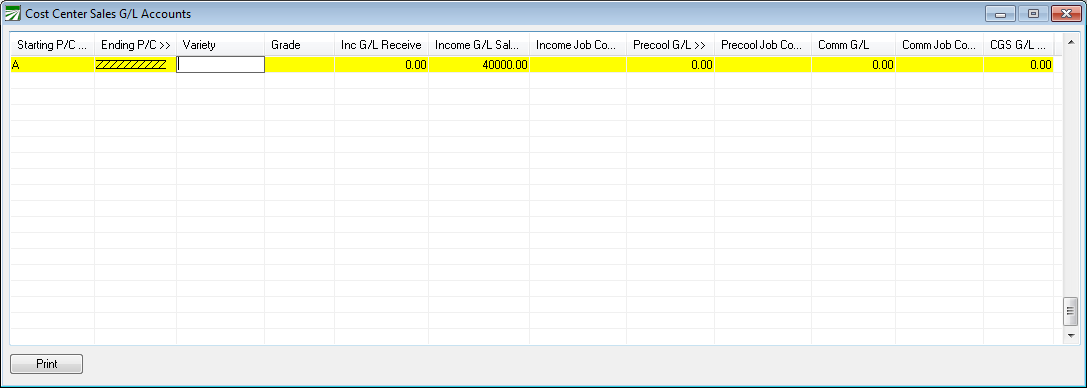
Each entry in the table is based on a starting and ending product code range. For the simplest scenario where you are posting all income to a single G/L account, you can set up a single entry as shown above that will apply to all sales. Using “A” and “ZZZZZZZZZZ” for the starting and ending product code range will ensure that this entry will apply to all sales.
At a minimum, you must supply a G/L account in the “Income G/L Sale” column. You may also enter a job code if you want this to be used on the income line that is generated.
If you charge a commission to the farming side of the business (just as you would charge a commission to an outside grower) then you can set a commission rate in the grower file and supply a General Ledger account to which to which the commission expense can be posted. A job code may also be entered for the commission expense. When you charge commission, you must also enter the grower clearing account in the CGS G/L column.
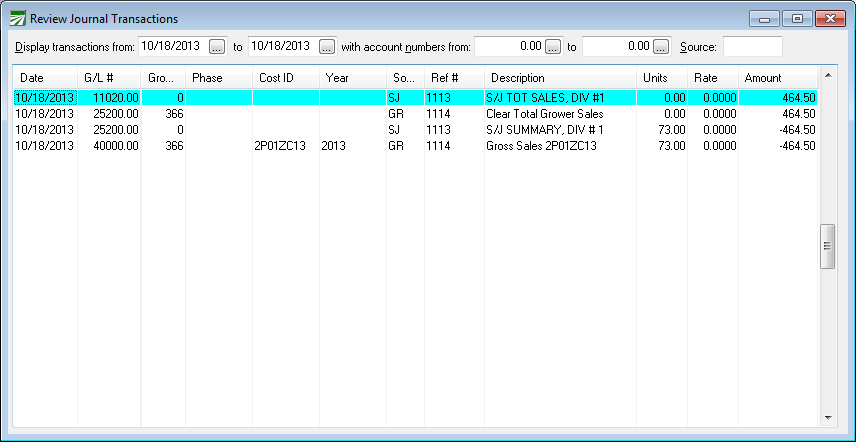
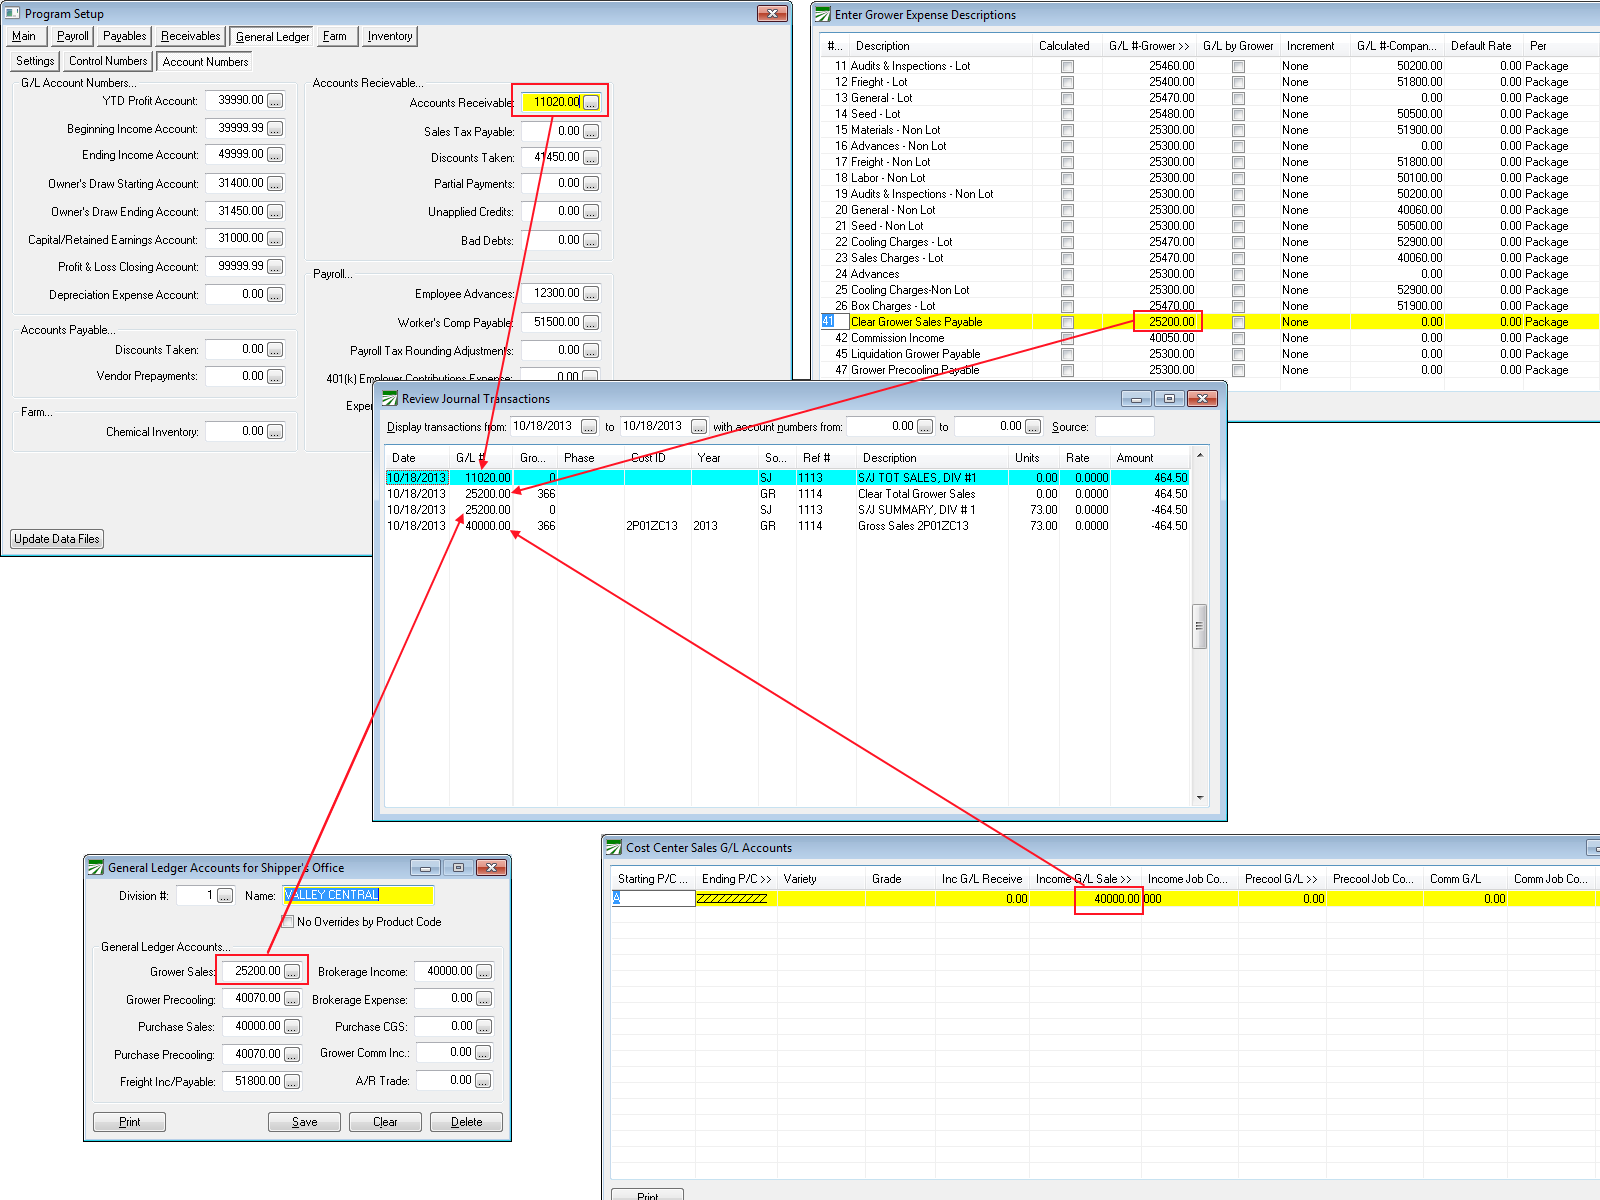
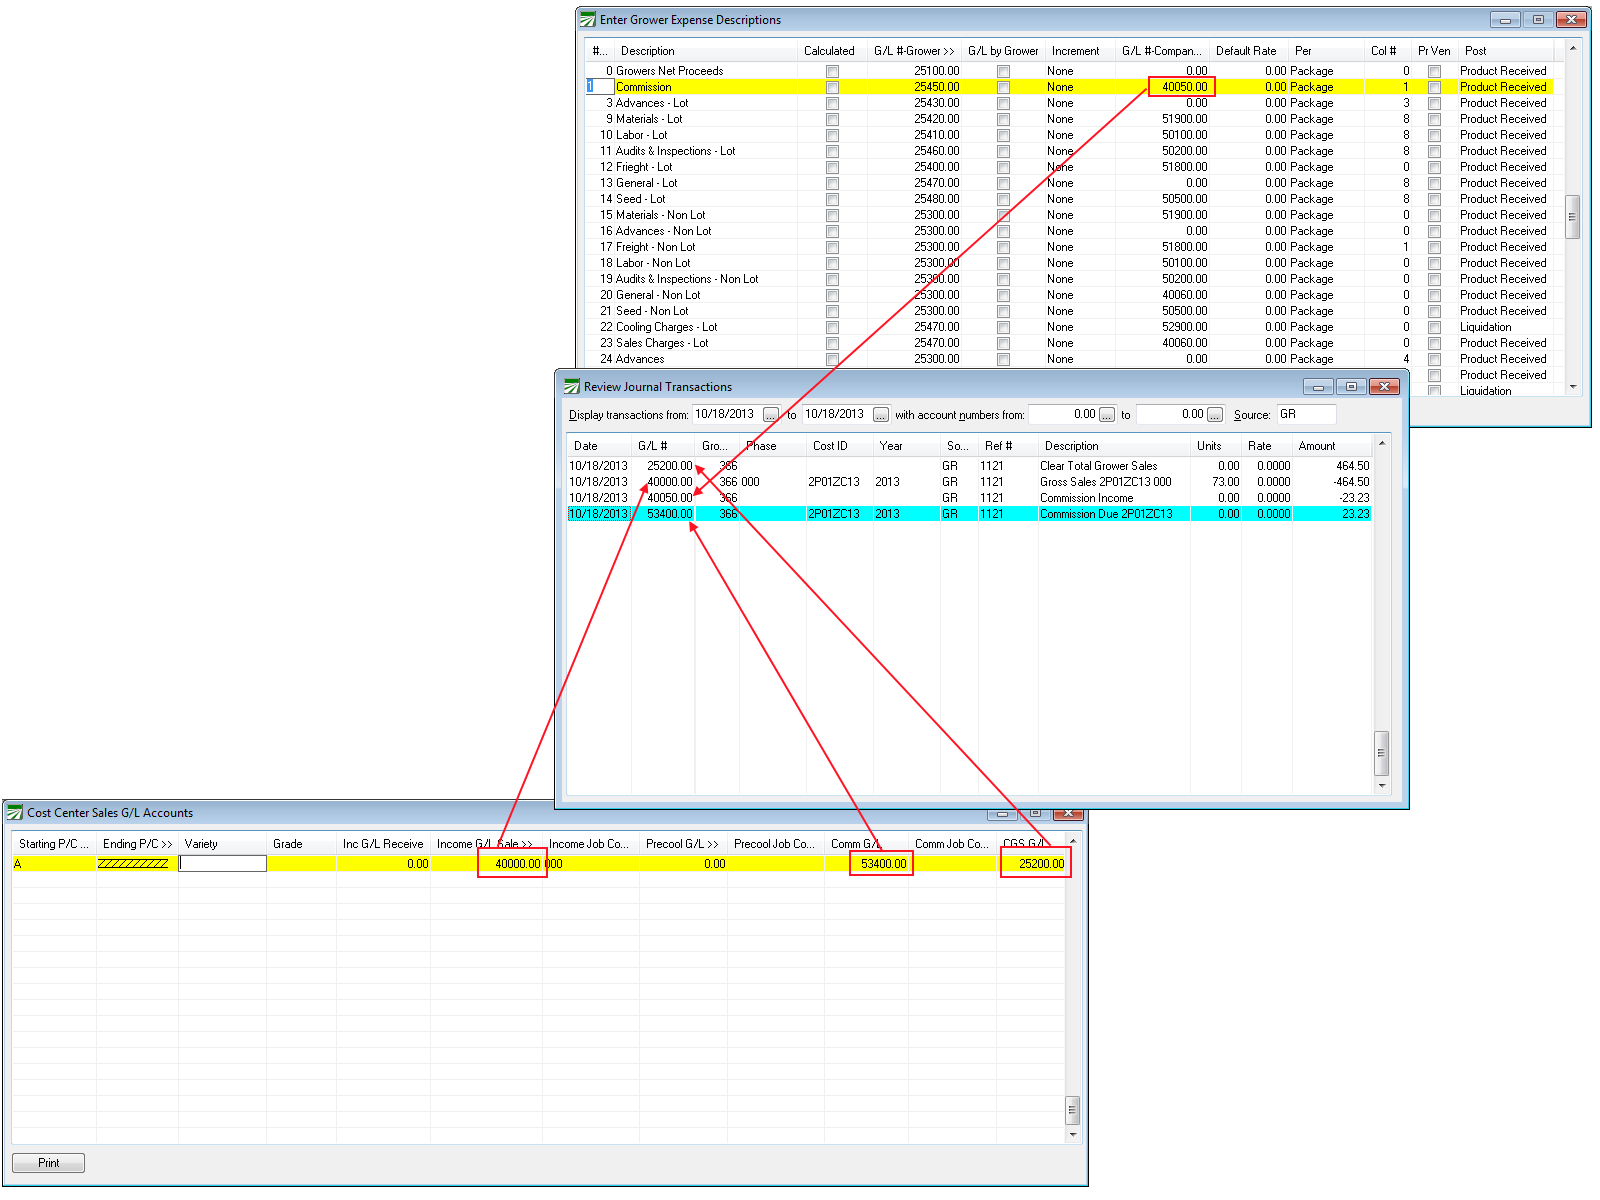
The following Review Journal Transactions window shows the entries that will be generated in the most simple situation. Two transactions are posted by the Sales Journal, a debit to A/R Trade and a credit to the Grower Clearing account (25200). Next, the Grower Accruals post a debit to the Grower Clearing account (leaving a zero balance in this account) and a credit to the Vegetable Sales account (40000). The credit to Vegetable Sales includes the Cost ID for the field where the product came from. The next section explains how this happens.
The following illustration shows where all of the General Ledger account numbers are set up for the example shown above:
The following screenshot shows a more complex example of how the Cost Center G/L Accounts table can be set up to post to different General Ledger accounts depending on the product code used:
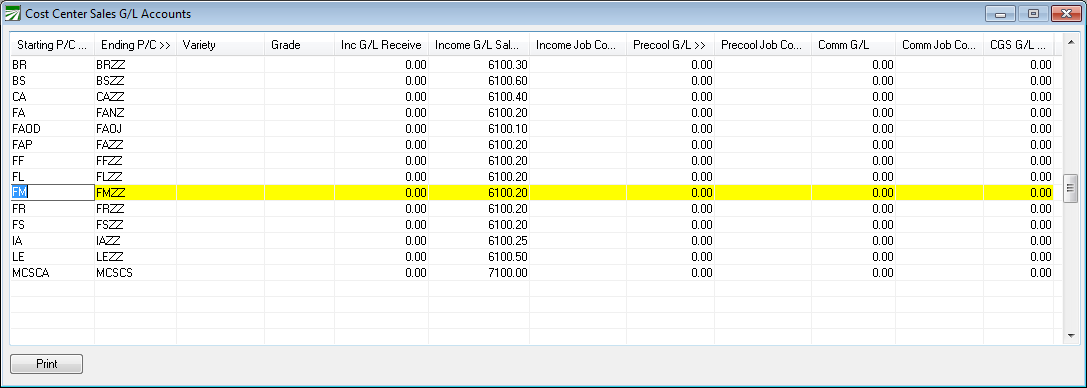
In this case, most product codes have a two-letter prefix: all of the broccoli product codes start with “BR”, Brussel sprouts with “BS”, lettuce with “LE”, etc. The Starting P/C column contains the abbreviations, while the Ending Product Code includes the abbreviation plus “ZZ”.
Note that what has been entered for the starting and ending product codes does not actually exist in the product file. Rather, the starting and ending product codes are designed to capture all of the codes in between. This is important to note because if you use actual product codes for either the starting or ending column, it is possible that at some point in the future you might set up a new product code that doesn’t get included in an existing entry in this table.
For instance, suppose you use “CUXL” as the ending product code on one entry, and later create a new product code call “CUXXL”. Because the new product code is after the ending code, the Grower Accrual report will give you an error because it won’t be able to find an entry in the table that matches the new product code.
Lot Numbers and Cost Centers
On the inventory and sales side, all product is identified by the grower and lot #. On the farming side, income and expense are identified by cost center. The key to getting your income posted to the right cost center is to set up lot numbers and cost centers that match.
Here is an example of a series of lot numbers:
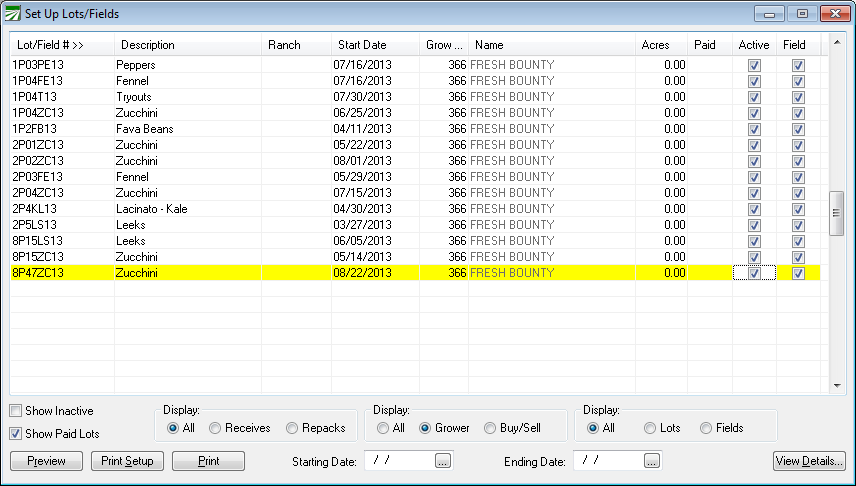
And here is the cost center that corresponds to the lot number that is highlighted above:
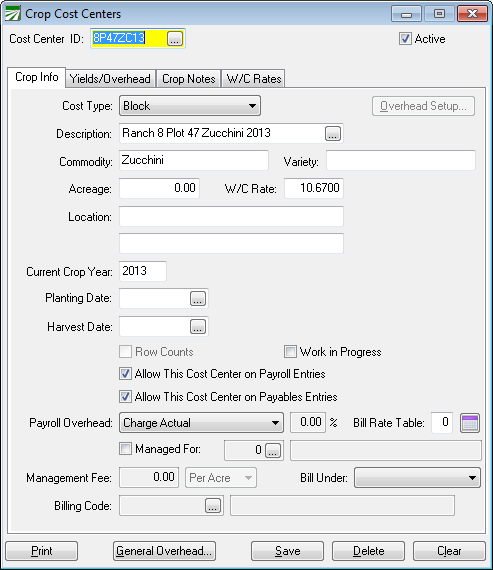
If sales have been posted to a lot number for which a corresponding cost center has not been set up, the program will display a warning message when you run the Grower Accrual Report, and the report will not run and post the grower accruals to the General Ledger until this has been corrected.
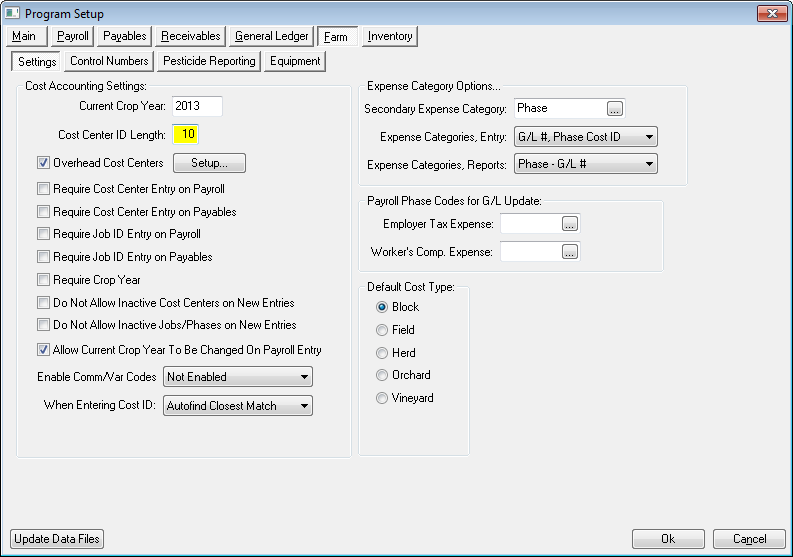
By default, cost center ID’s have a maximum length of eight characters and lot numbers have a maximum length of ten characters. As long as you set up cost centers first, this should never be a problem. But if you find that you need to use all ten characters available for the lot numbers, you can increase the size of the cost center file to match.
Go to Tools > Program Setup > Farm > Settings option. Enter 10 for the Cost Center ID Length and click on the Ok button. A database update will then need to be done to expand the Cost ID fields in the database from eight to ten characters.
Examples and Sample Reports
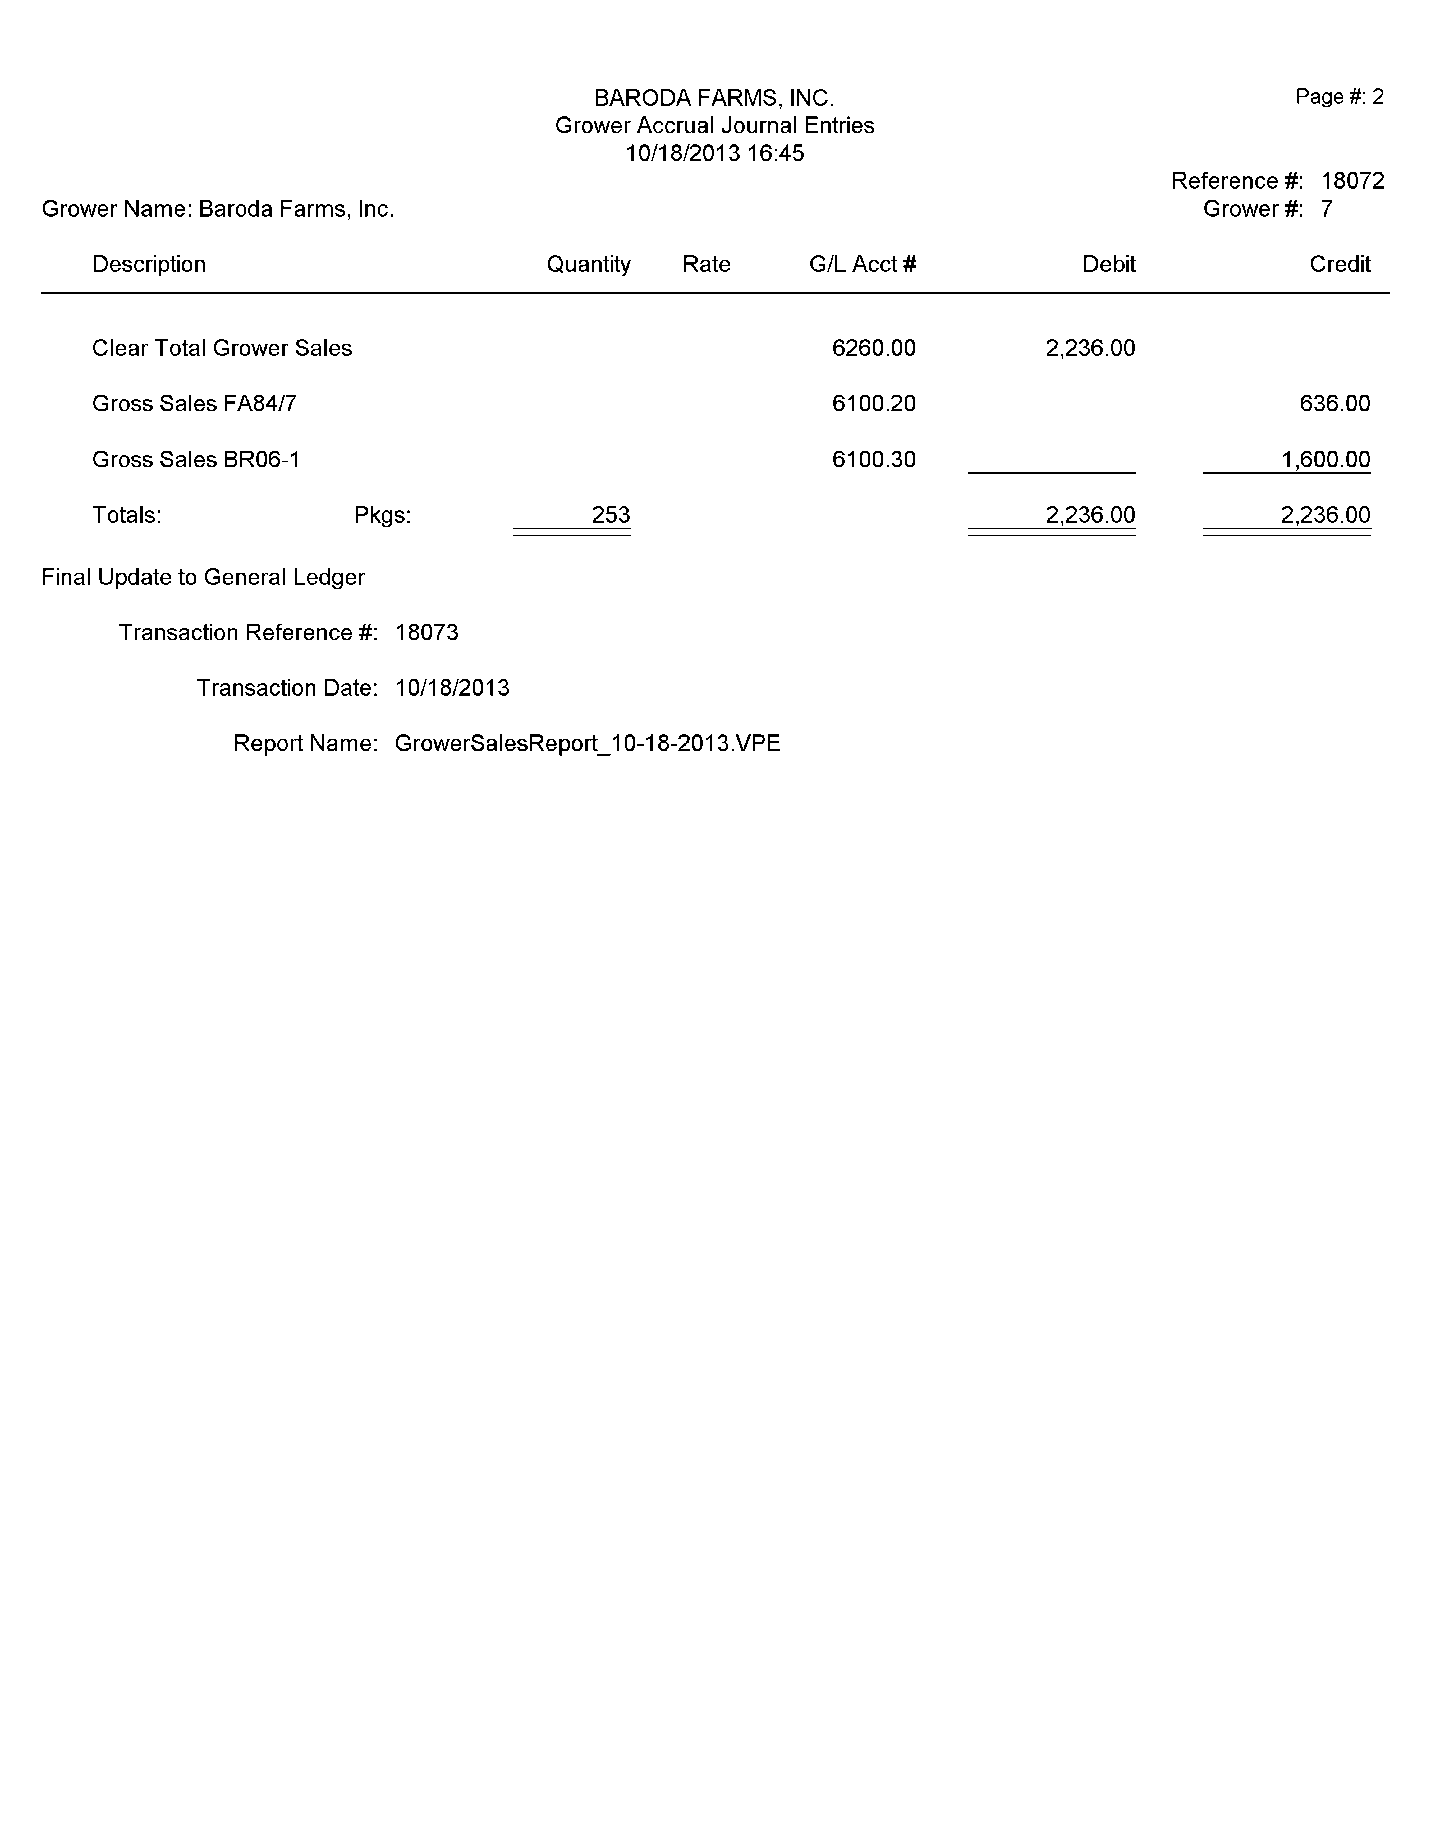
The following grower accrual report shows a sale where commission is charged.
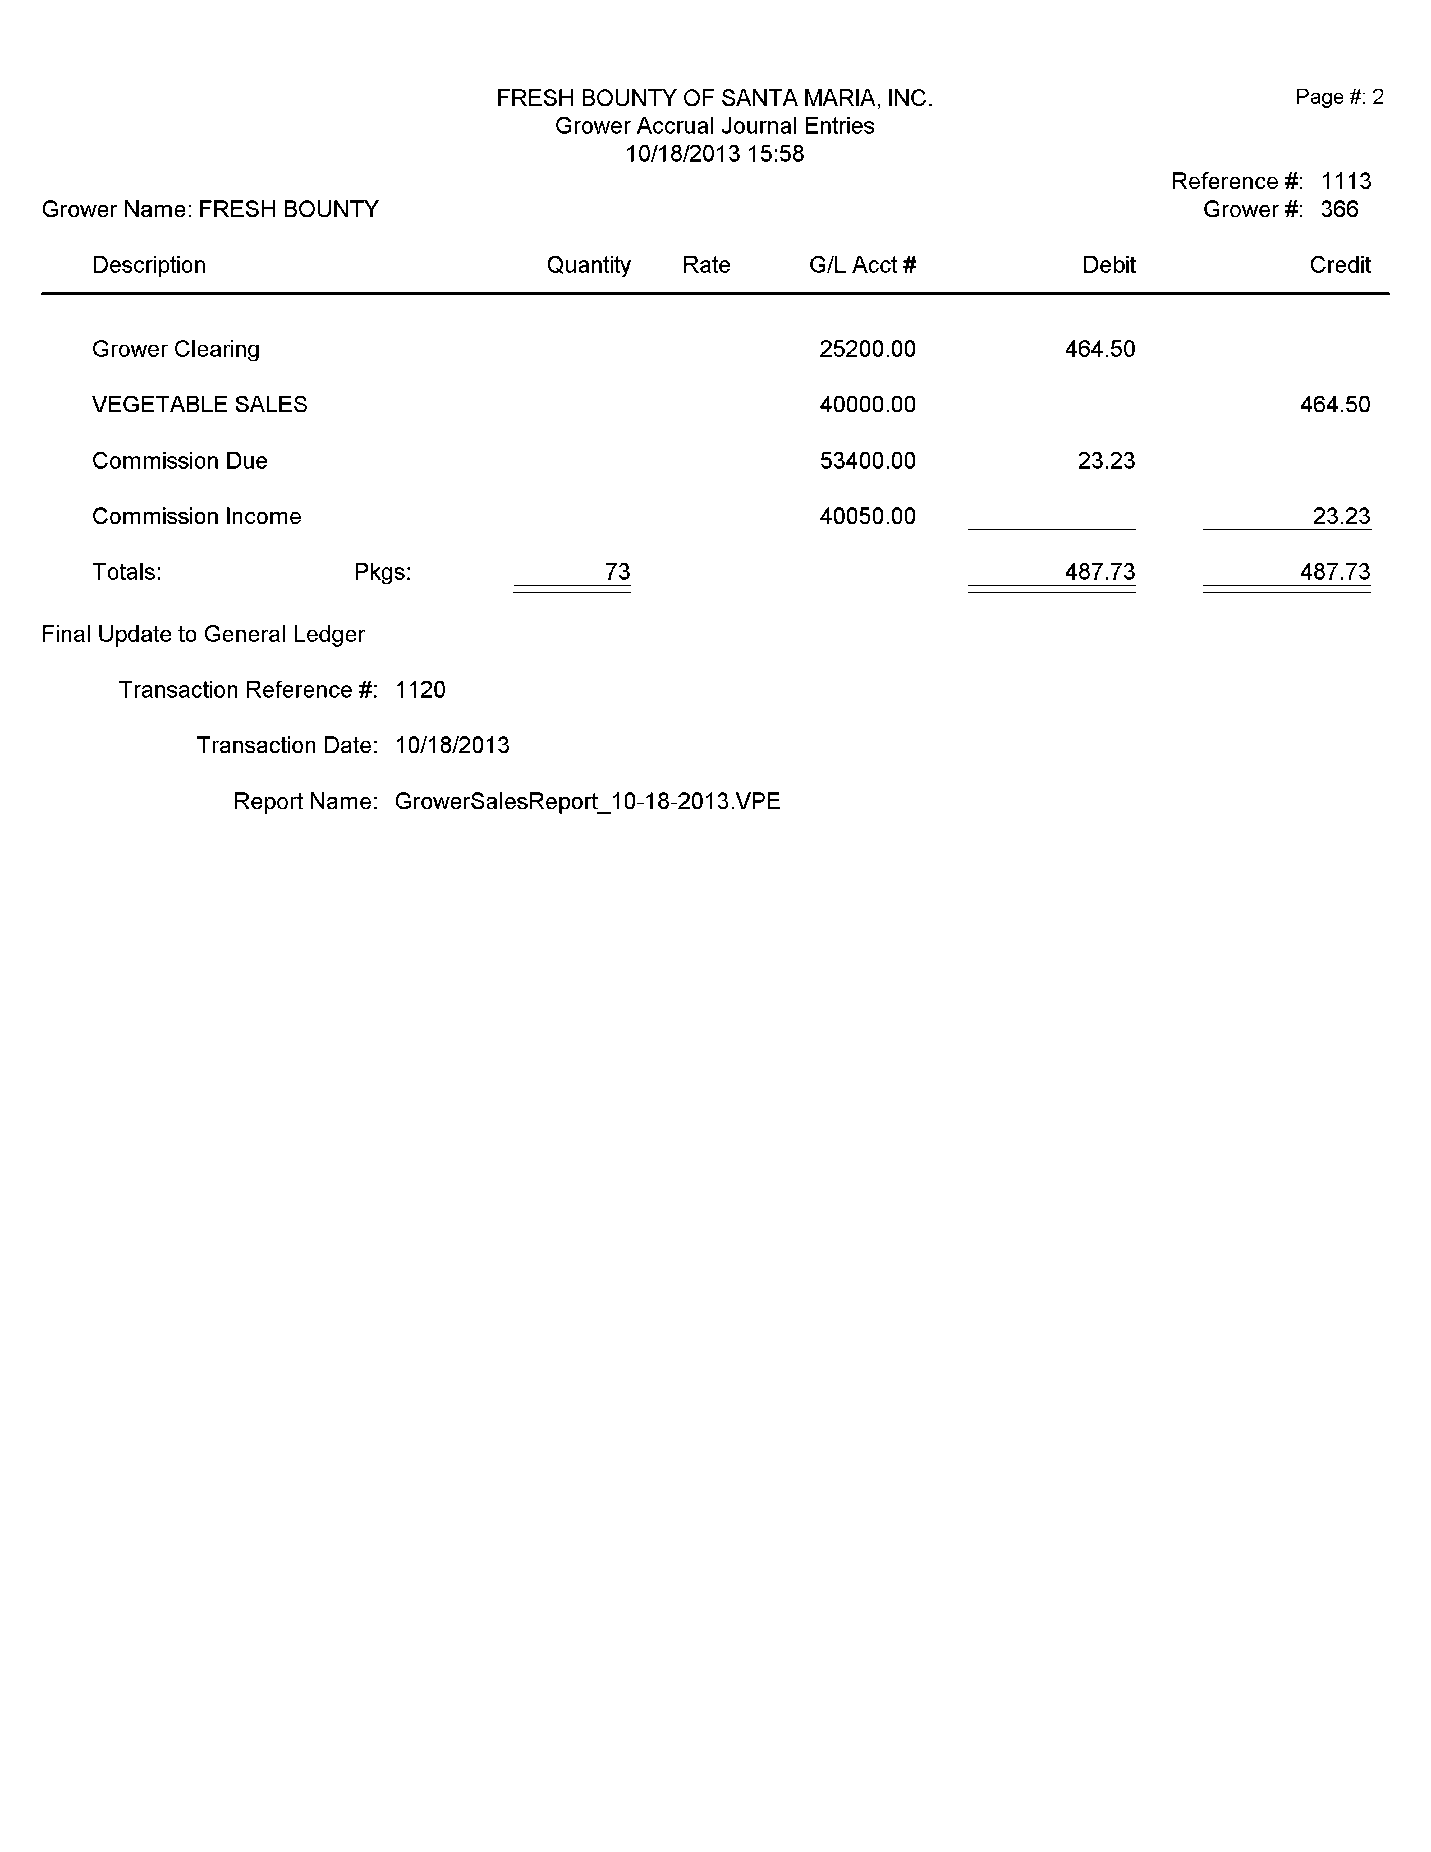
Note that for the commission, an income account is credited while an expense account is debited. This of course results in no net change to overall profit or loss because the commission cost is booked as an expense while at the same time the commission is booked as income. However, the expense side of the transaction is posted with the cost center. This means that the commission will be charged to the cost center and a commission expense will appear on the cost accounting reports.
Here are the same transactions shown in the Review Journal Transactions window showing the cost center on both the sales income and the commission expense:
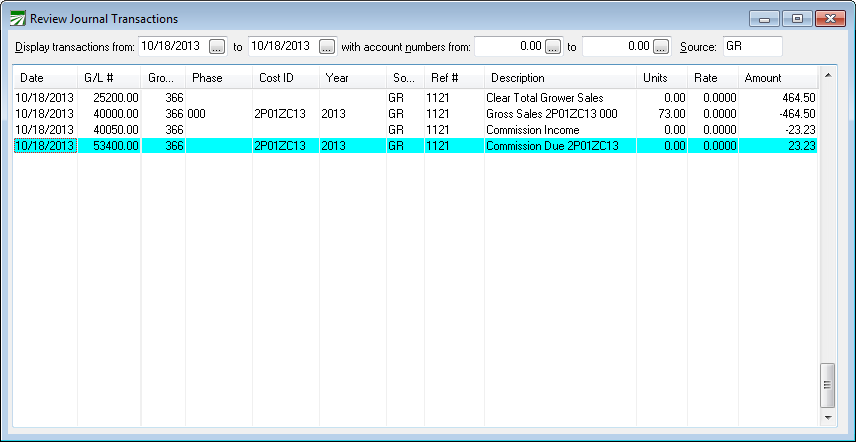
Note that on the income transaction, the Units column will have the number of packages sold.
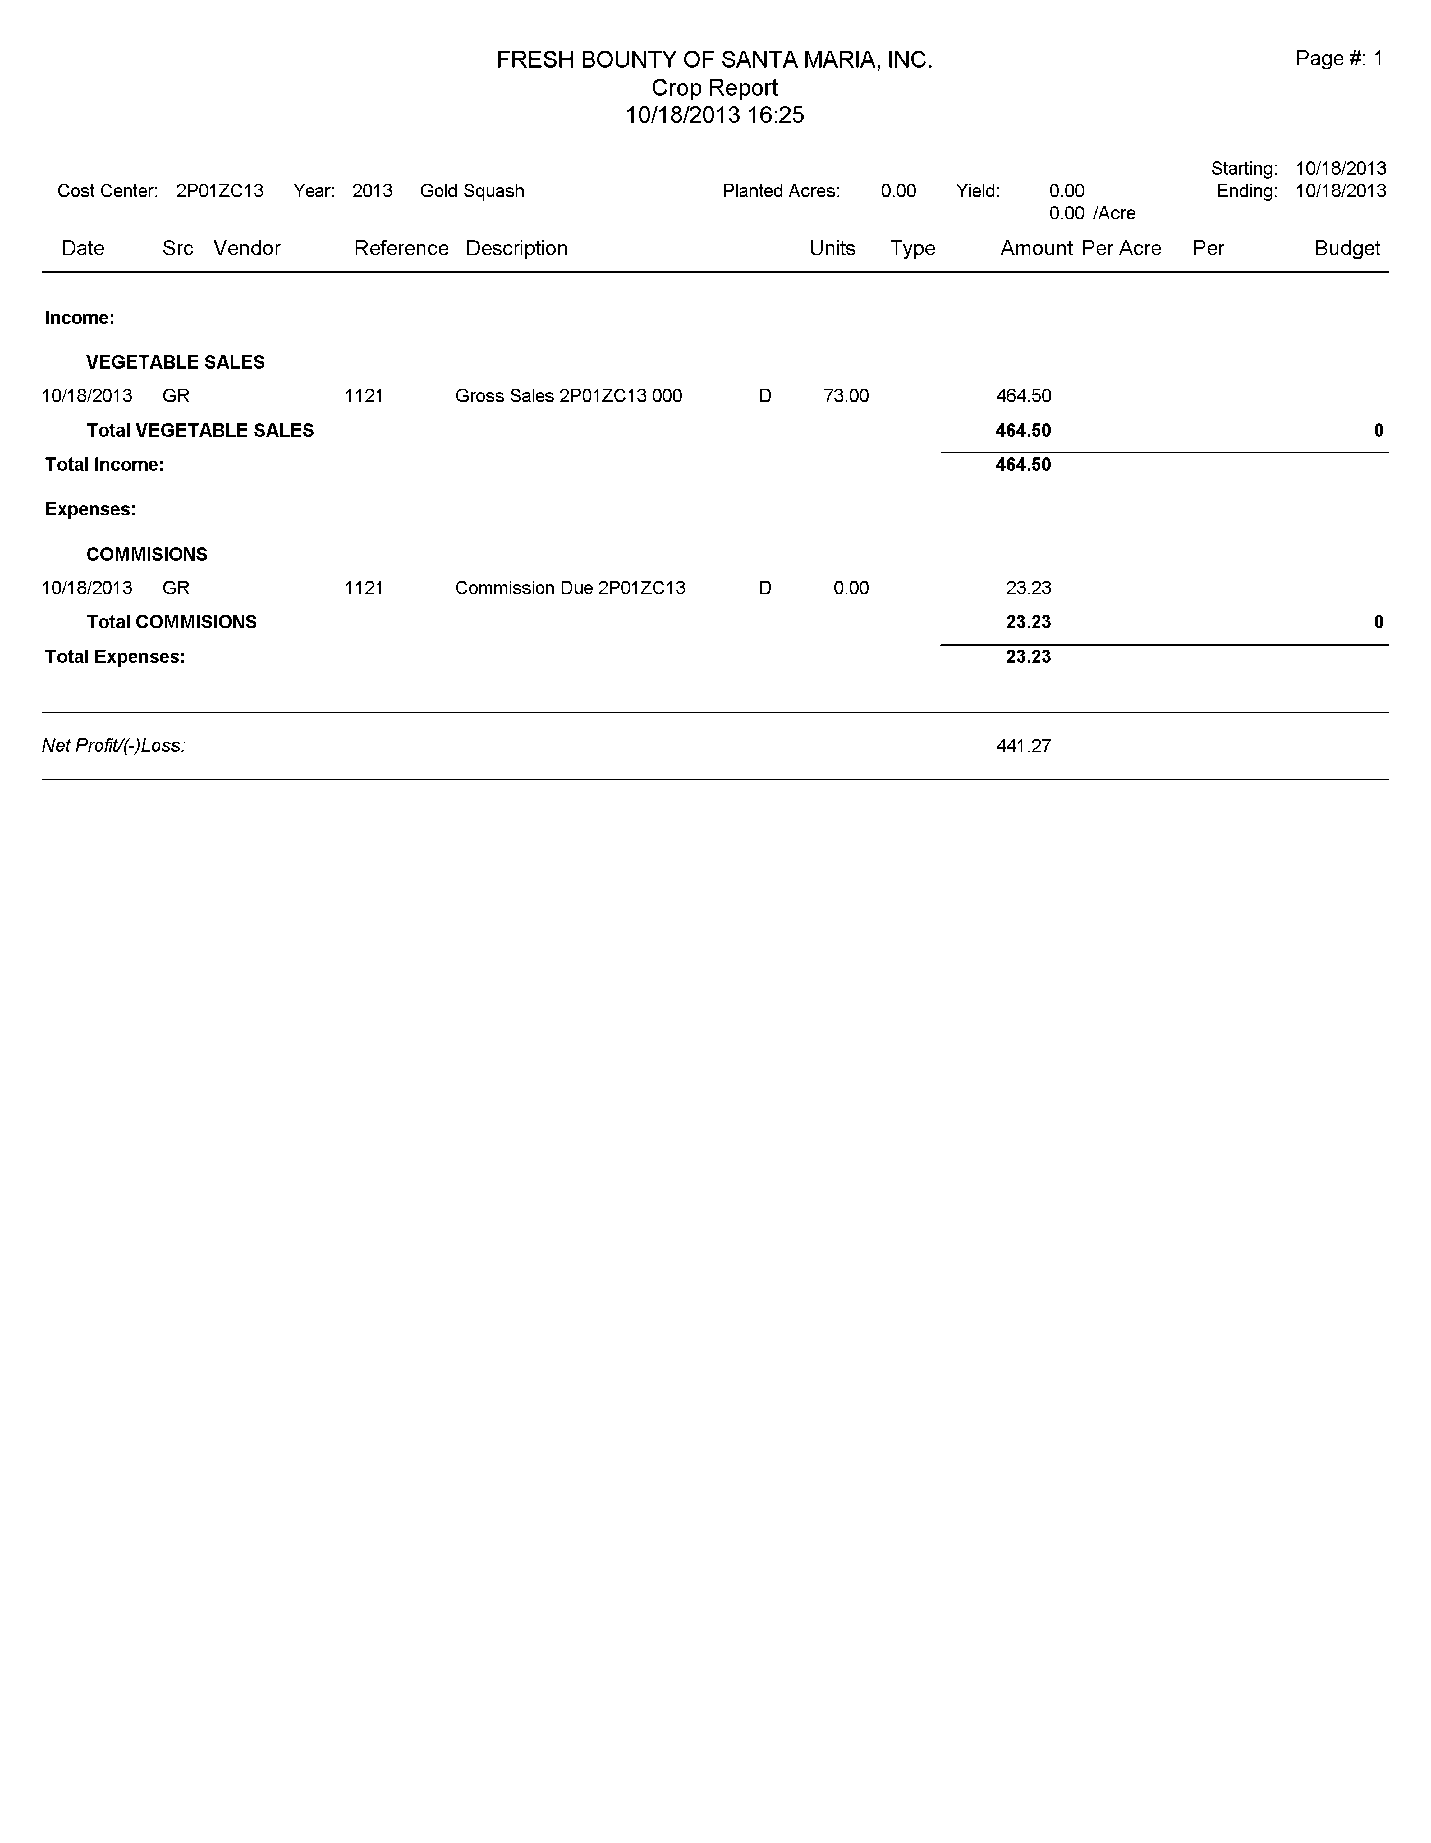
Finally, here is the Crop Report showing the two transactions:
The following illustration shows where the G/L account numbers are set up for this example:
Posting Income to Multiple Accounts
The following reports shows income being split between two different accounts:
In this case, two different product codes were billed on a single invoice, and the income for each commodity is booked to separate account and cost centers:
