CHEP Pallet Shipments

This report will list orders that deal with different kinds of pallets, including CHEP and RPC pallets. You can filter this report by Date, Location, and type of pallet.

Go to Order Entry > CHEP Pallet Statements.

A screenshot of a computer

Description automatically generated

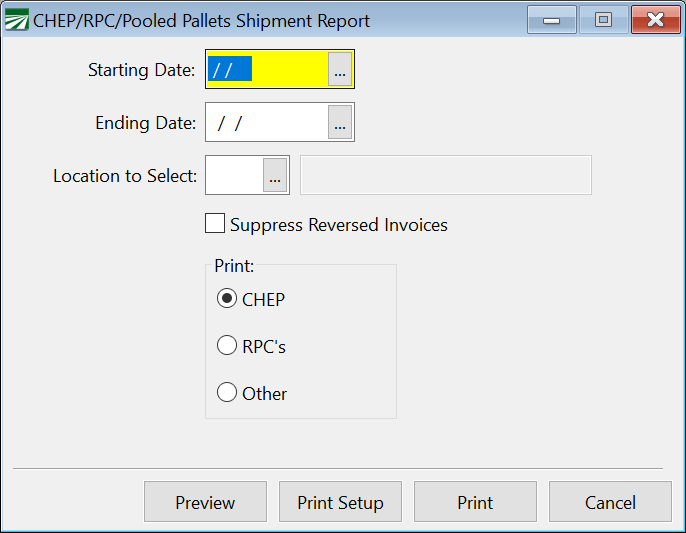
Starting Date / Ending Date

Run this report for a specific date range by entering the starting and ending dates in these two boxes.

Location to Select

Run this report for a specific location by entering it in this box.

Suppress Reversed Invoices

When this box is checked, the report will suppress Reversed Invoices.

Print Options

Select what to print. Select from: CHEP, RPC’s, or Other.

CHEP & BROWN Pallets Workflow

Follow the steps in the chart below to Receive, Relieve, Report, and Expense CHEP and BROWN Pallets.

These instructions assume CHEP and BROWN Pallet Stock #’s have been entered in Inventory Entry > Packing Materials and that they are included in the Parts Entry for each Product Code, Pack Style, and/or Size.

Also, that a Cert Company has been designated for each Warehouse location from which Pallets are shipped. These can be set up under Shipper Certifications.

A Global ID should be assigned to each shipping warehouse. Global IDs should be entered for each receiving location in the Customers database. This entry is made in the Ship-To Locations tab by editing each location.


Workflow

Steps

1.Order Pallet Inventory

  • Go to Materials Inventory > Purchase Orders > Purchase Order Entry.

  • Tab past the P.O. # entry to the Vendor or Name Key entry and select the vendor account.

  • Tab to the Ship To entry and select the Warehouse where the product will be received.

  • Tab through the Order Date to autofill the current date.

  • Tab to the Required Date entry and enter your expected receiving date.

  • Tab to the Ship Via entry to enter truck broker information, if needed.

  • Tab to and set Frt Terms, if needed.

  • Tab to Job Num and Comments and add any needed information.

  • Click into the Deptstock entry in the grid.

  • Enter the items being purchased, being sure to enter the Quantity in the # Ordered Column.

  • Please note the Purchase Order number and click Save to finish.

2.Create Pallet Tags

  • When creating Pallet Tags, ensure the Type of Pallet code is entered. C for CHEP and B for BROWN.

3.Scan Tags to Orders

  • As orders are shipped, scan the Pallet Tags into each order.  The software will automatically track which pallets have the CHEP or BROWN codes.

4.Receive Pallet Inventory & Create Payable

  • When an invoice for pallets is received, return to the Purchase Order number entered above.

  • Tab to and enter the Date Recd, then select the Received checkbox.

  • The program will ask if you would like to Receive All Lines. Do NOT answer Yes, as the program will automatically enter the full-received quantity on all line items. 

  • Answer No, and manually enter “Issues” quantity from the invoice in the # Received column of the line item.

  • Tab to and enter the G/L#>>, and then select the B/O checkbox.

  • Now click Back Order. A dialog will ask if you want to create a backorder for the remaining quantity.

  • Click Yes and a new P.O.# will appear with a .01 suffix and only the remaining back order quantity showing for the line item.

  • Place your cursor in the P.O.# entry and press F7.

  • The previous P.O.# without a suffix will appear showing only the “Issues” quantity received.

  • Click Purchase to create a Payable Invoice.

  • A dialog box will open asking “Finalize and update AP?” Click Yes.

  • An Additional Invoice Data window will open.

  • Verify the correct Vendor account, Invoice Date, Invoice Number, Invoice Total, Terms, and Due Date are filled in to each entry.

  • Make sure the Ok to Pay? checkbox is selected and click OK.

  • A dialog box will inform you the AP Invoice has been saved. Click OK, then click Save to clear the P.O. window when finished.

  • When the next Invoice is received for this P.O., use the lookup to select the P.O.# that has the correct suffix (.01, .02, etc.).

5.Relieve Pallet Inventory and Expense Pallets to Grower/Lot

  • After a Payable Invoice has been created for the previous week of shipments, go to Inventory > Inventory Receives.

  • Use the Receiving # or Lot #/Load # lookup to retrieve the first Receive for the first Packout of the previous week.

  • Click Material Costs.

  • In the Create Fiber Inventory Transactions window, click Create Entries.

  • The software now calculates and displays the quantity of packing materials, including CHEP and BROWN Pallets that will be expensed to this packout and relieved from inventory.

  • Since both CHEP and BROWN pallet quantities appear, the user may now edit the quantities of each Type of Pallet to indicate the actual quantities used in the Packout.

  • For example, if all the pallets used were CHEP, simply zero the quantity of BROWN pallets.

  • To edit the quantity, highlight the line and press Enter.

  • The software will ask: Adjust Quantity Used? Click Yes.

  • A dialog box will ask you to enter a New Quantity.

  • To change the quantity to zero, simply click OK.

  • The software will ask: Do you want to change the quantity to zero?

  • Click Yes. A dialog box will acknowledge the change.

  • Click Close. A dialog box will ask: Create journal entries for packout costs? Click Yes to confirm the materials.

  • Repeat the process above with all remaining Inventory Receives for the previous week.

6.Create & Upload CHEP Report

  • Go to Order Entry > CHEP Pallet Shipment Report.

  • Enter the Starting Date for the Shipments you wish to report.

  • Tab to and enter the Ending Date.

  • Tab to and enter the Warehouse in the Location to Select.

  • Ensure the CHEP report is selected in the Print section.

  • To create an Excel or CSV file, enter a filename in the Export File Name entry using the respective .xls or .csv extension.

  • Click Browse to select a folder location to save the report.

  • Click Preview to generate the report.

  • Upload the Excel or CSV file to the CHEP website.

Note: The export file is not currently available for BROWN.