Backup & Restore
How to Backup Your Data
The Backup & Restore option is located on the Tools menu. This option will create a backup of your data files only. It does not backup program files or any of the “support” files necessary to operate your Datatech Accounting Software. The backup file is a standard compressed ZIP file which can be read by many different programs (e.g. WinZip). Windows XP also includes direct support in Explorer for reading files stored in a ZIP file.
The Restore option will “unzip” the files stored in a backup file, replacing the files in your current company. You should exercise great care when using the Restore option. The Restore operation overwrites your current files. Therefore, if you restore the wrong files and do not have actually have a backup, you will lose your data. Datatech cannot assume any responsibility if the Backup and Restore options are not used properly.
If you are currently using a backup program, you may not need to use the Backup option built into your Datatech Accounting Software. Your backup job may be backing up the entire program directory (not just the data files) as well as other important data files (word processing documents, spreadsheets, etc.). Also, if you have multiple companies, you will probably find it more convenient to continue using your current backup software since it can backup data files for all of your companies at the same time.
Backing Up Data
When you select the Backup and Restore option from the Tools menu, the following window will open:
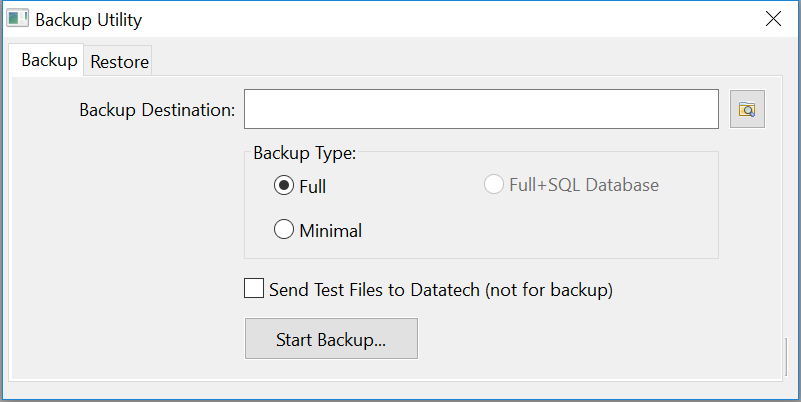
By default, the program will create a “Backups” directory underneath your main program directory (normally “Winfarm” or WinLCO”). This means that your backup files will be created on the hard drive of your computer or the server’s hard drive (if you are working on a network).
Normally, you do want to create the backup file on some kind of removable media, such as an Iomega ZIP disk, flash memory stick, or an external hard drive. Standard 3.5” floppy disks can be used for backups, but this is usually not the best solution. First, a floppy disk does not hold much information (1.44 megabytes, compared to 100Mb for Iomega ZIP disks). Second, floppy disks can be unreliable, and one disk with a read error may mean the entire backup is no good.
Note that ZIP disks, flash memory sticks, and external hard drives all have enough capacity for multiple backup files. One 100Mb ZIP disk may have enough room for 10-20 backup files, depending on how large they are. While you can put multiple backups on one disk, we still recommend that you use multiple disks. This is because if you have all of your backups on one disk and you lose that disk, you lose all of your backups. Rotating backup media is highly recommended. For example, you might have one ZIP disk for each day of the week. This means you will always have five different backup disks, and if any one of them is damaged or lost, you have a previous day’s disk to restore from.
Additionally, it is important to have an off-site backup. For example, if you are using ZIP disks for your backups, you may want to take the most recent backup disk home with you. In case of fire or theft, you will still have a backup to restore.
If you are backing up to a ZIP disk, flash memory stick, external hard drive, or other media, be sure to change the Backup Destination entry to the appropriate drive letter.
Another thing to keep in mind when using removable media (such as ZIP disks) is that you may need a drive to restore backups; if your computer with an internal ZIP drive is stolen, you’ll need to have another computer with a ZIP drive (or an external drive) to restore your backup. This is one reason why USB flash or hard drives are convenient; you can just plug them into another computer and restore your backup.
If you are on a network, note that it is also possible to back up to a shared network drive. For instance, if one of your workstations is designated as a “backup server” in case your main server goes down, you can create a backup on that computer’s hard drive, making it easy to restore your data on that computer and continue operating while your server is being repaired.
There are two other options on the Backup window. First is the Backup Type. You can select either Full or Minimal. A Full backup will include all data files with their index files. A Minimal backup will include just the data files without the index files. When a Minimal Backup is restored, the files will be need to be reindexed. This will be handled automatically by the Restore option. A Minimal backup will require less space than a Full backup. This may be more of a consideration if you are using floppy disks to back up. If you are using larger capacity backup media, we suggest using the Full backup.
Second, there is a checkbox called Send Backup to Datatech. If you have internet access, this option can be used to send a copy of your files to Datatech to diagnose a problem. After the backup file has been created, the program will automatically upload the file to our server. You would normally not use this option unless you are working with Datatech Customer Support.
Warning If you are on a network, make sure that all users have exited the program before starting the backup. If the Datatech Accounting software is open on other computers, the data files will be in use and cannot be backed up.
As mentioned before, the program creates a standard ZIP file when a backup is done. This filename of the ZIP file is based on your company name and the current date. For instance, a backup done for “Richard’s Farming, Inc.” on 12/20/23 will be called “RICHARDS_FARMING_INC_12202023.ZIP”. Because the date is a part of the filename, a single drive or folder can contain multiple backup files. But this also means that you can only have one backup file per day on a single driver or folder.
Click on the Start Backup button to begin the backup. The window will expand and you’ll see a status line, progress bar, and results box that shows the progress of the backup operation:

When the Backup is done, Results box will show whether or not the backup completed successfully:

The actual number of files backed up may not be the same as shown above, depending on what software you’re using and whether you are doing a Full or Minimal backup.
Sometimes there may be errors during the backup process. Normally, you do not need to worry about warning errors, as shown below:

In this case, the backup did not find any QDF files (Query Definition File) which would be the case if you don’t use the Query option on the Tools menu.
In other cases, there may be serious errors:

In this example, the backup was done while the program was open by another user. Data files open by another user cannot be backed up, as indicated by the last line in the results box: “139 files skipped”. If this happens, make sure all users have exited the program (and that you do not have another copy of the program loaded on your computer) and try the backup again.
When the Backup has been completed, the program will be restarted automatically.
Restoring Files
When you need to restore a backup, go to Tools > Backup and Restore, and click on the Restore tab:

Click on the button with the folder on it to select a filename to restore. The backup files may be located in a folder on your computer’s hard drive, on another computer’s hard drive, on a removable disk, flash drive, or external hard disk.
Once you have selected the filename to restore, click on the Start Restore button to restore the file. If you are working on a network, make sure that no users are in the program when a restore is performed (just as is done with the backup option). If the program is open on another workstation, the files will be open and the restore will not be successful.
The restore option overwrites your current data files. The program will remind you of this when you click on the Restore button:
If you want to stop the restore operation, click No. Otherwise, click on Yes to continue. The Restore window will expand to show the progress of the restore operation as well as the results:

When the restore operation is completed, the program will be restarted automatically.
Click here to see the topic: Backup & Updates - Automatic Backups.