Fax and Email Settings
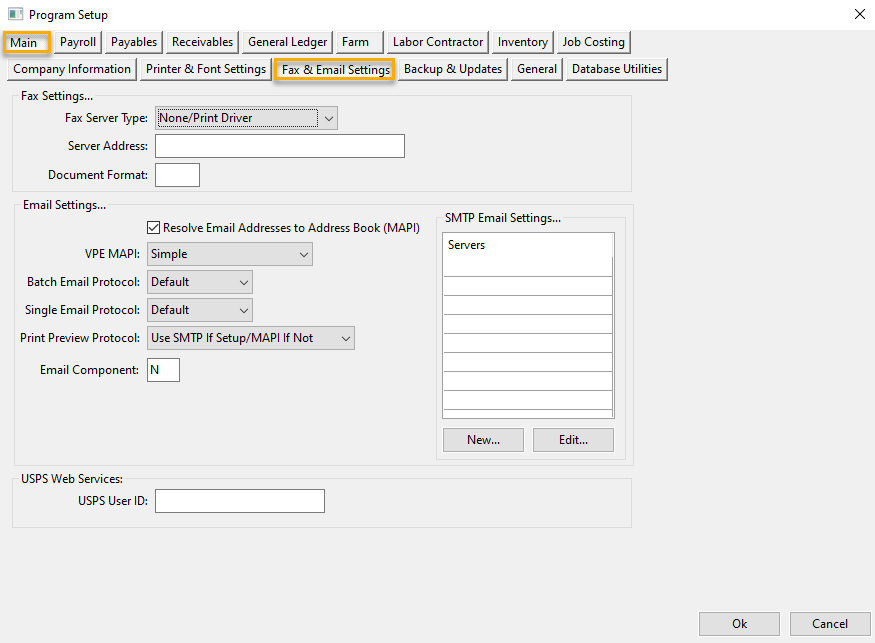
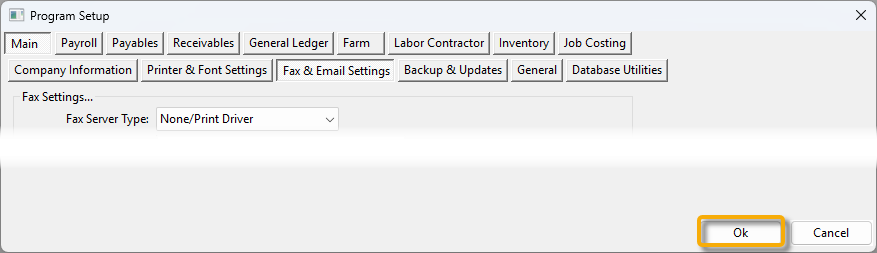
Go to Tools > Program Setup > Main > Fax & Email Settings.
Fax Server Type
Fax Service: This can be used with any online fax service that accepts faxes as emails. Enter the fax service’s email server for the Server Address. Any documents that you want to fax will be sent as an PDF attachment in an email to the address <FAX NUMBER>@<SERVER ADDRESS>.
Faxware/GFI FAXMaker/VSI Fax: These premise-based server options will print the documents to be faxed to the printer driver specified by the Fax Driver. The destination fax number is embedded in the fax document so the server will know to what number the fax should be sent.
For Faxware and GFI FAXMaker, the number is embedded in the following format:
@@NUMBER <FAX NUMBER>@@
For VSI Fax, the fax number is embedded in the following format:
@VFX[tfn=<FAX NUMBER>]
Microsoft Fax Service: The Microsoft Fax Service is a premise-based fax server built into the Microsoft Server operating system.(Refer to the Microsoft Fax Setup section for details on how to set up and use this option.)
Server Address
Enter the name of the server here. For the Microsoft Fax Service, this will be the name of the local server running the service. For an online fax service, this will be the name of the Fax Service’s email server that receive fax requests.
Document Format
For the Microsoft Fax Service, specify the format to use for sending faxes. This can be a bitmap format (e.g. BMP, TIF, PNG) or a document format (PDF/XPS).
Each workstation that sends faxes must have a default application to print files in the format you have specified. For instance, if you specify the PDF format, you must have a PDF viewer/reader applications installed on your workstation.
Microsoft Fax Setup
The server must have the Microsoft Fax Service installed and a compatible fax modem/fax board installed. All workstations must add the Microsoft Fax network printer to the Printers folder to be able to submit jobs to the server.
The Fax Server Type and the Server Address must be entered under Fax Settings:

Email Settings
Once purchased, Datatech Accounting Software can immediately be used to send emails with reports and other documents attached in Adobe Acrobat format. This is done using a protocol built into the Windows operating system called MAPI. This is a simple protocol that lets an email client application tell Windows “I’m the email program. When there are other applications that need to send emails, give me the information and I’ll take care of composing and sending the message.”
When you click Email in the Print Preview window, the program saves a copy of the current document in Acrobat format, then tells Windows that it wants to send an email with the document as an attachment. Your email software receives this information and opens a New Message window where you can enter/edit the destination email address, subject line, and body.
For this to work, you do need an email client installed on your workstations. Your email client software must be configured to use a mail server on your local area network or your ISP’s mail server. Web based email systems (i.e. email accessed through a browser) will not work with MAPI because there is no local email client software for Windows to work with.
Examples of email clients include Outlook, Outlook Express, Windows Live Mail, and Thunderbird; these have all been used with Datatech Accounting Software. Other email clients may work as well as long as they support the MAPI interface.
When MAPI Does Not Work
Support for the MAPI interface is not always reliable. Sometimes it works, sometimes it doesn’t. In those cases where it does not work, an alternative method of sending emails may need to be used.
First, there are both known and unknown compatibility problems with certain combinations of Outlook and versions of Windows. For instance, 64-bit versions of Outlook cannot provide email service to 32 bit Windows applications (such as Datatech Accounting Software). In other cases, Outlook displays a vague error message or sometimes nothing happens at all, and it is not clear whether the problem is with the email client itself or the MAPI interface in Windows. We have seen different issues depending on what version of Outlook the customer has.
If you are having trouble getting the email capability working from the Print Preview window, review Knowledge Base article #216 for suggestions on how to determine what the problem is.
In other cases, the MAPI interface works but it is the wrong tool for the job. Sending mass emails is one of these situations. A virus or worm might use the MAPI email service to read your email contact list and send copies of itself to everyone in your address book. To prevent this type of abuse, Outlook (the most commonly used email program) will pop up an alert every time another application attempts to send an email or access your address book without notifying you. If you are sending out a batch of invoices to many different customers or a hundred quote sheets to your customers, you do not want to click Ok for each one. (This notification doesn’t appear when you send emails from the Print Preview window because the New Message window requires that you click on the Send button.)
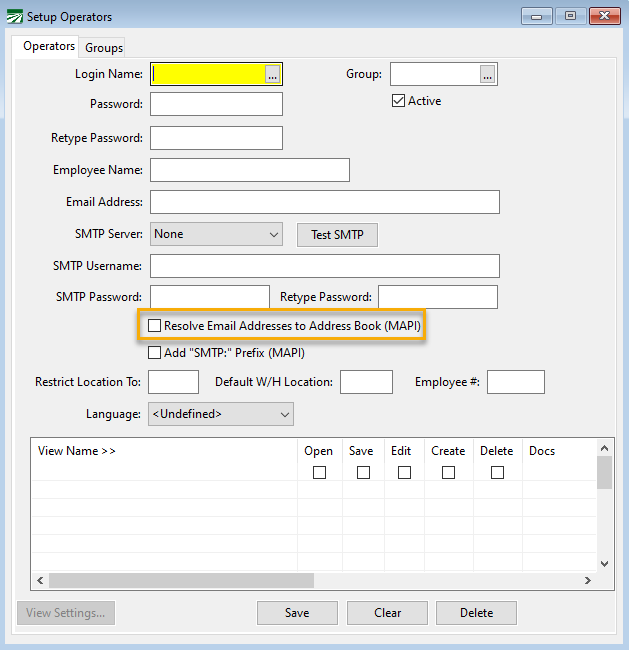
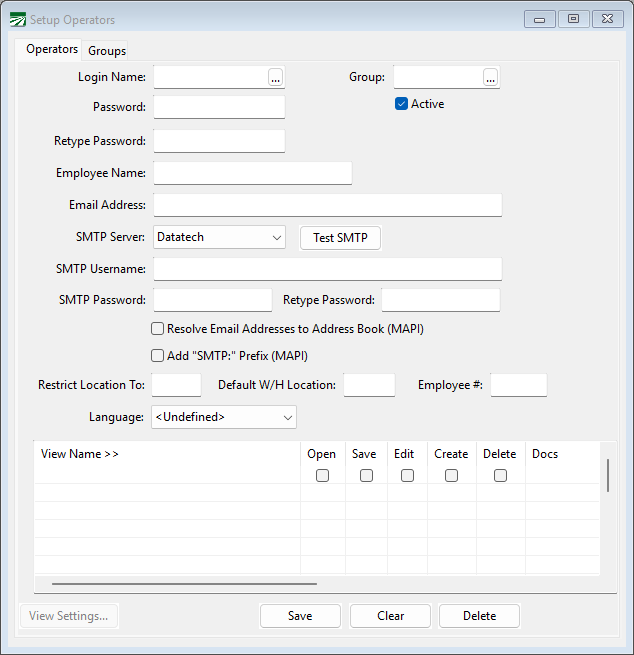
Sometimes Outlook allows a third party program to send an email, but does not allow it to access the address book. Other times, Outlook refuses to send an email unless the recipient’s email address is present in your Address Book and verified. A setting - Resolve Email Addresses to Address Book (MAPI) - is available to tell the program whether or not to access the address book in the Setup Operators window:
If you have trouble sending emails with Outlook, try selecting this box if it is not selected, or deselecting if it is selected. This setting may need to be set differently for each user when different versions of Windows and/or Outlook are used by each user.
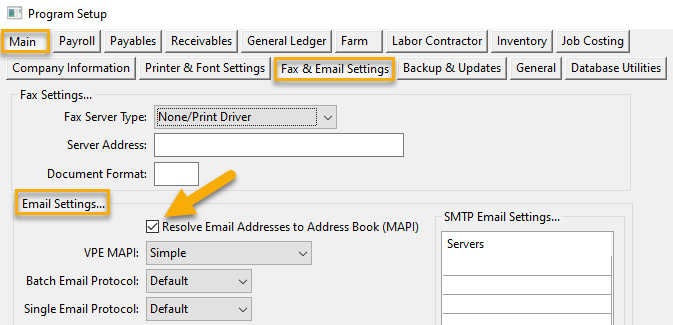
For a single user, you may not have an operator name set up. In this case, the same box can be selected under the Fax & Email Settings:
In both cases, after changing the Resolve Email Addresses to Address Book setting, restart the program and see if this fixes the problem.
Using SMTP To Send Emails
In cases where MAPI does not provide a workable solution, the SMTP protocol can be used to send emails. SMTP differs from MAPI in that the Datatech Accounting Software application talks directly to your email server to send the emails instead of using the email client that is installed on your workstation. Your email server could be a server on your local area network (e.g., an Exchange server set up and maintained by your system administrator), it could be your ISP’s email server, or it could be a third party email provider/free email account (e.g. Gmail, Yahoo Mail, etc.).
SMTP is the recommended method for sending batches of emails. This may include sending invoices, statements, quote sheets, etc., to a large number of contacts all at once. Warning messages generated by Outlook are completely eliminated by communicating directly with your email server.
Originally SMTP features were used in Datatech Accounting Software for sending out automated mass emails. We’ve now added an email dialog where you can edit emails before sending it. Therefore, it can be used for sending reports, invoices, and other documents directly from the program.
Some additional setup work is required to use SMTP to send emails. The Datatech Accounting Software needs to know the address of your email server as well as the user name and password used to log into it. This is the same information that you have to give your email software for it to work. If you are not sure of this information, your network administrator can assist you with the information provided in this document.
When sending emails through SMTP, the sent emails may not be automatically archived in a “Sent” folder. This can depend on the email server. For example, Gmail will create an item in the Sent folder.
If the customer needs to have a copy of every email sent via SMTP and these emails are not archived in the Sent folder, you can enter an email address to use for automatically sending a blind carbon copy. You should be able to set up a routing rule that will automatically place these copies in a specific folder. The system also supports sending a copy as a regular carbon copy, as well as overriding the “Reply To” email address.
SMTP Email Settings
Before you can send emails using SMTP, you must provide the correct settings in the Datatech Accounting Software program. The settings are entered in two places: (1) the Email Settings under the Fax & Email Settings tab; and (2) the Operator Setup. We will first discuss entering information in the Email settings:
Note Multiple email servers may be set up and assigned to different users. This might be needed in cases where some users have different email servers, or you need different CC/BCC or log in options selected for different users.
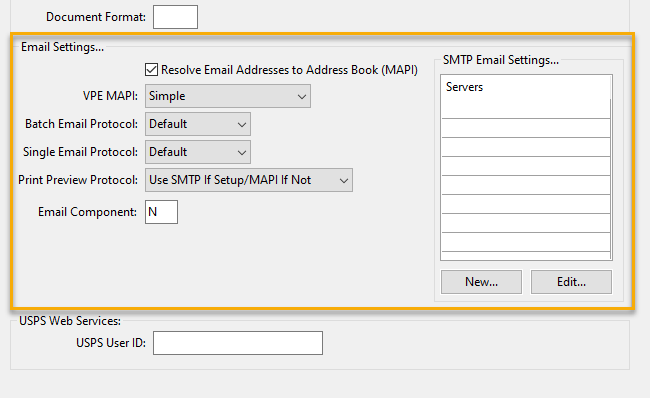
Batch Email Protocol
This setting controls which email protocol is used when sending batch emails. This would apply, for instance, when emailing customer invoices during batch printing or emailing customer statements.
Customers may want to use SMTP for batch emailing to avoid the security warnings that would result when sending a large number of emails.
Single Email Protocol
This setting controls which email protocol is used when sending a single email. For example, in The Shipper’s Office when the Email Passing option is selected in Order Entry, this setting would be used to determine how the email is sent.
A customer may want to use their MAPI email client when sending a single email. This could be the case if their address book has all of their customers’ email addresses in it and they haven’t set up the email addresses on the customer accounts. Therefore, the program wouldn’t automatically address the emails.
Note If you set up an SMTP server and enter the SMTP user names and passwords in the operator accounts but you do not update the information in the Email Settings under the Fax & Email Settings tab, the program will not use SMTP to send emails.
Print Preview Protocol
This option controls what happens when the email button is clicked in the Print Preview window. If set to “Use SMTP If Setup/MAPI If Not” the program will open the SMTP Send Email window as long as the operator’s account has the SMTP address set up and a SMTP server assigned.
Adding a New Email Server
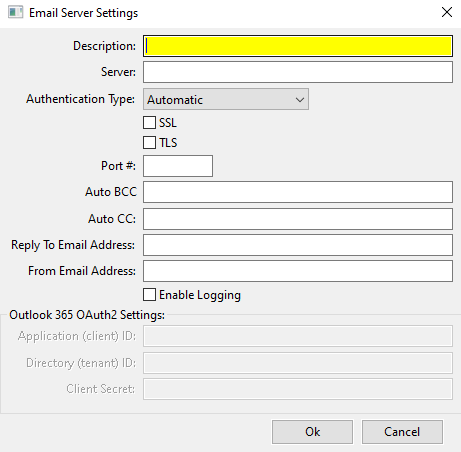
To enter settings for a new email server, click New… under SMTP Email Settings. The following window will open:
See the Common Email Provider Setup Information section below for examples of how to configure the system for various email providers
Description
Enter a description for this email server. If you prefer, you can enter the SMTP Server Address here.
Server
Enter the email server’s address - either the name or IP4 address.
Authentication Type
For most email services, select Automatic. If a specific authentication type is required, you can select it from the available options.
SSL
Select this box if SSL is required.
TLS
Select this box if TLS is required.
Port #
The Port # is not necessary; the default port (25) will automatically be used. If the SSL box is selected, then the default port used by the program will be 465. You only need to enter the port # if it is different from the standard port #’s.
Auto BCC / Auto CC
These two settings allow you to specify one or more email addresses that are automatically added to all outgoing emails sent by all users. This can be helpful if you want to have a record of each email sent and your email service does not automatically place a copy of the email in a “Sent” folder.
Reply To Email Address
If you enter an email address here, every email sent will use this for the “Reply To” address. That means when the recipient replies to the message, replies will be directed to this address rather than the sender. (The sender’s email address still appears as the sender when the recipient opens the email.)
From Email Address
If you want to override the From email address that will appear to the recipient, you can enter it here.
Enable Logging
When this box is selected, the program will log all SMTP activity to a file called “smtplog_[USER].txt” in the “SMTP” subfolder under the main data folder.
Operator Setup
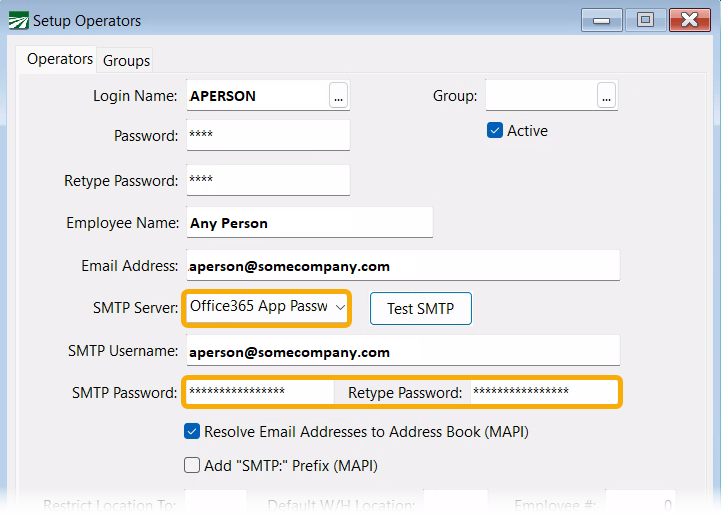
The login information for individual email accounts is entered on the Setup Operators window (Tools > Setup Operators). Users should provide their Email Address, Employee Name, SMTP Username and SMTP Password. An SMTP Server that has been previously set up in the Program Setup window must also be selected from the drop-down menu. A test email can be sent once the required information has been entered.
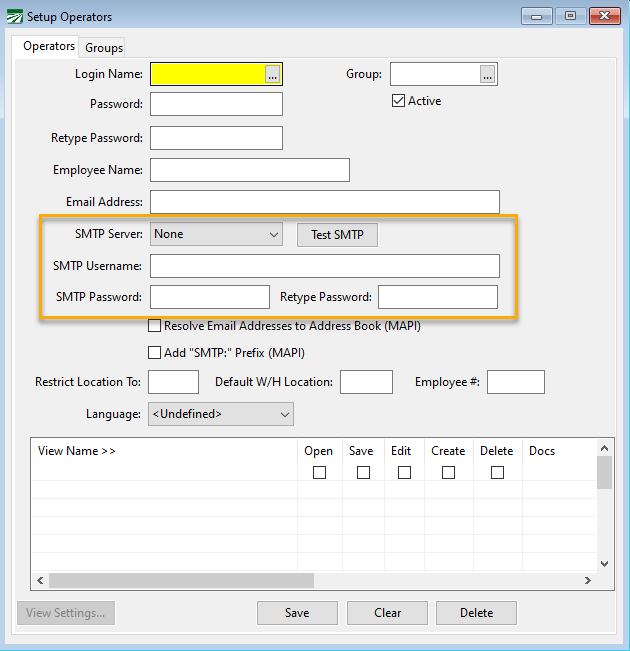
Note The two checkboxes below the SMTP Password only affect emails sent via the MAPI protocol; they do not affect the SMTP emailing.
Testing Procedures
Once the SMTP username and password have been set up on the operator account and the server settings have been set up on the Program Setup window, you can send a test email to see if everything works.
If the settings and login information is correct, a test email will be sent to the operator’s own account as well as the Datatech Support email account. Otherwise, an error will be displayed and the program will display the SMTP log file for the test email. Examine the error log for errors and other details to determine why the test failed.
Common problems include incorrect passwords or user names and incorrectly configured email server settings.
Common Email Provider Setup Information
Datatech Email Setup (Our local Exchange server)
Program Setup
SMTP Server Address: 192.168.1.2
SMTP Auth Type: Automatic
Port #: 25
Operator Setup
SMTP Username: Windows user name
SMTP Password: password used to login to network
Office 365 Email Setup
Program Setup
SMTP Server Address: smtp.office365.com
SMTP Auth Type: Automatic
Port #: 587
SSL (Port 465): Checked
TLS: Checked
Operator Setup
SMTP Username: your full email address
SMTP Password: password you use to login to Office 365 email
Gmail Setup
Program Setup
SMTP Server Address: smtp.gmail.com
SMTP Auth Type: Automatic
Port #: 465
SSL (Port 465): Checked
TLS: Unchecked
Operator Setup
SMTP Username: YourUsername@gmail.com (full email address)
SMTP Password: password you use to login to Gmail
Note Google may require that the user enable less secure apps to access the account. See the following page: https://support.google.com/accounts/answer/6010255?hl=en. Google may also turn off the option to enable less secure apps of the user does not send emails regularly.
Yahoo Email Setup
Program Setup
SMTP Server Address: smtp.mail.yahoo.com
SMTP Auth Type: Automatic
Port #: 465
SSL (Port 465): Checked
TLS: Unchecked
Operator Setup
SMTP Username: YourUsername@yahoo.com (full email address)
SMTP Password: App password generated by Yahoo. Login to your Yahoo account in a browser, go the Account Security, click on Manage app passwords or Generate app passwords. Select Other for your app and enter Datatech as the app name, click on the Generate button, and Yahoo will create a password for you to copy and paste into the SMTP Password entries on the Operator Setup window.
AOL Email Setup
Program Setup
SMTP Server Address: smtp.aol.com
SMTP Auth Type: Automatic
Port #: 587
SSL (Port 465): Checked
TLS: Checked
Operator Setup
SMTP Username: YourUsername@aol.com (full email address)
SMTP Password: password you use to login to AOL Mail
Microsoft Outlook OAUTH2 Setup
Application Setup in Azure Portal
Note The most current version of the Chilkat DLL is needed to support Office 365 OAuth2 authentication. If for some reason a customer does not have the latest DLL, download it from L:\Windist\DLL.
-
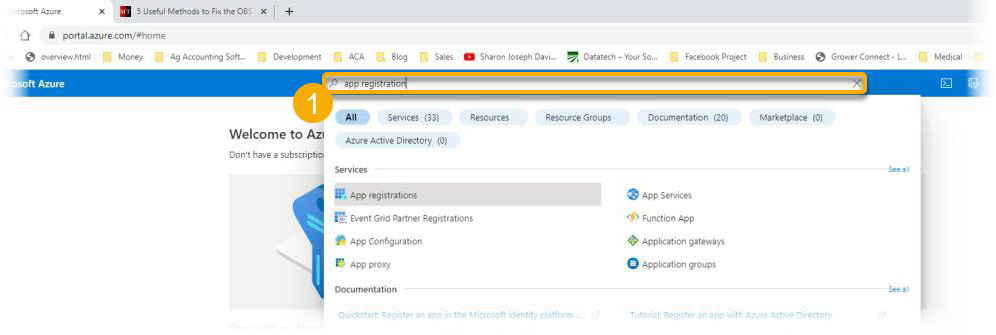
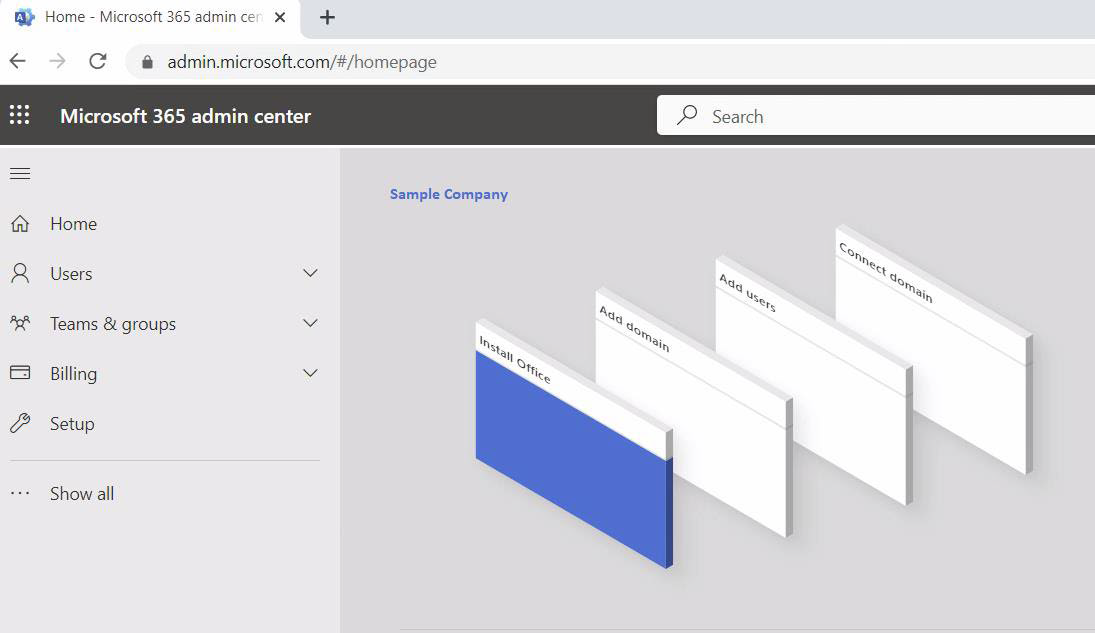
Open a web browser and go to portal.azure.com. Log into your admin account for the domain. This will take you to the Microsoft Azure home page. Type App Registration in the search bar and then click on the result.
-
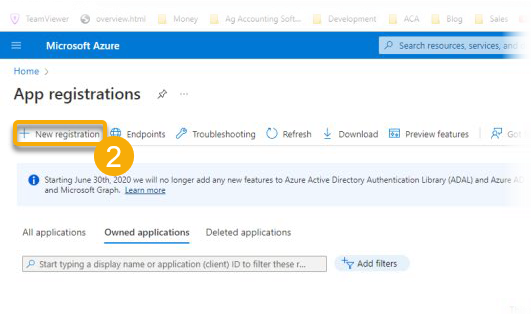
Click New Registration.
-
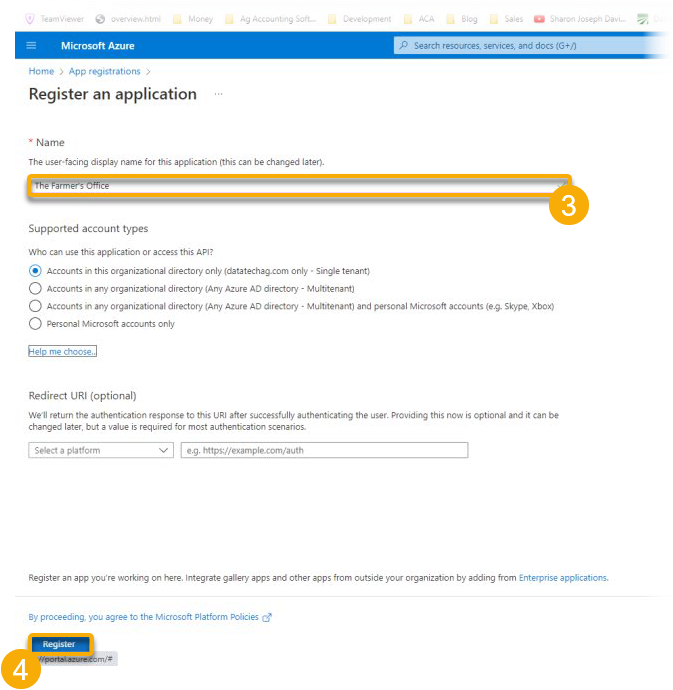
Enter the name of the application, e.g. Datatech Accounting Software, The Farmer's Office, or The Shipper's Office.
-
Click Register.
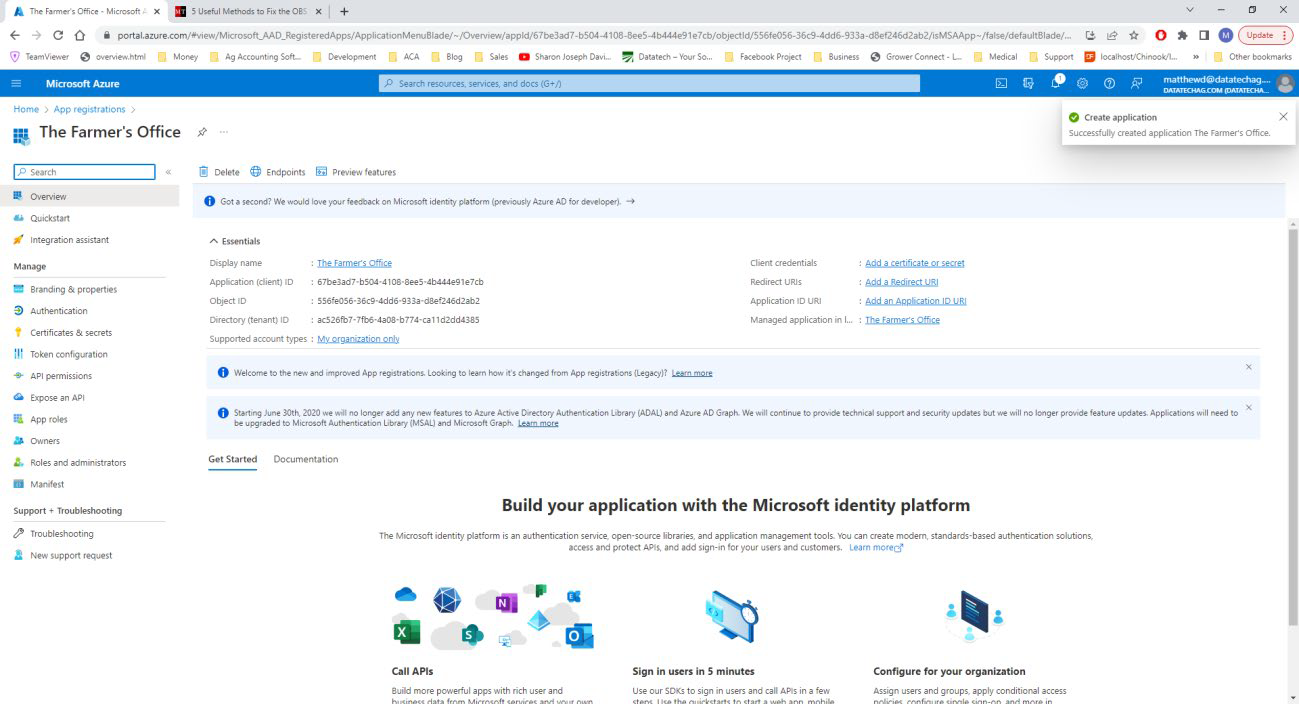
This creates a new application. The Application ID (client) and Directory ID (tenant) will be important for steps used later in this setup.
-
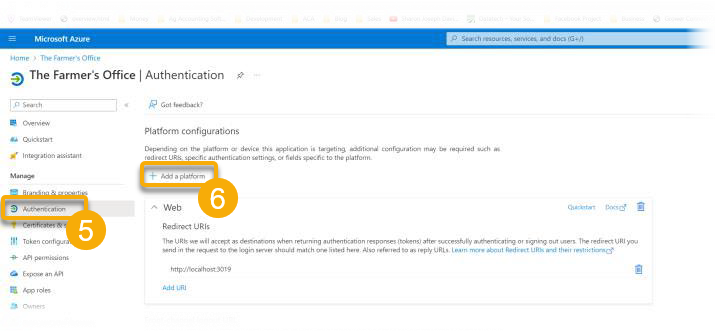
Next, a redirect URI needs to be created. To do this, click Authentication
-
Click Add a platform.
-
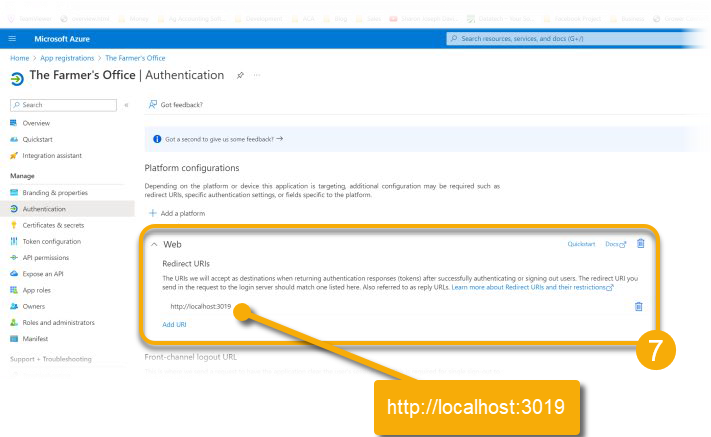
Select Web and enter http://localhost:3019 for the Redirect URI. Then click Configure at the bottom of the screen. Microsoft will send a response to our program via UDP on port 3019.
Note If the customer has a firewall blocking incoming connections on this port, it will need to be opened to allow the response to be received.
-
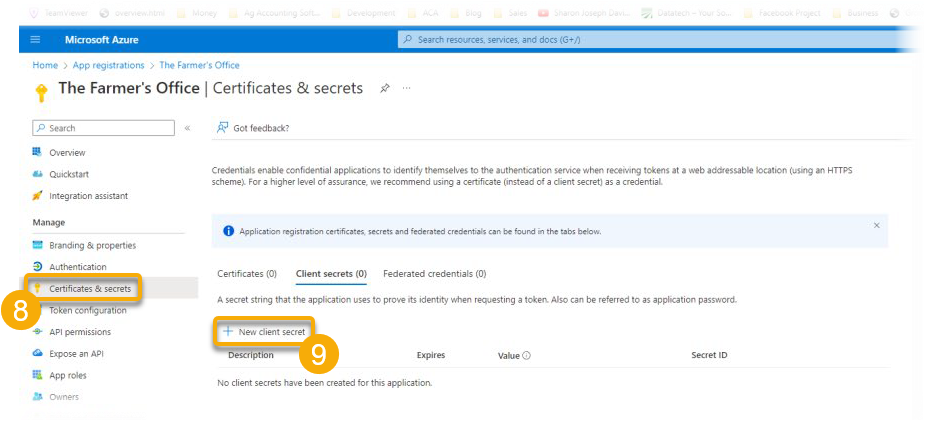
Click Certificates & secrets.
-
Click New client secret.
-
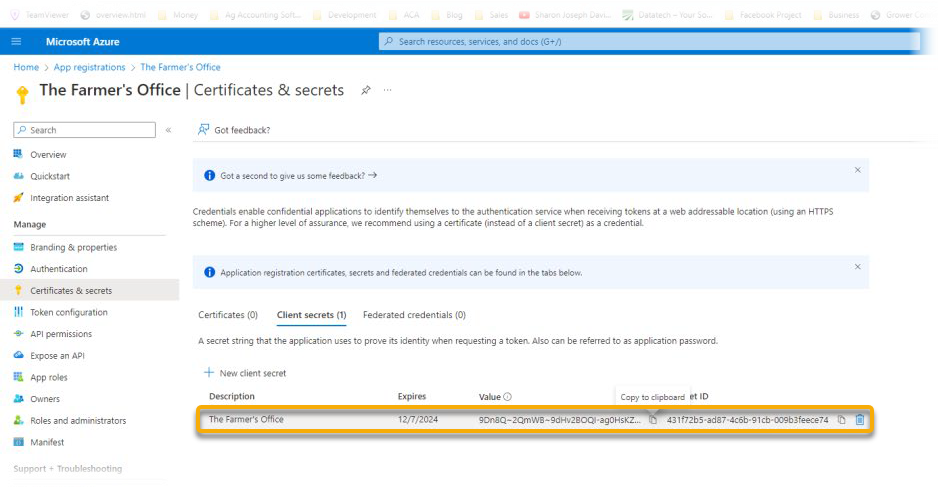
Enter the same description that was used for the application. We recommend changing the Expires setting to 24 months. Click Add and you will see the new secret listed.
-
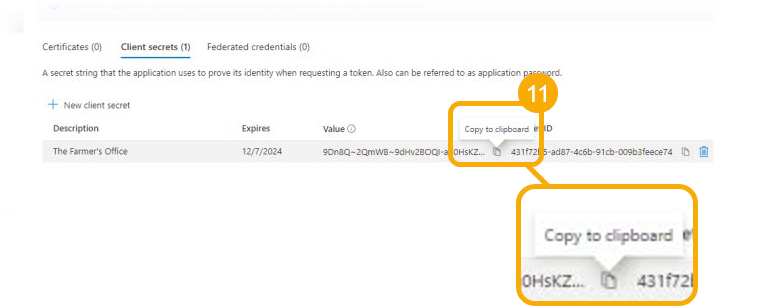
Click the Copy button to the right of the client secret to copy it to the clipboard. This is important for step #16.
Warning If you navigate away from the page or refresh the page, the full client secret will be hidden.
-
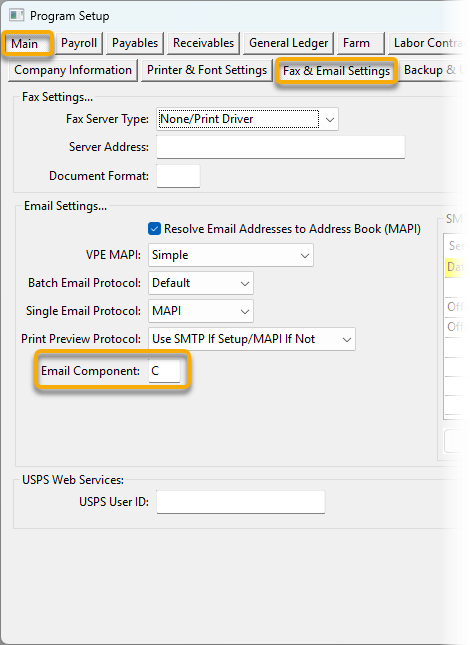
Now switch to the Datatech Accounting Software. In the software program, go to Tools > Program Setup > Main > Fax & Email Settings. Make sure the Email Component entry is set to C. If it is set to N, make sure to change it to C.
-
Under SMTP Email Settings..., click Office 365.
-
Click Edit.

-
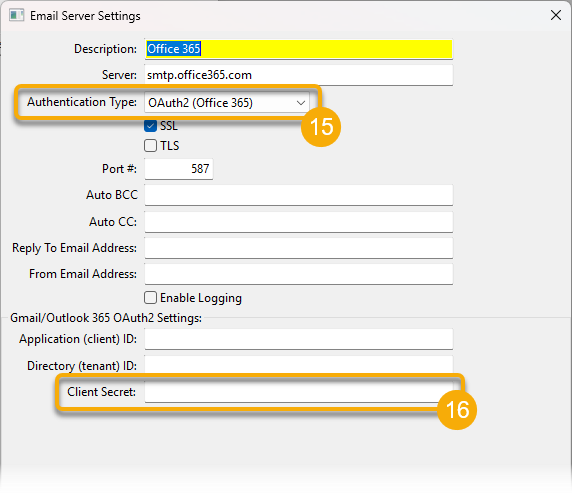
In the Authentication Type entry, click the drop-down and select OAuth2 (Office 365). This will enable the bottom 3 entries.
-
Right click in the Client Secret entry and paste the client secret you copied earlier from the browser.
-
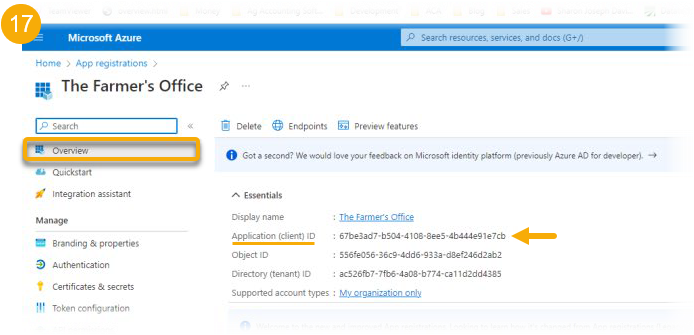
Switch back to the browser and click Overview. Place the mouse pointer to the right of the Application (client) ID and click on the button that appears to copy the ID to the clipboard.
-
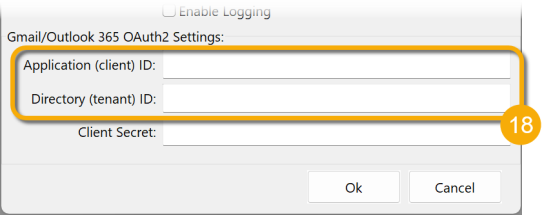
Go back to the software program and paste the ID into the Application (client) ID entry for the Email Server Settings. Repeat steps 17 and 18 for the Directory (tenant) ID.
-
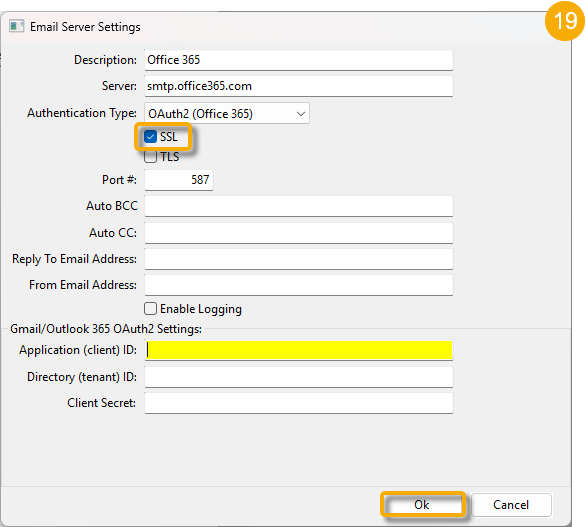
Make sure the SSL check box is selected. Then click OK to save the server settings.
-
In the Program Setup window, click Ok. This completes the server setup.
User Account Setup in Datatech Software
The following steps will need to be completed for each user with an Exchange 365 email account.
-
If you are an admin who is setting up multiple accounts from one computer, go to Tools > Setup Operators.
-
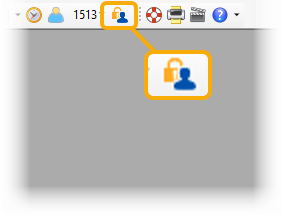
If you are a user doing the setup on your own workstation, click the Change Password/Email Settings button on the toolbar.
If you are using the Setup Operators window, use the look-up button to select an operator with an Exchange 365 email account.
The Change Password/Email Settings will automatically load the users settings; these settings can only be changed by the user. Therefore, this window can be accessed by any user without the need to give them access to the Setup Operators window.
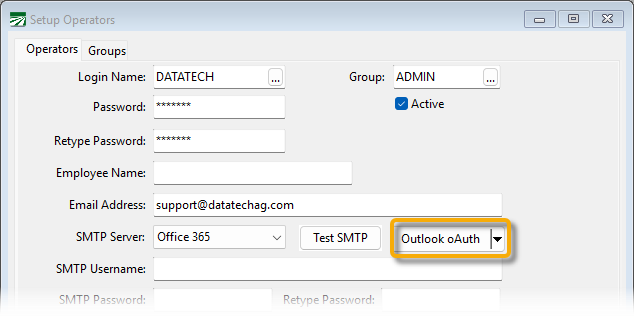
The Outlook oAuth button will be enabled once a server that is configured for OAuth2 authentication has been selected. In the Setup Operators window, it will be to the right of the SMTP Server setting:
In the Change Password/Email Settings window, it will be at the bottom next to the Test SMTP button:

Click this button to start the OAuth2 authentication process. A browser window will open where the user will be directed to log into their account to provide our application with permission to send emails using their account via SMTP. They will need to enter their name and password.
Once they enter their name and password, Microsoft sends a response back and the program should display a message saying “OAuth2 authorization granted!” The program will wait up to 30 seconds for this response. While it is waiting, the program will not respond to user keyboard input.
Possible error messages you may receive are:
-
"No response from the browser!"
-
"OAuth2 failed to complete."
-
"OAuth2 authorization was denied."
-
"Unexpected AuthFlowState:"
If you get the “OAuth2 authorization granted!” message, then Microsoft has sent a token to use in place of the user’s password when sending emails. This token is automatically stored on the operator account record. (It is not visible on screen.) The user’s SMTP password and the entry below it where the user retypes it should now be erased.
You should now be able to use the Test SMTP button to send an email using the new OAuth2 token. If that does not work, download the SMTP log file for analysis. The log files are located in the SMTP folder under the data folder.
Known Issues
If the customer has disabled ChilKat by changing the Email Component setting in the Program Setup to something other than “C”, the program will report an “Invalid message” error when attempting the OAuth2 authentication process. Change the Email Component to “C” and restart the program before attempting the authentication process again.
The response that Microsoft sends is via UDP on port 3019 (that is part of the Redirect URI entered above, http://localhost:3019). If the customer has a firewall blocking incoming connections on this port, it will need to be opened to allow the response to be received.
In some cases OAuth2 Authentication does not work 100% of the time. In these cases, you may want to try creating an App Password instead. To do so, see the instructions below.
Creating an App Password for O365 Users
In cases where OAUTH2 still has authentication issues, it may be necessary to create an app password for that user's Microsoft account to be used within Datatech Software; this should allow mail to be sent. There are four main steps that need to be taken to create an app password:
Enable Multi-Factor Authentication for an O365 user
To view and manage user status, complete the following steps to access the Azure portal page:
-
Sign in to the Azure portal as a Global administrator.
-
Search for and select Azure Active Directory, then select Users > All users.
-
Select Per-user MFA.

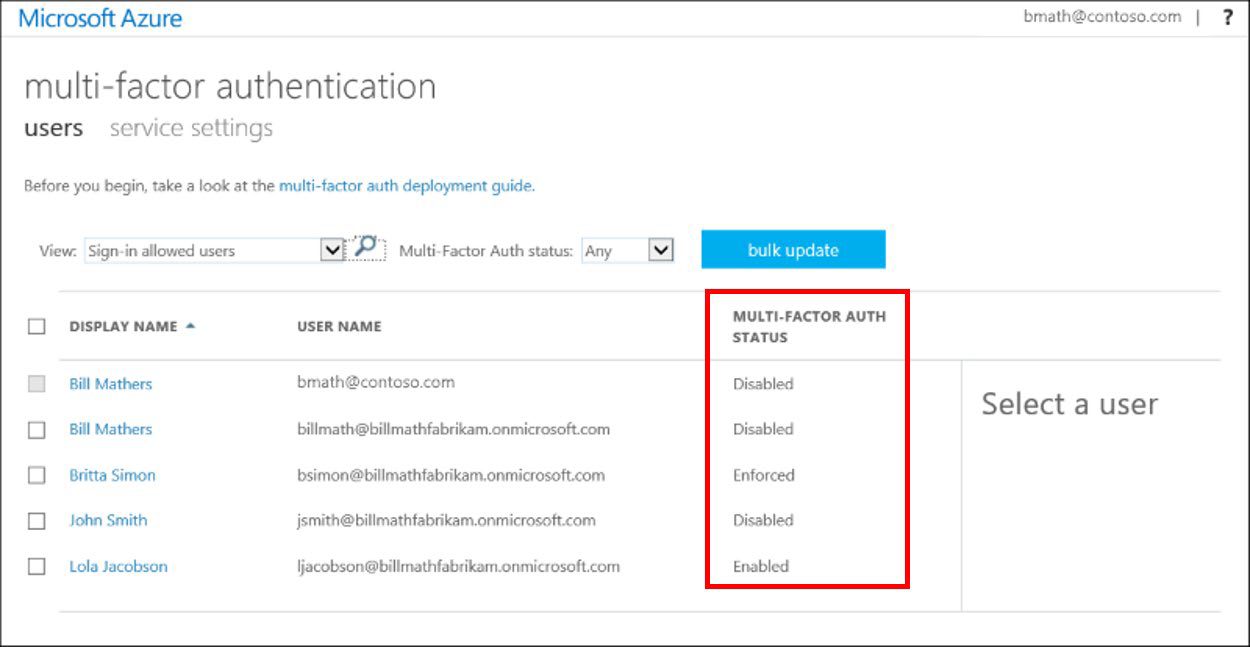
A new page opens that displays the user state, as shown below:
-
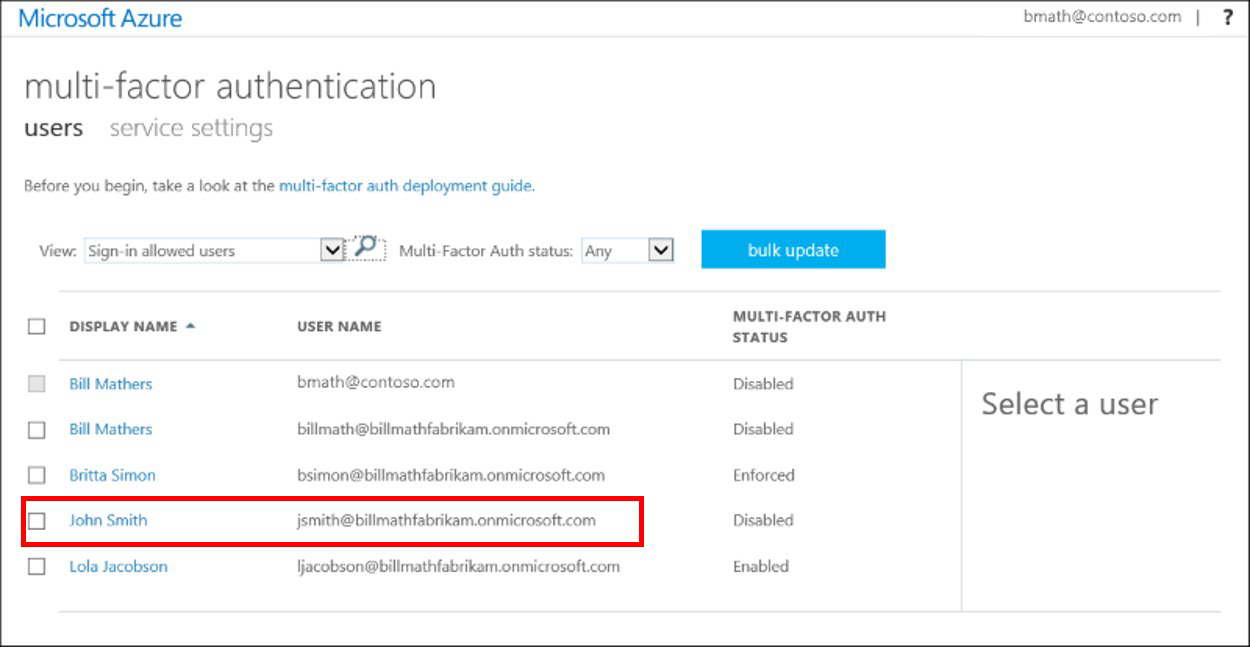
Find the user you want to enable for per-user Azure AD Multi-Factor Authentication. You may need to change the view at the top to users. In the example below, "John Smith" is the user whose status will be changed:
-
Select the box next to the name(s) of the user(s) for whom you want to change status.
-
On the right-hand side under quick steps, click Enable or Disable. In the following example, the user John Smith has been selected and is being enabled for use:

-
Confirm your selection in the pop-up window that opens.
-
After you enable users, notify them via email. Advise the user that a prompt asking them to register will be displayed the next time they sign in. Also, if your organization uses non-browser apps that don't support modern authentication, they need to create app passwords.
Note Enabled users are automatically switched to Enforced when they register for Azure AD Multi-Factor Authentication. Do not manually changed the user status to Enforced unless the user is already registered or if it is acceptable for the user to experience interruptions in connections to legacy authentication protocols.
Allow Users to Create App Passwords
By default, users cannot create app passwords. The app passwords feature must be enabled first. To give users the ability to create app passwords, an admin needs to complete the following steps:
-
Sign into the Azure portal.
-
Search for and select Azure Active Directory, then choose Security.
-
Select Conditional Access from the left navigation blade.
-
Select Named location from the left navigation blade.
-
Click Configure MFA trusted IPs in the bar across the top of the Conditional Access | Named Locations window.
-
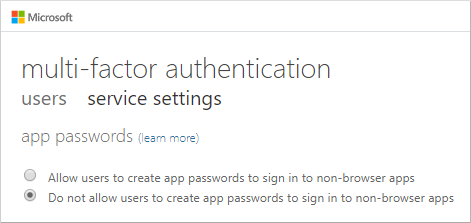
On the multi-factor authentication page, select the Allow users to create app passwords to sign in to non-browser apps option.
Create an App Password to Use for Datatech
-
Sign in at admin.microsoft.com as the user who needs the app password (or try login.microsoft.com if the user does not have access to the admin portal).
-
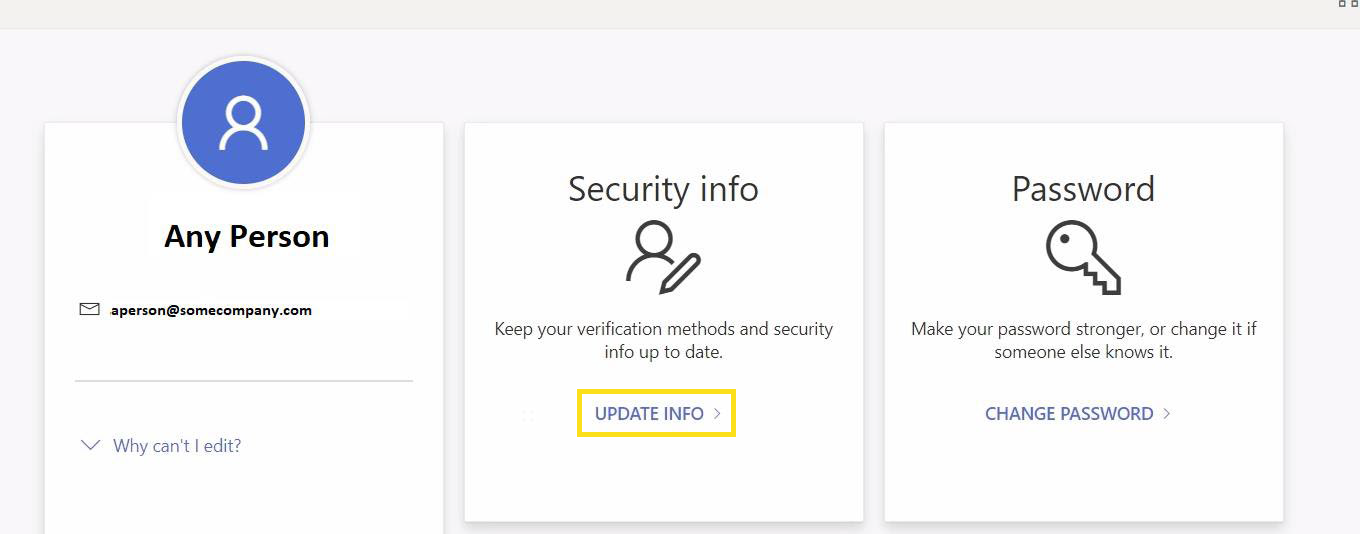
Click on the icon at the top right with the user's initials and select View Account.

-
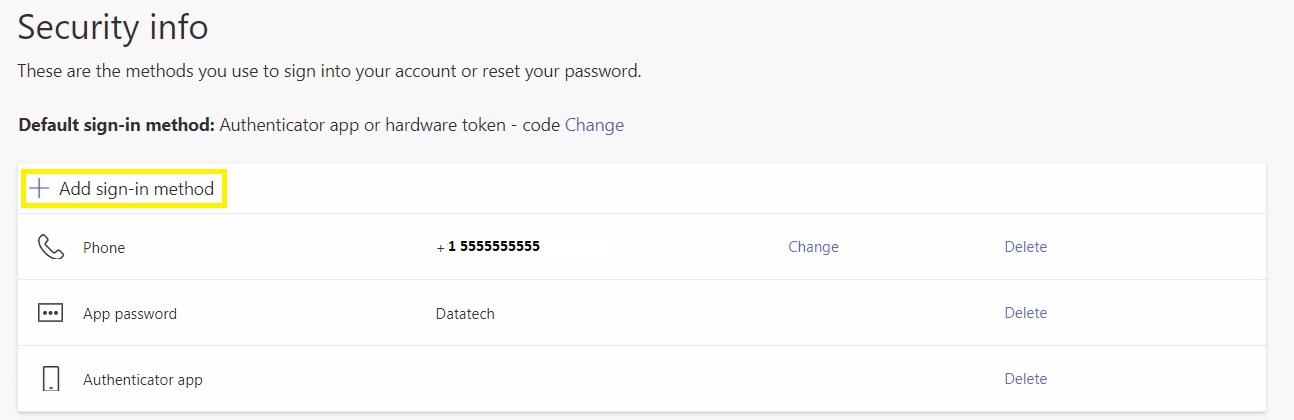
Under Security Info, click UPDATE INFO to view current sign-in methods.
-
Click Add sign-in method.
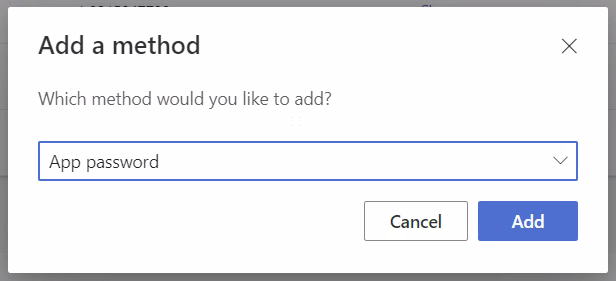
-
When asked which method you would like to add, select App password from the drop-down menu.
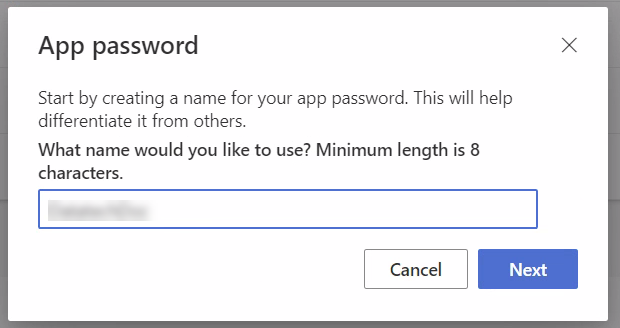
-
Create a name for the password, e.g. Datatech. Then click Next.
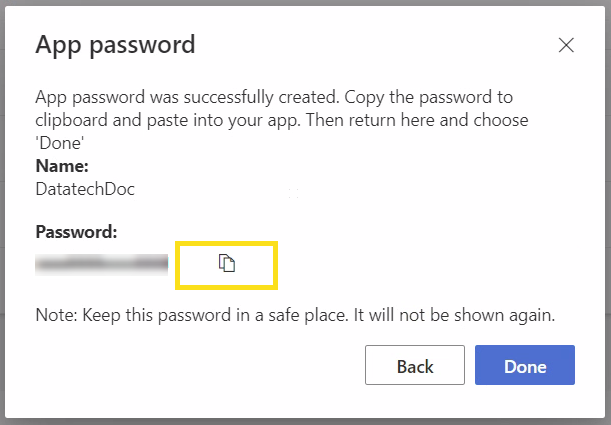
-
Copy the app password and make note of it in a secure place because it will not be shown again.
Enabling the app password in Datatech.
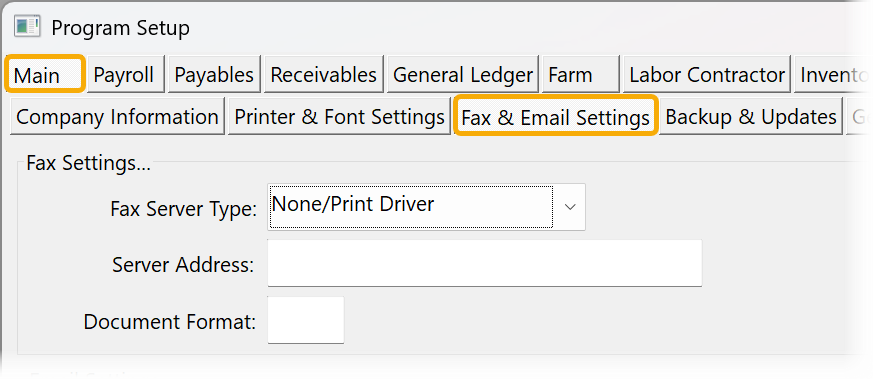
-
In your Datatech Accounting Software, go to Tools > Program Setup. Under the Main tab, click Fax & Email Settings.
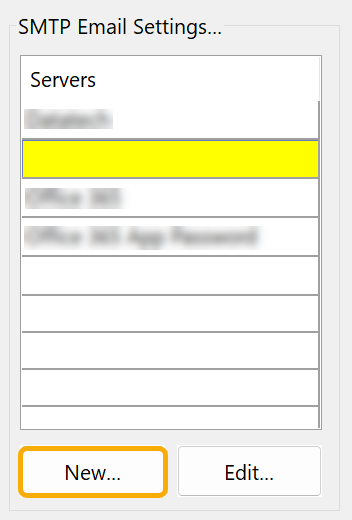
-
Under SMTP Email Settings, click New.
-
In the Email Server Settings window, create a new SMTP server in the program by using the same options as used below. Then click Ok.
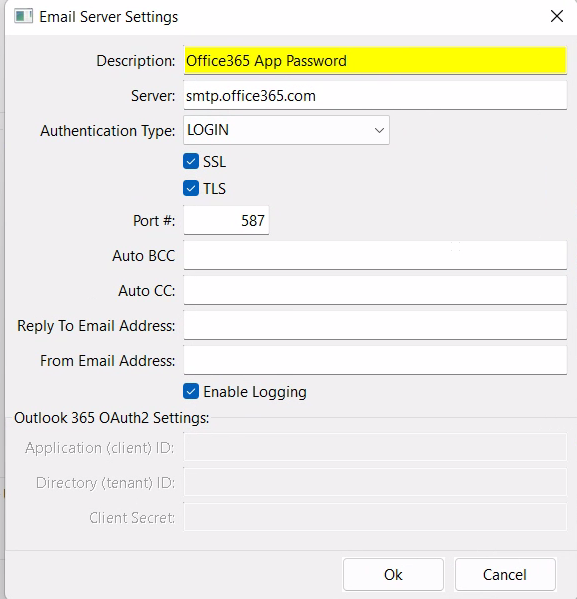
Note If all users will be using app passwords, you have the option of changing the Authentication Type from “OAuth2 (Outlook 365)” to "LOGIN" on the existing server. However, if some users will be using the app password and others will be using OAuth2, you will need two different servers set up with different authentication types.
-
Go to Tools > Setup Operators. In the Login Name entry, use the look-up button to select an operator for whom you're enabling the app password.
-
Make sure the correct SMTP server is selected for the operator and paste the app password in the SMTP Password entry.
-
Click Test SMTP. It should provide a message saying the test is succeeded.

Troubleshooting
If you receive an error that the authentication failed and OAUTH2 was previously enabled, you may need to manually remove the OAUTH2 token for the user.
Note Programs built after February 2023 will ignore any existing OAuth2 token if the server is not set to OAuth2 (Outlook 365) as the authentication method, so this should not be a problem on newer programs.
To manually remove the OAUTH2 token for a user, run the following query in SSMS but substitute your user’s operator name for APP_OPERATOR:
UPDATE OPERATOR Set OAUTH2_TOKEN = '' where operator.name = 'APP_OPERATOR'
After removing the OAUTH2 token for the user, the program will be able to use the LOGIN authentication method specified in the smtp server settings without any issues.
Operator Setup
SMTP Username: your full email address
SMTP Password: none
Program Setup
SMTP Server Address: smtp.gmail.com
SMTP Auth Type: Automatic
Port #: 465
SSL (Port 465): Checked
TLS: Unchecked
Enable Logging: Checked
Gmail Setup
Program Setup
SMTP Server Address: smtp.gmail.com
SMTP Auth Type: Automatic
Port #: 465
SSL (Port 465): Checked
TLS: Unchecked
Enable Logging: Checked
Operator Setup
SMTP Username: YourUsername@gmail.com (full email address)
SMTP Password: App Password (See below)
Note As of May 30, 2022, Google requires you to use an App Password instead of your Google Account password. This first requires that 2-Step Verification be enabled.
Enabling Gmail 2-Step Verification
-
Login to the Google account in a web browser. Click the Profile icon and select Manage Your Google Account.
-
On the left-side menu that appears, click Security.
-
In the Signing into Google section, find the 2-Step Verification option. Click the Off status button to the right.
Note If the status says On, then the user has already set up 2-Step Verification and you can proceed to the Gmail App Password Setup below.
-
When the next window opens, click GET STARTED and enter your password to continue.
-
Enter your phone number and choose whether to receive codes via Text message or Phone call. Then click NEXT.
-
Wait for the text message or phone call with the code. Once you have received the code, enter it to confirm it is working and click Next.
-
Select Turn On to activate 2-Step Verification across your Google Account.
Gmail App Password Setup
In Google Security settings, select App Passwords in the Signing into Google section. Re-enter your Google account password.
Select Mail from the Select app drop-down menu. Then select a Device.
Click Generate. Your password will appear in a new window. Do not close this window until you have entered the password into your Datatech Operator Setup.
Note You will not see the password again, so save it in your Datatech program immediately. If you lose the password before you have saved it, simply delete the existing App Password and generate a new one.
Adding Your App Password to Your Datatech Software
In your Datatech Accounting Software, go to Tools > Setup Operators.
Open the operator account connected to the SMTP email.
Copy and paste the new App Password into the SMTP Password and Retype Password entries.
Click Save. We recommend sending a test email to confirm everything has been set up correctly.
Yahoo Email Setup
Program Setup
SMTP Server Address: smtp.mail.yahoo.com
SMTP Auth Type: Automatic
Port #: 465
SSL (Port 465): Checked
TLS: Unchecked
Enable Logging: Checked
Operator Setup
SMTP Username: YourUsername@yahoo.com (full email address)
SMTP Password: App password generated by Yahoo.
-
Open an internet browser and log into your Yahoo account.
-
Go to Account Security then click Manage app passwords or Generate app passwords.
-
Select Other for your app and enter Datatech as the app name, then click Generate. Yahoo will create a password for you to copy and paste into the SMTP Password entries in the Operator Setup window.
AOL Email Setup
Program Setup
SMTP Server Address: smtp.aol.com
SMTP Auth Type: Automatic
Port #: 587
SSL (Port 465): Checked
TLS: Checked
Enable Logging: Checked
Operator Setup
SMTP Username: YourUsername@aol.com (full email address)
SMTP Password: password you use to log into AOL Mail
GoDaddy Office 365
If test emails fail with the following message: SmtpCmdResp: “535 5.7.139 Authentication unsuccessful, SmtpClientAuthentication is disabled for the Tenant. Visit https://aka.ms/smtp_auth_disabled for more information." GoDaddy may not enable SMTP authentication by default; it may need to be enabled via PowerShell.