Job ID Setup
Job ID Setup Walk Through
When entering expenses, you will enter a General Ledger account, which defines the “type” of expense you are recording. You can use Job ID’s to provide more detail on the Cost Accounting reports for the types of expenses you have incurred.
Note If you have used other ag accounting systems, you may be used to different terminology. Job ID’s in the Farmer’s Office are equivalent to “Job IDs” in Famous, “activities” in Frontier, and “operations” in AgData.
For instance, you may have one expense account for “Field Labor”. For accounting purposes, on your Profit or Loss report you want to only want to see one total for all labor, across all fields and jobs. But for Cost Accounting reports, you do want to see a breakdown of labor for different jobs (pruning, suckering, tying, irrigating, pesticide applications, harvest, etc.). By using the Job ID’s, you can get this detail on the Cost Accounting reports, while retaining a single account on the financial reports where the breakdown is not needed.
This applies not just to labor but to any General Ledger account you use for Cost Accounting. For instance, you might also set up a General Ledger account for Chemicals, and create Job ID’s for Fertilizer, Herbicides, Pesticides, Defoliants, Fungicides, etc.
Go to Cost Accounting > Job ID Setup.
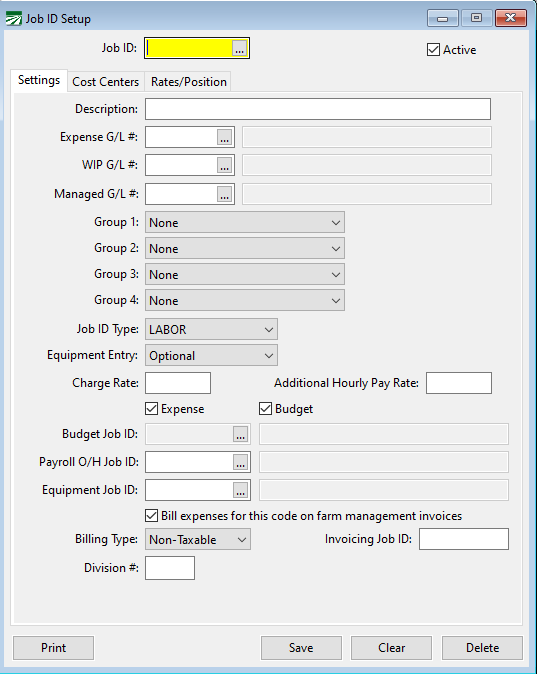
Job ID
Enter a unique code on each line of up to eight letters or numbers. This can be as an abbreviation ("PR" for pruning, for instance) or you can use numeric codes.
If you use numeric codes, we recommend using leading zeros (i.e., enter "01" instead of "1" if your codes are under 100, use "001" if your codes are over 100"). Codes are sorted alphanumerically, so the leading zero is needed to display them in order.
Description
Enter a Description here for the job.
Expense G/L #
You can enter a default General Ledger expense account here to use. A G/L # is not required; this is an optional entry. If entered, the G/L # will be used as a default on check entry. For instance, if you have a General Ledger account for weed control, and there are eight different Job ID’s that should always fall under weed control, you should enter the General Ledger account for weed control on these Job ID’s. Then when you enter checks and use these Job ID’s, the General Ledger account for weed control will automatically be used.
Press [F4] or click on the column header to get a lookup of General Ledger accounts.
WIP G/L #
This entry can be used to designate the default G/L # to use when entering an expense to a Work in Progress Cost Center. A Work in Progress Cost Center will generally have all expenses posted to an asset account. The expenses are later moved to the Expense G/L # by the Work In Progress posting report.
Managed G/L #
In some cases, farm management companies may also have Cost Centers that belong to them in addition to providing management services. The Chart of Accounts may be set up with different expense accounts for internal and external Cost Centers. In these cases, the Expense G/L # can be used for internal Cost Centers, and the Management G/L # can be used for the external Cost Centers (expenses that will be billed).
Group 1/2/3/4
Groups are used for reporting purposes. You can set up Groups and assign each Job ID’s to up to four different Groups. On Cost Accounting reports, Job ID’s that are assigned to the same group will be printed together and subtotaled.
When you run a Cost Accounting report, you may select which Group assignment (1/2/3/4) you want to use for grouping and subtotaling the Job ID’s.
For farming management companies, Group 2 codes are always used for the Investor Summary Reports.
Job ID Type
The Job ID Type is a 2-digit numeric user defined category for your Job ID’s that can be used for reporting purposes. Go to Cost Accounting > Job ID Type Setup.
Example You may have different Job ID Types set up for different expenses relating to different activities, such as pesticide application (labor, materials, equipment, labor overhead). A group could be assigned to combine different types of expenses for the same cultural activity (pesticide application in this example) while different job types would be assigned to the job codes for labor, materials, equipment. When reporting by Job ID Type, this would allow you to group and subtotal all labor Job ID’s, all Job ID’s, etc.
Equipment Entry
This controls whether or not an entry is required for Equipment costing when this Job ID is used. Select “No” to skip the equipment costing entries automatically. Select ‘Required” to require an equipment ID when this Job ID is used. Select “Optional” (the default) to make the equipment entry optional.
Charge Rate
This is a default rate used for billing purposes. You can set up a default rate that will be entered for you automatically on customer invoices when this Job ID is used for billing.
The Charge Rate will also replace the pay rate when the Create Crop Invoices option generates invoices from payroll expenses.
When using the Grower Labor Report to bill payroll, the Charge Rate is also used to replace the pay rate when a grower account is set to Fixed Rate/Job Code Charge Rate for the Billing Method setting.
Additional Hourly Pay Rate
Entering an amount here will assign an additional pay rate for this Job ID. When a Job ID has an additional hourly pay rate assigned to it, that rate will be added on to the employee’s default pay rate when this Job ID is used.
For example, a Job ID is set up with an Additional Hourly Pay Rate of $2.00. When doing Payroll and that Job ID is used on an employee with a default pay rate of $12.00, the program will automatically enter $14.00 per hour.
Active
Job ID’s that are no longer used can be marked as inactive by deselecting this box.
Expense / Budget
These checkboxes determine whether the Job ID will be used for entering expenses and/or for budgeting purposes.
Normally, a Job ID is used for both. In some cases, you may want to set up budgets using budget-only Job ID’s. A budget-only Job ID allows you to group several related Job ID’s that are used to track expenses into one budget category. This is where the next entry is used.
Budget Job ID
For any Job ID’s that are not used for budgeting (i.e. are only used for entering expenses), do not select the Budget checkbox. This will enable the Budget Job entry where you can select the Job ID that is used for budgeting this particular activity.
Payroll O/H Job ID
If entered, the Payroll O/H Job ID will be used for the payroll tax and workers comp expense transactions accrued by the Payroll Journal for labor billed under this Job ID. This is typically used when doing Work In Progress accounting. This allows your labor and overhead costs to be posted under different Job ID’s. When the WIP Posting is done, these two different Job ID’s can point to two different General Ledger expense accounts, one for the labor and one for the payroll taxes and Worker’s Comp expense.
Equipment Job ID
If entered, the Equipment Job ID will be used for the equipment charges generated by the Payroll Journal for equipment usage entered on the payroll checks.
Bill expenses for this code on farm management invoices
This setting is used for farm management billing. It will be disabled if the farm management billing option is not enabled. Normally this box will be checked, so that expenses entered under this Job ID will be billed to customers. If you deselect this box, the program will not bill any expenses posted under this Job ID to customers when you use the Create Invoices option.
Apply payroll markup/billing rate to all transactions
Select this checkbox if you want to apply the payroll markup/billing rate to non-payroll transactions as well.
Billing Type
This setting allows you to control the sale type that is used by the program when it creates the line items on the customer invoice. Normally all line items will have a Non-Taxable billing type, but if you need to charge sales tax for some items, you could set up a Job ID that will bill items out under the taxable type.
Other sale types could be used to control which general ledger accounts income is posted to.
Invoicing Job ID
The Invoicing Job ID is used for a custom farm management invoicing option. This entry allows you to group billing amounts for several different Job ID’s together under a single “main” Job ID.
Cost Centers Tab
The Cost Centers tab page allows you to specify which Cost Centers a Job ID can be used for. This provides a validation system to prevent invalid combinations of Cost Centers and Job ID’s.
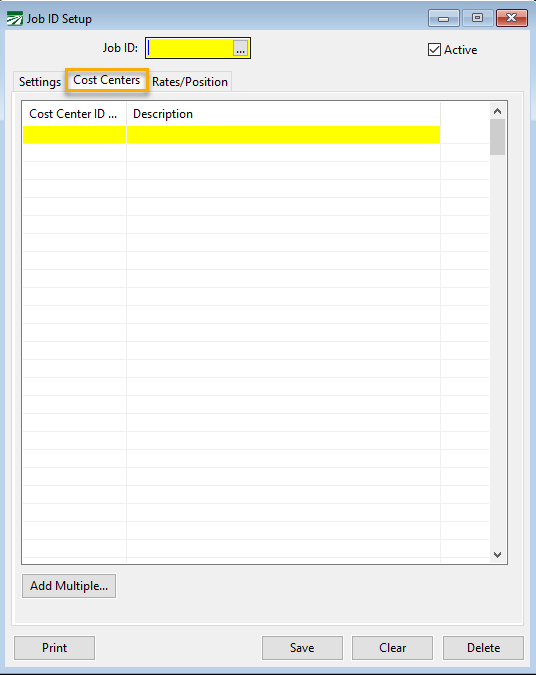
When you add a Cost Center to the list for a Job ID, that Job ID will automatically appear on the Job ID’s tab page for that Cost Center on the Cost Center setup window. In other words, both tab pages can be used to maintain the same validation table information.
If you do not enter any Cost Centers, then the default behavior of the program is to allow any combination of Cost Centers and Job ID’s during transaction entry. But as soon as one entry is added to the validation table for a Cost Center, the table must contain entries for all Job ID’s that you want to be able to use for that Cost Center.
Click Add Multiple at the bottom of the window to select and add multiple Cost Centers at once.
Rates/Positions Tab
For farm management invoices, flat hourly billing rates can be set up using this tab. Setting up rates based on Job ID and employee position provides a way to bill customers at different rates depending on the position the employee is working.
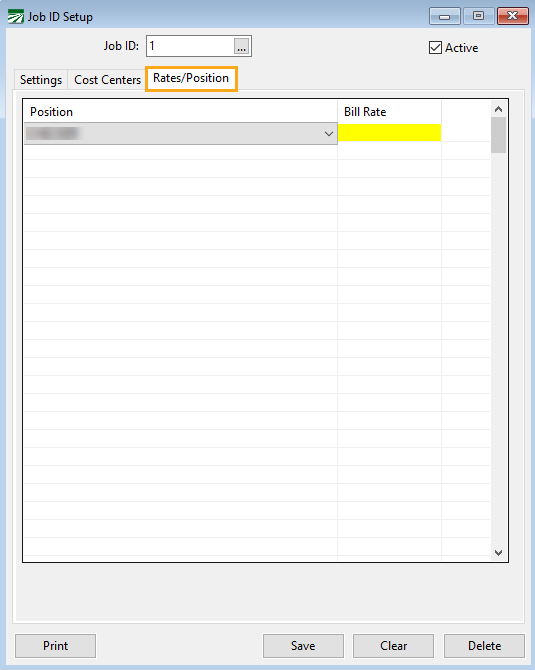
In the grid, select the position from the drop-down and enter the corresponding bill rate. Positions are set up within the Payroll Validation Table Entries window.
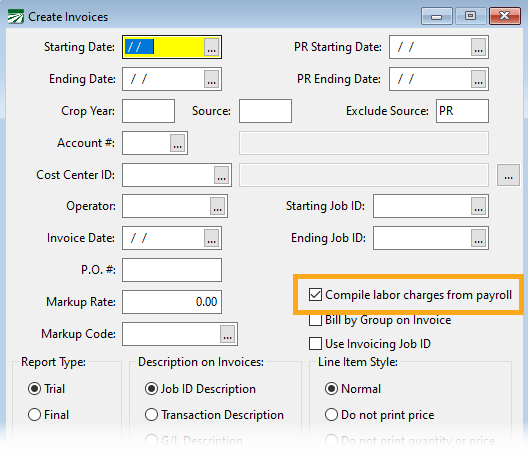
Note When creating farm management invoices, the Compile labor charges from payroll check box must be selected to use the billing rates set up by Job ID/position.
Budget Only Job ID’s
As mentioned in the instructions for setting up Job ID’s, it is possible to set up Job ID’s that are used for only budgeting purposes, Job ID’s that are only used for expenses and Job ID’s that are used for both budgets and expenses.
In most cases, you can set up all of your Job ID’s to be used both for budgeting and expensing. If you’re not sure why you would need to use Job ID’s only for budgeting, then you’ll probably never need to use budget only Job ID’s.
Printing a List of Job ID’s
Click Print in the bottom left corner of the Job ID Setup window to print a list of your Job ID’s. The following window will open:
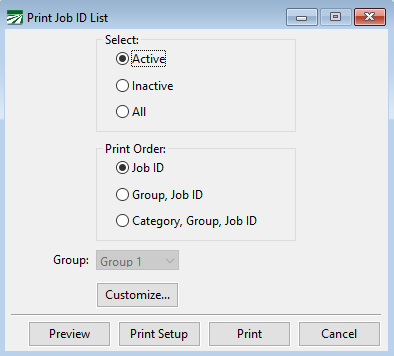
Select
Choose either Active, Inactive or All Job ID's.
Print Order
Choose the order in which to print the Job ID's.
Group
If you selected either Group, Job ID or Category, Group, Job ID for the print order, choose a group code (1, 2, 3, or 4) from this drop-down menu.
Customize...
Click Customize to add or remove items from the report. By default, most items in the Job ID setup will print on the list. However, if you don’t use certain items, you can remove them from the report.