Vendor Invoices
Entering Vendor Invoices
This is used to enter vendor invoices. From this entry, the accounting information will be entered in the general ledger and the invoice will be scheduled for payment based on the due date you enter.
You can expense the invoice to one or more General Ledger accounts and/or Cost Centers.
Invoices may also be put on hold. Thus, if you use the option to print the checks automatically, you may confidently let the program generate the checks without worrying that the computer will pay an invoice you didn't want paid.
Note The Accounts Payable program allows you to choose two systems of paying checks. You may use the Accounts Payable Invoicing program for accrual accounting, or the Direct Expensing Check Entry for demand check printing, or a combination of the two. If you are entering information initially for checks that have already been issued, it is suggested that you use the Direct Expense Check Entry Program.
Go to Payables > Invoices.
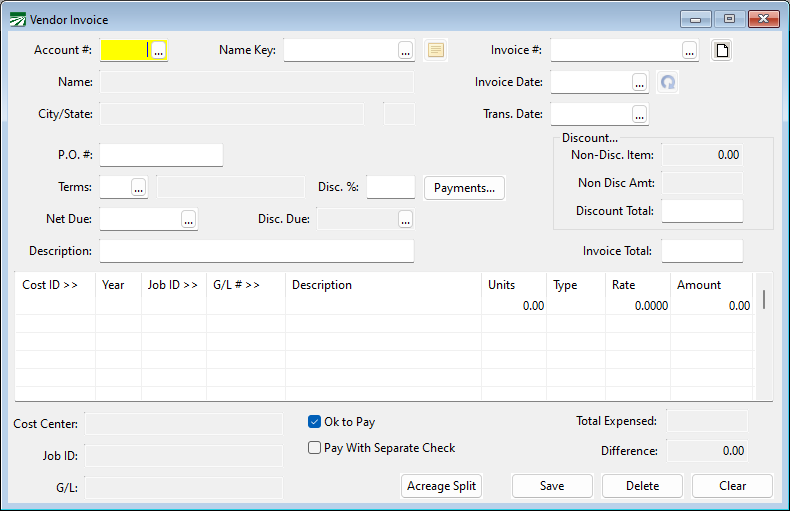
Account # / Name Key
Enter the account number or name key for the vendor you want to write the check to. On either of these two fields, you can press [F4] or click on the lookup buttons to open the vendor account lookup window.
Show Vendor Notes

The icon next to Name Key allows you so see notes about this vendor.
Invoice #
Enter the vendor’s invoice number here. The invoice number may be up to 14 numbers and/or letters.
If there is no invoice number (for instance, a monthly electric bill) you can create an invoice number like “10/2003 STMT”.
Print Invoice Detail Report

The icon next to Invoice # allows you to print a detailed report for that invoice. This is helpful for an internal review process to see details about everything that has been entered.
Invoice Date
Today's date will appear here automatically on your first entry. If you change the check date, this date will be retained for subsequent invoices.
P.O. #
If you have a Purchase Order number, enter it here.
Terms
If you have assigned a terms entry to the vendor, the terms number will appear here automatically, and the due date and discount date and amount (if any) will be calculated automatically. Do not enter the number of days in this entry. The Terms entry "relates" to the terms file, where the number of days for the net due and discount rate/days are entered..
Discount %
If the terms selected has a discount, the rate will be entered here for you automatically. You may override the rate if necessary.
Payments
Clicking this button will open the scheduled payments window. This panel allows you to break up the payments made on an invoice. This will be covered more in depth later.
Net Due
The net due date will be calculated and entered for you here automatically. You may override this if necessary.
Discount Due
If the terms selected has a discount, the due date for taking the discount will be calculated and entered here for you automatically. You may override this if necessary.
Description
The description you enter here will be printed at the top of the check stub. It will also be automatically entered on each line item (but you may change it on each line item of course).
Invoice Total
Enter the amount of the invoice here.
Non-Disc. Item
If the invoice total includes any items that are not eligible for a discount, such as freight or other charges, enter the amounts here. Each time you enter an amount and press [Enter], the amount will be added to the Non Disc.Amt entry just below. This way, if there are several items which are excluded from the discount calculation, you can enter each one separately and the program will total them up. As you enter non-discount items, the discount total entry is recalculated.
Discount Total
This amount will be calculated automatically based on the discount rate, invoice total, and total of non-discount items. You can override the amount calculated by the program if necessary.
Invoice Line Item Entry
Every invoice will have one or more line items. This is where you tell the program to which expense account(s) and cost center(s) you want to assign the amount of the check. In addition, if you are paying for expenses on behalf of one or more growers, you can enter the grower account(s), expense number(s), and lot numbers if you are tracking expenses by log. The line item entry is also referred to as the detail portion of the check.
As you enter the information on the line items, the description for the general ledger account, cost center, and job code will appear in the boxes at the bottom left. The total of lines will also be displayed to the right, as well as the difference between the check total and the total of the line items. Before you can complete a check entry, the line items must balance with the check total.
On each line item you will enter the following information:
-
G/L #: If you entered a default General Ledger (G/L) account for the vendor on this check, that G/L # will be entered automatically here. You can change it if necessary. Press [F4] to get a lookup list of G/L accounts.
-
Cost ID: If this is a direct crop expense, enter the cost center to charge this line item to. Press [F4] to get a lookup of cost centers.
-
Grower #: If you are paying an expense on behalf of a grower and this should be deducted from the grower’s gross return, enter the grower number here. Press [F4] to get a lookup of grower accounts if you are not sure about the account number. By entering a grower account and an expense #, the program will create a grower charge on the liquidation report.
-
Expense #: Enter the expense number for the grower charge to use.
-
Lot #: If you are using the Lot Accounting system, you may also enter the lot number that this charge should be against. If you leave the lot number blank, then this charge will appear on the Create Grower Payable window after lots have been liquidated. See the Lot Grower Liquidations manual for more information.
-
Job ID: This is used as a subcategory for cost accounting reports. If you are not using subcategories, then this column will not appear. Depending on your settings, this may have a different heading (such as Operation, Phase, or Activity). You can press [F4] for a lookup of job codes.
-
Year: This is the crop year to charge this line item to. The crop year will appear automatically for you if a default crop year has been entered either in the system file or on the cost center itself.
-
Description: The Description you entered above will appear here automatically. Change it if you want to note more details. For instance, you might have entered "Chemicals" above, but on the line items enter the brand names of the chemicals purchased on each line item.
-
Units: If applicable, enter the units here. For instance, you might enter the number of tons of fertilizer purchased, or gallons of a pesticide, or number of vine stakes, etc.
-
Type: Enter the unit type, if applicable. This could be tons, pounds, gallons, CWT, each, etc.
When entering line items for chemicals that have been purchased, use the following abbreviations:
GA – Gallons
PT – Pints
QT – Quarts
OZ - Ounces
TN – Tons
LB – Pounds
GR – Grams
KG – Kilograms
You may also use the “Purchase Unit” abbreviation that you have entered on a chemical.
Rate
If applicable, enter the rate per unit here. This entry is optional, check your program setup to see if it is enabled. If you enter both the units and the rate, they will be multiplied out and the result will appear in the Amount column.
Amount
The amount will default to the difference between the total expensed on the line items and the check total.
In other words, on the first line item you enter, the amount will default to the check total. In many cases, checks only have one line item, and so this saves you from typing in the check total again.
However, if you will be splitting up the amount into separate line items, simply type in the amount for this line item and it will replace the amount that is already there. On the last line item, the amount should be correct
Once the line items balance with the check total, the Save button will automatically be highlighted. Press the Space bar or Enter to save the invoice and clear the window for another entry.
Automatic Check Printing Settings
Putting an Invoice on Hold
At times you may need to enter a bill but for various reasons, it will not be paid before the due date that you have entered. Normally, the Automatic Check Printing option will pay all invoices according to the due date. For bills that you want to place a hold on, the Ok to Pay checkbox at the bottom of the window will control whether or not an invoice will be paid by the Automatic Check Printing option. Normally this box is selected for any new invoice that you enter. Deselect the box to place a hold on the invoice.
Remember that the Ok to Pay checkbox only determines whether or not the Automatic Check Printing will pay the invoice. When you are ready to pay an invoice that was placed on hold, you can do one of two things:
-
Edit the invoice, selecting the Ok to Pay box. This can be done on the Invoice entry window, or through the Edit Payment Status on Invoices option under the Payables Reports/Tools menu. The next time you use the Automatic Check Printing option, the invoice will be paid.
-
Enter a Payables Check manually from the Checkbook Register window, or use the Batch Payables Check Printing to print a check for this invoice.
Issuing Separate Checks
When there are several invoices to be paid for one vendor account, the Automatic Check Printing option will combine the invoices together and print a single check for the total amount of all invoices. On the check stub, each invoice will be itemized.
In some situations, you may want to issue a separate check for a particular invoice. In this situation, you should select the Pay With Separate Check box at the bottom of the invoice entry window. This will cause the Automatic Check Printing to print a separate check for this invoice. If more than one invoice on the same vendor account has this box selected, then a separate check will be printed for each of those invoices. If there are also other invoices to be paid that do not have this box selected, the Automatic Check Printing will issue a single check to pay those invoices together.
Both the Ok to Pay and the Pay With Separate Check checkboxes can be changed after an invoice has been entered. If you need to edit these settings on multiple invoices for the same vendor, the best way of doing this is to use the Edit Payment Status on Invoices option.
Printing the Invoice Journal
The Invoice Journal report is provided for you to check over a batch of vendor invoices and correct any errors before finalizing the invoices on the report. Until the invoices are finalized on the Invoice Journal, they will not appear on the Cash Requirements Report and they will not be paid by the Automatic Check Printing option.
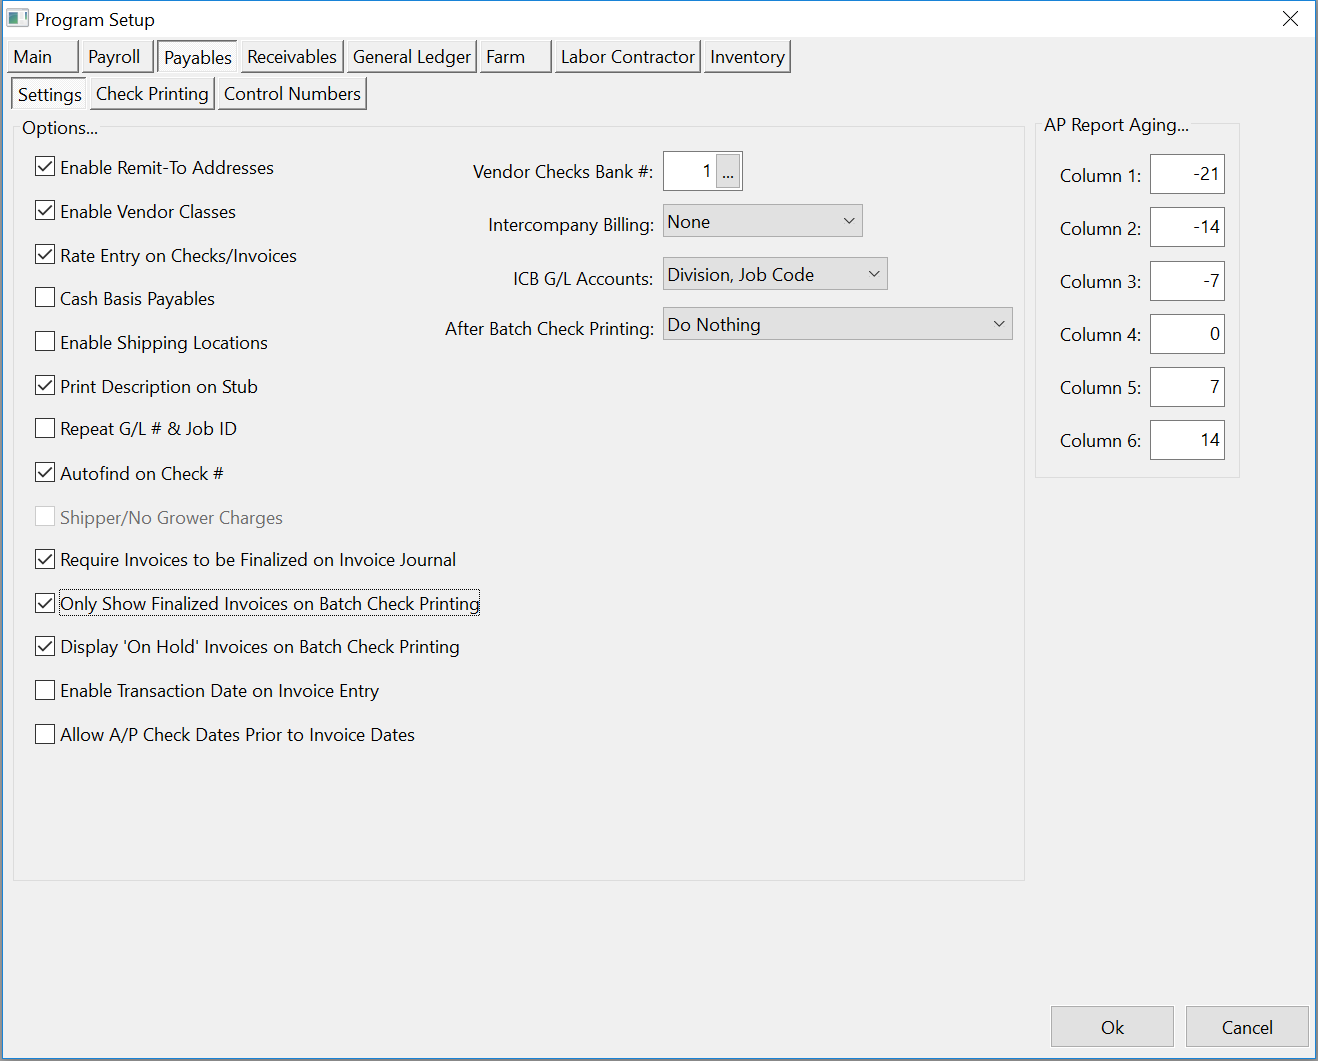
Printing the Invoice Journal and finalizing the invoices is an optional step. A setting in the Program Setup window controls whether or not it is necessary to print the Invoice Journal. To change this setting, go to Tools > Program Setup, and click on the Payables tab.
Here you can select or deselect Require Invoices to be Finalized on Invoice Journal.
Recurring Payables Invoices
Once you have finished entering an invoice, you can make it a recurring invoice that will be created automatically on a specific schedule. This can be useful for rent bills, lease payments, or other invoices that are the same amount from month to month. To create a recurring invoice, click on the button just to the right of the Invoice Date entry. The following window will appear:
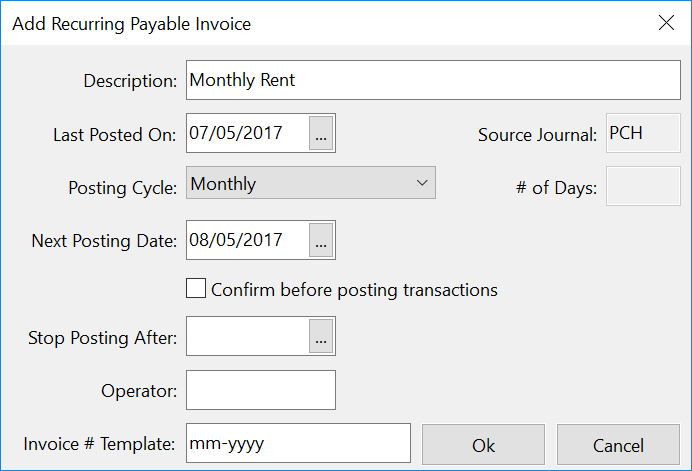
Description
The description from the invoice entry window will appear here automatically. If you did not enter a description on the invoice, you will need to enter one here.
Last Posted On
The invoice date will appear here automatically. Normally you would not change this entry.
Posting Cycle
Select either Monthly, Weekly, User Defined, or Manual. If you select User Defined, enter the number of days between posting in the entry to the right.
When you choose the Manual setting, a set of recurring entries will be created but they will not be posted automatically by the program. You can post them manually by going to the General Ledger >Transactions and selecting the Recurring Journal Entries option.
Next Posting Date
This will default automatically to one month from the "last posted on" date. Enter a new date to post the next entry on if you have changed the posting cycle.
Confirm before posting transactions
Select this box if you want the program to alert you before posting the transaction. This can serve as a reminder that the transactions have been created and gives you a chance to override the creation of the recurring entries. If you do not select this box, the transactions will be posted automatically on the next posting date when you start the program.
Stop Posting After
Enter a date to stop posting the recurring transactions. For instance, if you are setting up an invoice for a 4 year lease, you could enter the date of the last payment here and the program will not create an invoice after that date.
Operator
You can enter a user name here (typically your own) to limit posting of the recurring journal entries to when a particular user logs into the program.
Invoice # Template
Each invoice on a vendor account must have a unique invoice number. For recurring invoices, the invoice number is often based on the date or month the bill is posted. A template is used to create a unique invoice # for each invoice. The program will automatically recognize patterns in the invoice number and try to create a template for you. You can edit this template or supply your own template.
You can use the following values in the template:
“######” will be replaced with a unique invoice serial number (six digits, with leading zeros). If no template is provided, this will be used as a default invoice number.
"mm/yyyy" will be replaced with the month and four digit year, for example "01/2006"
"mm/yy" will be replaced with the month and two digit year, for example "02/06"
"mm/dd/yyyy" will be replaced with the invoice date, for example "01/26/2006"
"mm/dd/yy" will be replaced with the invoice date, for example "02/05/06"
"yyyy" will be replaced with the four digit year, for example "2005"
"mmm" will be replaced with the three leter abbreviation of the month, for example "JAN"
Any other text or numbers that appear in the template will be used "as-is" in the invoice number of a recurring invoice.
In the above screenshot, the recurring invoice was created based on an invoice that had "JAN 2006 STMT" as the invoice number. The program translated that into the template "mmm yyyy STMT". Using this template, the next invoice that will be created on February 5th will have "FEB 2006 STMT" as the invoice number.
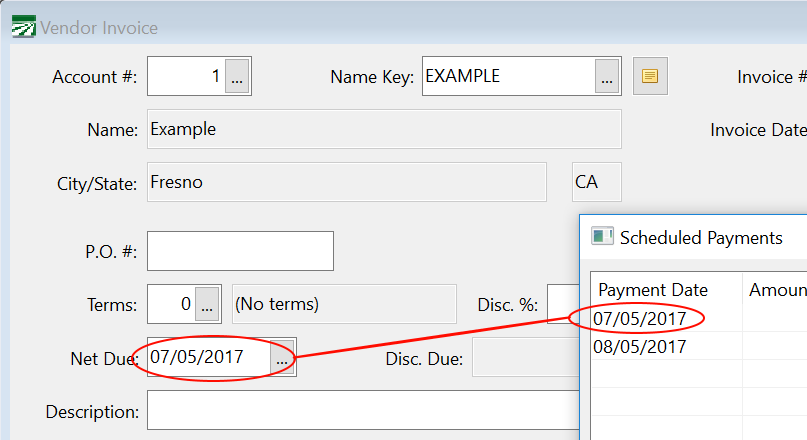
Scheduling Partial Payments
Click on the Payments… button next to the Terms entries to enter a series of partial payments for this invoice.
The Scheduled Payments window will appear where you can enter the dates and amounts of the payments to be made:

If you need to revise the payments later, you can bring up a vendor invoice and click on the Payments… button to make changes. The Paid column will be checked for each entry after that partial payment is made.
Note For the scheduled payments to be made, the Net Due date on the invoice and the date of the first payment must be the same. If the dates do not match up, then the program will not use the first payment amount when you pay the invoice. Even if you manually change the amount to pay while writing the check, the program will not “link” that partial payment with the scheduled payment that you set up, and the next scheduled payment will not be made.
When you use the single Accounts Payables Check Entry, Batch Payables Checks, or Automatic Payables Checks to issue a vendor check, the program will use the partial payment amount automatically:
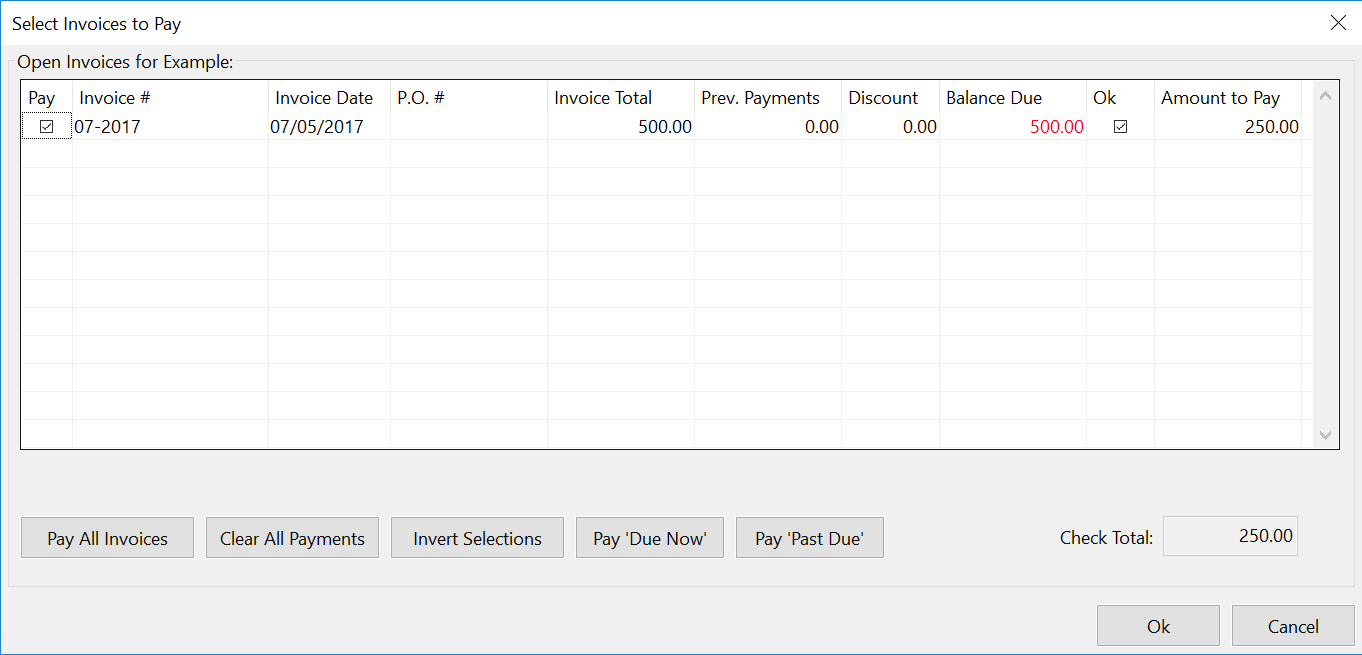
Once a scheduled partial payment has been made, the Due Date of the invoice will be advanced to the next scheduled partial payment:
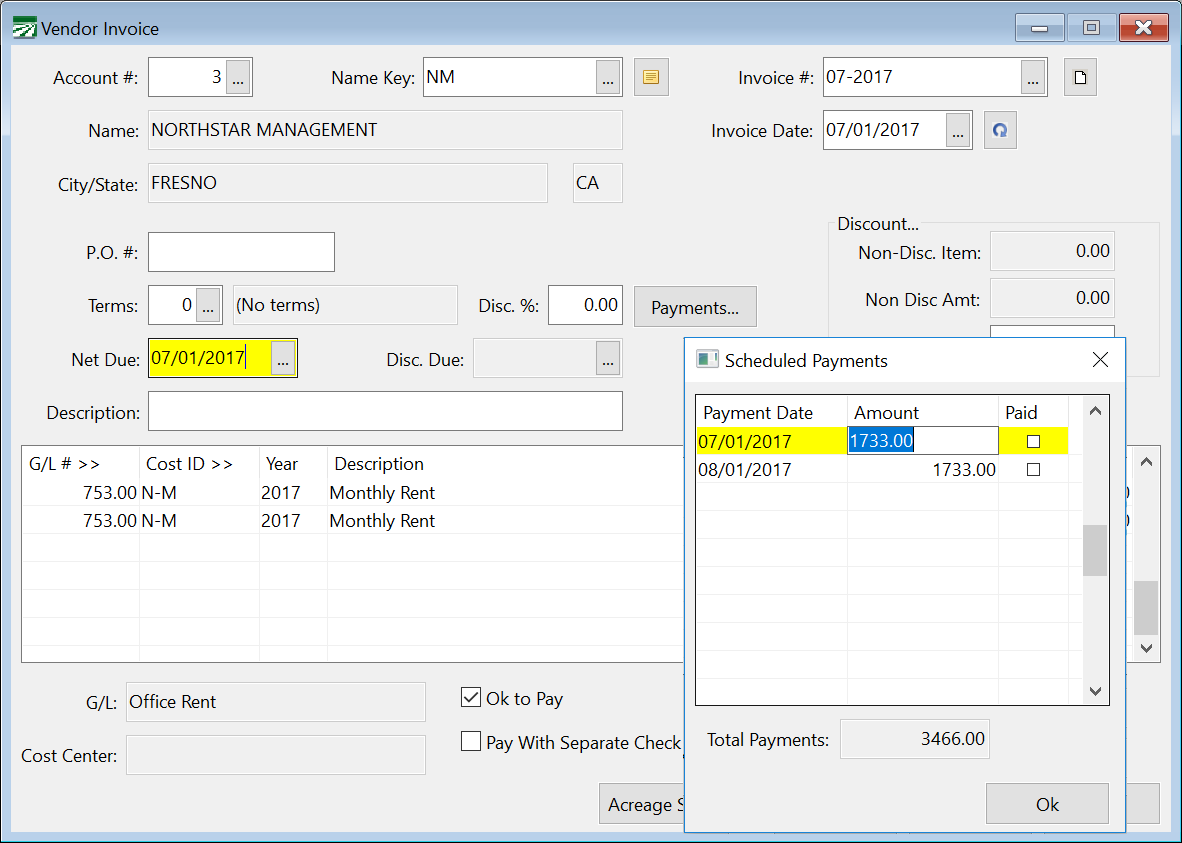
Again, it is important for the Net Due Date on the invoice to always match a date in your scheduled payments window. Otherwise, the program will not use the next scheduled payment amount when you go pay the invoice.
Once an amount in the scheduled payments list has been paid, you can place the mouse pointer over that line and a Tool-tip will appear showing you the check number for that partial payment.
Vendor Invoice Lookup
What order the invoices are listed in on lookup
How to see just invoices in the current batch
How to search for an invoice
How to add columns (P.O. #, Total Paid) to an invoice lookup
Automatic A/P Invoice Update
Note This option is only available in certain cases for the Shippers and Brokers software programs. Contact Datatech Support for more information.
When entering sales invoices, you can enter the purchase information for the items you are selling. This includes the shipper/vendor that you are purchasing from, the shipper reference # (usually their invoice #) and the cost of the item.
Once the invoice is finalized, the produce purchases report and the Produce Purchases Entry window can be used to create the A/P invoice for each item purchased on the sales invoice.
The Automatic A/P Invoice Update option automates this process. When a sales invoice is finalized, the program will automatically create an invoice for each shipper’s purchased product on the sales invoice.
Here is an example of a sales invoice and the A/P invoice that is created when the invoice is finalized. This is the sales invoice items:
When the invoice is printed and finalized, an A/P invoice is automatically created:
As you can see, for every item purchased from this shipper with the same Shipper #, a detail line is created on the payable transaction.
We recommend that the program option be set to put the payable invoice on hold (Ok to Pay is not selected). When you receive the shipper’s invoice, you can change the status to Ok to Pay so that it will appear on the Cash Requirements Report.
CREDIT MEMOS
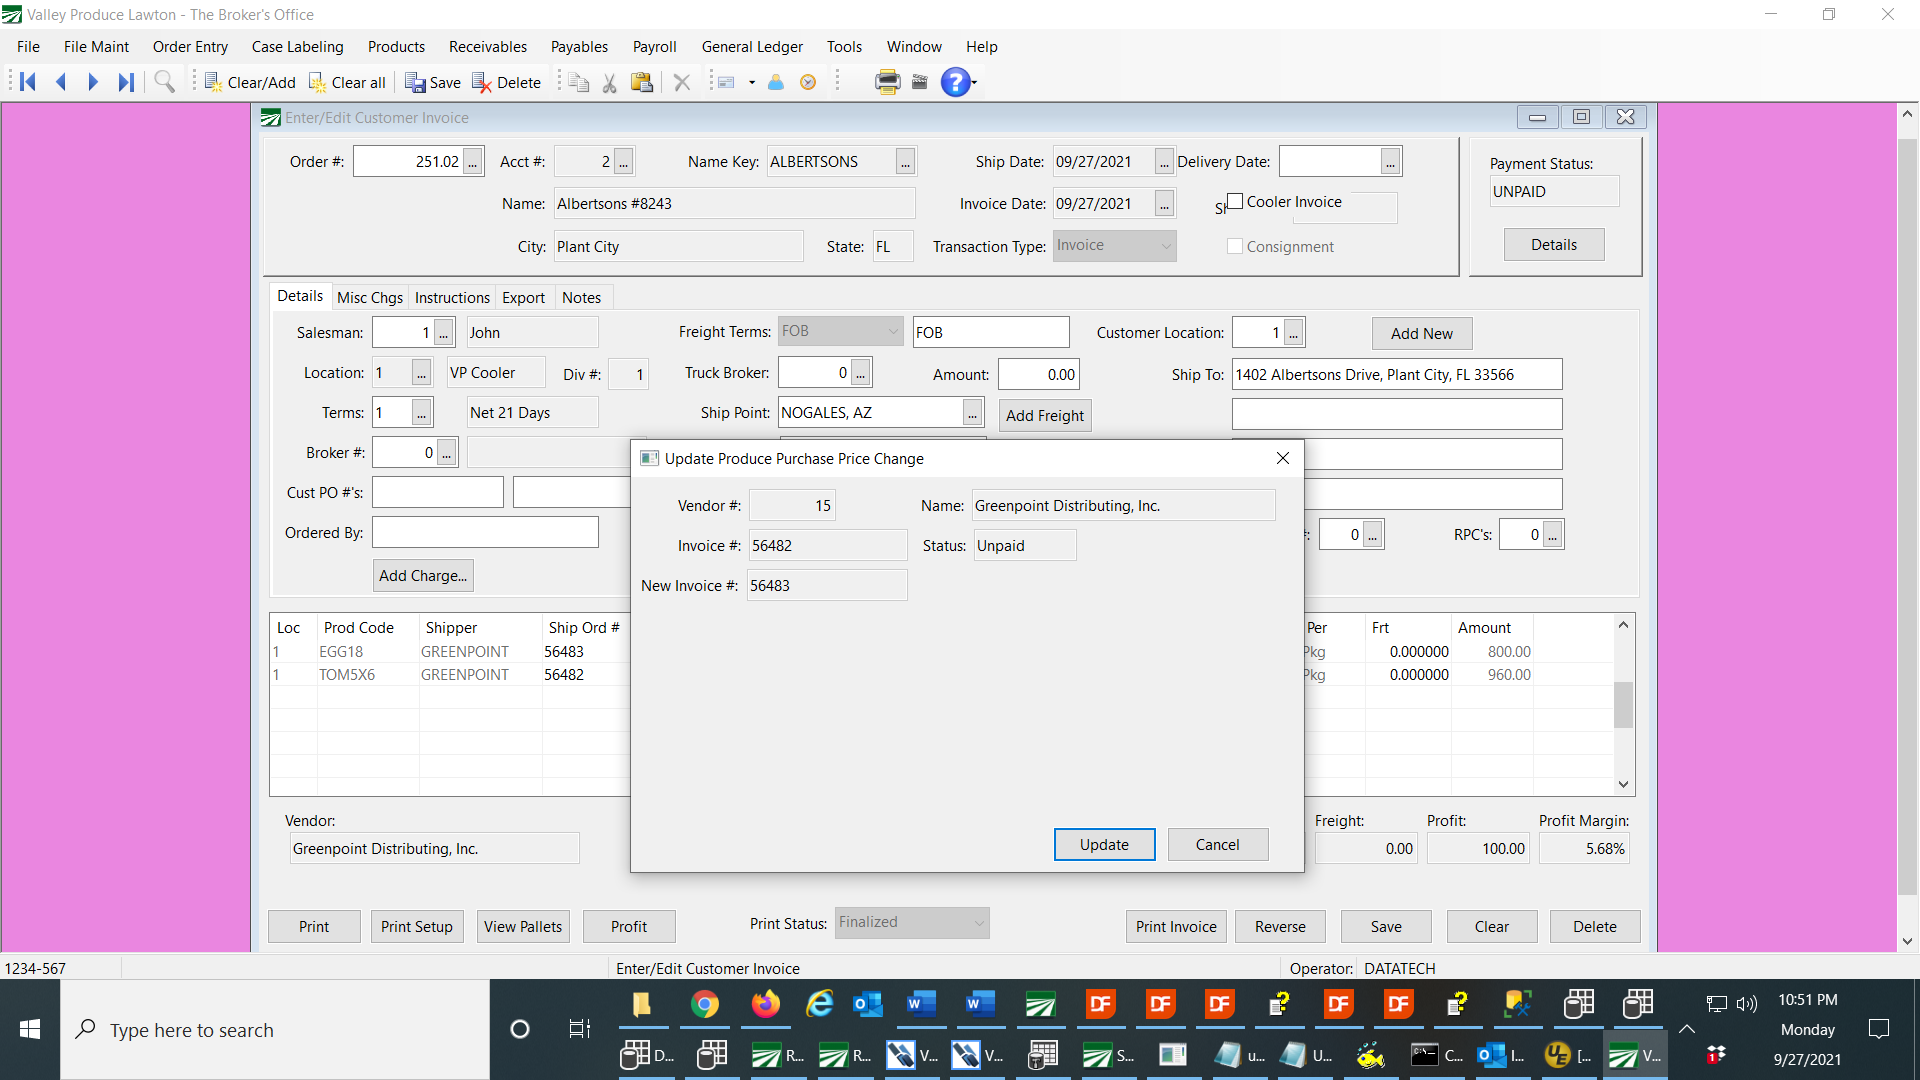
In the event that you need to issue a credit to the customer for market decline, bad arrival, etc…, and you are getting a credit from the shipper, this information can be entered on the Credit Memo and the program will automatically adjust the payable invoice for the credit. In the following example, a credit of $1.00 per box is issued to the customer for the Bell Peppers, and the shipper is giving a credit of $.75 per box.
First, you can use the Create Credit Memo option and enter the credit information:
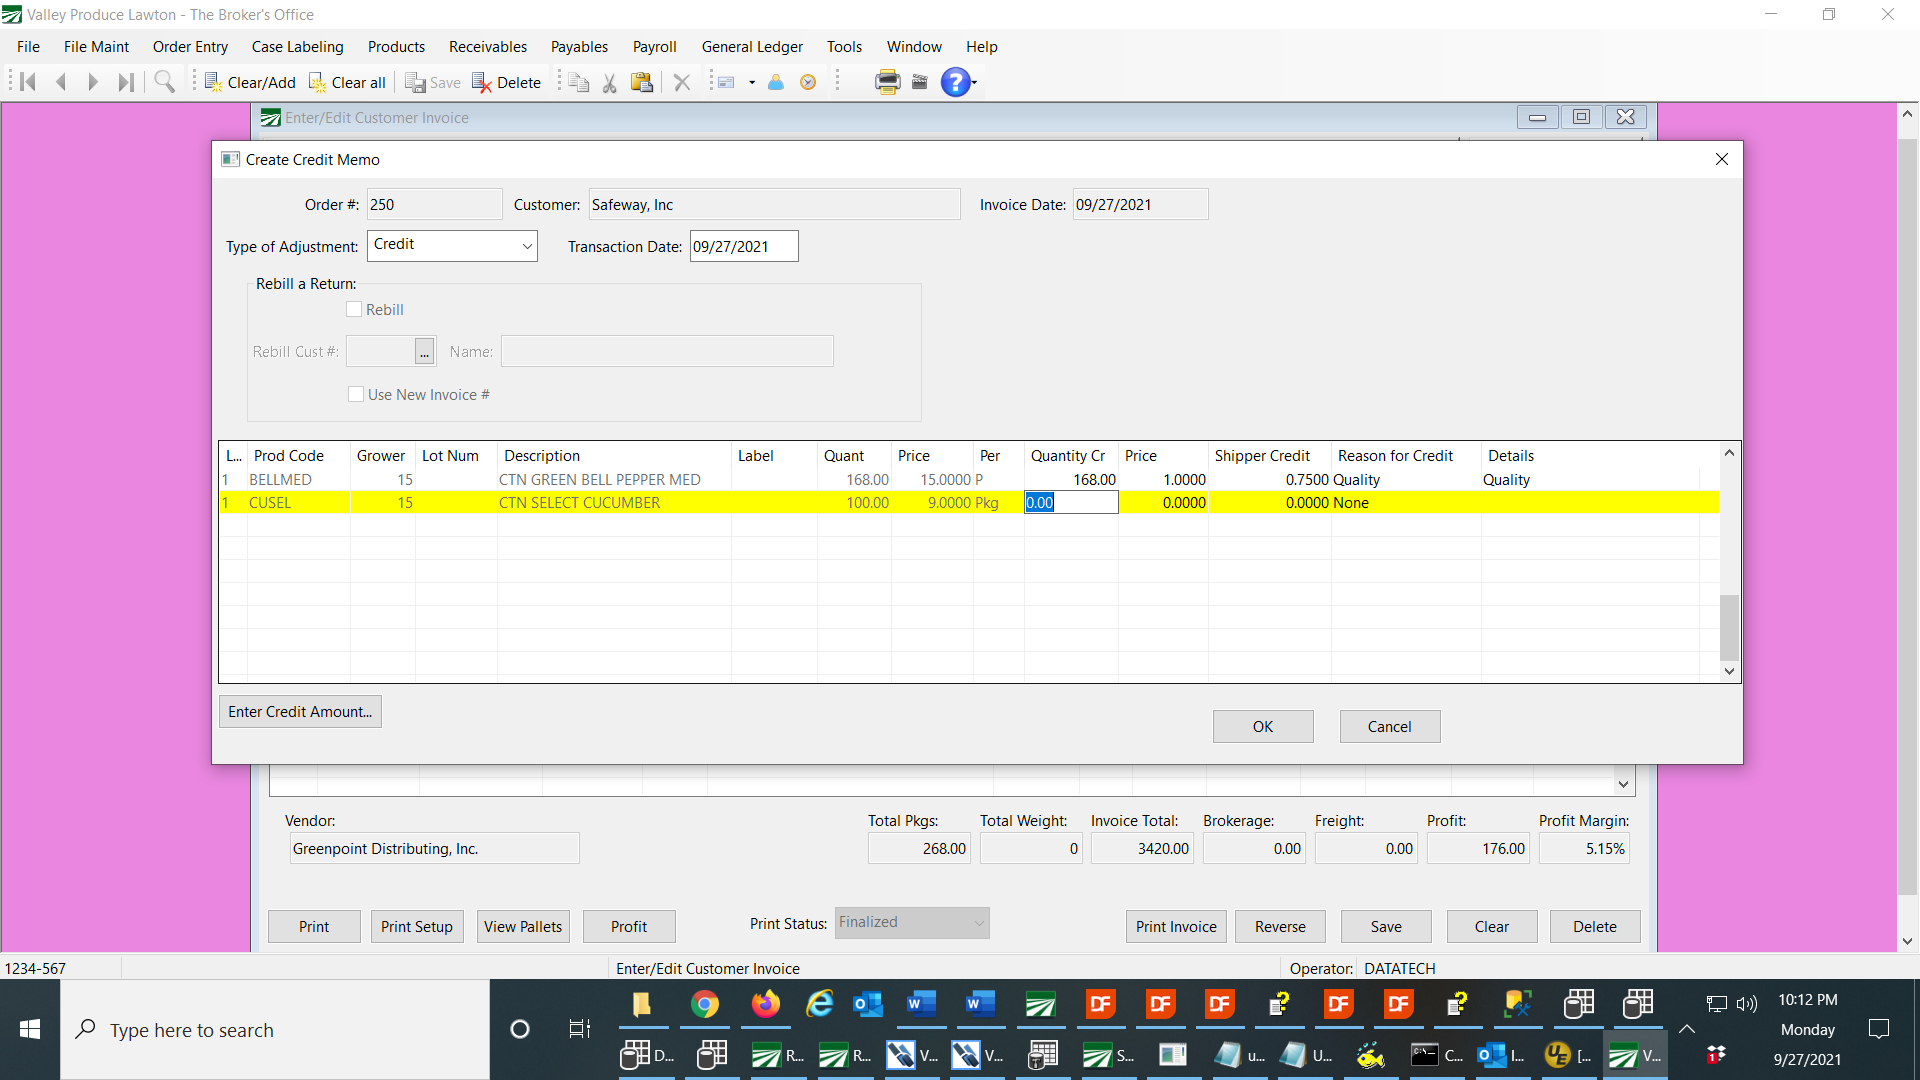
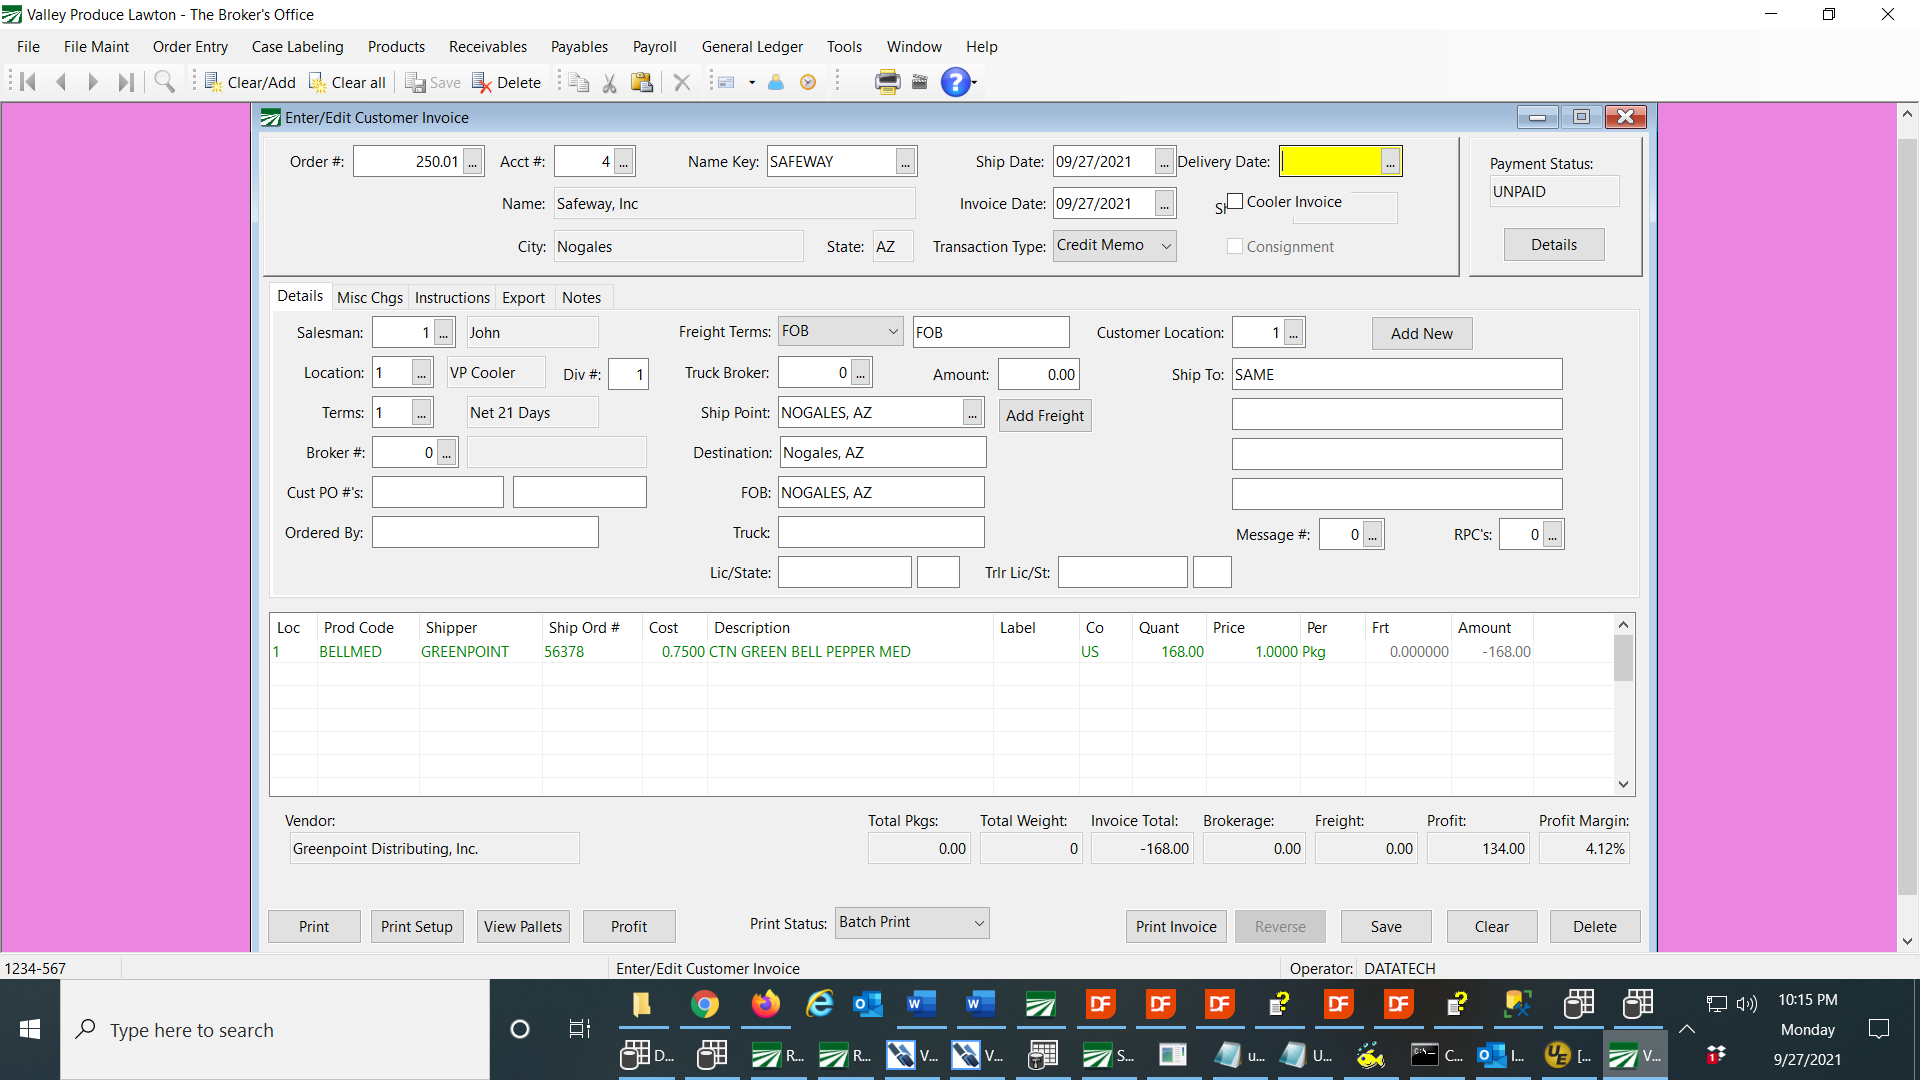
Once you click Ok to create the Credit Memo, the Credit Memo will be opened in the Invoice Entry window. Then you can print and finalize the Credit Memo. Here is what the line item will look like with the credit of 1.00 and the shipper allowance of .75:
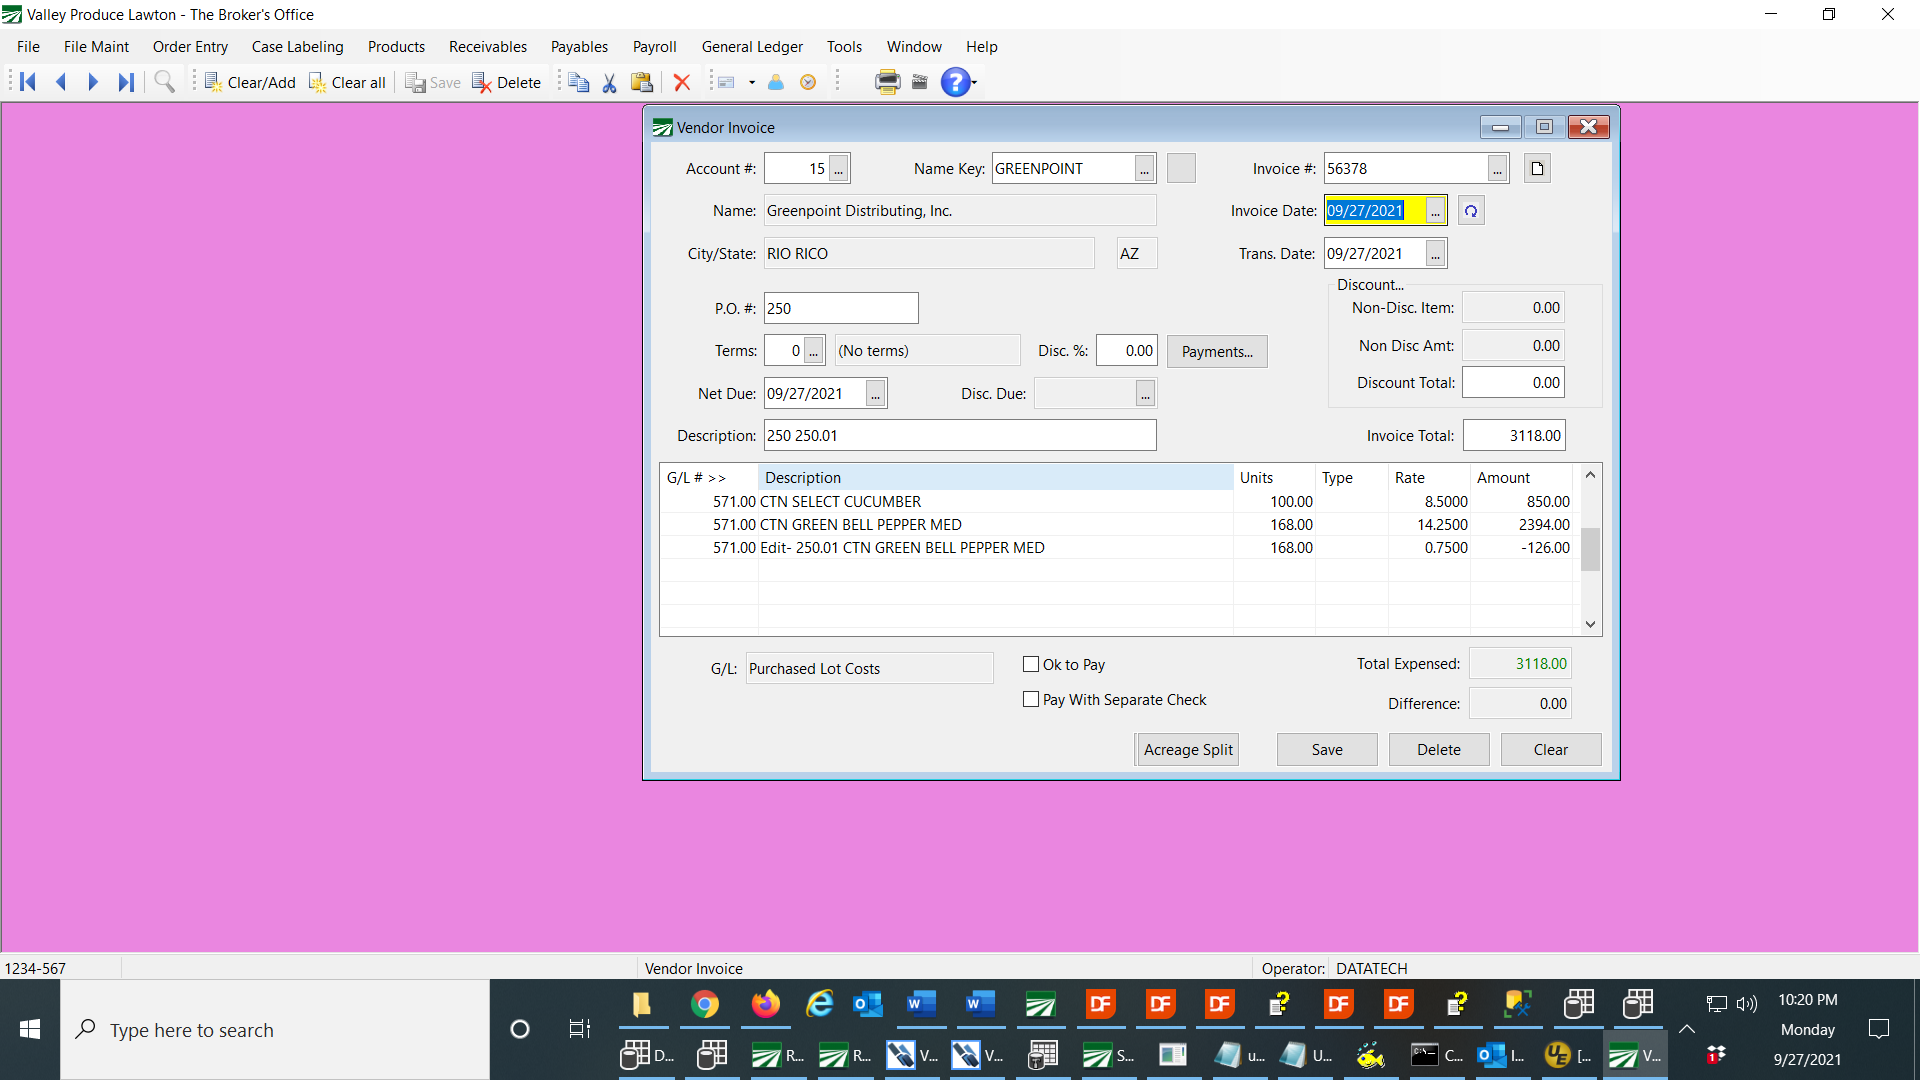
After the Credit Memo is finalized, this is how the adjustment will look on the payable invoice:
REVERSE/REBILL
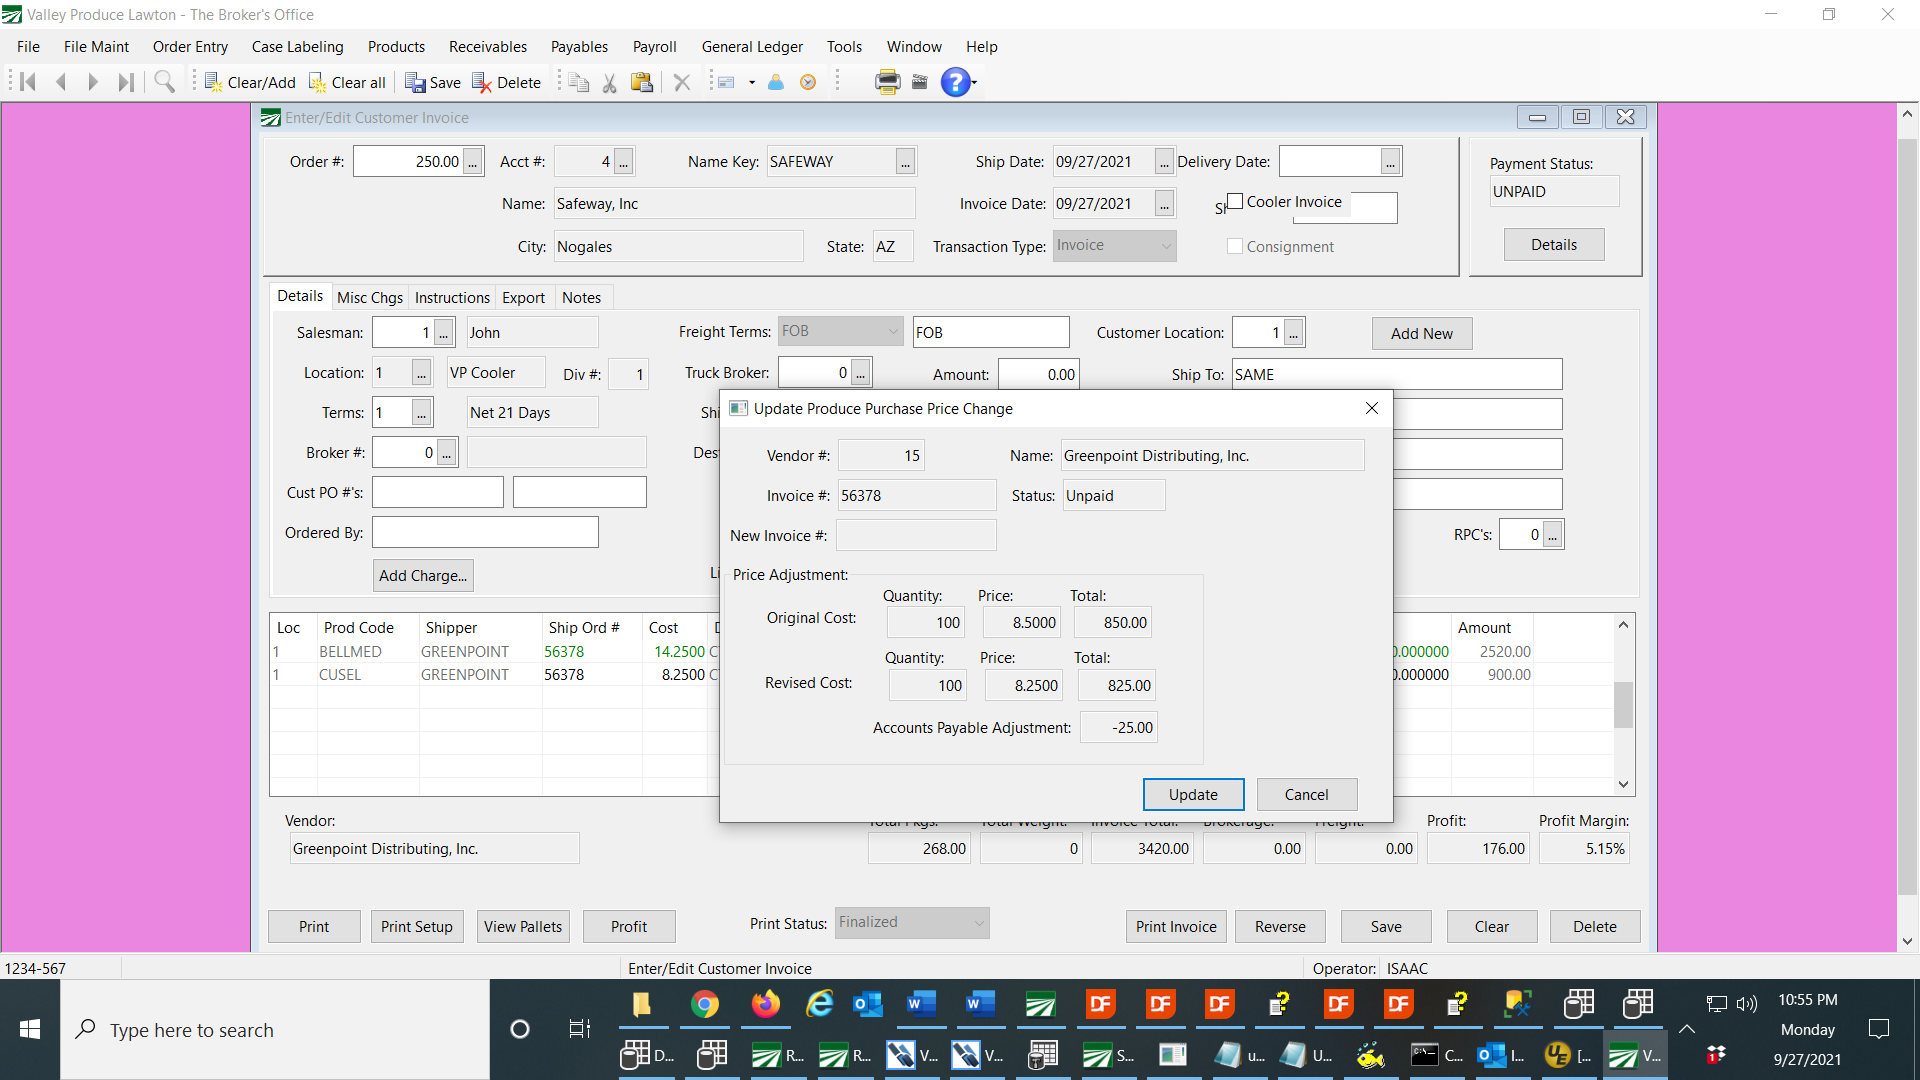
Another option available for changing the amount of an invoice to give a credit is the Reverse/Rebill option, where an invoice is reversed, and then the prices are changed on the rebill. When any shipper costs are changed on the rebill, the program will prompt you to adjust the payable invoice.
These adjustments are completed immediately, instead of waiting until the rebill is finalized, since that adjustment needs to be done at the time the cost is changed.
Here is an example of an original invoice:

A credit of $2.00 for the Eggplant needs to be issued to the customer, and the shipper is allowing a $2.00 deduction on purchase. When you reverse and rebill, you will have the rebill invoice on the window as follows, and when you adjust the shipper cost to $9.50, a window will pop up to verify that you want to adjust the payable invoice:

When you click Update, the payable invoice will be updated immediately to show a credit of $160.00. You can then also edit the price the customer will be billed, then print and finalize the invoice.
This is what the payable invoice will show:
EDIT A/P INVOICE # or COST
If a payable invoice has been created using the automatic update, any edit of the payable invoice # or the product cost (to correct an error where you are not giving a credit) should be done from the Sales Invoice.
When you display a finalized invoice, you can edit the Shipper # or the cost, and when you do, a window will appear to verify that you want to make the change. When you make the change, the payable invoice will be update automatically. Here is an example of correcting the Shipper Order #. When you change one line, the program will also change every other line with the Shipper #.
Here is an example of a change in the cost, which will update the payable invoice with the change:
PRODUCE PURCHASES REPORT
You can use the Produce Purchases Report to get reports of finalized payable invoices. You can also use it as an audit to make sure all payable invoices have been created. However, you would normally not use this to create payable invoices, since that is done automatically.
PRODUCE PURCHASES ENTRY
Payable invoices that are created automatically are not compatible with the Produce Purchases Entry window. As noted in the above instructions, adjustments to payable invoices can be made in various ways from the Sales Invoice Entry window, through edits, Credit Memos and Reverse/Rebills.
If for some reason you need to edit a payable invoice that is created automatically, use the general purpose Enter/Edit Vendor Invoices to make edits that cannot be made through the Sales Invoice Entry window.
OTHER TOOLS
We recommend that when payable invoices are created automatically, the Ok to Pay flag is not set. You can then approve them for payment when you receive the invoice from the shipper.
To monitor invoices you may have on Do Not Pay, you can print the Do Not Pay Invoice List. This will help keep track of missing shipper invoices.
Also, when checking and approving invoices, you can use the Edit Payment Status window on Invoices. This will display invoices for a vendor in a list, allowing you to quickly approve any invoices you have received from that shipper, then move on to the next shipper.
Open Invoice Journal Message
If you have entered vendor invoices without printing and finalizing the Invoice Journal, you may get the following message:
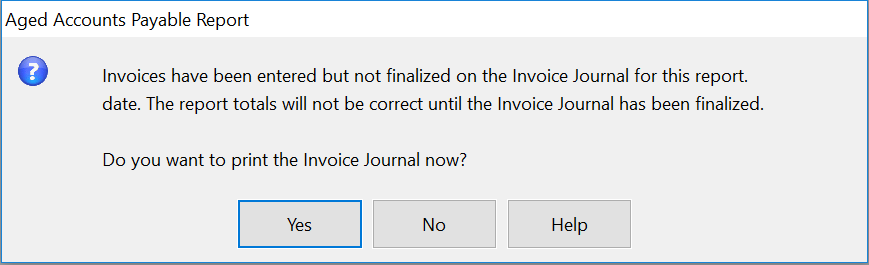
Invoices that have not been finalized on the Invoice Journal will not be included on the Aged Accounts Payable Report. Because they are posted to the General Ledger immediately, they will be included in the Control Total that prints at the end of the report.
To print and finalize the Invoice Journal, click on the Yes button when this message appears, or go to Payables > Reports > and select the Invoice Journal menu option.
This message will only appear if there are invoices in the current batch that have not been finalized and they are dated prior to or on the report date that you are using to print the aging report.
The Invoice Journal is designed to be a report that is used to review the invoices you (or other users) have entered before releasing them for payment
Some users may prefer not to print and finalize vendor invoices on the Invoice Journal. There is a setting on the Program Setup window that will control whether or not the Invoice Journal needs to be printed and finalized.
When deciding what type of workflow you want to use with Payables, keep in mind the following. Unfinalized vendor invoices:
-
Will not appear on the Aged Accounts Payable Report
-
Will not appear on the Cash Requirements Reports/Automatic Check Printing.
-
May or may not appear on the Batch Check Printing window (this is controlled by a setting in the Program Setup option).
If you turn off the requirement to print and update invoices on the Invoice Journal, then invoices will be automatically included on all of these reports/options.
The setting that controls whether or not you need to print and update invoices on the Invoice Journal is under Tools > Program Setup > Payables > Settings > Require Invoices to be Finalized on Invoice Journal:
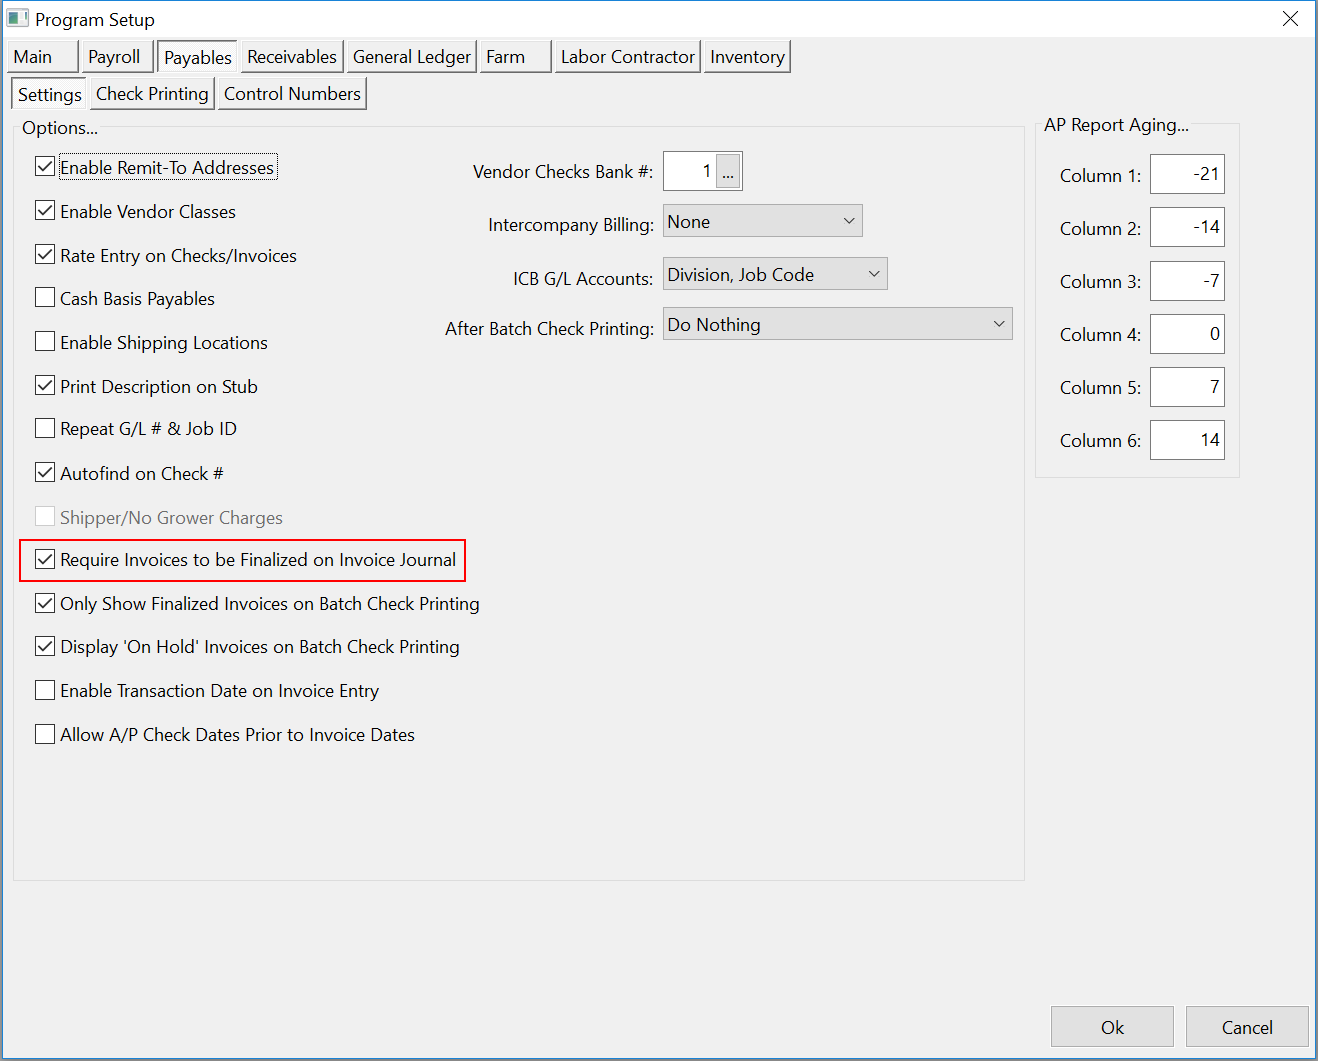
When the box labeled “Require Invoices to be Finalized on Invoice Journal” is deselected, invoices will be automatically finalized when they are entered. This means that they will not appear on the current batch Invoice Journal and will not need to be finalized on that report. Keep in mind that if you have any unfinalized invoices already entered, changing the status of this box will not finalize them. You will still need to print the Invoice Journal one last time to finalize those invoices.
When invoices are finalized automatically as they are entered, the current batch option for printing the Invoice Journal will never print any entries. You can still deselect the Current Batch check box and enter dates to print the report for if you want to get a list of invoices.