Batch Payroll Check Entry Right-Click Menu
The right-click menu has shortcuts for several options that you may need while doing your payroll.
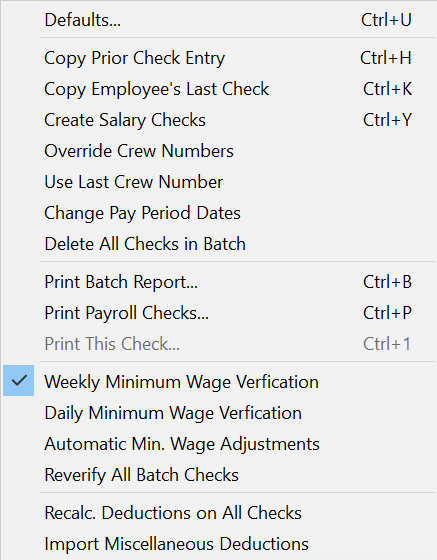
Several of the menu options have keyboard equivalents. For instance, if you want to print the payroll check that is currently displayed, press Ctrl+[1] to open the Print Payroll Checks window with that employee’s check already selected to print.
Create Salary Checks
This option will create a check in the current batch for every active employee that is set to Salary for their Pay Type. This option can be accessed from the right-click menu as well as the shortcut key Ctrl+Y.
Before you use this option, make sure to enter a starting and ending date for the pay period. Whatever dates are currently entered will be used for the salary checks. If you have already entered checks, the pay period dates will be retained from those entries. If the pay cycle for salary employees is different, make sure you change the dates. For instance, if you were entering checks for weekly employees and the salary employees are paid on a biweekly basis, you would need to change the pay periods before creating the salary checks.
If a check has already been entered for an employee that is paid on a salary basis, the program will skip that employee. It will not modify the existing check or create another check.
Salary employees must also have a Default G/L # and a Pay Rate entered on their account for the program to automatically create a check using this option.
Copy Check
The right-click menu on the Batch Check Entry window has two options for copying checks. The first option is Copy Prior Check Entry. This is useful if you have several employees that have the same (or very similar) wages. To use this option, first select the employee account. Then select the option from the right-click menu and the program will copy the line item details from the previous check that you entered. You can make changes if needed, and save the check when you are done.
In addition to selecting this option from the popup menu, you can click Copy Check at the bottom left corner of the window or use the keyboard shortcut Ctrl+H.
The second option is Copy Employee’s Last Check. This can be useful if an employee is paid the same wages each pay period, and you want to simply copy the employee’s prior check detail for the current pay period.
Note The Copy Employee's Last Check option looks for and copies only the last check issued seven days from the current date. If you enter a check date that is more than seven days in the future, the program will not find it.
Override Crew Numbers
Checks that were created by the Daily Payroll Entry will be assigned to the last crew number that the employee worked on. In some cases, you may not want the checks to be printed by that crew number. This option will allow you to automatically override the crew numbers assigned to employee checks in the current batch before they are printed with the crew number assigned on the employee account.
Change Pay Period Dates
Changing Pay Period Dates
There may be times when you accidentally enter the wrong date for the starting and/or ending date of the pay period. Because the pay period dates are retained between entries, when a wrong date is entered it may go unnoticed for some time. When you do finally notice the error, you may have a lot of checks with the wrong date. The Change Pay Period Dates option can be used to quickly correct checks that have been entered with the wrong pay period dates.
-
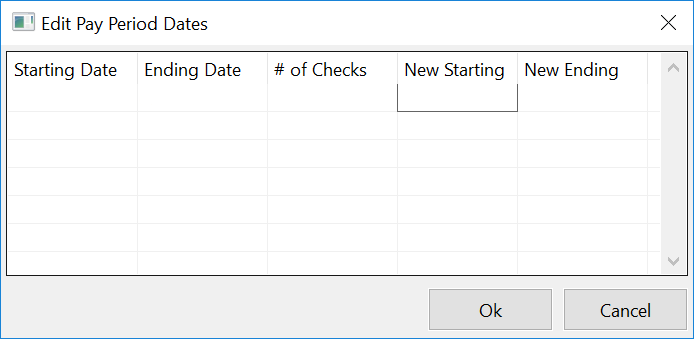
Right-click on the Batch Payroll Check entry window and select the Change Pay Period Dates option from the pop-up window.
-
In the first two columns, the window will show the starting and ending dates of all checks currently in the batch. The third column shows the number of checks that have those dates. Enter the new starting and ending pay period dates to use in the fourth and fifth columns. You can also enter a correction to just the starting or ending date here.
-
Click Ok to make the changes or click Cancel if you do not want to change the pay period dates.
Delete All Checks in Batch
The Delete All option is available on the Batch Payroll Check Entry right-click menu. It should be used with care, because once checks are deleted from the current batch, there is no way to recover them.
The Delete All Checks option can be disabled through security settings in the Operator setup file.
Import Miscellaneous Deductions
Select this option to import miscellaneous deductions from a CSV file. The CSV file must include the account number, deduction number, and the amount of the deduction on each line.
The import option will produce a report listing the deductions that were imported as well as any problems with the import data, including: the employee account number doesn't exist, the employee does not have a check in the batch, or the deduction number specified has not been set up.
Note This option will automatically create tax adjustment lines for pre-tax deductions that are imported.
What is the format for importing misc deductions on batch payroll check entry?
CSV file format, no header.
Three to five columns.
First three columns are required, fourth and fifth are optional
First column is Account number
Second column is deduction number
Third column is amount in dollars.
Fourth column is Method, single character, one of the following values:
-
G = Percent of Gross
-
I = Percent of IRA Wages
-
F = Flat
-
C = Custom
-
A = Adjust Each Check
-
N = Percent of Net
-
H = Per Hour
-
M = Percent of Net (-Misc)
-
U = Percent of Union Wages
-
1 = Flat w/Percent Gr Cap"
-
2 = Flat w/Percent Net Cap
-
3 = Flat w/Percent Disp Cap
This column can be left blank; if so it will default to F (flat). Note that although percentage methods can be imported, the amount is always treated as a dollar amount. There is no column defined to import the percentage rate to use.
Fifth column is Frequency, single character, must be one of the following values:
-
E = Each Check
-
W = Weekly
-
B = Biweekly
-
M = Monthly
-
A = Annual
-
O = One Time
This column can be left blank; if so it will default to E (each check).
Note This is not the same file format as the option to import miscellaneous deductions on the Employee Setup window.