Print Payroll Checks
Printing Payroll Checks
Once you have entered all payroll check information and verified it is correct, you can print the payroll checks.
Go to Payroll > Checks > Print Payroll Checks.
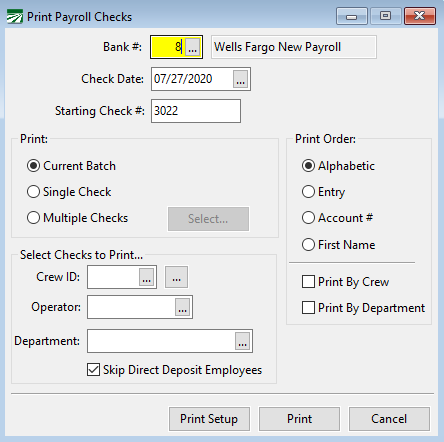
Bank #
This will default to the bank account number for payroll checks that is set in the Program Setup. You can override this if you need to print checks from a different bank account.
Check Date
This will default to today's date. The check date must always fall within the current quarter.
Starting Check #
The program keeps track of the starting check number automatically. Verify that the starting check number is correct. If it is not, you can just type in the correct starting number. (If the starting check number gets off, you can also change the setting for the next check number on the Bank Account Setup window.)
Select Current Batch to print all checks that are in the current batch. This includes all checks entered through the Batch Payroll Check Entry window or that were created from the Daily Payroll Entry window.
If you want to print a check for only one employee, select Single Check. Then select the employee that you want to print. A lookup is available to select a check from the current batch.
If you want to print checks for multiple employees that are in the current batch, select Multiple Checks, and then click Select to the right to choose which checks you want to print.
Print Order
Select either Alphabetic, Entry, Account # or First Name order. If you are printing a single check, the print order does not matter, so it is disabled.
Print by Crew
If you have entered checks for employees on different crews, selecting this box will print out the checks grouped by crew #, in the print order (alphabetic or entry order) that is specified below.
The following four selection criteria are only enabled when you select the Current Batch option. These options allow you to select certain checks in the current batch to print.
Crew ID
If you only want employees on a specific crew printed, enter the crew number here. (All other checks will not be printed or finalized and can be printed later.) Otherwise, leave this entry blank to print all crews.
You can also select multiple crews by clicking the button to the far right of the Crew ID entry. Select your crews and click Ok. The entry will then show ‘Mult’.

Operator
In a multi-user system, you can print checks entered by a specific operator. If checks were created from Daily Payroll, they will have the operator name of the person who created the checks, which may be different from the operator(s) who originally entered the check information.
Department
When this box is selected, all checks will be grouped by department. If Print by Crew is also selected and there are multiple crews within a department, then the checks for each department will be printed in crew number order.
Skip Direct Deposit Employees
If some of your employees are set up for direct deposit, you do not need to print a check for them and you should select this box.
There may be some cases where you still want to be able to print a check for a direct deposit employee, e.g. if you are issuing a check for a bonus, vacation or sick pay. In these situations, make sure this check box is not selected.
If you do not have the direct deposit option enabled, this entry will be disabled.
Print Setup
Click on this button to select a printer to use for check printing. If you do not select a printer, the report will automatically be printed to the default printer in your Printers folder. To see what the current printer selected, you can move the mouse pointer over the button and a tool tip will appear showing the printer name and port.
The program will maintain a separate printer setup file for payroll checks. This means that checks can automatically be printed to one printer and reports can be printed to a different printer. You can also change the printer used for payroll check printing by going to the Program Setup option on the Tools menu. Click on the Payroll button, then the Check Printing button. You’ll see the name of the currently selected printer for payroll checks, and you can select a different printer from this window.
On a network, each user will have their own printer setup files. This means that it is possible for different users to print checks to different printers. It also means that if you do want everyone to print checks to the same printer, each user will need to select that printer on their computer.
Click on this button to print the report to the current printer. To see the current printer, you can move the mouse pointer over the button and a tool tip will appear showing the printer name and port.
Cancel
Click on this button to close the window.
After the first check is printed, the program will ask if the alignment was ok. If the check is not aligned correctly, you can answer No and stop the check printing process or you can fix the problem and continue printing. When the first check is not printed correctly, that check will be reprinted. Make sure you void the first check that printed out so there is no possibility of two checks being given to that employee.
Selecting Multiple Employees
When you select the Multiple Checks option and click on the Select button, you will get a selection list similar to the following:
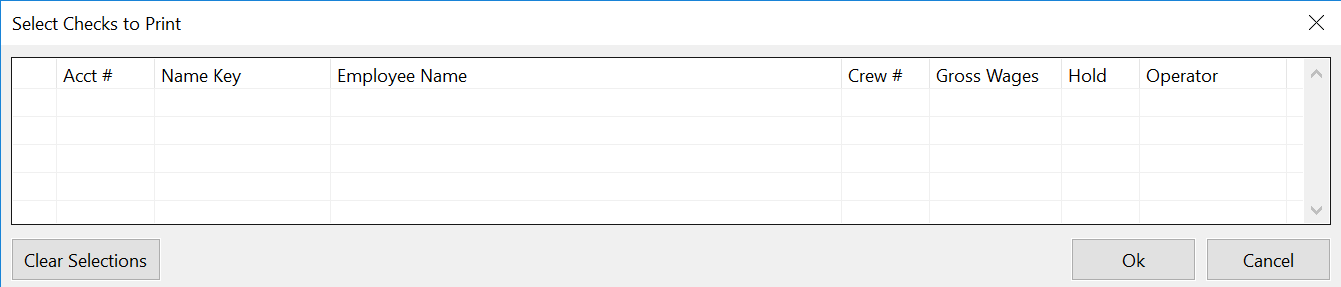
All of the checks in the current batch will be listed in this grid. Select the box in the first column to select the checks that you want to print. You can resize the window to view more checks.
You can change the order that the employees are listed in by clicking on any of the column headings of the grid.
To select a range of entries, select the box for the first employee, then select the box for the last employee while holding down the Shift key. All of the entries in between the first and last selections will be selected.
Click Ok to close the window. Click Cancel to clear all of your selections and close the window.
If you place the mouse cursor over the Select button, a tool-tip will appear showing how many checks have been selected to print. You can click Select again and add or remove checks to be printed.
After checks have been printed, the list of checks will be refreshed. Any checks that were printed will no longer appear in the list.
Printing Checks on a Network
For various technical reasons, each workstation on a network maintains its own set of printer default files. If you normally print checks from the same workstation each week, then you don't need to worry about this. The default printer for printing payroll checks will always be set to the correct printer. But if you print checks from a different workstation (where you've never printed checks before) then the payroll check printer may not be set up on this workstation. You can either click on the Print Setup button or go to the Payroll page on the Program Setup option and select the printer.
The reason that each workstation has its own printer setup files is due to incompatibilities with these files between different versions of windows. Also, the port that that is used for the printer may be different. For instance, on a Windows network, the check printer may be a local port on one computer (e.g. LPT1:) but a network UNC port on all other computers (e.g. \\WS1\HP2200). Since the printer setup file contains the port (in addition to other information that is printer driver/operating system specific) a single printer setup file on the network server for all workstations will not work.
To print checks to a dot matrix printer, a printer definition must be set up that will tell the program which port to print the checks to. This is done on the Program Setup window. From the Tools menu, select Program Setup, and then click on the Printers & Fonts button on the second row of buttons at the top of the window:
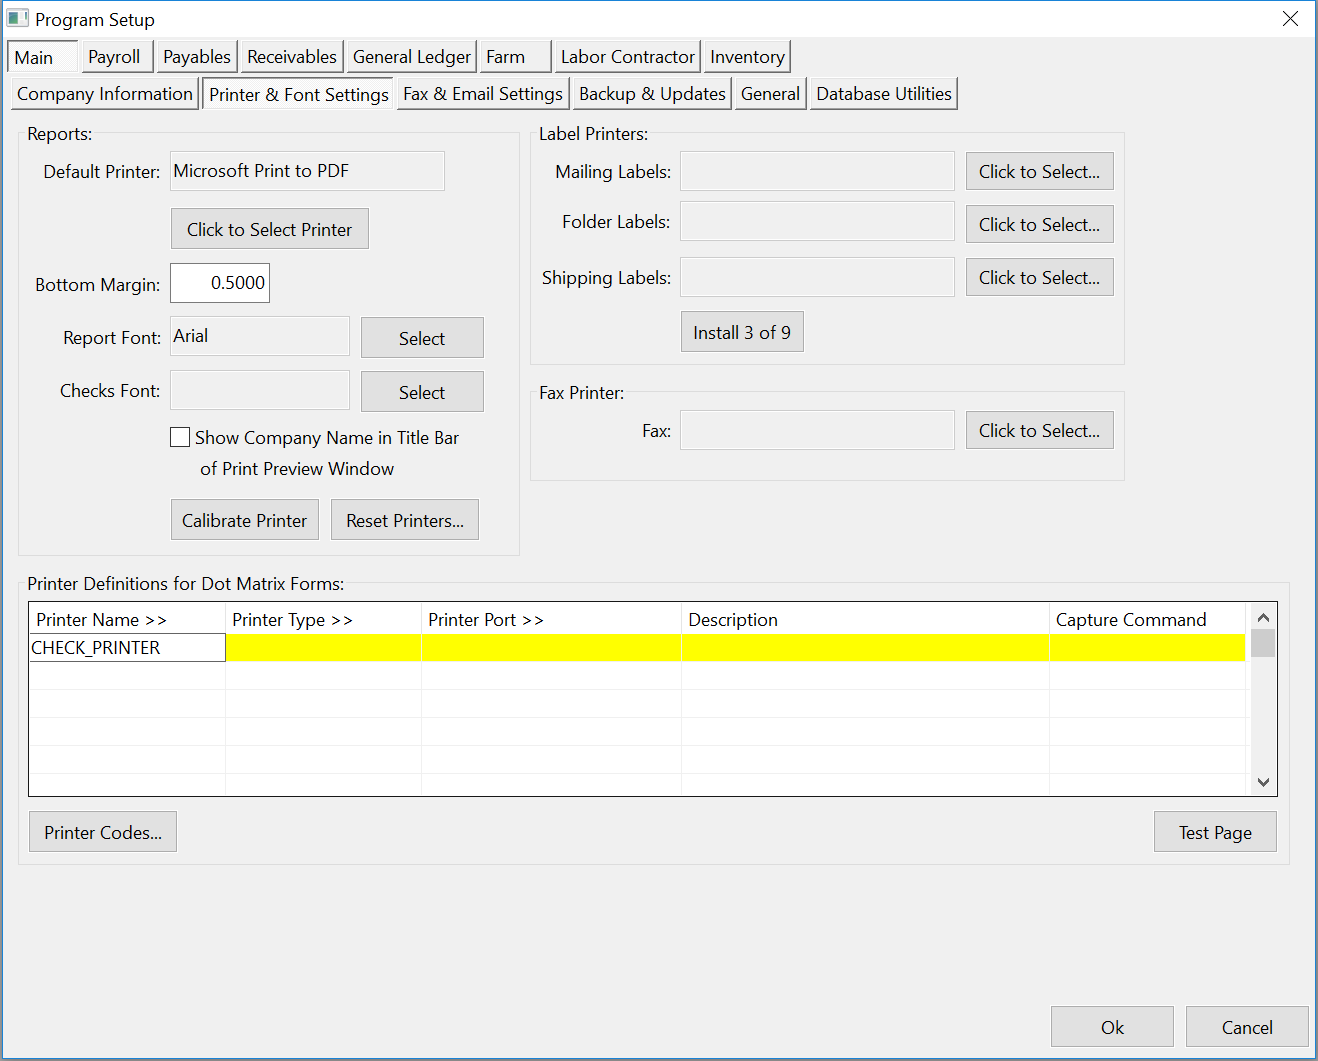
On the Printer Definitions for Dot Matrix forms, you must have an entry with CHECK_PRINTER as the printer name. In the Printer Type column, press [F4] to select the printer codes used by your printer. Under the Printer Port column, enter the printer port to print the labels to. This is usually a UNC path to a shared printer, in the form of \\computer_name\printer_name. You can also enter a LPT port (LPT1, LPT2, etc.).
If you are using Window XP and printing to a local printer, it is usually best to set up a shared printer and print to the UNC path for that printer instead of the LPT port. Windows XP sometimes has problems with applications that print directly to the LPT port.
If you have a network and may be printing checks from any workstation to a single shared printer, a UNC path must be used so anyone can print checks from any workstation.
Printing Messages on the Check Stub
When using a custom check format, you can define an area on the check stub for messages to print. A standard message can be set up to print on all check stubs. Several other messages can be set up that will print when certain conditions are met. You can also set up a message for each individual employee account. These messages can be set up to always print or to print on the check stub one time.
The custom check format option can only be used with full page checks on a laser or ink jet printer.
To set up a message for an individual employee, bring up the employee account and click on the Check Profile tab at the top of the window. The entry for the employee’s check stub message is at the bottom right corner. Below the message, a check box controls whether the message will be printed once. If the box is selected, the message that you enter will be printed on the employee’s next check, then the program will clear the message so it will not appear on subsequent checks.
One thing to keep in mind is that the message will be cleared immediately after the check has been printed. This means that if you need to reprint a check, the message will not appear on the reprinted payroll check.
To set up the messages that can be printed on the check stubs for all employees, go to the Program Setup option on the Tools menu, click on the Payroll button at the top of the window, and then click on the Check Messages button below that.
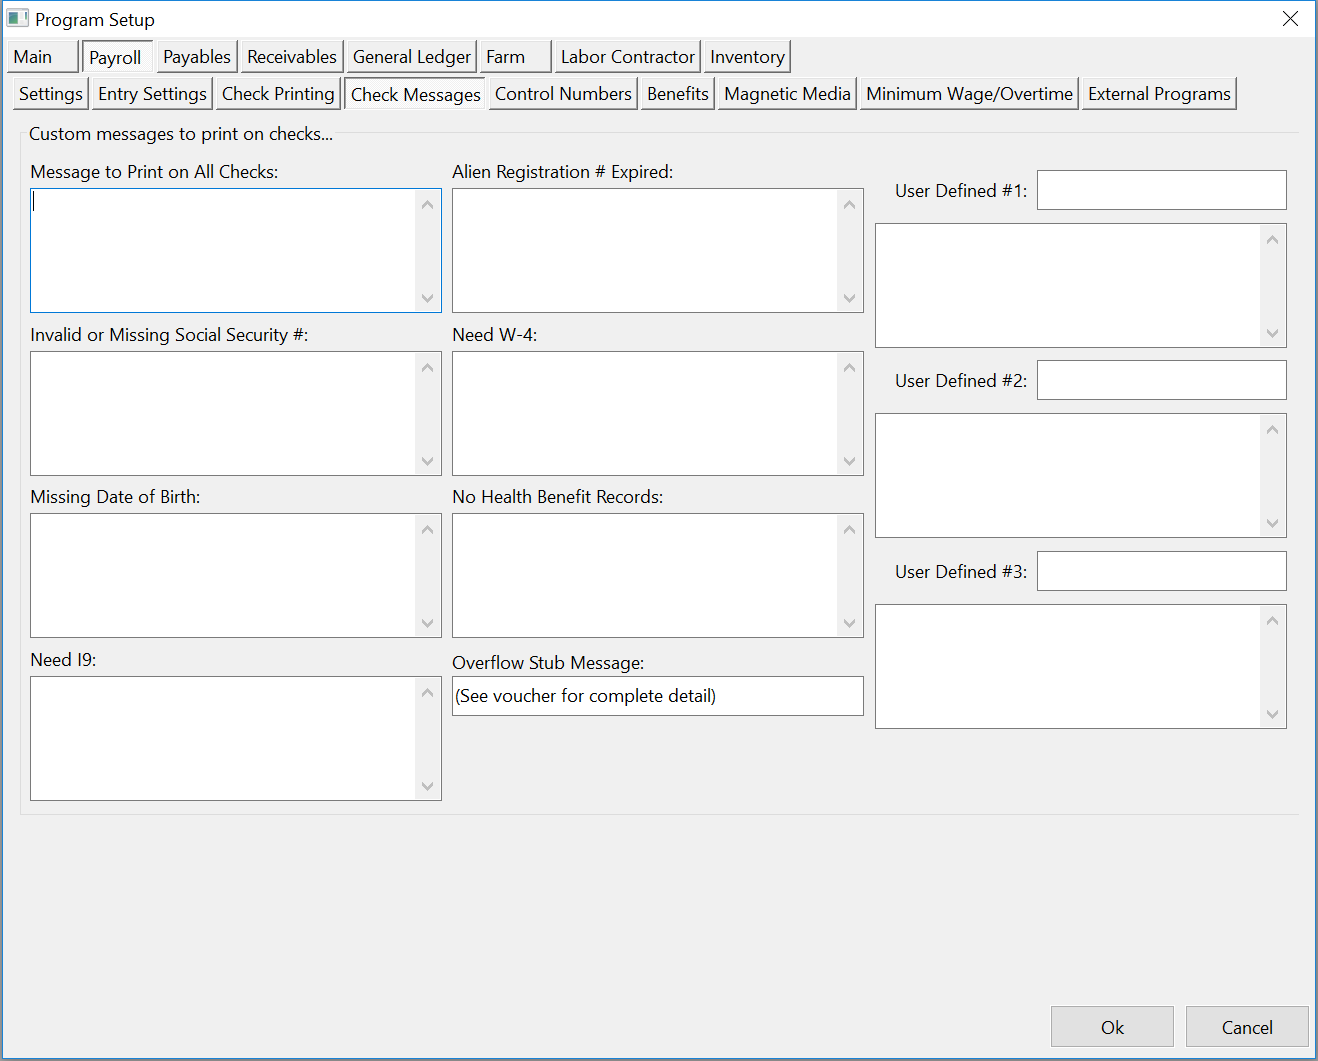
It is possible for multiple messages to be printed on the check. For instance, if an employee has a message set up on their account, has a bad social security number, and you have a message set up to print on all employees’ checks, all three messages will be printed. In the setup for your custom check format, you should take care to provide enough room for your messages to print on the check stub.
If any employee has a message set up on their account, that message will print first, followed by the conditional messages in the order that they appear on the Check Messages setup window. The Message to Print on All Checks will be printed last.
In any of the messages that you enter, you can included data from the employee account within the message by including a field name surrounded by a less than and greater than sign. For instance, including “<LICENSE_NUM>” in a message will cause the program to print the employee’s driver’s license number. The following table lists the field names that can be used in the check messages:
|
Field Name |
Description |
|---|---|
|
NAME_KEY |
Employee name key. |
|
CREW_NUM |
Crew number that the employee is assigned to. |
|
LAST_NAME |
Employee’s last name |
|
FIRST_NAME |
Employee’s first name and middle name/initial |
|
MAIL_ADDRESS |
Employee’s mailing address |
|
ALIEN_REG_NUM |
I-9 number |
|
ALIEN_EXP_DATE |
I-9 expiration date |
|
PHONE_NUM |
Employee’s telephone number |
|
DATE_BIRTH |
Employee’s date of birth |
|
DATE_HIRE |
Date employee was originally hired |
|
DATE_TERM |
Employee’s termination date |
|
REASON_TERM |
Reason for termination |
|
MARITAL_STATUS |
Marital status for tax calculation purposes (M or S) |
|
FED_DEP |
Number of exemptions claimed for federal withholding |
|
STATE_DEP |
Number of exemptions claimed for state withholding |
|
ADDL_FED_WHT |
Additional federal withholding amount requested |
|
ADDL_ST_WHT |
Additional state withholding amount requested |
|
PAY_TYPE |
Type of pay: H=Hourly, P=Piecework, S=Salary |
|
PAY_RATE |
Employee’s default pay rate |
|
DATE_LAST_RAISE |
Date of employee’s last raise |
|
VAC_RATE_NUM |
Employee’s vacation accrual rate |
|
SICK_RATE_NUM |
Employee’s sick pay accrual rate |
|
LOAN_AMOUNT |
Current balance of employee’s loan/advance |
|
LOAN_DEDUCTION |
Default deduction for loan/advance |
|
ACCT_NUM |
Employee’s account number |
|
PIN |
Employee’s PIN |
|
LICENSE_NUM |
Employee’s driver’s license number |
|
DL_EXP_DATE |
Employee’s driver’s license expiration date |
|
INSURANCE_DATE |
Insurance coverage thru date |
|
LAST_MED_EXAM |
Date of employee’s last medical exam |
|
POSITION |
Name of employee’s position |
|
DEPARTMENT |
Name of department employee is assigned to |
|
CELL_PHONE |
Employee’s cell phone number |
|
PAGER_NUM |
Employee’s pager number |
|
EMAIL_ADDRESS |
Employee’s email address |
|
H2A_HRS_OFFERED |
Number of hours offered to H-2A workers |