Entering Bank Settings for Direct Deposit
Direct Deposit Setup + Testing
Your company’s bank information should be entered before finalizing Direct Deposit payments and creating a Direct Deposit file.
-
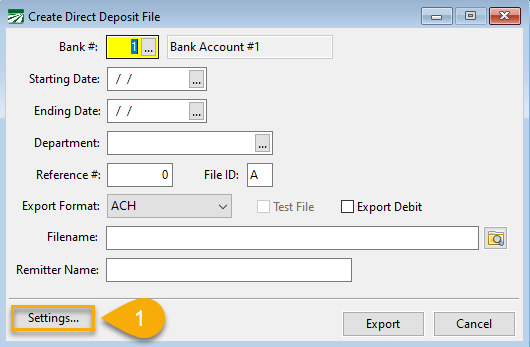
To enter bank settings, go to Payroll > Checks > Create Direct Deposit File. Then click Settings.
Note If there are multiple bank accounts used for Direct Deposit, you will have to select them from the Bank # entry and enter the information in the settings for each one of them.
-
In the Bank Account Direct Deposit Settings window, enter your bank’s information. You will need to request much of the information from your bank.
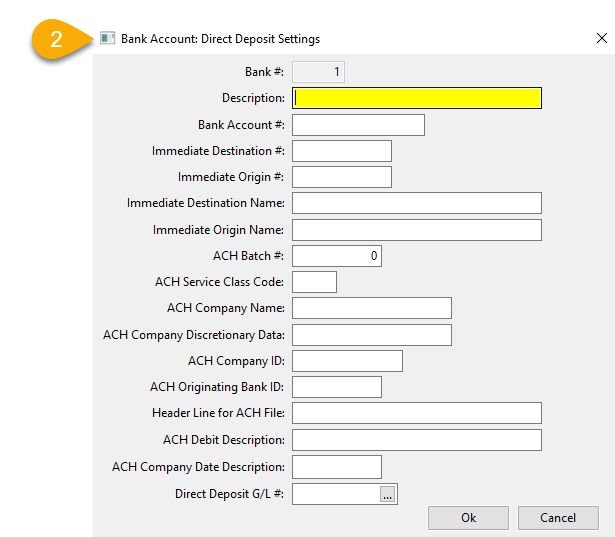
The typical entries needed for the Direct Deposit Settings window are as follows:
Note Depending on your financial institution, the information required can vary and cannot be provided by Datatech. If you have any errors following the upload of your test file, please ask your bank what corrections need to be made in the file.
-
Description: Enter a description of your own choosing for the account.
-
Bank Account #: Enter your bank account number.
-
Immediate Destination: Enter your account routing number
-
Immediate Origin #: This may be 1 + your Federal ID, but the bank may assign a different number for this.
-
Immediate Destination Name: Enter your bank’s name.
-
Immediate Origin Name: Enter your company name as it appears with your bank.
-
ACH Company Name: Enter your company name.
-
ACH Company ID: This is typically entered as 1 followed by your Federal ID or the bank can assign their own.
-
ACH Originating Bank ID: This is usually the first 8 digits of the routing number, but this could vary by the bank.
-
ACH Debit Description: Enter a description here to automatically create a debit transaction which offsets the credit entries in the ACH file.
Note This is different from how the Payroll Export Direct Deposit option works. When using that option, the user must select a check box that triggers the program to add the debit transaction.
The program can produce a standard ACH file format suitable for uploading directly to your bank. The Settings button allows you to enter several settings that are necessary to generate a valid ACH file.
Click Settings, then the following window will appear:
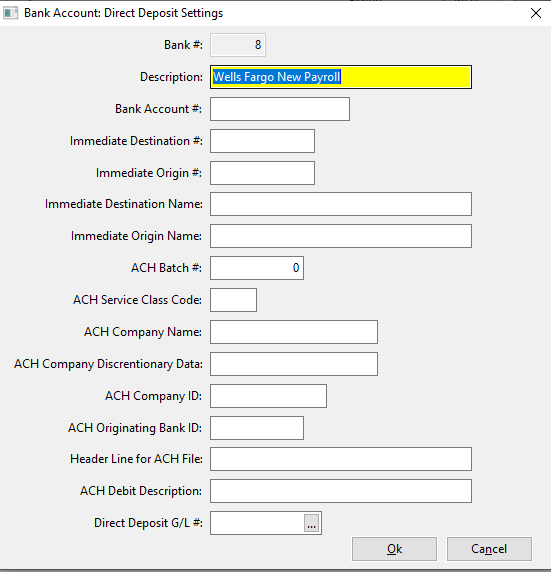
The settings are specific for each bank account. If you need to create direct deposit transactions from different bank accounts, or you close an account an open a new one, you will need to enter the settings for each account.
The Bank Number is displayed at the top of the window, along with the bank account description. Enter the following information for the ACH file:
Bank Account #
If you have already entered your bank account number on the Bank Account Setup window, it will appear here.
Description
If left blank, the program will put “Direct Deposit Total” in the description field for the debit transaction. Otherwise the program will put the description you enter here (up to 22 characters).
Immediate Destination #
Used on the “1” header record (positions 4-13).
Consult with your bank for the correct values for these fields.
Immediate Origin #
Used on the “1” header record (positions 14-23).
Immediate Destination Name
Used on the “1” header record (positions 41-63).
Immediate Origin Name
Used on the “1” header record (positions 64-86).
ACH Batch #
This entry is not used at this time.
ACH Service Class Code
This is a three-digit numeric code that is used on the “5” header record. If no code is entered, the program will use the default code of “200”. Otherwise enter the class code required by your bank for direct deposit files.
ACH Company Name
If entered, this will be used on the “5” (header) record. Otherwise the program will use your company name entered under Program Setup.
On the “5” record, the Company Name is in positions 5-20.
The company name will appear on the receiver’s statement.
ACH Company Discretionary Data
If entered, this will be used on the “5” (header) record. Otherwise the program will leave this field blank.
On the “5” record, the Company Discretionary Data is in positions 21-40.
ACH Company ID
If entered, this will be used on the “5” (header) and “8” (control) records. Otherwise, the program will use your Federal Employer ID # from payroll.
On the “5” record, the ACH Company ID is in positions 41-50.
On the “8” record, the ACH Company ID is in positions 45-54.
ACH Originating Bank ID
If entered, this will be used on the “5” (header), “6” (transaction) records and the “8” (control) record. If not entered, the program will use the first eight digits of the ACH Origin Routing # entry for the Originating Bank ID field on these records.
On the “5” record, the ACH Originating Bank ID is in positions 80-87.
On the “6” records, the ACH Originating Bank ID is in positions 80-87 as part of the Trace Number field.
On the “8” record, the ACH Originating Bank ID is in positions 80-87.
Header Line for ACH File
Some banks may require an initial header line with specific information that is not part of the standard NACHA specification. For those banks you can enter the header line here. It can be up to 80 characters.
This entry is not specific to the ACH file type. Entering a G/L # here allows you to handle situations where the bank takes a lump sum amount from your bank account for the total direct deposit payments instead of taking the amounts for each individual direct deposit payment.
When the Payroll Journal is updated to the General Ledger, it creates a credit transaction to your Cash in Bank general ledger account for each check/direct deposit payment. If you specify a Direct Deposit G/L #, it will credit that general ledger account for direct deposit payments (instead of crediting the cash in bank account). Printed payroll checks will continue to generate credits to your cash in bank account as individual transactions.
The Payroll Journal will also debit the Direct Deposit G/L account for the total direct deposit payments. That means that this account will never have a balance, since the program always posts a debit to offset the credits. To offset this debit, it posts a credit to the cash in bank account for the total of the direct deposit payments. This transaction should then match up with your bank statement.