Export Checks to QuickBooks
Quickbooks Export Walkthrough
If you are using Datatech Software to do payroll only and QuickBooks for the rest of your bookkeeping and accounting, the payroll check information can be exported using the following file exports:
QuickBooks Desktop: .IIF File
QuickBooks Online: .CSV File
The QuickBooks export feature is an extra cost option. Therefore, if you have not purchased it, the option will not appear on your menu. Normally, this option will be enabled during the initial installation and setup of your Datatech Software. If you purchase the option later, a Datatech Support Representative will provide you with instructions for enabling the option or will enable the option for you.
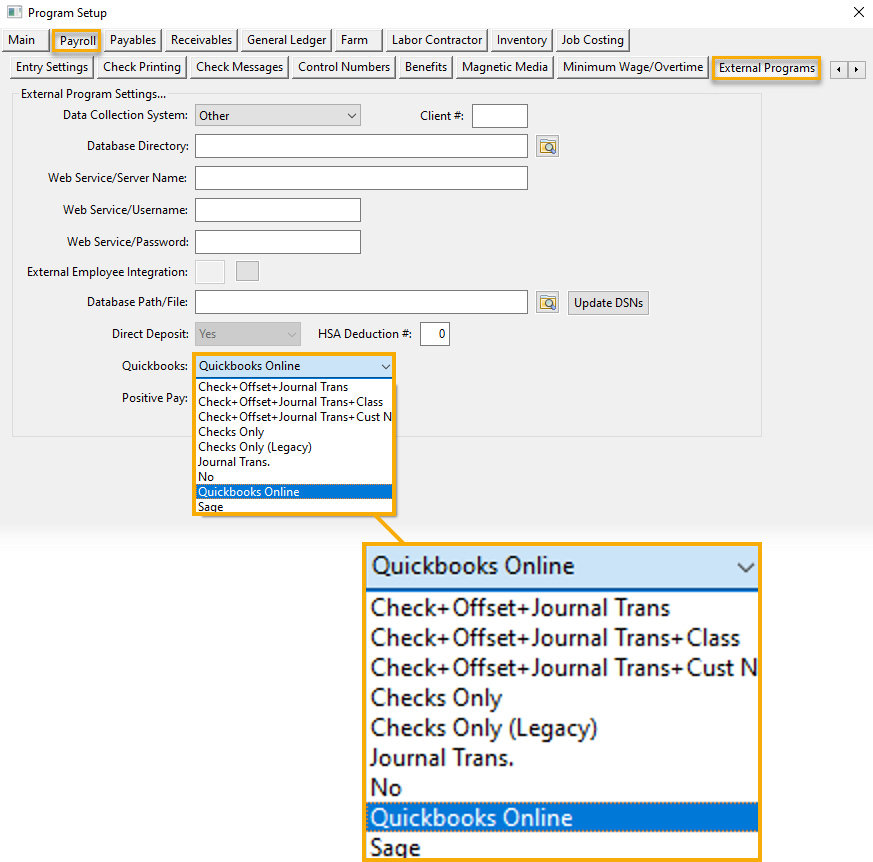
There are seven different options for exporting check information to Quickbooks. Go to Program Setup > Payroll tab > External Programs. In the Quickbooks entry, click the drop-down to display the export options.
Checks Only (Legacy)
Checks Only (Legacy) exports only cash in bank entries to QuickBooks; employees' names will not appear in the export.. For each credit to the cash in bank account, there is a debit posted to an offset account. Use this method if you are going to post a set of journal entries for labor expenses, payroll taxes, and other transactions related the payroll manually.
Journal Trans.
Journal Trans. posts a complete set of journal entries for the payroll, including credits to cash in bank, credits to payroll tax liabilities, debits to the payroll labor account(s), tax expense account(s), and worker’s comp expense account (if you have enabled the accrual of worker’s comp insurance), and any credits for miscellaneous deductions. To use this option, you must set up the general ledger account descriptions in the Datatech software to match your account descriptions in QuickBooks. This method is now considered obsolete.
Check + Offset + Journal Trans
This option combines the first two options. An independent set of journal entries is posted for each check, with an offsetting debit posted to a “payroll clearing account”. Then a separate set of journal entries is posted for the payroll tax liabilities, deductions, labor expense, tax expense, and worker’s comp expense. This set of entries includes an offsetting credit to the “payroll clearing account”. This is the preferred method for posting a complete set of journal entries to QuickBooks.
Checks + Offset + Journal Trans + Class
This allows you to link Cost Centers to Classes in QuickBooks. When enabled, you will see a QuickBooks Class entry on the Cost Center where you can enter the class to which you want the Cost Center assigned. For example, you may be capturing payroll at a block level, but only categorizing by commodity in QuickBooks. Therefore, multiple Cost Centers may be assigned to one QuickBooks Class. The name should be entered as discussed in the Chart of Accounts, i.e. if the Class is part of a group, you would enter the heading/group name followed by a colon, then the class name.
Quickbooks Online
QuickBooks Online produces an excel file (.CSV) for the checks only and does not create any journal transactions for the miscellaneous deductions, taxes, etc.
Checks + Offset + Journal Tran + Cust Name
This sends the customer name assigned to the Cost Center in the Memo field. Doing so allows you to track in Quickbooks the customer for whom the work was done.
Checks Only
This option works the same as Checks Only (Legacy) except that it includes employees' names.
Sage
Select this option if you will be exporting checks to Sage. The checks will be exported as an Excel file.
Each check is offset with a clearing account and the rest of the transactions will post by total of the General Ledger account. There will be no detail on costing.
If you need to change the method used for exporting the checks to QuickBooks, you may change this setting on the Program Setup window.
Once enabled, you can go to Payroll > Reports > Export Checks to QuickBooks.
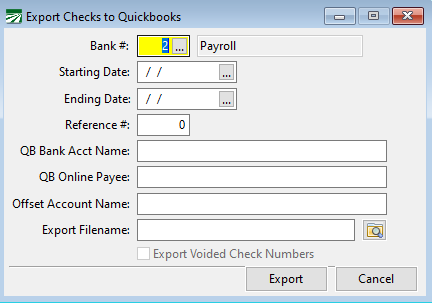
To export the checks, enter the following information:
Bank #
The default payroll bank account will appear here automatically. Change the account # if you need to export checks written from a different bank account.
Starting Date / Ending Date
Enter the starting and ending dates to select the checks to be exported. Checks are selected based on the check date, not the pay period dates. The check date must fall within the date you provide.
QB Bank Acct Name / Offset Account Name
When using the first method, enter the names of the accounts in the QuickBooks General Ledger that you want to post the checks to. The names must match exactly the account names used in QuickBooks, or else QuickBooks will create new entries in the Chart of Accounts when it imports the transactions.
Once you have entered the account names once, the program will remember the names used and they will appear automatically the next time you export checks.
If you are using the second method to export checks to QuickBooks, these entries are not used and will be disabled. Instead, the program will use the account descriptions in the Chart of Accounts.
If you are using the third method to export checks to Quickbooks, the Offset Account Name entry will be enabled, but the QB Bank Acct Name entry will not. Enter your “payroll clearing account” name in the Offset Account Name.
QB Online Payee
Export Filename
For QuickBooks Desktop exports, enter the path and filename of the IIF file to export the information. You may want to use the check date as part of the filename or you may choose to use the same name each time, overwriting the previous file each time you export the transactions.
Remember where you export the file to because you will need to select this file when you use the Import option in QuickBooks.
For QuickBooks Online exports, enter the path and filename of the .CSV file.
Export Voided Check Numbers
This option is only available when using the third method for exporting checks. When this box is selected, the export file will include any check numbers that were voided during the payroll check printing (or reprinting) process. This will result in the check number that was voided being exported to QuickBooks.
Note Check numbers that are voided are not the same thing as payroll checks that are voided. Check numbers that are voided during the printing process are simply checks that are recorded with a zero amount, indicating that that check number was not used for a payroll check. This option is provided so that you have a way of exporting a record for every check number to QuickBooks, instead of having to manually record unused check numbers in QuickBooks.
This box will be selected by default, but there may be some situations where need to exclude voided check numbers. For instance, suppose you print a batch of checks and needed to void a check number because the first payroll check did not print properly. Then you export the checks to QuickBooks (including the voided check number) and import them into QuickBooks. After doing this, you get a late time card for one employee, enter the time, print the check (using the same check date as your first batch), and export the check to QuickBooks.
When exporting to QuickBooks, you can isolate the single check by entering the payroll journal reference number. This will result in an export file that includes only the new check that you printed. However, voided check numbers are not recorded under a payroll journal reference number. The program does not keep track of whether a voided check number was already exported to QuickBooks, and even if it did, it would have no idea whether you had actually imported it into QuickBooks. Because of this, all voided check numbers for the date range that you select when generating the export file are exported every time the export is done.
In this scenario, when you create an export file for the single check, you would deselect this checkbox so the voided check number is not re-exported. If you do re-export the voided check number, QuickBooks will display a message telling you another check number already has that number.
Export
Click on this button to create the export file.
Cancel
Click on this button to close the window without creating an export file.
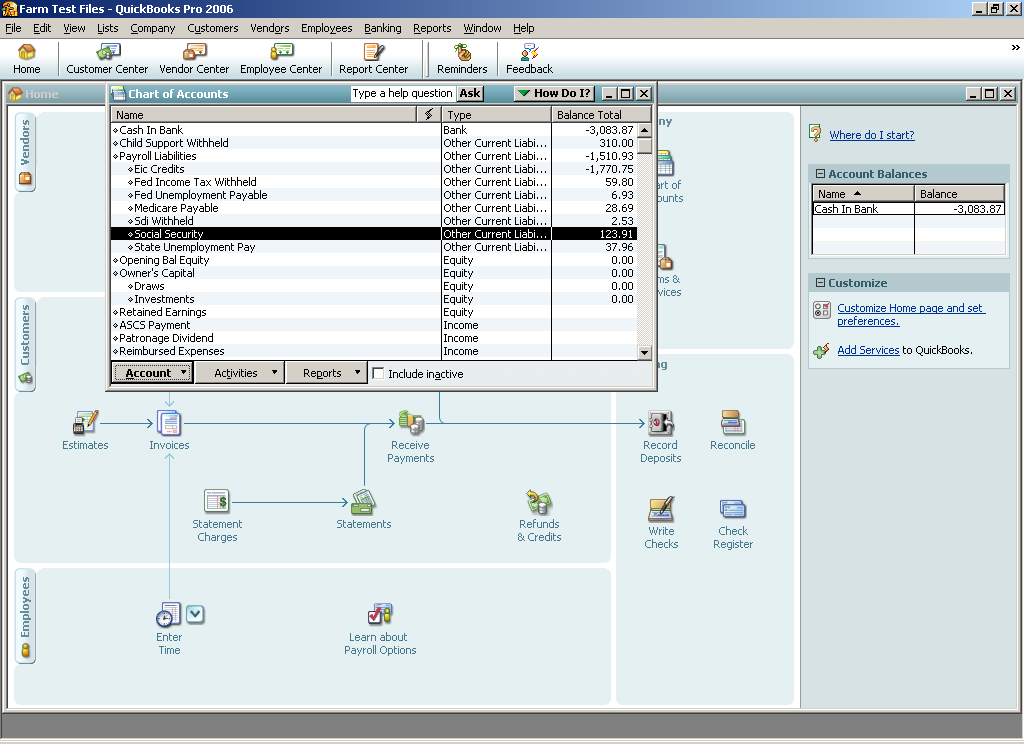
General Ledger Account Setup
When using the second and third methods to export checks to QuickBooks, the Payroll Journal will create a full set of journal transactions in the Datatech General Ledger module. These transactions are then exported to QuickBooks “as-is”. The accounts descriptions in the Datatech Chart of Accounts are in the IIF file to tell QuickBooks where to post the transactions.
As noted above, you must make sure that the account descriptions in the Datatech chart of accounts match the account descriptions in the QuickBooks chart of accounts. If you have sub-accounts on your QuickBooks chart of accounts, it is important to set up the descriptions in the Datatech chart of accounts correctly.
For example, suppose the individual accounts for each payroll tax liability are sub-accounts of an account called “Payroll Liabilities”:
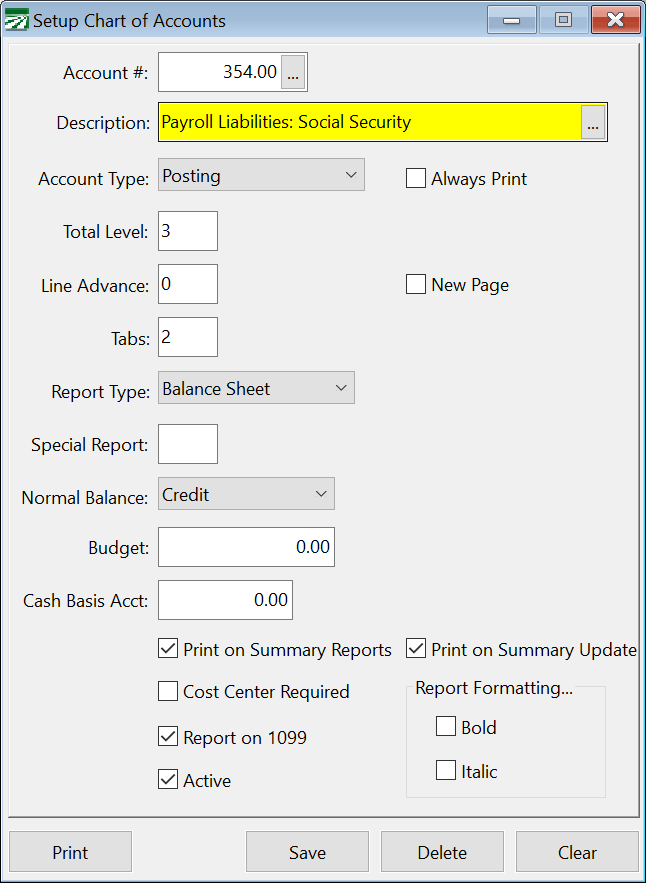
For sub-accounts, QuickBooks identifies them by using the following notation “Main Account Name: Sub-Account Name”. Therefore in your Datatech chart of accounts, you will need to set up account descriptions with the main account name, a colon, and then the sub-account name. For example:
If you do not set up your chart of accounts this way in the Datatech software, QuickBooks will create new entries in your chart of accounts (usually as bank accounts) so that it can import the transactions. If this happens, you may want to restore a backup or delete the imported transactions along with the new accounts that QuickBooks created. Then make changes to the Datatech chart of accounts and try the import again.
If you are having trouble with account names not matching between QuickBooks and Datatech, you may find it helpful to export the Chart of Accounts in QuickBooks to an IIF file, and then view the account descriptions that appear in this file. (You can use Excel to view the IIF file.) If you can’t resolve the discrepancies, contact Datatech Customer Support for assistance.