Cash Receipts
Cash Receipts
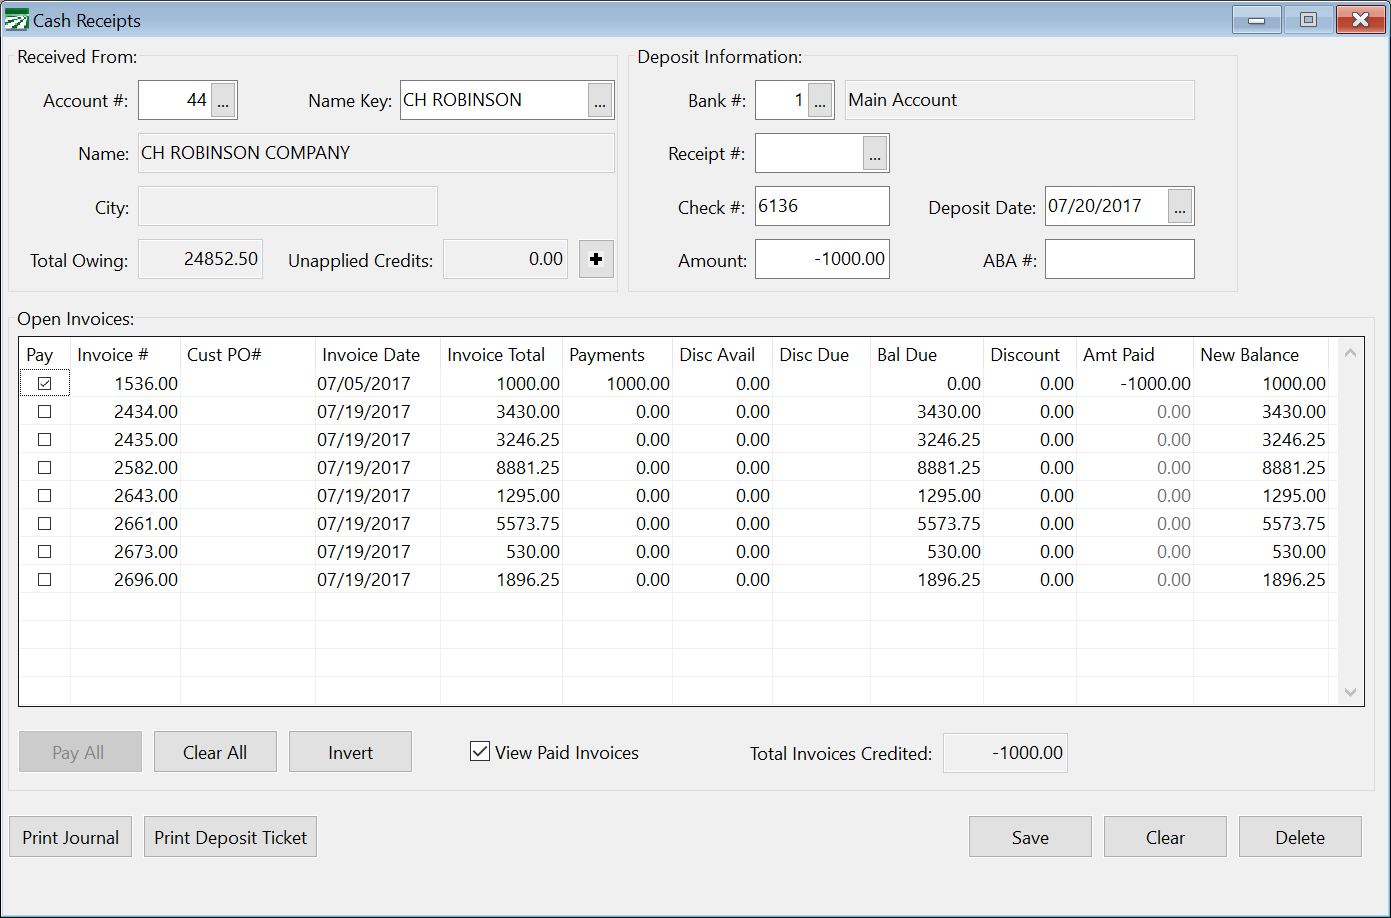
To enter payments on invoices, go to Receivables > Cash Receipts > Cash Receipts.

Invoice # / Name Key
If you know the invoice number being paid, enter it in the Invoice # entry. If you don’t know the invoice number, enter the account # of the customer from whom the payment was received in the Name Key entry. You can also press [F4] or click on the lookup button to select the customer from the customer lookup.
Once a customer account is selected, the open invoices on the account will be displayed.
Bank #
The default bank account for Cash Receipts will be used automatically. Change the bank account number if you are depositing funds to a different account. Keep in mind that if you are making deposits to different accounts on the same day, a separate Cash Receipts Journal will print for each bank account so that the deposit totals will be updated separately.
Receipt #
The program will automatically assign a receipt number to each entry. On a new entry, leave the receipt number blank. If you want to edit an existing entry and you know what the receipt number is, you can enter it and the Cash Receipt details will be displayed. If you are not sure of the receipt number, you can press [F4] or click on the lookup button to select an entry from the lookup.
Check #
Enter the check number. Since this is an alphanumeric entry, you can also enter words (e.g. “CASH” for a cash payment, or “CC” if paid by credit card, etc). If a payment was received via ACH, the entry should begin with "ACH".
Amount
Enter the amount of the check.
Deposit Date
Enter the deposit date
#
Enter the # for printing on the deposit ticket. If you don’t use the deposit ticket, you can leave this entry blank.
Unapplied Credits
When entering a Cash Receipt for a payment that is more than the open invoices, you can click Unapplied Credits to create an unapplied credit entry for the balance of the check after crediting all of the invoices.

Open Invoices
Select which invoices are being paid by this check by selecting the box in the Pay column. When you select the box, the program will automatically put the balance due in the Amount Paid column.
If the customer is making a partial payment on the invoice, you can click on the amount paid column and change it.
As you enter amounts paid on each invoice, the Total Invoices Credited is displayed at the bottom of the window. When the Total Invoices Credited equals the check amount, you can save the cash receipts entry.
Making Corrections
Before the Cash Receipts Journal Has Been Updated
You can make corrections or delete entries before the Cash Receipts Journal is updated. To edit a Cash Receipts entry that is still in the current batch, follow these steps:
-
Go to Receivables > Cash Receipts. Click on the lookup button for the Receipt # entry. This will give you a lookup listing all of the entries in the current batch. (On the lookup, you can scroll with the mouse, use the arrow keys, or search for a check by clicking in the Check # column and then simply typing in the check number.)
-
Once you have selected the entry you want to edit, the invoices that were paid on this entry will be displayed, along with all open invoices on the account. At this point, you can change the check total, change which invoices are credited with the payment, or even delete the entire entry by clicking Delete.
After the Cash Receipts Journal Has Been Updated
Once the Cash Receipts Journal has been updated to the General Ledger, you must go through an un-finalizing process to move the entries back into Cash Receipts for editing. To unfinalize a deposit, follow these steps:
-
Go to Payables > Checkbook. Double-click on the Deposit; this will open the Deposit Detail window. Then, press Ctrl+U. This will send the Deposit back to the Cash Receipts window as entered, but not updated.
-
From the Cash Receipts window, use the lookup button on the Receipt # entry to find the Deposit needing correction. The Deposit can now be modified or deleted.
Note Make sure to go into the window originally used. The Receipt # entry is available in all three types of Cash Receipt Entry windows.
-
Run the Current Batch Cash Receipts Journal. If you have a Deposit Total to update, update as usual when done with the corrections. If you delete all entries, there is no journal that needs to be updated.
Discounts
If a discount rate or amount was entered on the invoice and the payment is made before the discount date, the program will automatically display the discount amount in the Discount column and it will be subtracted from the balance due.
You can also override the discount taken on an invoice that is paid. For example, if the customer takes a discount but the payment is entered after the discount date, you can still enter the discount amount.
Some customers use the discount entry as a simple way of entering adjustments instead of entering a credit or return. This can be done in simple situations where all income is updated to the same general ledger account and you don't give discounts on invoices.
To do this, set the Discounts Taken G/L account number in the Program Setup to your income G/L number. When you enter an amount in the discount column, the program will debit the income account when you enter a discount amount.
How do I move a credit balance on an invoice to the customer’s unapplied credit balance?
If you have an overpayment or credit balance on an invoice and you want to move that credit to the customer’s unapplied credit balance, you can do this by making two offsetting entries. First, enter a negative payment on the invoice on the Receivable Cash Receipts window. This should result in a new balance of zero on the invoice. Then enter a positive payment through the Enter Unapplied Credits window.
The two entries will offset each other, so there is no net change to your cash in bank balance. The negative payment entered on the invoice will bring the balance down to zero, so the invoice will no longer appear on the aging report as an open item. And the positive payment entered on the Unapplied Credit window will increase the total unapplied credit balance on the customer account.
Overall, the amount that the customer owes has not changed. However, instead of the overpayment appearing as a negative balance on the invoice, it will now be included in the customer’s unapplied credit balance.
What if a customer overpays an invoice?
An invoice may be overpaid by entering a payment amount that is larger than the invoice total. In such a case, the invoice will remain open and show a negative balance due. The negative balance due indicates that the invoice has been overpaid.
At some point in the future, you will want to apply the overpayment to another invoice; the Cash Receipts window is used to do this. There are two situations where you will do this.
The first situation is where a new invoice may have been finalized and you want to transfer the overpayment to the new invoice. In this case, you would enter a cash receipt with a zero amount. In the Open Invoice List, you will mark the overpaid invoice (the program will automatically place a negative payment amount on this line) and the new invoice. Edit the payment amount on the new invoice, entering the overpayment as a positive amount. The positive and negative amounts cancel each other out (creating a zero amount for this cash receipts entry) and have no effect on your cash in bank balance. The amount that was overpaid is simply transferred to a new invoice.
The second situation is that you are entering a payment from the customer and, at the same time, want to transfer the overpayment to a new invoice. The procedure is similar, except that you would enter the amount paid as you would for a normal cash receipt entry. In addition to entering the payment amount for each invoice that is being paid, you will enter
How do I apply a credit memo when entering a payment?
A credit memo is used for price adjustments and reduces the amount the customer owes. When a credit memo is issued, the original invoice still reflects the original amount billed and the credit memo will have a negative amount. The original invoice combined with the credit memo will reflect what the customer owes.
When a payment is received, it must be applied to both the original invoice and the credit memo. Select the box for the credit memo first, then select the original invoice. Doing it in this order will cause the program to credit the full amount of the original invoice as the payment amount.
I applied a payment to the wrong invoice. How do I put it on the right invoice?
If you have not updated the Cash Receipts Journal, then you can edit the original cash receipts entry and move the payment to the correct invoice. To find the original entry, you can click on the lookup button of the Receipt # entry.
If you discover the error after you have updated the Cash Receipts Journal, you will need to make another entry with a negative amount on the invoice that you originally entered the payment on and a positive amount on the correct invoice. Because you are entering both positive and negative amounts, there will be no change to your cash in bank balance.
To make this type of correction, enter the customer account or name key, date and check number, then select the box labeled View Paid Invoices at the bottom of the window. All invoices that have been paid will then be listed. Find the incorrect invoice and enter a negative amount for the amount(s) paid to reverse your previous entry. Then enter the payment amount on the correct invoice.
How can I refund an overpayment or a credit balance to the customer?
There are three steps to issuing a refund to a customer. First, the credit balance needs to be taken off the customer account. This is accomplished by entering a negative cash receipt for the credit amount on the Receivables Cash Receipt window. Entering a negative cash receipt will bring the balance down to zero for the invoice or credit memo with the credit balance as shown below:
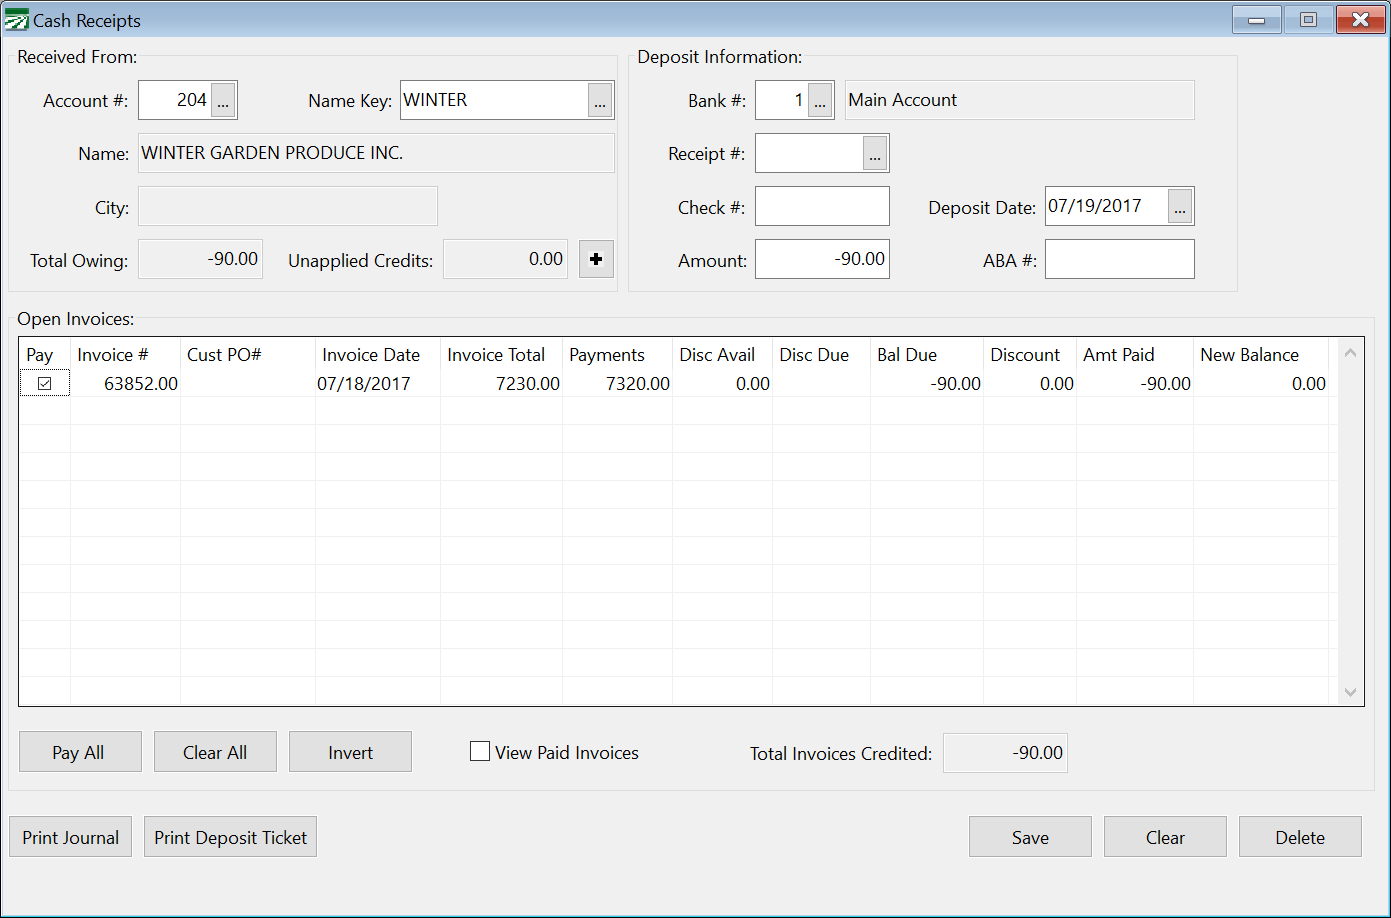
In this example, the customer mistakenly paid $7,320 instead of $7,230; this resulted in a credit balance of $90. Since the credit balance shows as a negative (in the Balance Due column), enter a negative amount in the Amount entry to bring the balance to zero.
The second step is to enter a miscellaneous cash receipt to offset the negative payment that you have just entered. These two entries cancel out each other so that there is no net change to your cash in bank account. This is how the miscellaneous cash receipt entry would look to offset the entry shown above.
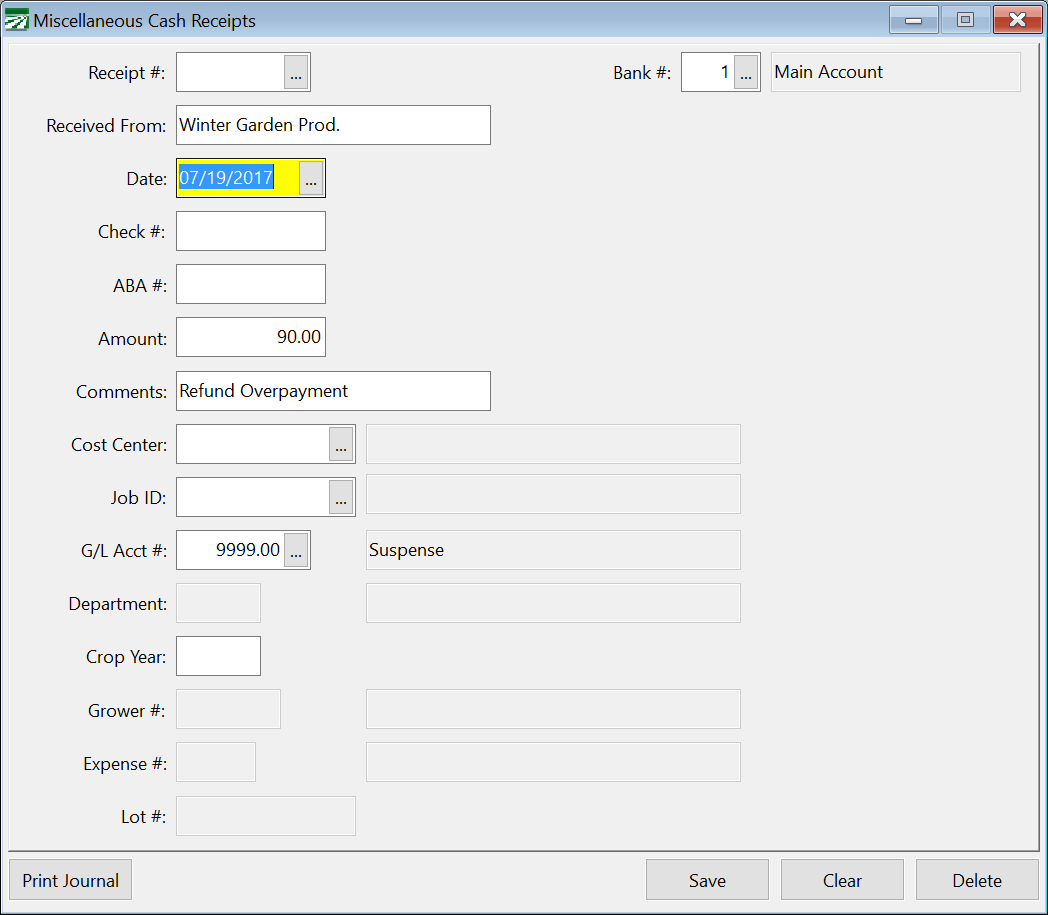
The Miscellaneous Cash Receipt window allows you to credit the entry to a single General Ledger account. In this example, we used the Suspense account. This General Ledger account will be used in the last step.
The first two steps have removed the credit balance from the Receivables system without changing your cash in bank amount. The amount of the overpayment is posted to an account in the General Ledger. The last step is to write a check to the customer using the Direct Expense option:

Enter zero in the Account # entry to use the No Vendor account; this allows you to enter the name and address of the customer in the Name/Addr entry. If the customer is also set up as a vendor, you can enter their account number in the Account # entry. On the line item, the General Ledger account should be the same one used on the Miscellaneous Cash Receipts window. The miscellaneous cash receipt entry will credit that account and the direct expense check will debit the account for the same amount. Therefore, there is no change to the account balance.
How do I write off an uncollectible amount to bad debts?
This can be done with two entries. First, a receivable cash receipt is entered to clear the balance due from receivables. Next, a negative miscellaneous cash receipt is entered to record and expense to the bad debt account. The two entries combined cancel each other out, so there is no net change to your cash in bank account.
Before you can do this, make sure that you have a bad debt expense account set up in your Chart of Accounts.
First, record payments as shown below on the Receivable Cash Receipts entry window:
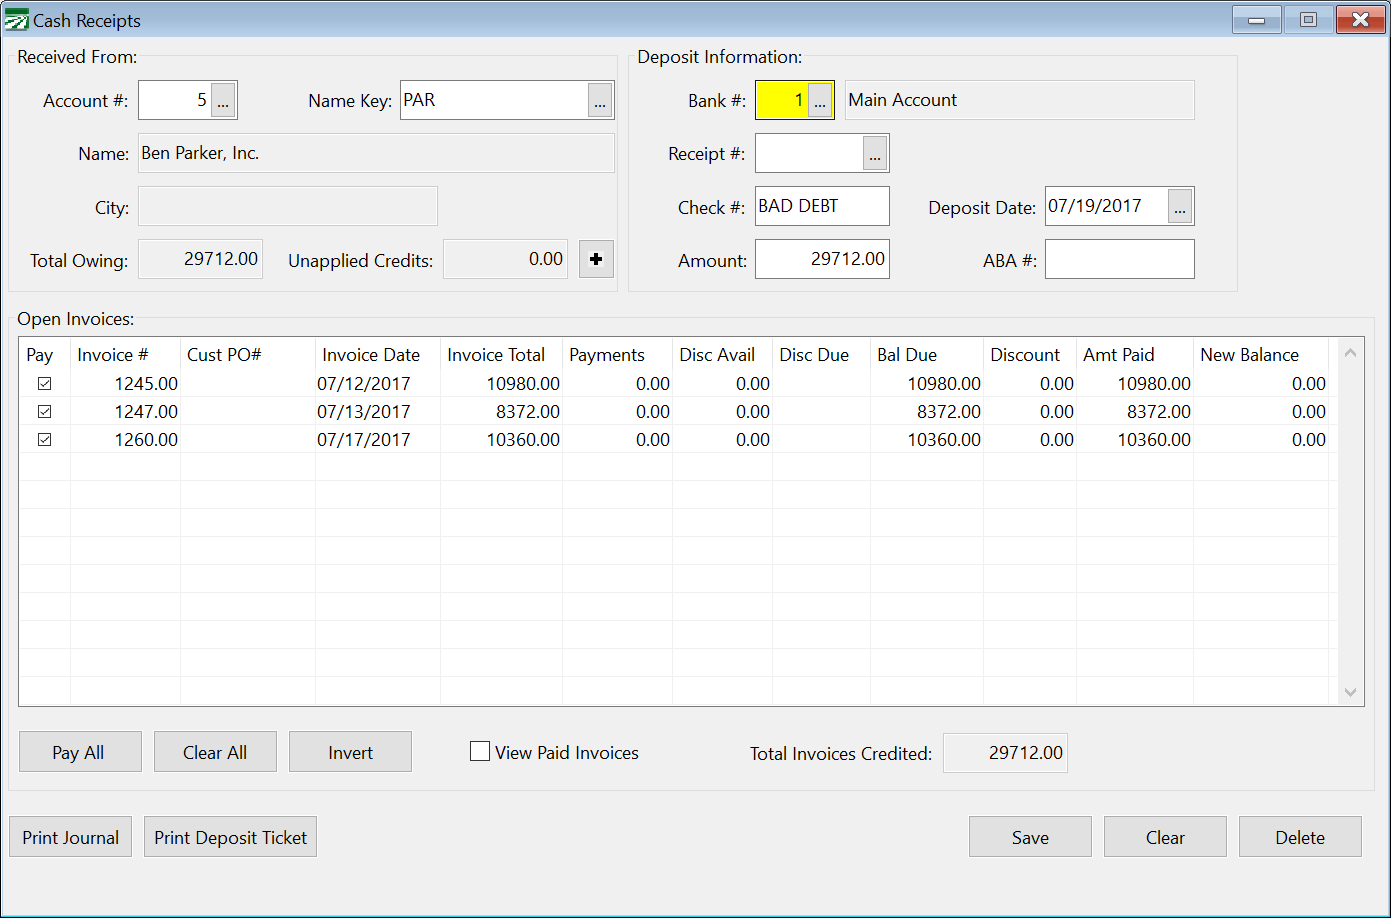
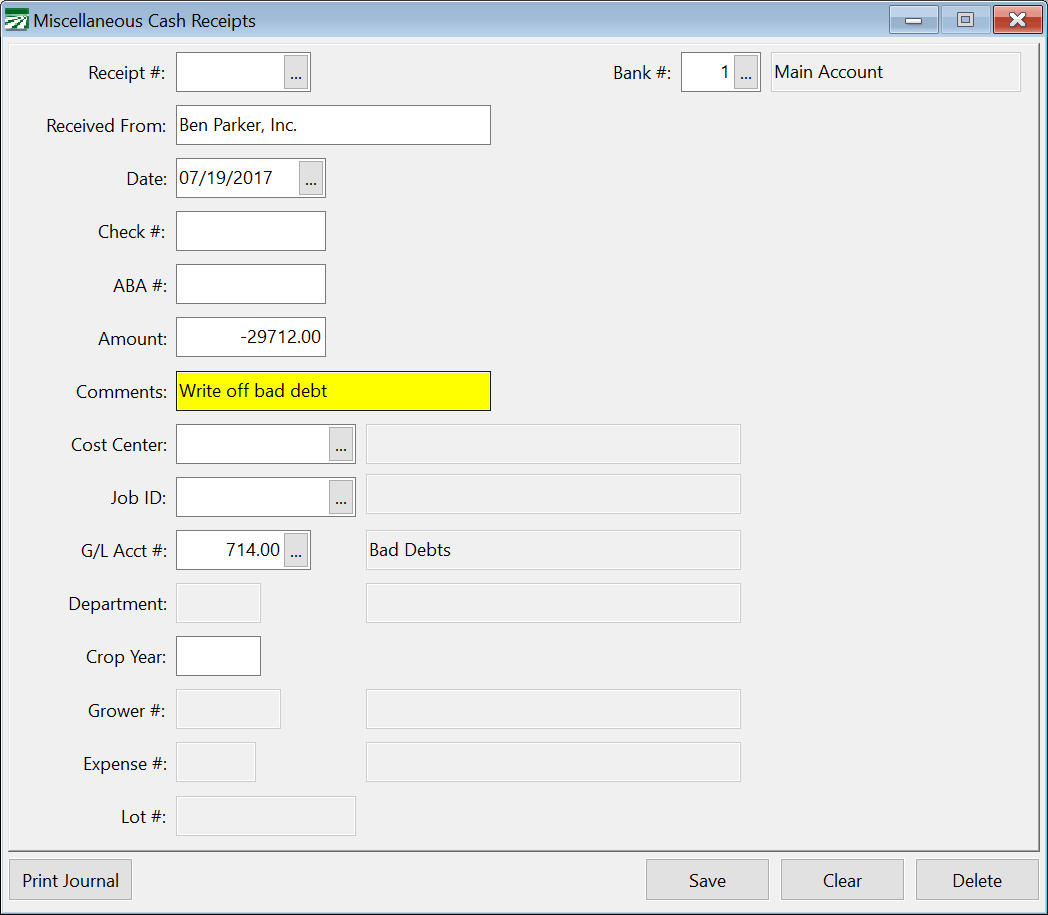
In this example, we are writing off the entire balance owed by the customer on three different invoices. A check number is not necessary for this entry. You can enter “BAD DEBT” for the check number if desired. Save this entry, then open the Miscellaneous Cash Receipts entry window to enter the second part of the transaction:
In this window, make sure to do the following:
-
Enter the amount as a negative value.
-
Use the same deposit date on the miscellaneous cash receipt entry as you did on the receivable cash receipt.
-
Select the Bad Debt General Ledger account.
Enter comments if desired. Save the entry, then run the Cash Receipts Journal to post your entries to the General Ledger. (If you have several customer accounts with balances that you need to write off, you can do all of the entries first and then run one Cash Receipts Journal.)
The Cash Receipts Journal will not post any amounts to your cash in bank account. The negative miscellaneous cash receipt entry will cancel out the payments applied to the invoices:

The Accounts Receivable Trade account will be reduced by the amount of the invoices that you have written off, and an expense will be recorded to the bad debt account (714.00 in this example).
Alternate Method of Writing Off Bad Debts
An alternate method of writing off bad debts is to set up a bank account for entering bad debts that uses the Bad Debts expense account. In the method described above, the net effect on the General Ledger is to reduce Accounts Receivable Trade and record an expense to the Bad Debts account. Transactions to cash in bank are also posted, but they cancel each other out. By setting up a bank account that uses the Bad Debts account, you bypass the debit and credit that are posted to the cash in bank account.
You can set up the bank account by going to Payables > Setup > Bank Account Setup:
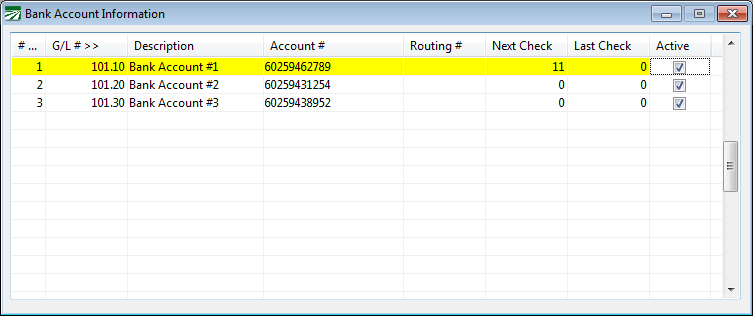
In this example, bank account #4 is set up to post to the Bad Debts Account.
In the Cash Receipts window, first change the current bank account to your bad debts bank account. Then enter the customer account, “Bad Debts” for the check number, the amount, date, and select Pay for the invoices that you want to write off.

After you have entered the cash receipts entries to write off the bad debts, make sure that you change the bank account back to your regular account if you need to also enter checks received.
If you have entered any cash receipts for a real bank account on the same day that you write off bad debts, the program will print a separate Cash Receipts Journal for each bank account.
How do I handle a check that is returned?
In this situation, the payment needs to be removed from the invoice(s) to which it was originally applied. A balance will be left on the invoice(s), and when you get another check from the customer, it can be applied against that open balance.
The payment can be removed by entering a negative cash receipt amount. This amount should match the amount the bank is deducting from your account balance. You will need to enter a negative payment on each invoice that was credited when the original cash receipt was entered. If you are not sure which invoices were credited, print the Cash Receipts Journal for the day the check was originally deposited.
In most cases, the invoices that you need to remove the payments from will be fully paid off. Since the Cash Receipts entry window only displays unpaid invoices, you will need to select the View Paid Invoices box at the bottom of the window to display the invoices that were paid.
In the top section of the Cash Receipts entry window, enter the customer account, the check number, the check amount as a negative, and the date the amount was deducted from your account.
Then select the View Paid Invoices box at the bottom of the window, find the invoice(s) originally paid by the check, and select Pay. A negative amount will appear in the Amount Paid column and the New Balance column will be updated as well.
Click Save when you are done. Normally you will want to print a separate Cash Receipts Journal for a returned check. If you do not, and you have other checks that are being deposited on the same day, the returned check entry and other deposits will be combined on one Cash Receipts Journal; the program will post one transaction total (your total deposit less the returned check). By printing and updating a separate Cash Receipts Journal, you will get a separate transaction reducing your bank balance for the amount of the returned check.
Note If your bank charges you a fee for returned checks, enter that under the Miscellaneous Charge option on the Checkbook window in Accounts Payable.