Labor Contractor Invoice Entry/Printing
In addition to the generic invoice entry window, farm labor contractors have the option of entering invoices in a window specifically designed for labor invoices. Some labor contractors (and their customers) prefer the layout of the invoices printed from this option, and use this option exclusively. Some may find the general purpose Invoicing entry window works fine for them, and so they don’t use this option at all. And some contractors may use either one or the other, depending on the situation or the grower that they are billing.
If you use both invoice entry windows, you will notice that invoices entered through the general purpose Invoicing entry window cannot be displayed or edited in the labor contractor invoicing window, and vice-versa. This is by design, because the entry windows are different enough that you can’t edit invoice information that was entered on the other window. If you use both invoice entry windows and you are having trouble finding an invoices, one of the first things to check is to make sure you are looking for the invoice in the right window.
Go to Receivables > Invoicing > Labor Contractor Invoice Entry/Printing.
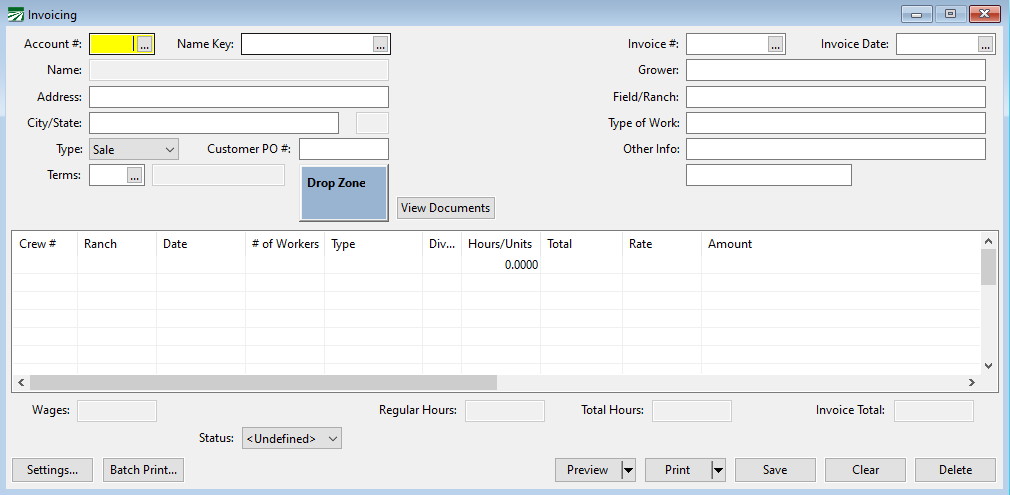
Account # / Name Key
Enter either the customer's account number or name key, or use the lookup button to select a customer account.
Grower
In most cases, the grower is the same as the customer account, so this entry is redundant and you can leave it blank.
In some situations, the customer won't be the grower. For instance, the customer may be a farm management company or a packing house. In this case, you can put the name of the grower that the work was performed for in this entry.
Field/Ranch
Enter the name or location of the field or ranch where the work was performed. If work is performed in multiple locations, you can use the Ranch entry on the line items (see below).
Type of Work
Enter the job(s) performed.
Other Info
Additional information may be entered here.
Invoice #
If the program is set to automatically number invoices, you may leave the invoice number entry blank. The program will assign the next available invoice number when the record is saved. Otherwise enter the invoice number here.
Note When multiple invoices are created by the Grower Labor Report to the same grower, an option has been added to increment the decimal part of the invoice #. This results in each invoice having the same main invoice # with additional invoices having .01, .02, .03, etc. Click here for instructions on how to enable this option in the program.
Type
Select from , Credit or Return.
Invoice Date
Enter the date of this invoice.
Customer P.O. #
Enter the customer's purchase order number, if applicable.
Terms
Enter the terms number or use the lookup to select a terms entry. The terms description will be displayed to the right.
Line Items
After you enter the terms, the cursor will go to the line item entry grid so you can enter the details for the invoice. You can also skip directly to the grid from the top half the window by pressing Ctrl+J (you must have entered at least a customer account and invoice date before skipping down to the line items).
For each line item you can enter the following information:
Crew #
If multiple crews are included on this invoice, you can record the crew number for each line item. Otherwise, you can leave this entry blank.
Ranch
If work was performed for multiple locations or ranches, you can enter the ranch on each line item. This will print on each line of the invoice. Because of space limitations, this entry is limited to 12 letters. Therefore, you may need to abbreviate the full name or location.
On a commission line, the text you enter here will appear at the bottom of the invoice on the line that bills the percentage and amount for the commission. For instance, if you need to bill individual taxes, worker’s comp, and the commission on separate lines, you can enter the description to use for each line in this column.
If nothing is entered in this column on a commission line, the program will check the grower account setup to see if a description was entered for the commission under billing description #1. If nothing is entered there, the program will default to printing “Commission”
Date
Enter the date work was performed. Press [F4] to select a date from the calendar lookup.
# of Workers
Enter the total number of workers for this line.
Type
When you are billing for wages, select either Bonus, Hours, Overtime, Double-time, Piecework, or Salary. As noted below, there are two different methods for calculating the total of the line item. For Bonus, Hours, Overtime, Double-time and Salary wage types, the program will multiply the number of men by the Hours/Units to determine the total units to be billed. The total units will then be multiplied by the Rate to determine the total for the line.
When you use the Piecework wage type, you will enter the total pieces in the Hours/Units column; this amount will be used as the Total Units and multiplied by the Rate. Since each employee may have a different number of units and it is not necessary to itemize the units for each individual worker on the invoice, piecework lines are calculated differently than other wage types.
The Salary/Hours type will bill the number of salary employees entered at the rate without factoring in the amount entered into the Hours/Units column. This allows you to enter the number of hours worked by the salary employees, and these hours will be added to the totals at the bottom of the invoice.
The Rest Break type will act similar to hourly wages in that it is calculated by multiplying the number of workers by hours and rate. It will then be added to the total hours/wages. On the invoice, "Brk" will appear next to the hours/man column.
Two other types are available for billing your overhead and insurance costs: Commission and Insurance. Normally these are used at the end of the invoice. When you use the Commission billing type, the total wages are entered automatically in the Hours/Units column. This allows you to enter the commission in the Rate column as a decimal (e.g. 38% would be entered as 0.38). When the Insurance billing type is selected, the total number of hours is entered automatically in the Hours/Units column.
Note When using the Insurance billing type, the hours entered for salary employees will be included in the total hours.
You can also select Equipment to bill for Equipment rentals. A Late Charge type is also available if you need to add a late charge to an unpaid invoice. (To add a late charge to a finalized invoice, you will first need to unfinalize it.)
A Subtotal option is also available if you need to add subtotals to your invoices. A subtotal line cannot have any hours/units or a price. On the invoice a subtotal line will print the total wages, total hours and/or total pieces. You can use multiple subtotal lines on an invoice, and each one will total only the wages since the last subtotal line.
When invoices are generated automatically from the Grower Labor Reports option, the program will use the Base Pay Type setting from the wage type file for the wage type on the line items. This makes it possible to set up new wage types and still have them billed correctly on the grower invoice.
Division
Enter the division for this line item or press [F4] to get the Division file lookup.
Hours/Units
When billing for hours, enter the number of hours per worker. For piecework billing, enter the total number of piecework units for all of the workers combined for this line item.
Normally for Salary you will enter 1.
Total
The program will display the total units here. For bonus, hourly, overtime, double-time and salary billing, it will multiply the number of workers by the hours/units. For piecework billing, the total units will be the same number that you enter in the Hours/Units column.
Rate
Enter the rate here.
If you are entering a commission line and a commission rate has been set up in the grower file, the rate will be entered automatically for you as a decimal (i.e., a rate of 38% will appear as 0.38).
Amount
The program will display the amount for this line item, multiplying the total by the rate.
Rearranging Line Items
As you enter new lines items, they are added to the bottom of the invoice. At times, you may want to change the order of the line items or insert a new line before existing lines. A right-click menu on the line item entry provides these options.
If you right click on an existing line, one of the options will be Insert Row. The keyboard equivalent to insert a row is Shift+F10. You will also have options Move Line Up and Move Line Down. The keyboard equivalents for these options are Alt+Up Arrow and Alt+Down Arrow.
Inserting Subtotals
In some cases, you may have added a series of line items and forgotten to add a subtotal in the middle of them, or you have re-arranged the ordering of the line items on an invoice and now wish to insert subtotals at specific points. You can do this by right clicking on a line item and selecting the Insert Subtotal option.
The line that you currently have highlighted when you do this will move down, and a subtotal line will be inserted in its place. You can modify the description text if necessary (it will default to “Subtotal”).
If you insert a subtotal and later decide that it is not needed, you can simply right-click on the line and select “Delete Line”.
Printing Invoices
Invoices may be printed as you enter them, or you can enter all invoices then print them in a batch.
To print an invoice when you are done entering it, click Print. You may also click Preview if you would like to preview the invoice on the screen before sending it to the printer.
After the invoice is printed, the program will ask if it's ok to finalize the invoice. If the invoice is ok and you don't need to make any changes to it, answer Yes. If you need to make additions or corrections to the invoice, answer No.
If you want to print invoices in a batch, select Batch Print on the Status entry before saving each invoice. Then when you are ready to print invoices, click Batch Print.... The Batch Invoice Printing feature will print each invoice that has been set to Batch Print.
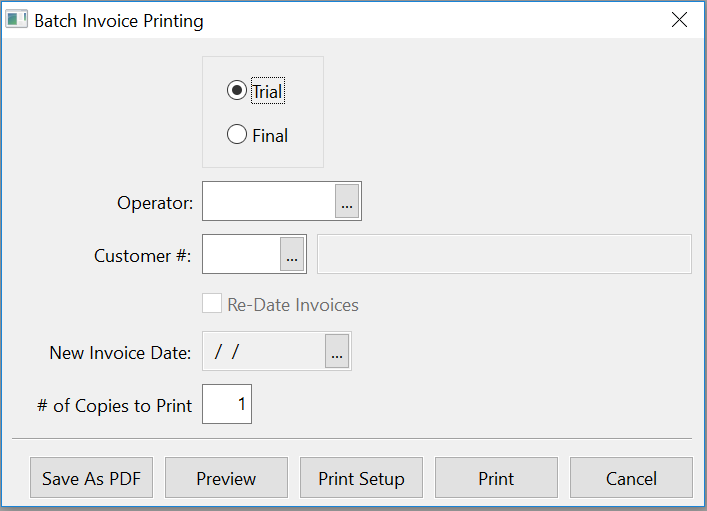
Invoice Type
You can print trial invoices before printing final copies, if you want to check over the invoices first.
Operator
If you have multiple users entering invoices, the invoices will be separated by each user's operator name. You can print invoices for a single user by entering the operator name.
Renumber Invoices
This option is normally used when you have preprinted invoices, and the invoice numbers that are originally assigned need to be changed to match the preprinted invoice numbers. When this box is selected, you will be able to enter the starting invoice #.
# of Copies to Print
You can print multiple copies of the invoice if desired.
Printing a Summary Invoice
If you have multiple invoices for one customer account, a summary invoice can be printed that combines the detail from all invoices when using the Batch Invoice Printing option. The summary invoice will show a total amount due which is the total of all invoices billed for that customer.
The Labor Contractor settings in the Program Setup window has a checkbox labeled Batch Printing Summary Invoice that controls whether or not the summary invoice is printed. Select this box to enable the printing of the summary invoice.
For this feature to work correctly, the invoices for a customer must have consecutive invoice numbers.
Generating Invoices from Payroll
The Labor Contractor style invoices can be generated automatically from your payroll information by the Grower Labor Reports. The key to doing this is the Update Line Items setting on the grower account. By selecting the Labor Contractor Invoice option for this setting, the program will create an invoice record that you can view, edit and print from the Labor Contractor Invoice Entry window.