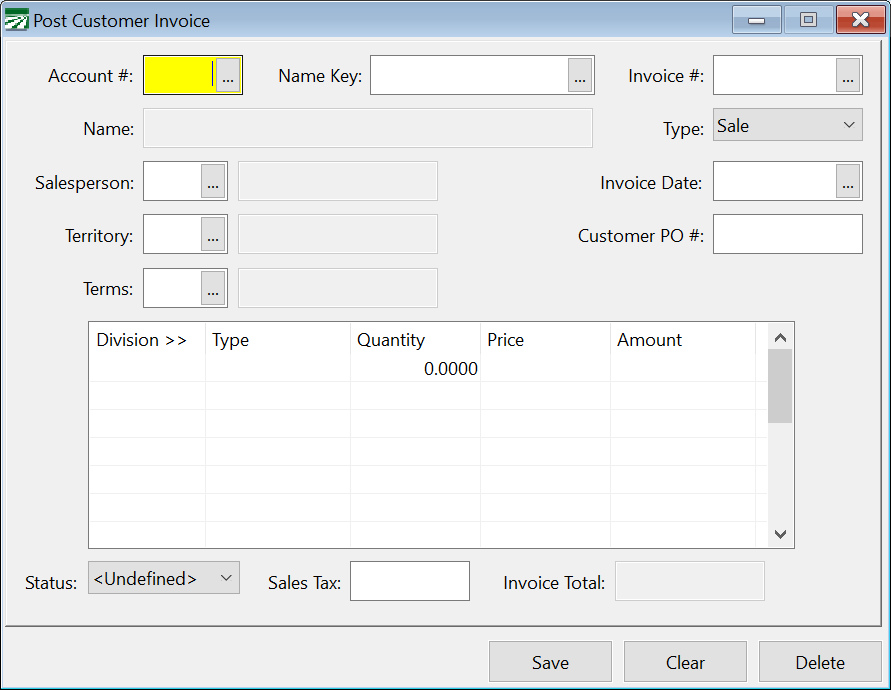
Post Invoice
Find the Post Customer Invoice window by navigating to Receivables > Invoicing > Post Invoice.
Account # / Name Key
Enter the Account # or Name Key of the customer you would like to invoice. Use [F4] or the lookup button to access the Account #/Name Key list.
Invoice #
Enter an invoice number for this invoice. One will be automatically assigned by the program if nothing is entered here.
Type
Select the type of transaction. You can select from 8 different options: Credit, Order, Quote, Return, Sale, Service Charge, Void, and Work Order.
Salesperson
Select the Salesperson for this invoice. Press [F4] to access the salesperson lookup.
Territory
Enter the territory for this invoice. Press [F4] to access the territory lookup.
Terms
Enter the terms for this invoice. Press [F4] to access the terms lookup.
Invoice Date
Enter the date for this invoice. This entry is required.
Customer PO #
If applicable, enter the customer P.O. number.
Entering Line Items
Once the heading information is entered, you can enter the line items for this invoice. These are found in the grid below the Terms entry. Each item will go in its own line. For each item, you must select a Division and Type. The type will determine if taxes are applied to the item.
Then enter the Price in a dollar amount. Finally, enter the Quantity of the item. The amount will automatically appear after the price and quantity are entered.
Status
Select the status of the invoice. This can be Unfinalized, Finalized, Batch Print, and Hold.
Sales Tax
Enter the sales tax for the invoice, if applicable.
Save
Click this button to save this invoice.
Clear
Use this button to clear this invoice entry screen to start the invoice over. This does not delete invoices.
Delete
Use this button to delete the invoice.
