Purchase Order Entry
The Purchase Order program is used to enter purchases of any items in inventory, as well as miscellaneous items not specifically set up in the master inventory file. In the produce shipper environment, the purchase order system should be used for the purchase of all packing materials as well as any inventoried raw products that are used in the production of finished goods.
Entry of purchase orders when product is ordered allows you to track open orders, back-order items not received, as well as receive the product and update accounts payable for payment of the purchase.
Various reports are available, including:
-
Purchase Order Register
-
Open Purchase Orders by Stock #
-
Open Purchase Orders by Vendor/PO
-
Purchases History Report by Vendor
Regardless of when you enter purchase orders, the purchase order entry is the method that must be used to add purchased product to inventory.
If you are using Lot ID’s to trace your materials, you will assign your incoming materials Lot ID’s on the Purchase Order Entry window.
To access the Purchase Order Entry window, go to Materials Inventory > Purchase Orders > Purchase Order Entry.

Purchase Order #
For a new purchase order, leave this entry blank. The program will automatically assign a purchase order number. When editing or processing existing purchase orders, you can use the lookup option [F4] to view a list of purchase orders.
Vendor Acct / Name Key
Enter either the vendor account number or name key. The lookup option is available for either entry, or you can select from the drop-down list that will appear when you type a partial name key.
Ship To
If your Ship-To address is different from your Bill-To address, enter the shipping address here.
Contact
Enter the name of your contact at the vendor.
Order Date
The program will automatically insert today’s date as the order date. You can change it as necessary.
Required Date
Enter the date by which the purchase must be received.
Date Received
If this is an initial order, leave the date received blank. If you are receiving product, or entering a purchase order for product already received, enter the date received. Make sure that when a date is entered here, you also select the Received box.
Received
Select this box when the item(s) on this purchase order are received. If you are entering a purchase order after the item is received and you select this box, you will need to enter the quantity received on each line item.
If you entered the purchase order prior to receiving, and you have pulled up a saved purchase order to receive, when you select this box the program will ask if you would like to receive all items. If you answer yes, the program will automatically enter the full received quantity on all line items. If you answer no, you will be able to manually enter the quantity received on each line item.
Terms
Enter the term # from your accounts payable terms file. This will default to the terms you have entered in the vendor file.
Ship Via
Select the shipment method from the lookup. You can add to this list simply by typing the new name directly into the field. The program will ask you if you would like to add this to the Ship Via file, and you can select Yes to save the name.
Freight Terms
Select from the drop-down menu, Collect, Prepaid or undefined.
Job Number
This entry is for your internal use only. You can use it for any reference number you need to track, or leave it blank.
Comments
This is a text field that can be used for additional information. Text entered here will automatically wrap.
The following data is entered for each item being ordered. When you have finished entering all lines, you can depress the F6 key to move to the buttons at the bottom of the window and print the purchase order, or you can simply click on the buttons with the mouse.
The following items listed below are optional. Depending on your requirements these columns can be turned on or off in the program setup:
-
Comments
Allows you to enter comments for each item being ordered
-
Customer
When special ordering items, you can track the customer for whom the product is ordered.
-
Freight
Use for entry of freight cost where you need to track freight cost separately.
-
G/L Account
Required entry if you update accounts payable with the purchase order information to create a payables invoice.
-
Unit Type
Display unit type on the window for information purposes only.
Note: To turn optional columns on or off, select the Tools menu, Program Setup, Inventory, Purchase Orders. Items with a checkmark will appear on the Purchase Order window.
Complete the following entries for each item:
Type of Sale
Enter the Type of Sale on character, or select from the lookup. Valid options are (R)esale, (N)on-Taxable, (L)abor, or (T)axable.
Department/Stock #
You can enter the complete Department/Stock #, or use the lookup. If you are purchasing an item not on inventory, leave this entry blank, and you can then enter the description.
Location
Enter the warehouse location where the product is to be received. This will always default to your home location, but may be changed.
Description
The description will appear automatically from the inventory master file. You can add to the description if necessary, up to 40 characters.
Quantity (#) Ordered
Enter Quantity on hand.
Quantity (#) Received
Enter Quantity on hand.
Cost
Enter cost per unit based on current valuation.
Finalize Purchase Order and Update to Accounts Payable
The Inventory system makes it simple to create an Accounts Payable Invoice from a Purchase Order. First, select the Purchase Order, either by typing in the number and pressing [F9] or by selecting from the lookup. Press [F4] or click on the lookup button on the Purchase Order number to select from the lookup window.
Once the correct Purchase Order is displayed, make sure you have indicated that the items have been received by selecting the box next to “Received” on the upper right side of the header. The program will confirm that you would like to receive all items.
Once you have marked the Purchase Order as received, you can finalize it and update to Accounts Payable.
To do this, click Purchase at the lower left side of the window. A new window will appear, similar to the following.
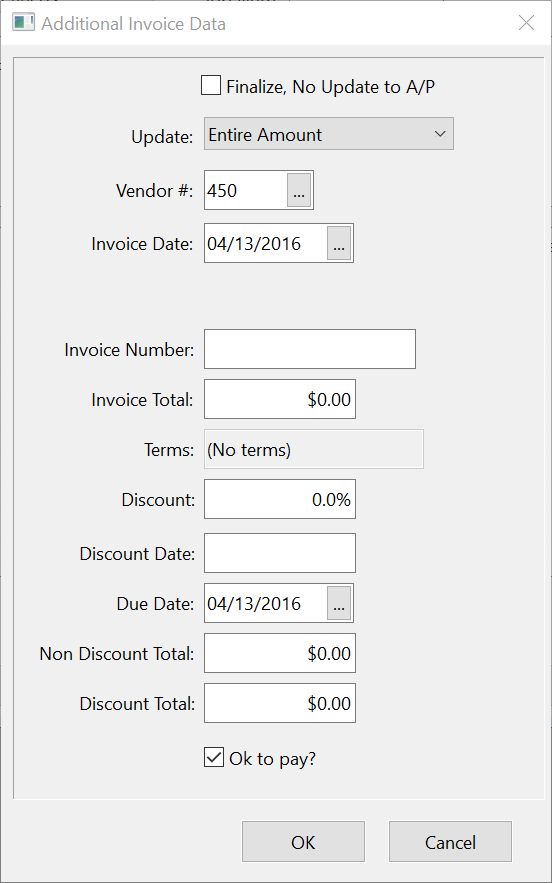
Most of the information will already be filled in from the Purchase Order information. You can fill in as little as the invoice number and then click on OK to save it to Accounts Payable. Following are details for each prompt.
Finalize, No Update to A/P
If you need to finalize a Purchase Order but do not want to create an Accounts Payable invoice, select this box and then click Ok.
Examples of when you would do this would be:
1. Entering starting inventory balances.
2. If an Accounts Payable invoice has been entered through the Accounts Payable program. You would still need to finalize the Purchase Order, and reference the PO# on the Accounts Payable invoice, but you do not want to update Accounts Payable as this would create an additional invoice.
Vendor Number
The vendor number from the Purchase Order will be used here.
Invoice Date
The date you entered as the receive date on the Purchase Order will appear here. You can edit this, if necessary.
Invoice Number
Enter the vendor’s invoice number.
Invoice Total
The total of the Purchase Order will appear here.
Terms
If you have default terms set up in the vendor’s file, those terms will appear here. You can change the terms here, which will affect the due date below. You can also leave the terms set to 0 (no terms) and manually enter the due date below.
Discount / Discount Date
If the vendor offers a discount if paid by a certain date, enter the discount rate and date in these fields. If your discount is set up in the terms, this will automatically fill in the Discount, Discount Date and Due Dates fields.
Due Date
This will be automatically filled in based on the terms above, but you can adjust this date as needed.
Non-Discount Total
If a discount is included in the terms, enter any amount that may not be discounted, such as freight and sales tax.
Discount Total
This is the amount that the discount rate is to be calculated on, ei. the invoice total less the non-discount amount.
OK to Pay
Unless this invoice is to be put on hold, you would want the OK to Pay box to be selected.
If you do not select OK to pay, this invoice will not appear on the Cash Requirements Report or on Automatic Checks. You may want to review the “Do Not Pay Invoice List” under the Payables/Payables Reports/Tools menu to see if there are invoices set not to pay.
OK
Click Ok to save this entry to an Accounts Payable invoice.
Once this information has been saved, you will be able to view and edit it, if necessary, under the Payables menu, Invoices option. You will still need to run the Accounts Payable Invoice Journal to update the entries to the General Ledger. Once the Invoice Journal is updated, the invoice will appear on the AP Aging report and you will be able to make a payables check to the vendor.