Custom Check Formats
Custom Check Formatting
Several different check formats for payables and payroll checks are preprogrammed into the Datatech Accounting Software. If your checks do not fit one of these preprogrammed formats, you can use the Custom Check Format Definition option to specify exactly how you need the check to be printed. You can provide the size of the check and stub, along with where to print each item on the check. After creating the check definition, this option will be added to the "Check Style" options in the Program Setup option.
In addition to handling custom check layouts, the Custom Check Format Definitions also allow you to modify how the check stubs are printed for both payroll checks and vendor payables checks (but not direct expenses checks). An option is also available for printing on blank (not preprinted) check stock.
Keep in mind that once you have created your custom check definition, you still need to select it as the Check Style in the Program Setup option. We recommend that you then try some test printouts on blank paper to make sure that everything is printing in the right place.
Go to Tools > Custom Check Formats.

Format
Enter a name for this format. For example, you can enter the name of the forms company and their form number.
Length of Check & Stubs
Enter the length (in inches) of the combined check and stubs. Common lengths are 11" for a single check plus two stubs, or 7" for a check with only one stub.
The following options can be adjusted as needed (see note):
-
Check #
-
Check Date
-
Amount
-
Amount in Words
-
Name and Address
-
Pay To (Name)
-
Account #
-
Our Account #
-
Check Description
For each item above, enter the position (both horizontal and vertical) in inches where each item should print on the check. If any item does not have a position specified (i.e. you leave the entries at zero) then that item will not appear on the check.
The Amount and Account # items are numeric and are printed right justified based on the position that you enter. (All of the other items are left-justified.)
If your check format has a memo line, then the last two items - Our Account # and Check Description - will be used for vendor checks. You can print your account number with the vendor (e.g. a loan account #, credit card account, etc.) and/or the check description that you enter on each check.
On most check formats, there is a space set aside for printing the name and address of the payee. Some formats, such as Quicken/Quickbooks, also have a separate Pay To line. On that line, only the company/individual name is printed. Use the Pay To (Name) entry to print just the payee name on this line.
Print Stub #1 / Print Stub #2
Select these boxes to indicate that you want the stubs printed. If you have a 7" check format with only one stub, you would only need to select the first box.
Stub #1, Vertical Position / Stub #2, Vertical Position
Enter the vertical starting point for printing the stubs from the top of the page, in inches.
Stub #1 Length / Stub #2 Length
Enter the length in inches of each stub.
Font Settings
Click on the Select button to choose a font and point size to use when printing the check. The default settings are the Arial font at 10 point.
These checkboxes allow you to apply different styling options to items that are printed on the check:
-
Print Name/Address Bold
-
Print Asterisks Around Name
-
Print Asterisks Around Amount
-
Print Dollar Sign on Amount: This option allows you to turn off printing a dollar sign in front of the amount on the check. (It is possible some bank systems may misinterpret the dollar sign as a number.)
-
Print Street Address for H-2A Employees: Selecting this option prints the employee's street address on the check for H-2A employees rather than their mailing address.
Note When the address in their home country was entered for the mailing address, H-2A employees encountered issues cashing checks with foreign addresses on them; printing the street address eliminates this issue.
A signature can be printed automatically on checks that are printed by the program. This feature is only available if you set up a custom check format; a signature cannot be printed with any of the preprogrammed check formats. To print a signature, you must first scan a signature and save it as a Windows BMP, PNG, GIF, TIF or JPG file. (BMP, PNG, TIF or GIF are recommended formats since these formats perform lossless compression. You may see compression artifacts in signatures stored in JPG format.)
In this section, you will tell the program where the bitmap file is located, where to print it on the check and how big it should be.
Bitmap Filename
Enter the full path and filename of the bitmap file. Click on the folder button to the right of the filename to select a file from the Open File dialog.
The program supports other graphics formats besides BMP - including GIF, JPG, TIFF, and PNG. A lossless graphics format is normally best for printing signatures. PNG is usually the best format since it is lossless and has better compression than BMP files.
Position
Enter the vertical and horizontal positions in inches for where to print the signature file. This is the position of the upper left corner of the signature file. Depending on how much white space there is around the signature itself, you may need to experiment a little with positioning the signature so that it appears on the signature line preprinted on the check.
Size
Enter the width and height to print the signature file.
Additional security settings for printing the signature are available on the Signature Settings tab page.
Options
Click on the Options button at the bottom left corner of the window to open a popup menu with the following options:
Check Layout Test Print
This will print a sample check using the settings on the Check Layout tab. This sample check does not use any settings to print the stub from the payroll or payable check stub tab pages. A box will be drawn indicating the area reserved for each stub. To preview how the stubs will look, it is necessary to print an actual check.
Print Check Layout Settings
This will print a single page with the check layout settings. This was originally meant to facilitate using the same check setting for another company, but it is easier now to simply export and import the check format settings.
Check Layout Defaults
This option has a submenu with four different options. Each option will set up default values for the check layout and stub positions accordingly.
Export Settings
Use this option to export all of the settings to a check definition file which can then be imported into another company. This makes it possible to create a custom check format once and re-use it for multiple companies.
The check definition file includes all of the settings on the Custom Check Format Definitions window - including the Blank Stock Settings, Payroll Check Stub and Payable Check Stub.
The default location for storing the check definition file is in the “Definitions” folder under the main application folder. Check definitions file will use the extension “.dtcheckxml”.
Import Settings
This option can be used to import a previously exported check definition. Select the check definition file to import and the setting will be imported and displayed.
The blank check stock feature is an extra cost option. This allows you to print on check stock that is not preprinted. You must use special magnetic toner and a special font so that the bank account and routing information printed at the bottom of the check can be scanned by automated equipment at banks. When you purchase this option, you will receive special instructions on how to set up the custom check format.
The MiCR font will need to be installed on any workstations that will print checks. The MiCR font is used to print the bank account, routing number and check number at the bottom of each check. This information must be printed using this font in specific locations at the bottom of the check to allow for automatic scanning of this information.
The following sections cover each of the sub-tabs on the Blank Stock Settings tab page.
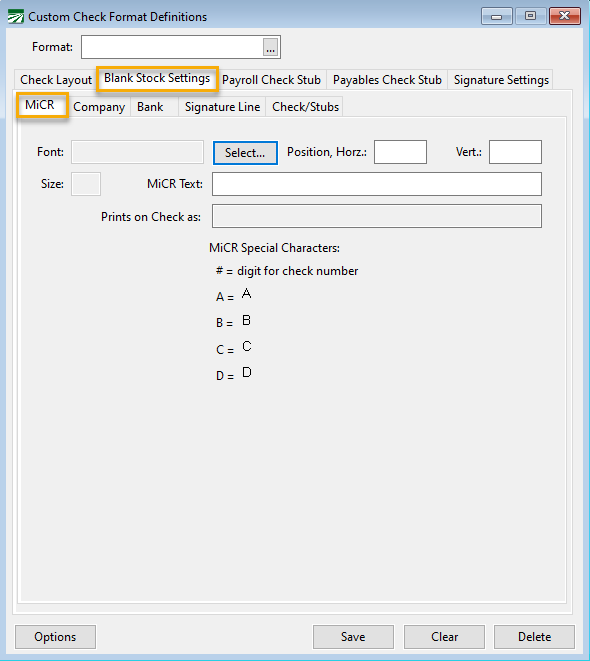
MiCR Text
The MiCR text is printed at the bottom of the check in a special font that can be read by automated scanners used at banks. This line includes the bank account number and routing number for your checking account at your bank along with the check number. Four special characters are used as separators between this information. These special characters are inserted using the letters A, B, C and D.
Normally you can copy the MiCR line information from an existing pre-printed check.
When you are using a single custom check format with multiple bank accounts, you can enter the bank account and routing numbers in the Accounts Payable Bank Account Setup window. In the MiCR line text, enter “<ACCOUNT>” and “<ROUTING>”. These codes will be replaced with the bank account number and routing number respectively of the account that you are printing check for.
Company
This tab includes settings to print your company name and address and a logo.
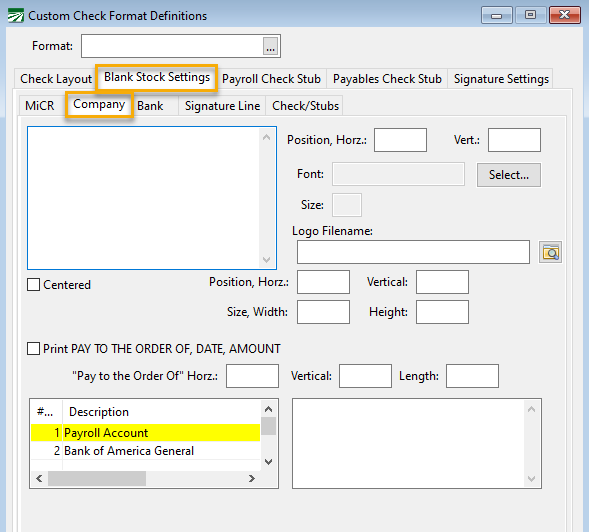
Enter your company name and address in the edit box in the top left. You can include additional information if desired, such as phone numbers, federal ID number, etc. Next to the edit box, enter the horizontal and vertical position in inches (upper left corner) of where on the check you want your company information to appear.
If you want each line of the company information centered horizontally, select the Centered box below the edit box. Otherwise the text will be left-justified.
You can also select a specific font and font size to use when printing your company information.
If you have a logo that you want to appear on your checks, select the logo filename. You may use a BMP, GIF, JPG, PCX, TIFF, PNG, or WMF file for your logo. Enter the position in inches and the size for the logo.
Some blank check stock has the words “PAY TO THE ORDER OF”, “DATE” and “AMOUNT” preprinted. If your blank check stock does not have these words preprinted, you can select the box to print them.
Bank
This tab includes settings to print your bank information. This may include your bank’s name, address, phone number, and routing number.
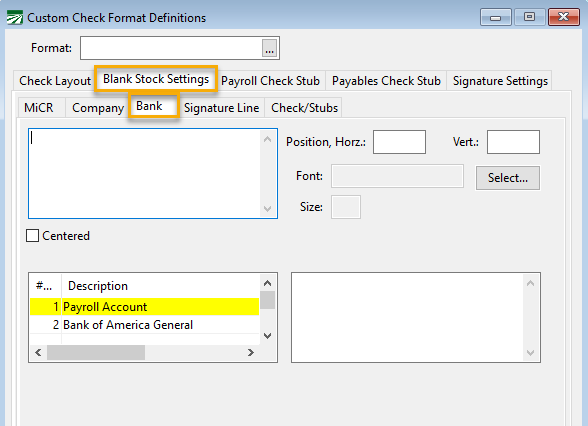
Like the Company tab, you may enter a block of text (e.g. bank name and address) and must enter a position in inches to print the bank information. You may also choose to center the text and select a font/font size in which to print the bank information.
Signature Line
Some blank check stock will have the signature line preprinted, others do not. This tab allows you to choose to print a signature line and an optional message that prints above or below it.

Enter the position for the signature line in inches and the length (typically signature lines are about three inches).
If desired, enter the text for the signature line, for example “AUTHORIZED SIGNATURE”, “VOID AFTER 60 DAYS”, etc. The text will always be centered on the signature line. You can specify the vertical position for the text. If you enter multiple lines of text, you can position it in such a way that some text appears above the signature line and some text appears below it.
You may also select the font and font size for the signature text. Keep in mind that the font and font size will affect the vertical spacing when you enter multiple lines of text.
Check/Stubs
This tab specifies where to print the check # on a stub and also allows you to create a heading that will appear on all stubs (this would normally contain your company name and address information).
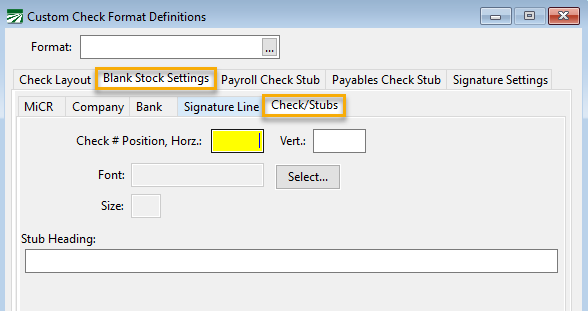
Enter the positions in inches to print the check number. Since the check # is printed right justified, this should be the position of the upper right corner of the check #. You may also select the font and font size to use when printing the check # on the stub.
The stub heading will be printed 2/10” higher than the vertical stub positions that you enter on the Check Layout tab. That is because those positions specify where the program should start printing check stub details, not the vertical position of where the stub actually starts.
This tab page allows you to customize the printing of the payroll check stubs. This includes:
-
Control over which columns are printed for the employees’ gross wages
-
The order in which line items are printed on the check
-
Whether to print a subtotal in the detail section
-
Whether to combine similar line items into one line
-
Where the deductions are printed,
-
Font, size and style settings for each section of the stub.
The following sections explain the setting that are available on each sub-tab of the Payroll Check Stub tab.
Columns
This tab page allows you to control which columns appear on the payroll check stub detail section, their positioning and whether or not lines with similar information are combined into one total.
If no columns are defined, the program will use a default set of columns based on the status of the Ag Check Stub checkbox setting under Tools > Program Setup > Payroll > Check Printing.
For the default ag check stub, the program uses approximately 5 ¾” of the page from the left margin (¼”) for the detail section. Including the left margin, the detail section is 6” wide. The remaining 2 ¼” of space (excluding the right margin of ¼”) on the right-hand side is reserved for printing the wages, deductions and net check amounts (both for this check and year to date).
Click on the Defaults button at the bottom left corner of the tab page to create a set of default columns that you can then to modify. You can create columns manually by clicking on the New button under the column list.
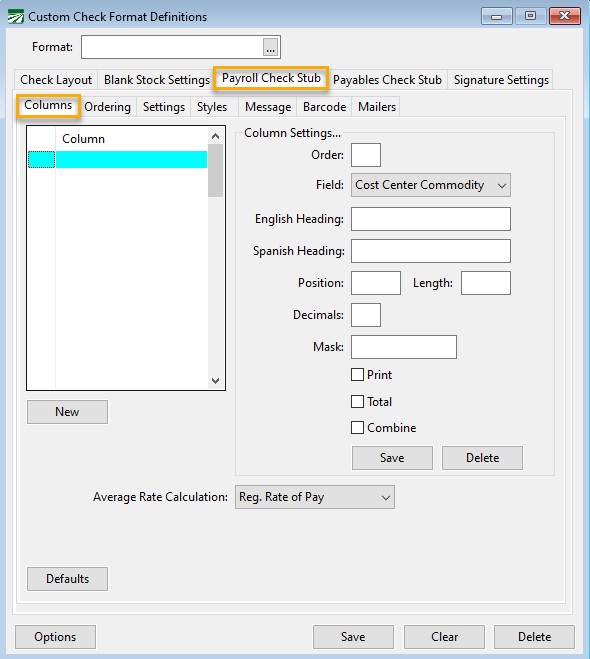
For each column, enter the following information:
Order
Start numbering the columns at 1.
Field
Select which field will appear in this column.
English Heading / Spanish Heading
Enter the headings that you want to appear at the top of the check stub for this column.
Position
Enter the position in inches from the left margin.
Length
Enter the length of this column in inches. This setting is mainly useful for text columns (such as job or crop descriptions) that may need to be truncated to avoid overwriting information in the next column.
Decimals
For numeric columns, enter the number of digits to the right of the decimal place that the program should print. This setting is primarily useful on the Units and Rate columns, which may have up to four digits to the right of the decimal place. If you only ever enter amounts with up to two digits, you can print these amounts with fewer decimal places than they would normally use.
Mask
The mask setting can be used on numeric and date columns to control how they are formatted. A mask consists of a pattern that tells the program how to print the data.
For numeric columns, the following formatting codes are used in the mask:
, - comma inserts local thousands’ separator every three places to the left of the decimal
. – period is replaced with the local decimal separator
; - semi-column comes after format for positive numbers, before format for negative numbers
# - no digit or one digit
0 - one digit, or a zero
* - any number of digits, include one
For instance, if you wanted to format the Amount column with a dollar sign and the comma as the thousands separator, you could use the mask “$*,#.00”
Several options for formatting dates are available:
m – month number 1-12 (1-2 digits)
mm – month number 01-12 (always 2 digits)
mmm – local abbreviation for month (e.g. Jan-Dec)
mmmm – local name for month (e.g. January-December)
d – day number 1-31 (1-2 digits)
dd –day number 01-31 (always 2 digits)
ddd – local abbreviation for day of week (e.g. Sun-Sat)
dddd – local name for day of week (e.g. Sunday – Saturday)
yy – two digit year, 00 to 99
yyyy – four digit year
/ - slash is replaced with local date separator
For the date worked, if no mask is supplied, it will be printed using the standard date formatting: “mm/dd/yyyy”. If you enter a mask, then the date will be printed accordingly. For instance, the mask “ddd mmm d” will result in the date 10/15/2013 printing as “Tue Oct 15”. The mask “mm-dd-yy” would result in it printing as “10-15-13”, and “mm/dd” would result in “10/15”.
Local abbreviations and names for the days of the week and month are run through the check printing translation table. Therefore, you can have Spanish language names and abbreviations appear on check stubs for employees that have their check stub language set to Spanish.
One thing to keep in mind is that the “local name” and “local abbreviation” is based on the Windows Region and Language localization settings. If you have your copy of Windows set to use the Spanish language, then the “local” settings will return Spanish names for the days of the week and the months. If multiple computers are used for check printing and their localization settings are different, this can cause problems with the right languages appearing on the check stub. You should make sure that the localization settings are the same on all computers across your network.
If you stick with numeric dates, localization does not cause any issues.
If this box is not selected, then this column will not print on the check stub. In some cases, you may need to include a particular field in the stub columns for purposes of combining similar lines together but you may not want that column to actually print. For those situations, you can add the column, deselect this box, and select the Combine box.
Total
When this box is selected, the program will add up the amounts in this column and print a total. If a subtotal line has been enabled, a subtotal will also be printed for this column. This box is normally only used on the Hours, Pieces, Units, Amount and Hours Offered columns.
Combine
The program can combine similar line items together and print a combined total instead of printing each individual line. This checkbox determines which columns must have the same data in order for the program to determine that they should be combined. The program compares the data in all of the columns that have this box selected to see if the data matches; if it does, then the units, hours and amounts for those lines are combined together.
At a minimum, you must have the Combine box selected on a Wage Type and the Rate columns. Otherwise, the program may combine lines with different pay rates, and the check stub will not print accurate amounts.
After entering the settings for a new column or editing the settings for an existing column, click on the Save button below the Combine box to save the changes for that column. Do not click on the Save button at the bottom of the window, because that will save all of the settings for the check format and clear the entire window.
If you need to delete a column, click on the Delete button next to the Save button.
Average Rate Calculation
Ordering
The ordering tab controls what order the line items will be printed in on the check stub. If no ordering sequence is set up, then the program prints the line items in the same order as they appear on the check entry window. (Except for farm labor contractor stubs in California, where the line items will always be grouped by grower to comply with state law.)
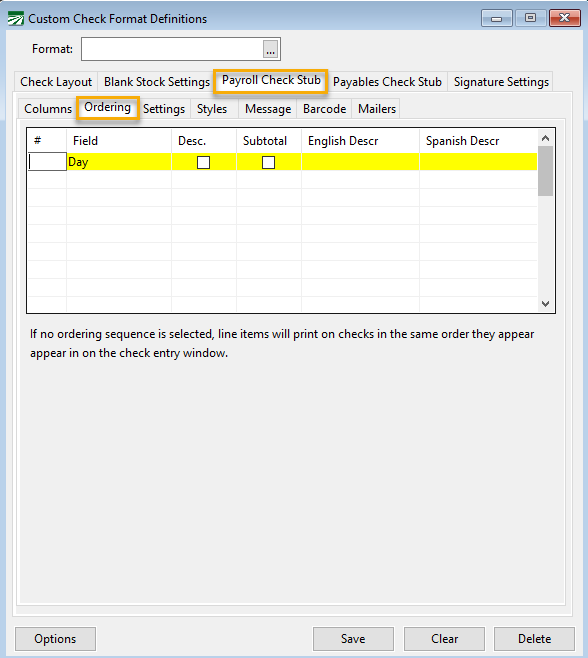
In the example above, the line items will be ordered by day. For each day, the lines will be grouped by the Job ID Description. If there are multiple lines for a single Job ID, then the lines are ordered based on the Report Order setting in the Wage Type file.
For each line in the table, enter the following information:
# (Sequence #)
Number the lines starting at one.
Field
Select the field for this part of the ordering sequence.
Desc.
Select this box if you want to order lines in descending sequence instead of ascending sequence.
For instance, if you wanted to print the lines with the highest amounts first, you could select the Total field and select this box.
Subtotal
This box may be selected on one line item only. Normally this will be the first line item in the ordering sequence. This determines whether a subtotal is printed as well as on what column the subtotal is based.
English Descr / Spanish Descr.
Enter the text that you want to appear on the subtotal line. This entry has no effect on lines that are part of the ordering sequence but are not subtotals.
Settings
This tab page is used for several general settings for check stub printing.
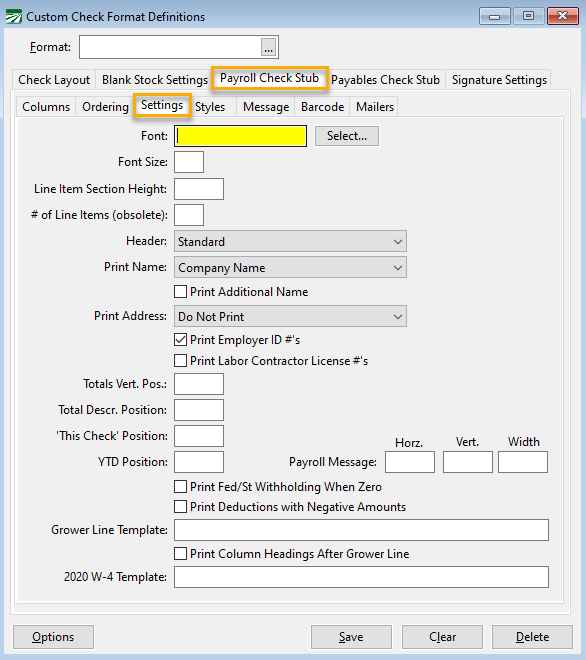
Font/Font Size
The font and font size setting will be used for the entire check stub unless you provide formatting settings in the Styles tab. If you have set up Styles, it is not necessary to set the font and font size here.
Line Item Section Height
This setting controls the height of the detail section in inches, excluding the column headings and totals at the bottom of the stub. If you do not provide a height, then the program will determine the detail section height using the stub height setting on the Check Layout tab.
In some situations, you might need to reserve some space at the bottom of the check stub for messages on payroll checks. If so, you can use this setting to make the detail section shorter than it would otherwise be based on the stub height on the Check Layout tab. (This might be necessary in situations where the same custom format is used for both payroll and payables checks.)
# of Line Items (obsolete)
This setting specifies the maximum number of line items that may print on the stub. This is considered an obsolete technique; we recommend using the previous setting to control the height of the line item section.
Due to the new formatting options that are available, and the fact that different fonts may be spaced differently (even at the same point sizes), this setting is not very precise. If you are currently using this setting, we recommend that you remove it and enter a value in the Line Item Section Height instead.
Header
This setting controls what type of heading is printed at the top of the check stub. The “Standard” header prints a single line with the employee and check information. Various “Detailed” options are available that print on up to four lines.
Print Company Name/Address/City/State/Zip/Employer ID #’s
These check boxes control whether or not this information is printed below the total section on the right side of the check stub. By default, these items will be printed. In some cases, you may not need them to be printed.
For example, when you are using one of the “Detailed” header options, your company name and address will be printed in the header section. Or this information may already be pre-printed somewhere on your check stub.
Additionally, the information may be included in the messages that you set up on the Message tab (see instructions below).
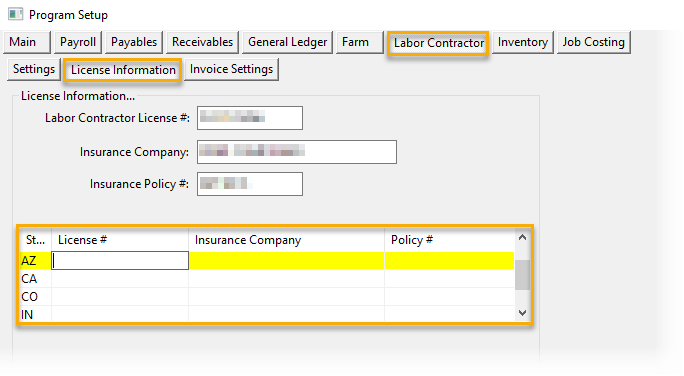
Print Labor Contractor License #'s
Select this check box if you want the labor contractor's license number to appear on the check stub.
Note This option can be used only if you are using a custom check format. If so, ensure the license number is entered in the Program Setup: if you are a single state user, go to Tools > Program Setup > Labor Contractor > License Information and enter the license number in the grid.
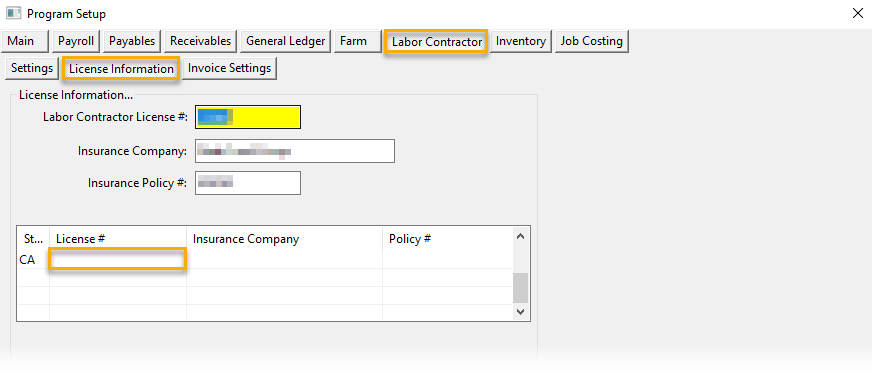
If you are a multi-state user, enter the license number in the grid according to the corresponding state.
Total Vertical Pos
This setting (entered in inches) controls the vertical location of where the total section (listing the total wages and deductions for both this check and YTD) appears on the check stub. If your checks have two stubs, leave this setting zero; the total section will automatically print alongside the detail section.
If you have only one check stub, you can control the vertical position of where this section starts. In some cases, you may wish to set up a check stub where the detail section uses the entire width of the stub, and the totals section is placed at the bottom of the check stub.
Total Descr. Position/ ‘This Check’ Position/ YTD Position
Enter the horizontal positions (in inches) for the three columns of the totals section.
Payroll Message
Specify the horizontal and vertical positions to print messages on the employee’s check stub. Also, enter the width of the message. The message that prints on the check stub may be standard, custom, conditional or a combination of the three. This depends on: (1) settings you have entered for the Check Messages section of the Payroll settings in the Program Setup window; and (2) the Check Stub Message entered on the individual employee accounts.
Print Fed/ St Withholding When Zero
By default, if no tax is withheld for federal or state income tax, the program will not print the description or amounts. Select this box if you want these deduction descriptions to appear on the employees’ check stubs even if no withholding has been taken out of the employees’ wages.
Print Deductions with Negative Amounts
Some employees may be confused by reimbursements showing as negative deductions on their checks. When this option is selected, tax and miscellaneous deductions will be printed as negative amounts on the payroll check stub. Reimbursements made through miscellaneous deductions (which are entered as negative miscellaneous deduction amounts) will be printed on the check stub as positive amounts.
Grower Line Template
For farm labor contractors, the check stub will automatically group and print labor for each grower together. A heading line is printed for each section with the grower’s information. This entry can be used to customize the heading line. The template must be enclosed in parenthesis and use Visual DataFlex string operators (+, -, *) to generate a valid text string. Literal text may be enclosed in single or double quotes.
You can use the following fields in this template:
STRING(PRGROWER.ACCT_NUM)
PRGROWER.NAME_KEY
PRGROWER.NAME
PRGROWER.ADDL_NAME
PRGROWER.MAIL_ADDRESS
PRGROWER.CITY
PRGROWER.STATE
PRGROWER.ZIP
PRGROWER.PHONE1
PRGROWER.PHONE2
Print Column Headings After Grower Line
When this box is selected, the check stub will not print the column headings at the top of the check stub. Instead, it will print the column headings after each grower heading line. For long detail sections, you may find this more visually appealing and easier to read.
Styles
The Styles tab allows you to control formatting for each element on the check stub. If no styles are set up, then the default formatting will be used based on the font and font size that you enter on the Settings tab page.
When printing the stub, the program looks for specific entries in the style list by name. If you don’t have any styles set up, click on the Defaults button and they will be created for you. The default set of styles will use the font and font size that you have entered on the Settings tab. If you have not entered a font and size on the Settings tab, the styles will be created using Arial/8 point.
Once the styles have been created, you can modify them. This includes changing the font, font size, bold, italic, and other settings.
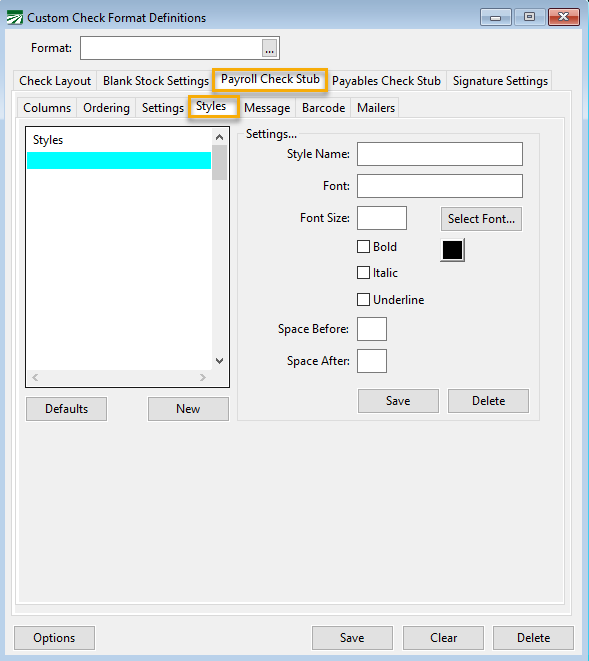
The Space Before and Space After are measured in points and can be used to add white space above or below a line printed with a specific style.
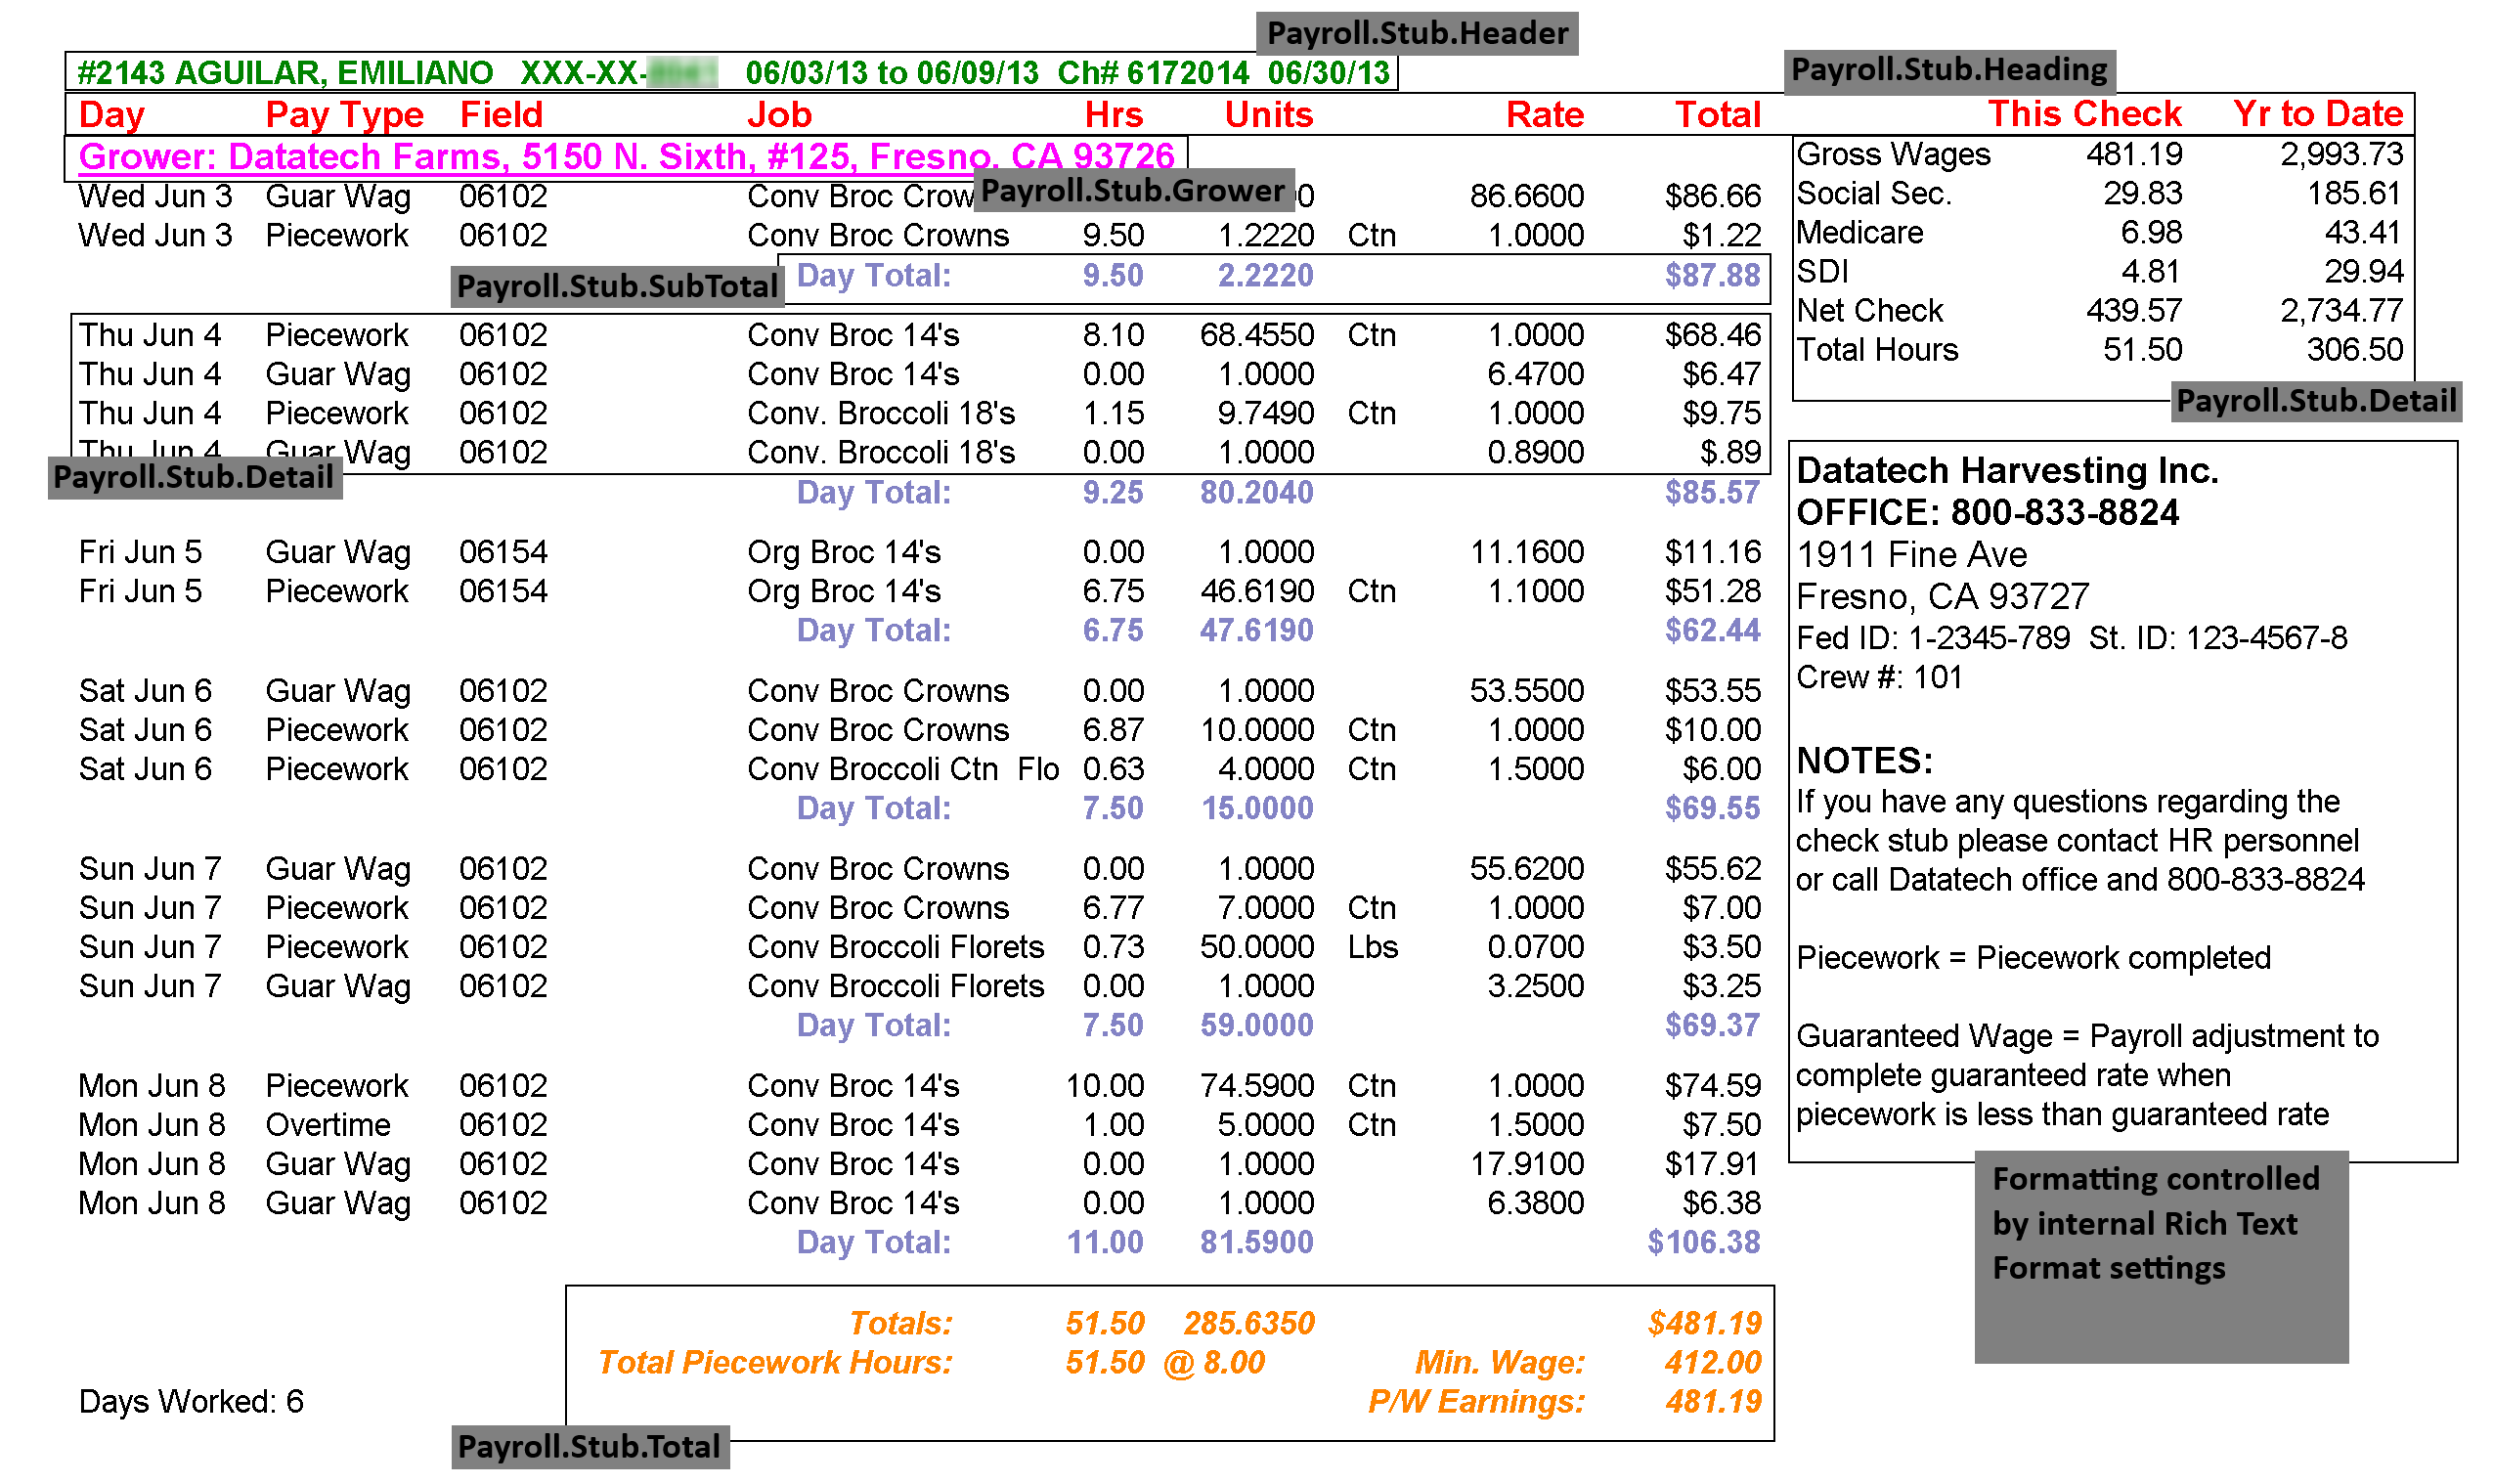
The following sample stub printout shows which styles affect which parts of the stub. In this example, we have used distinct styles with different colors to better highlight where the formatting for each style takes effect. Normally you would not use multiple colors like this (although the check stub demonstrates that it is possible). The style names for each section are shown in the gray boxes.
Message
This tab allows you to set up a standard message that will be printed on all check stubs below the “This Check/Year to Date” totals columns. You may set up one message for English and one message for Spanish.
Note The message entered under this tab is in addition to any messages that are entered under Tools > ProgramSetup > Payroll > Check Messages. Those messages will still be printed on the check stub when needed, and based on the position you specify on the main Check Layout tab.
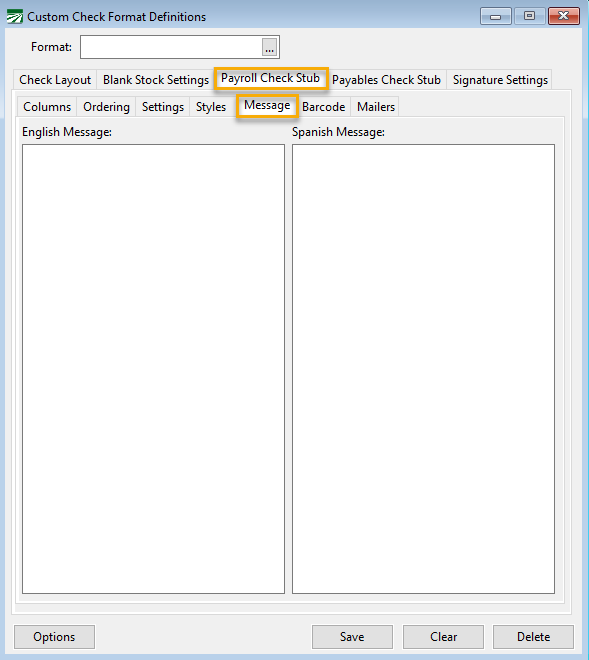
Both of the messages are stored internally as Rich Text Format (RTF) documents. This means that you can format the text within the edit boxes and that formatting will be used when the message is printed
Use Ctrl+B to use bold formatting, Ctrl+I to use italics, and Ctrl+U to underline.
Different fonts and font sizes may be used for these messages, but the edit boxes do not have controls for changing these. To do this, you can enter text into a word processor (e.g. Microsoft Word or WordPad) and change the font and font size settings for the message there. You can then copy and paste the message back into the edit box, and the formatting and font settings will be retained.
Barcode
The barcode feature prints a Barcode/QR code on the check to identify whether the check is more than one page. (This would be the case if Print Check Vouchers for Overflow Checks During Check Printing and/or Continue Stub on Voucher for Overflow Checks are selected in Program Setup > Payroll > Check Printing.)
The code then tells a folding machine how many pages are included to fold together and stuff in an envelope.
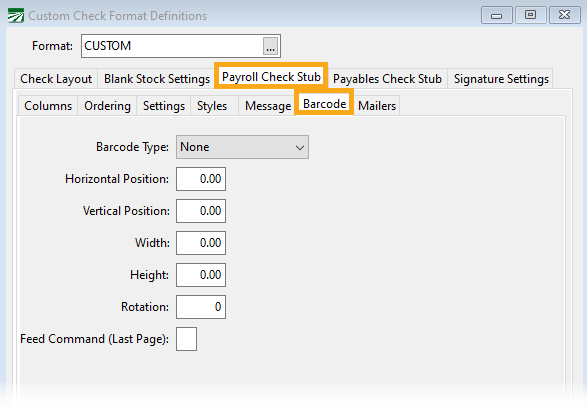
Barcode Type
Select a barcode type: Code 128 (1D), DataMatrix (2D) or None.
Horizonal Position / Vertical Position
Enter numbers in Horizontal Position and Vertical Position to position the barcode on the check stub. You may need to print a check stub and use a ruler to get these measurements, test them and then make any adjustments as needed.
Width / Height
Enter numbers in Width and Height to size the barcode.
Feed Command (Last Page)
The feed command will instruct the folding machine to do different functions at the end of folding.
Note For the feed command and other barcode settings, review the settings required for your paper folding machine.
Mailers
The Mailers feature allows payroll check stubs to be printed with the employee’s mailing address and the employer’s return address on them so that the payroll check stub can be mailed.
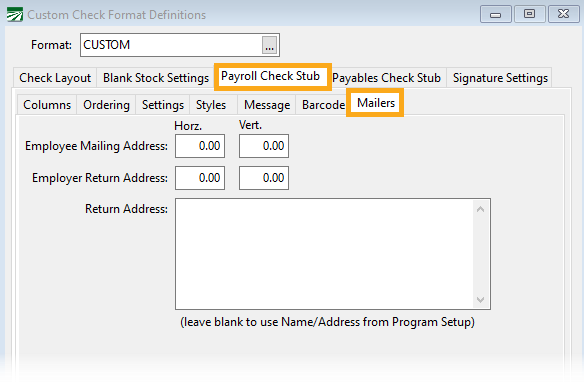
Employee Mailing / Employer Return Address Horz. And Vert.
Enter numbers in the horizontal and vertical position to position the Employee Mailing Address and Employer Return Address on the check stub. You may need to print a check stub, put it in an envelope with windows for addresses, and use a ruler to get these measurements, test and then make any adjustments as needed.
Return Address
If the Employer Return Address used for this check stub is different from the address in the Program Setup, enter it here. If not, leave this entry blank to use the Employer Name/Address from the Program Setup.
Normally vendor checks are printed on check stock with blank stubs. The settings on this tab page allow you to customize how the stub is printed for payables checks (direct expense checks do not use these settings). This allows you to position each element for the detail lines (where the invoices paid are listed) as well as specify items and positions for a total line. These settings make it possible to use check stock that has pre-printed stubs.
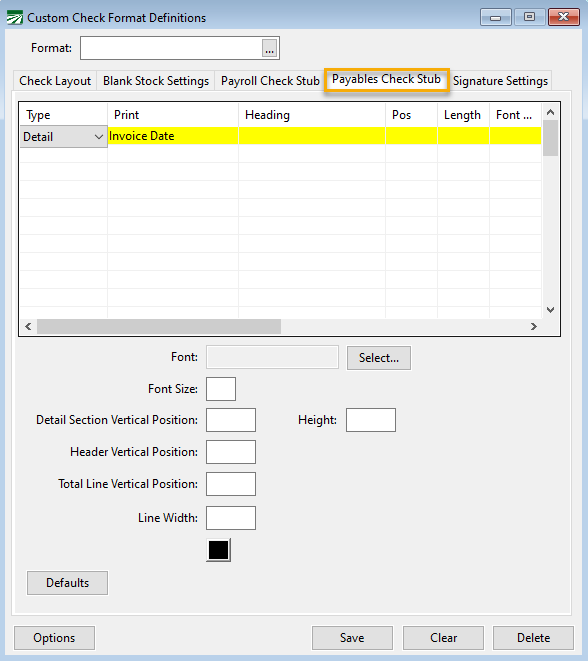
The grid is where you will enter the items that are to print on the stub. For each of the items, you will specify the following:
Type
Specify whether this line is a Detail item (part of the list of invoices paid) or a Total item (an item that is printed one time, at either the top or bottom of the stub).
Select the item to print. Note that some items are designed to only print on detail lines, while others are designed to only print on the total line.
Heading
Leave this blank if you are using stock with pre-printed stubs. If not, you can enter a heading that will appear at the top of the detail list.
Pos
This is the position in inches from the left margin to print this item. Numeric items are printed right justified based on this position.
Length
Enter the length for this item. This is usually not needed for numeric items, but may be needed for the description, invoice #, P.O. #, vendor name etc.
Below the grid there are several settings that control the overall look of the stub:
Font / Font Size
Click on the Select button to change the font and font size that will be used for the check stub. This may be different than the font/font size used on the check part itself.
Detail Section Vertical Position
Enter the distance in inches from the top of the stub to start printing the invoice detail section. If headings are included for the detail section, this is where the headings will print, and the invoices will start on the next line. If no headings are specified, then the invoice list will begin at this position.
Height
Enter the height in inches for the invoice detail section. If there are more invoices paid on a check than will fit in the detail section, then the last line in this section will print “Other Invoices Totaling” and show the total of the invoices that could not fit on the stub. (A check voucher can be printed separately for these stub overflow checks.)
Header Vertical Position
Total Line Vertical Position
Enter the distance from the top of the stub in inches to print the items on the total line.
Line Width
The Signature Settings tab page contains security settings that control which users and what check amounts may have a signature automatically printed on the check.
When a signature is printed automatically on the check, you may want to set a dollar limit and/or a password that must be entered before a signature can be printed.
Any checks that exceed the dollar limit that you set will not have a signature printed on them at all.
When you set a signature password, checks that are under the dollar limit will only have the signature printed if the correct password is entered.
In addition to setting a global password that applies to all users, you can set up different passwords and limits for individual users. This lets you set higher or lower limits for specific users that will apply only if they enter their own individual password when printing checks.
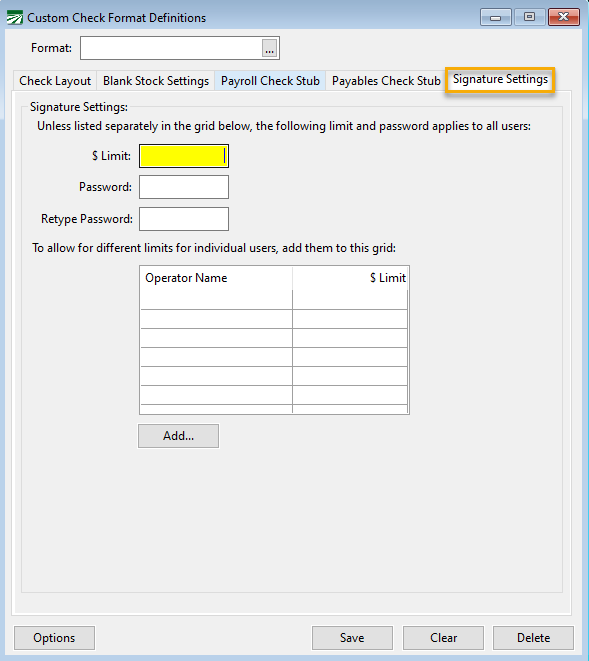
$ Limit
As a security measure, you may set a dollar limit above which a check will not have a signature automatically printed. Checks above this amount will have to be signed by an authorized signer on the account.
Password
You can set up a master password that must be entered prior to printing checks with a signature. This password can be entered by any user that has access to the check printing features in Payroll or Accounts Payable.
If the password is not entered, the program will still print the check but it will not print the signature on the check.
When you type in the password, asterisks will appear for each letter you type in. You must retype the password in the next entry to confirm it.
Note If you are going to be setting up different passwords and limits for every user that prints checks, you must set up the master password (even it if it will not be used) to activate the signature printing security features.
Adding Check Limits/Passwords by User
Click on the Add… button to add an entry to the grid for an individual user. The following window will appear:

Enter the operator name, dollar limit and password to use for printing the signature on the check. Click Ok to save the entry.
Note that the password used for printing checks does not need to be the same as the password that is used to log into the program. In fact, it is best to use different passwords for each purpose. This way, if a user’s password to log into the program is compromised, the same password will not work to print a check with a signature.
If you need to edit the settings for an operator that is already listed in the grid, double click on the operator name to edit their information.
If you need to delete an operator from the list, double click on the operator name and then click Delete in the bottom left corner of the Check Signature Settings window.