Printer & Font Settings
Go to Tools > Program Setup> Printer & Font Settings.
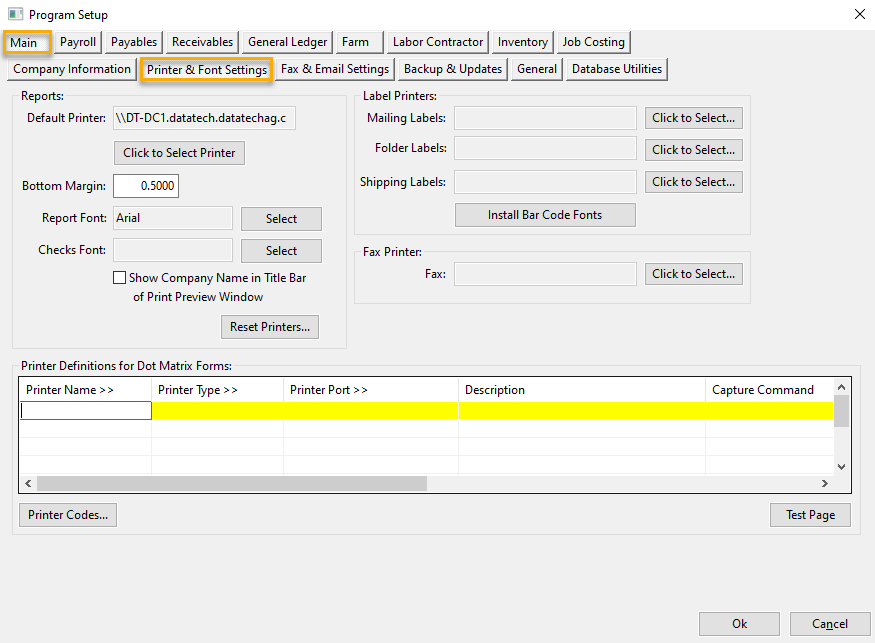
Main Options
Printer and Font Settings
The Printer and Font Settings page allows you to select printers for specific purposes as well as the fonts to use for reports and checks.
This page includes settings for direct printing to dot matrix and thermal transfer printers for forms.
Printer Definitions for Dot Matrix Forms
If you use dot matrix printers for forms such as checks, W-2’s, etc., then you will need to enter the printer settings in this table to tell the program where to print these forms.
Printer Name
This entry must be one of several predefined values. The program looks for specific printer names when it prints certain forms.
CHECK_PRINTER – This printer will be used to print both vendor checks and payroll checks.
PRCHECK_PRINTER – If you want to print payroll checks to a different printer than your vendor checks, add a line using this printer name.
INVOICE_PRINTER – This printer is used for printing customer invoices on continuous forms.
LABEL_PRINTER – This printer is used for printing continuous labels on a dot matrix printer. The program supports printing on 1” high by 3” wide labels only.
BOL_PRINTER – This printer is used for printing on continuous bill of lading forms.
W2_PRINTER – This setting is used for printing on continuous W-2 forms in the 2 per page format.
PAL_PRINTER – This setting is used for pallet tag printers (typically a thermal transfer printer). For pallet tag printers, select the NO PRINTER CODES option for the printer type.
CONF_PRINTER – This setting is used for printing confirmation of sale forms (brokerage confirmations).
CANCONF_PRINTER – This setting is used for printing on continuous Canadian Confirmation of Sale forms.
CREW_PRINTER – This setting is used for printing on continuous crew sheet forms.
Printer Type
This entry allows you to select the printer codes that will be used to control the printer (set pitch size, line spacing, and other options.) If the incorrect printer codes are selected, your forms will likely not print correctly.
Most printers emulate either an IBM Pro printer or Epson FX/LQ and can use one of these settings. For example, Okidata printers can emulate either set of codes. You may need to check your printer’s configuration menu to see which codes it is currently set up to use.
If you are not sure what printer codes to use, then once you have set up a printer definition you can click on the Test Page button in the bottom right corner to print a test page; this will include lines printed in the different pitch sizes and line spacing settings. If the test page comes out correctly, it should be ok to use those codes. See the section below for an example of a correct test page.
Printer Port
This is a required entry. The printer port specifies where the printout will be sent to. This could be one of the 4 following things:
The printout could be sent to a literal printer port such as LPT1: or LPT2:. Note that more recent versions of Windows may not allow applications to print directly to the port. The program may get a “Can’t Open Output File” error if this is the case.
If the literal port does not work, you may need to share the printer under Windows and use the UNC path to the printer. The UNC path consists of a double backslash, the computer name, a backslash, and the printer’s share name. In the sample screenshot above, the INVOICE_PRINTER definition is printing to the UNC path \\datatech-matt\oki320.
For a network printer, it may not be possible to print to a port or share name. In this situation, if the printer or print server supports direct (“raw”) printing, you may specify the TCP/IP address of the printer. The PAL_PRINTER in the above screenshot is set up to do this. For the Printer Port, enter “TCPIP:” followed by the network address of the printer, followed by a colon and the port number to print to (typically 9100).
Finally, for testing purposes, you can specify a path and filename as the Printer Port. The program will generate a text file, the contents of which would normally be sent to a printer. This can be useful if you need to verify that the program is using a certain printer definition or if it is necessary to determine exactly what is being sent to a printer (e.g. checking to make sure the proper data and printer codes are being output).
Capture Command
The capture command is rarely used. This is an obsolete technique that is still supported for backwards compatibility. This column allows you to enter a command to execute each time the printer is used. For example, a Novell Netware CAPTURE command or a NET USE command for Windows based printers to redirect printing to an LPTx: port to a network printer. In nearly all cases, a UNC path should be used instead of attempting to use a capture command.
Test Page
Here is how a test page should look:
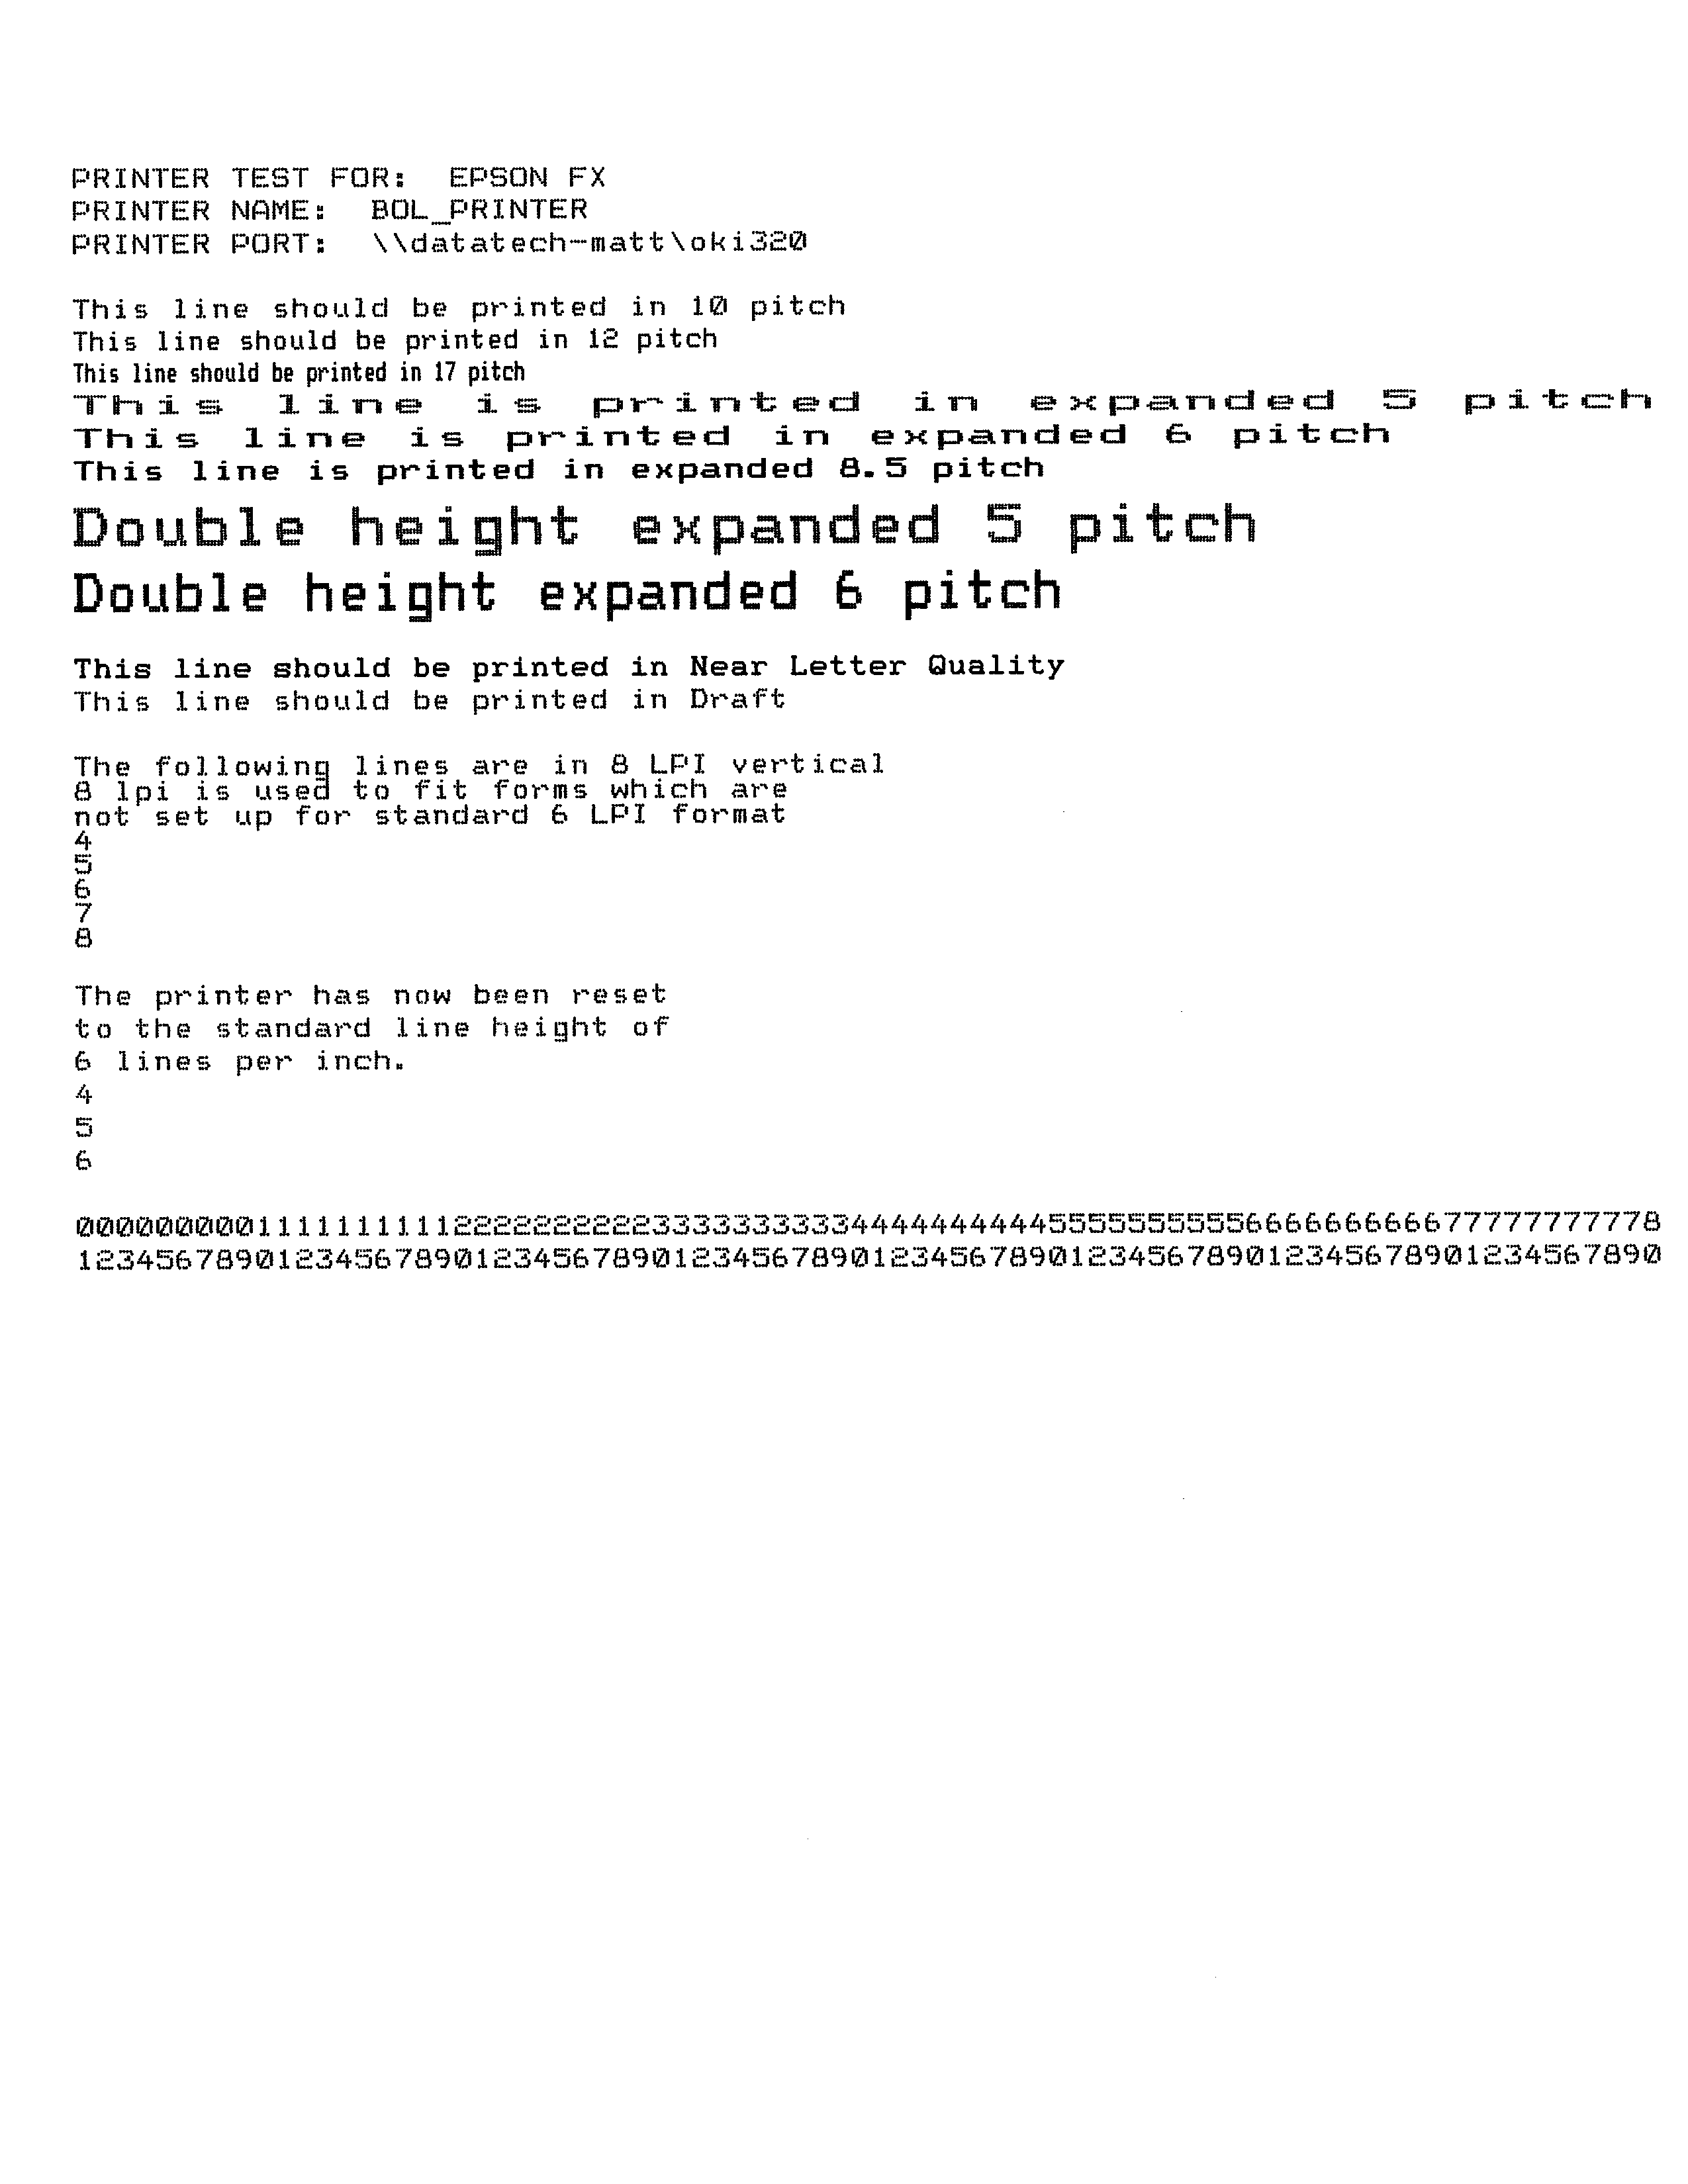
Your printer may not support all of the codes on this page. The most critical codes are the 10, 12, and 17 pitch lines and the 6 and 8 lines per inch sections. All of these codes need to be correct for printing payroll checks. Other codes that appear on the page are typically used only for custom forms.
Note that the 8 lines per inch and 6 lines per inch section each print 8 and 6 lines, respectively. Use a ruler to verify that each of these sections is printed within a height of one inch.
The last two lines are printed to make sure that your printer is capable of printing a full 80 columns at 10 pitch. If any of the numbers wrap around to the next line, you may not be able to print forms correctly. This may require adjusting the tractor feeds of your printer to get the full 80 columns.
If you are not sure if your printer test is correct, fax it to Datatech and we can verify it for you.
Printer Codes
A printer code file is installed automatically with your Datatech Accounting Software. In most cases, you will not need to add or edit any of the entries in this file. Sometimes it may become necessary to change settings or create a new entry in the printer code file to support your printer. Normally, Datatech support personnel will assist you with this.
When you click on the Printer Codes button, the following window will appear displaying the printer codes for the currently selected printer definition:

For each printer code, you can enter up to six decimal values. Printer manuals normally list the decimal values for each code. If your printer does not support a particular feature, you can leave those printer codes blank.
Label Printing
In addition to printing batches of labels on laser printers (on Avery 5160 and 5163 compatible label sheets) you can print individual labels on a dedicated label printer, such as the Dymo LabelWriter series. Labels printed one at a time may be useful for time cards, mailings and file folders. You can select the printer(s) to use for label printing on the Program Setup window:

Three different types of labels are supported. You can select a different printer for each type of label if necessary. Mailing and folder labels are designed to print on the same size label stock (1” by 3.5”). Shipping labels are designed to print on larger labels since they print both the FROM and TO addresses.
In the vendor and customer entry windows, you can print a single label by clicking on the Print Label button at the bottom of those windows. This will print a mailing label. The customer account number is printed on the mailing label so it is suitable for using on file folders as well.
In the employee entry window, you have a choice of printing either a mailing label or a file folder label. The label printing options are accessed through the right-click menu:
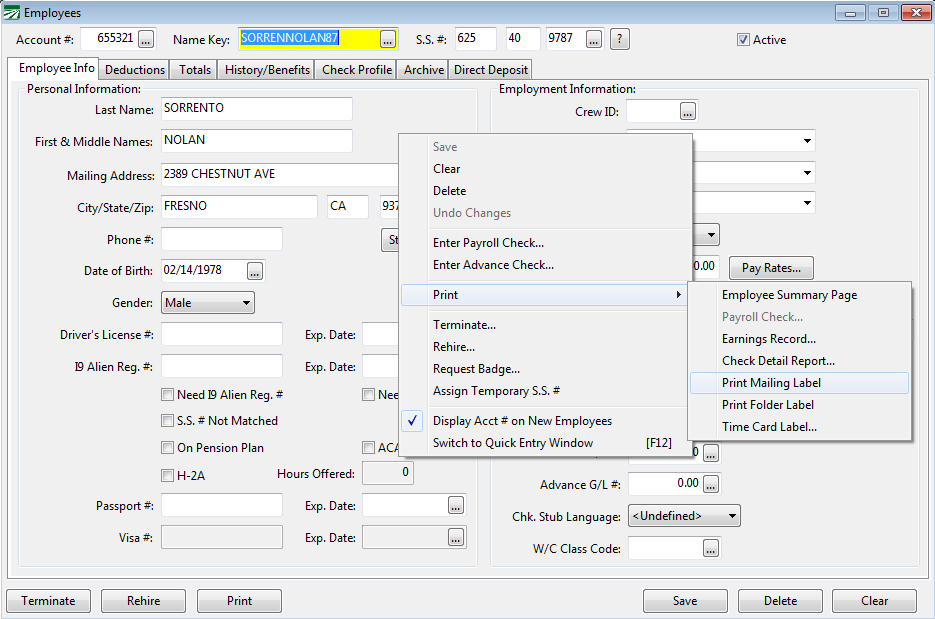
The file folder option prints a label with the name, address and both the employee’s account number and social security number. The mailing label has the name, address and account number.
In addition to printing labels one at a time, you can also print batches of labels on your label printer using the options to print labels for employees, customers and vendors. On the Label Type selection, simply choose the “Dymo Label 1 x 3” option:
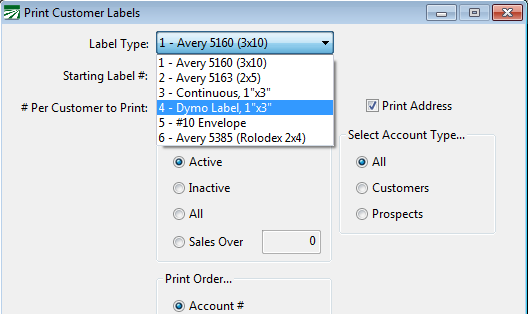
When you select the Dymo Label option, the program will automatically send the labels to the mailing label printer selected in the Program Setup window.
If you are using the Datatech Accounting software on a network, each user has their own printer selections for printing labels. That means if you have a Dymo printer shared on your network, each user will need to select that printer for label printing. If you have Dymo printers attached to each local workstation, then each user can select their own printer for printing labels.