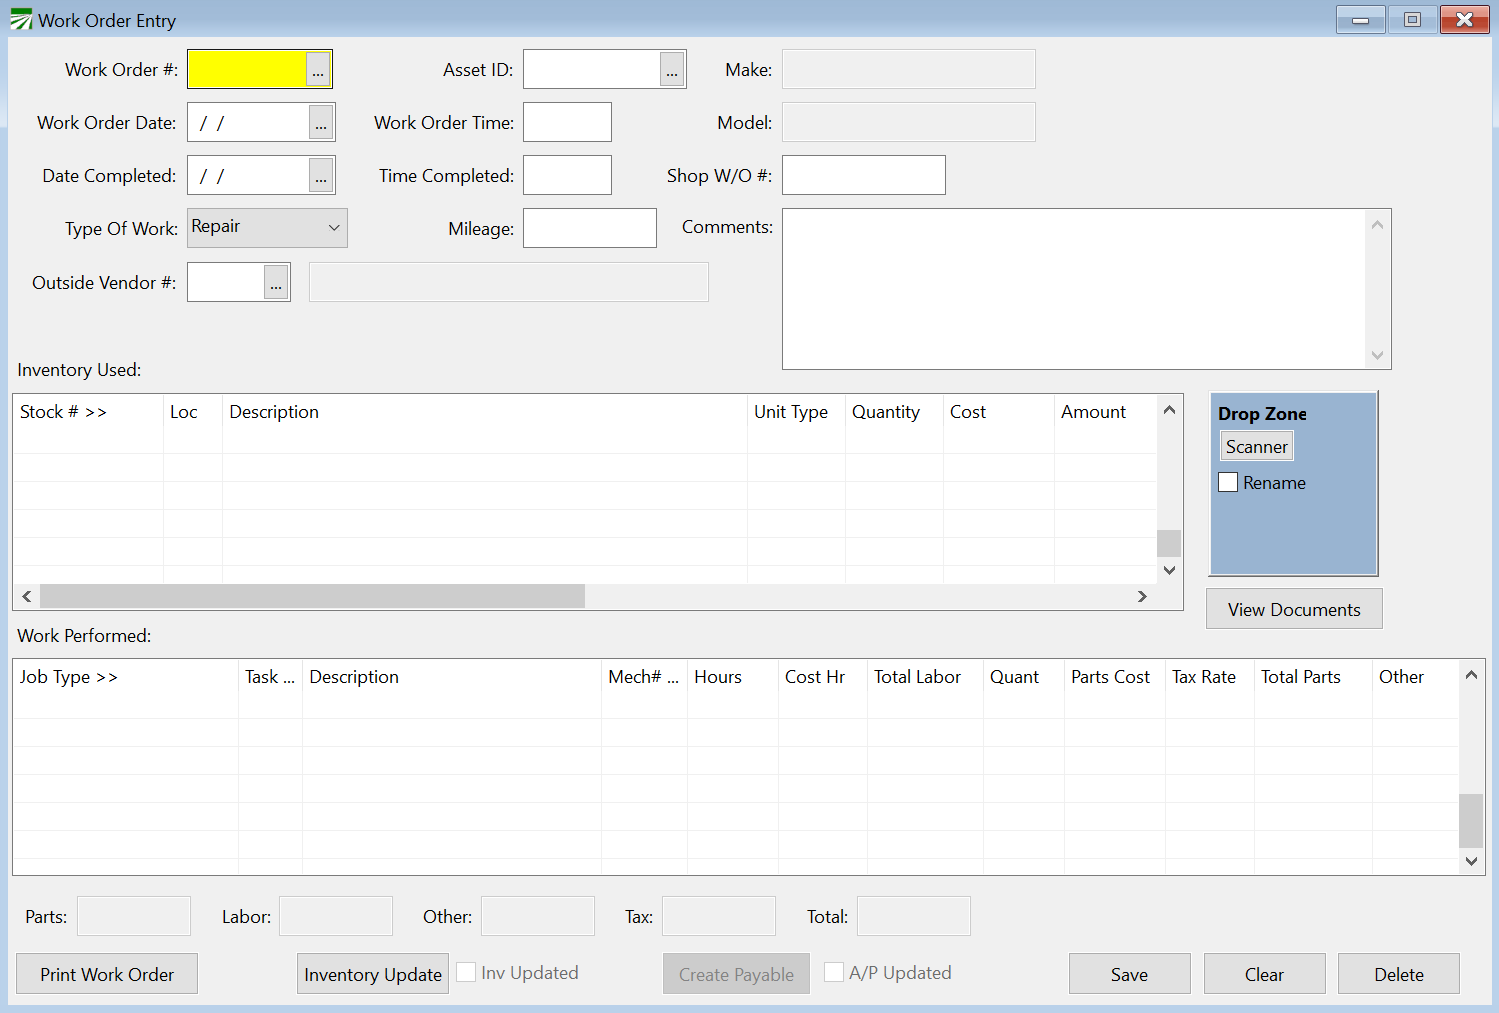
Work Order Entry
Use the Work Order Entry window to enter, edit, and print Work Orders. You can enter a Work Order to be completed or enter information on work already performed.
Work Orders can also be automatically generated by the program for Scheduled Job Maintenance, which is discussed under the topic, “Scheduled Maintenance Job Report.” If you have used this option to generate Work Orders and need to edit a generated Work Order, you may do so in the Work Order Entry window.
The cost of the labor and parts from Work Orders are updated to the vehicle’s cost, which is included in the Equipment Expense Analysis report.
Go to Data Entry > Work Order Entry.
Work Order #
If you are adding a new work order, leave the work order number blank and the computer will assign a number.
If you are editing an existing work order, enter the work order number, press [F4], or click on the lookup button to get a lookup window of existing work orders.
Acct #
Enter the Vehicle/Equipment ID number.
Work Order Date
Enter the date the work began in this work order.
Work Order Time
Enter the time the work began on this work order.
Completion Date
Enter the date work was completed on this work order. If you have entered scheduled services for this vehicle/equipment, entry of the completion date will update the scheduled maintenance required on this vehicle/equipment.
End Time
Enter the time work was completed on this work order.
Type of Work
Click on the arrow to choose between Repair and Scheduled Service. When you print the Equipment Expense Analysis Report, the expenses for Work Orders will be reported under either Repairs or Scheduled Service based on this entry.
Note You would not want to combine repairs and scheduled services onto one work order, because this would give you an incorrect analysis on the Equipment Expense Analysis Report.
Mileage
Enter the odometer reading of the vehicle at the time of completion of work.
Note This does not update the vehicle’s current mileage but is simply a way of recording at what mileage the service was performed.
Part ID
Enter parts to be used. You may Press F4 or click on the lookup button to get a lookup window of your parts.
Description
The description of the parts will automatically come from the Parts Inventory file.
Quantity
Enter the quantity of parts.
Unit type
Enter unit type such as gallons, quarts, each. This will be one of the units of measure you have entered in the File Maintenance, and you may press [F4] or click on the lookup button to get a lookup window of unit types.
Cost
Enter the cost of the part.
Total
The total for this line will automatically be calculated by the program.
Job Type
Enter the job type. You may press [F4] or click on the Job Type box to get a lookup window of job types.
Task
Enter the task. You may press [F4] or click on the Task box to get a lookup window of tasks.
Description
Enter a description of the work.
Mechanic
Enter the mechanic code. You may press [F4] or click on the Mechanic box to get a lookup window of mechanics.
Hours
Enter the number of hours to complete each job.
Cost hr
Enter the cost per hour for each job.
Quantity
If you did not enter specific parts in the Part ID section above, you may enter the number of parts for each task here.
Part Cost
If you did not enter parts in the Part ID section above, you may enter the part cost per item for each task here.
Total Parts
The program will automatically calculate the part cost for this task.
Inventory Update
Once you have finished entering your Work Order, click Inventory Update. Then click Yes to confirm updating the inventory cost to the GL.
Note This is just the parts cost, it does not include labor. Labor will be cost through payroll for in-house mechanics.
Create Payable
If this Work Order is being created for an outside vendor, click Create Payable. See Topic: Linking Cost Accounting to FarmFleet.
