Employee Info Tab
Go to Employees > Employee Entry > Employee Info tab.
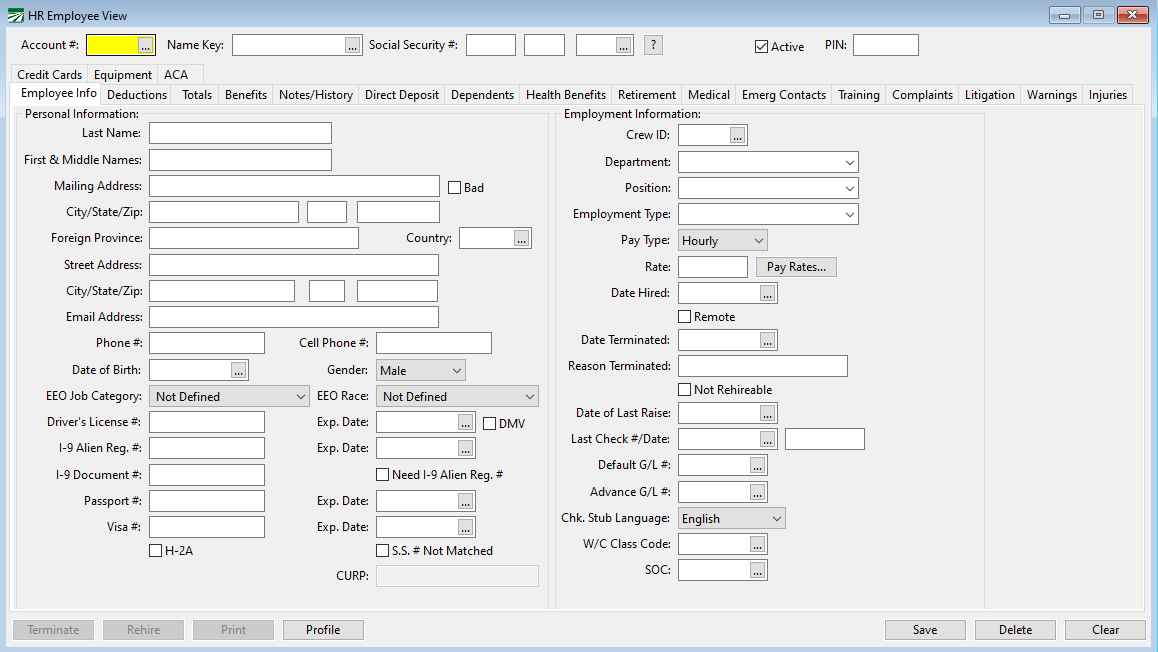
Personal Information
Last Name
The program will automatically capitalize names and addresses. Because of the requirements for electronic file reporting, leading letters (e.g. "O", "Mc", ect.) must not be separated from the rest of the surname by a blank space. For example: O’CONNELL should be entered OCONNELL, and MC DONALD should be entered as MCDONALD.
First & Middle Names
Enter the employee’s first and middle names.
Mailing Address
This field is for the address you intend to mail the employee’s check.
City/State/Zip
Enter the employee’s mailing, city, state and zip code. (The state should be the two letter postal abbreviation for the state.)
Street Address
If you need to keep track of a street address for the employee, click on the lookup button next to the Zip Code box or press [Enter] when it is selected. The following window will pop up for you to enter the street address:
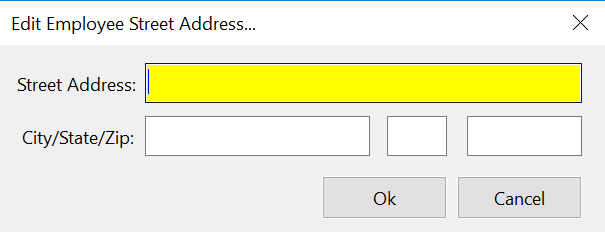
If you do not need to enter a street address, simply press [Tab] when the street address button is selected.
Bad (Address)

What is considered a bad address? The program will determine a bad address when one of the following has occurred:
1. The Bad Address checkbox is selected on the employee’s account.
2. The mailing address, city, or state is blank in the employee’s account.
3. The zip code is blank in the employee’s account.
Foreign Province / Country
The Country and Foreign Province entries should be left blank for domestic addresses in the United States.
If an employee does have a foreign mailing address, select the Country Code and enter the Foreign Province for the mailing address.
Do not enter an abbreviation for the Foreign Province in the State entry, it will be ignored for foreign addresses.

To set up Country Codes, go to Payroll > Setup > Foreign Country Code Entry.
Click here to see how to set up Foreign Country Codes.
Phone #
Enter the employee’s telephone number. This field is an optional entry.
Cell #
Enter the employee’s cell phone number. This field is an optional entry.
Email Address
Enter the employee’s email address. This field is an optional entry.
Date of Birth
This is an optional entry. The date should be enter in MM/DD/YYYY format.
Gender
To choose the employee gender, click on the drop-down menu button, and choose either Female or Male. You can also simply press “F” or “M” to select the gender.
Driver’s License # / Expiration Date
Enter the employee’s driver’s license number and expiration date, if available. This entry is not required.
I9 Alien Reg. # / Expiration Date
This field is used for recording alien registration numbers. Employees with a number will appear on the registered Alien Employee List, along with the expiration date that you enter. Leave this blank if the employee is not a registered alien.
Enter the date in which the employee’s registration number expires. Enter the date in MM/DD/YYYY format.
I-9 Document #
For registered alien employees, enter the document number that appears on the back of the current version (introduced in May 2010) of the Permanent Resident Cards and on the front of the older cards that were first issued in December 1997.
This document number consists of three alphanumeric characters (letters or numbers) followed by 10 numeric characters.
Leave this blank if the employee is not a registered alien.
Need I9 #
Select this box if you need an I-9 number for this employee but you do not have it yet. An Employee List can be printed for all employees that do not have the Alien Registration # entered yet.
S.S. # Not Matched
Select this box if you receive a “no match” letter from the Social Security Administration for this employee.
On Pension Plan
Select this box if the employee is on a company pension plan.
Passport # / Expiration Date
Enter the employee’s passport # and expiration date.
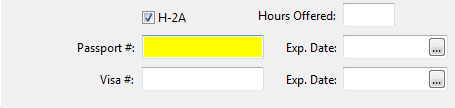
H-2A
The following entries will only appear if you have the H-2A Payroll option enabled:
H-2A
Select this box if the employee is an H-2A worker.
Hours Offered
Enter the total number of hours offered to this employee under his or her H-2A contract.
Visa # / Expiration Date
Enter the employee’s visa # and expiration date. These entries are only enabled for H-2A employees.
Employment Information
Crew #
This is a one to four digit user-defined number that will allow you to segregate employees into crews or locations.
This allows you to print lists of employees and crew sheets by crew.
Department
Select the department that this employee will work in. (Departments can be set up in the “Departments, Positions, Types” window which is found in the Setup sub-menu in the Payroll drop-down.)
Position
Select the position that this employee will have. (Positions can be set up in the “Departments, Positions, Types” window which is found in the Setup sub-menu in the Payroll drop-down.)
Employment Type
Select the employment type that this employee will have. These usually denote whether an employee is full time, part time, or seasonal. (Employment types can be set up in the “Departments, Positions, Types” window which is found in the Setup sub-menu in the Payroll dropdown.)
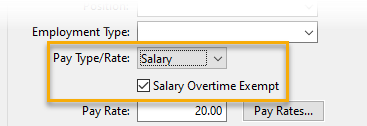
Pay Type/Rate
To select the pay type, click on the drop down menu button, and select, either hourly, piecework, or salary. This setting serves only as a default when entering payroll time, which you may override. An employee may have any combination of pay types on his or her check, for example, hourly wages and piecework wage types may be used together on the same check regardless of the pay type setting in the employee file.
Note If an employee's Pay Type/Rate is set to Salary, the check box for Salary Overtime Exempt will be enabled. Select this checkbox if the employee is exempt from overtime.
Pay Rate
This numeric entry sets the rate of pay for the employee. What you previously entered in the pay type determines what kind of rate this is.
If this is a salaried employee, the amount you enter here is the total amount to be paid on each paycheck.
If the employee is entered as hourly, the amount here will be multiplied by the number of hours worked for the gross check amount.
If you leave the rate of pay at zero, the program allows you to enter the rate of pay while entering the payroll check. This is necessary if you are paying an employee more than one rate on the same check
Date Hired
Enter the date the employee was originally hired in MM/DD/YYYY format.
When a new employee is entered, the hire date should be entered, so that the employee appears on the DE-34 report. (New Hire report)
This field should not be edited for re-hires. The pay history file should be used to record re-hires, absences, terminations, etc.
Remote
If an employee is a remote worker, select this checkbox. This option is used to accurately compile California Pay Data Reports.
Note The State for Wht entry on the Deductions tab of an employees file is used to determine whether the remote worker is inside or outside of California. This means when you are generating your California Pay Data Reports, they will either be added to the Total Remote Workers in California or Total Remote Workers Outside California columns.
Date/Reason Terminated
In the first field, the date of termination can be recorded for a quick reference for unemployment requests. The date should be entered in the MM/DD/YYYY format. The second field can be used to record the reason for termination.
Not Rehireable
Select this box if the employee cannot be rehired after termination.
Date of Last Raise
When an employee receives a raise in salary, you may put the date of the raise in the employee’s file for future reference. The date should be entered in MM/DD/YYYY format.
Note This Information may be entered in the history file instead or in addition to the Employee Info File.
Last Check #/Date
Every time a check is printed through the system, the program will automatically record the check # and date here.
To see the date the employee last worked, place the mouse pointer over the last check date. A tooltip will appear showing the last date worked on that check. (This feature requires that the Day entry was filled in on the payroll check for the program to determine the last date worked.)
Note If any employee is enrolled in direct deposit, then the Last Check #/Date entry will display the last direct deposit payment the employee received.
Default Labor G/L #
This is the default General Ledger Account number to which you wish to charge this employee’s wages on a regular basis. If you enter a number here, it will automatically appear when entering the employee’s checks.
If you do not enter a number, you can enter a General Ledger account number while entering the employee’s checks. This item should be skipped if the general ledger account number will vary from week to week or if you will be expending this employee’s wages to more than one general ledger account number on one check.
To set the default account number enter the general ledger number, press [F4], or click on the look up button to get a look up menu of general ledger account numbers.
Advance G/L #
This entry is used when you set up a separate general ledger account for each employee. If you are using separate accounts, enter the general ledger account number to which any deductions or advances will be credited for this employee.
If you use one general ledger account number for all employees’ advances, leave this entry blank. The general account number you use for all employees is set up in the Program Setup.
Chk. Stub Language
You may select either English or Spanish to use for printing headings on the payroll check stubs. (The <Undefined> setting will default to English.)
The Miscellaneous Deduction window allows you to enter Spanish language descriptions in addition to English descriptions.
Note that this entry will not appear if you are printing checks on a dot matrix printer. Only laser check formats support printing the check stub in Spanish.
PIN/Badge #
If you use a data collection or a time clock system that uses a separate number to track employees, enter that number here. (If you are not using of these systems, this entry will not appear.)
W/C Class Code
For most situations, we recommend letting the payroll system determine the appropriate worker’s comp class code to apply to payroll based on the cost center, job code and/or G/L # used on the payroll check entry. This provides flexibility if you may need to apply different rates based on what the employee is doing or where he or she is working, e.g. working in a vineyard, orchard, row crops, packinghouse, etc.
If you enter a worker’s comp class code on the employee file, then this will act as an override and the system will use that class code for all of the employee’s wages, regardless of where the employee is working.
SOC
This is currently for Washington and South Carolina Employers Only.
Quarterly Report filing for these states now requires the inclusion of Standard Occupational Classification (SOC) codes for each employee. Click here for instructions on creating and assigning SOC codes.