Crew Sheet Wizard
The Crew Sheet Wizard helps you enter Daily or Weekly Crew Time Sheets for Hourly, Piecework, or Base Hourly w/ Incentive Pay wage types. A crew must be created before using the wizard; however, employees do not need to be pre-assigned to a crew.
Overview
Go to Payroll > Daily Payroll Entry > Daily Payroll Entry. Right click anywhere in the grid of the Daily Payroll Entry window, then select Crew Sheet Entry Wizard from the menu.
Page 1- Crew Information (Including Crop & Job)
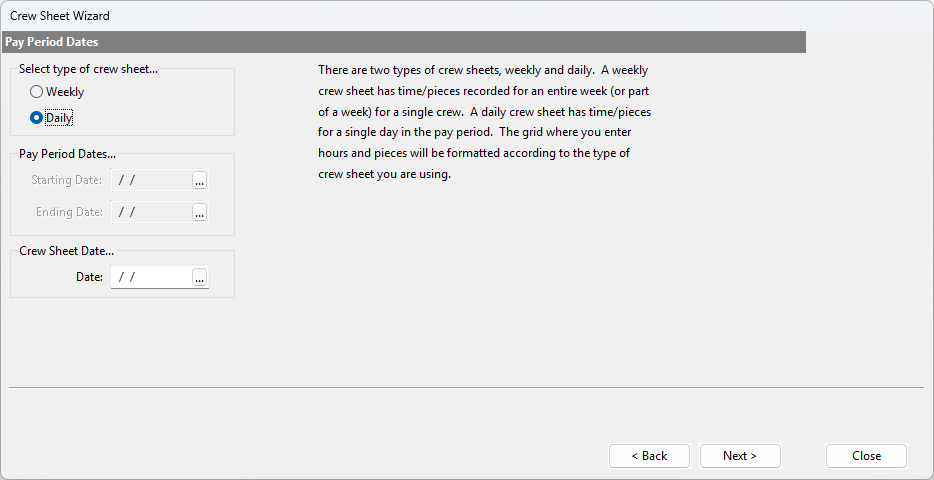
Page 2 – Pay Period Dates: Type of Crew Sheet
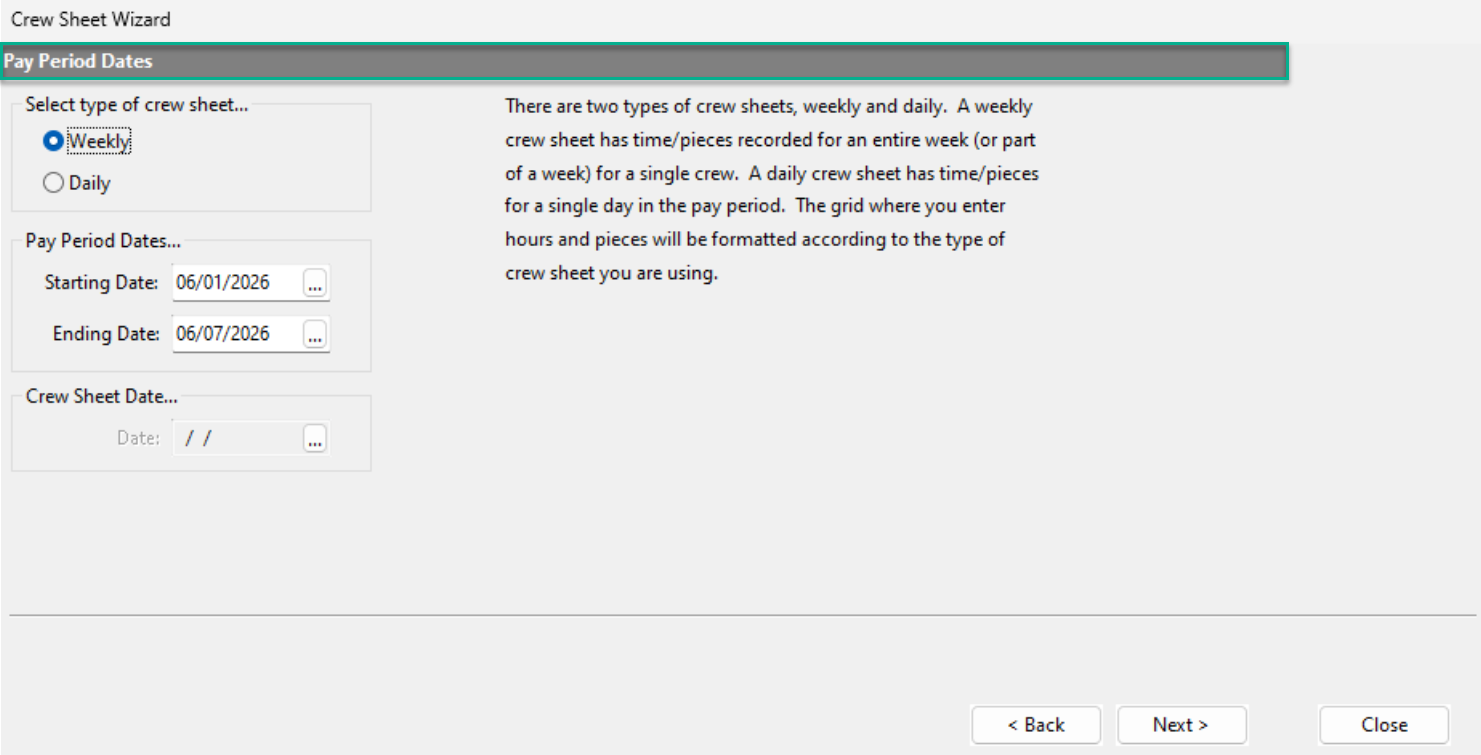
Note In California, piece-rate payroll requires non-productive time to be paid separately, which adds additional entries. Piece-rate or base hourly w/ incentive pay with non-productive time requires using the Daily entry option. If you have multiple days on one time sheet, you can utilize the Time Sheet # to automatically create the employee list for consecutive days to quicken the entry process.
Page 3 – Pay Types/Rate
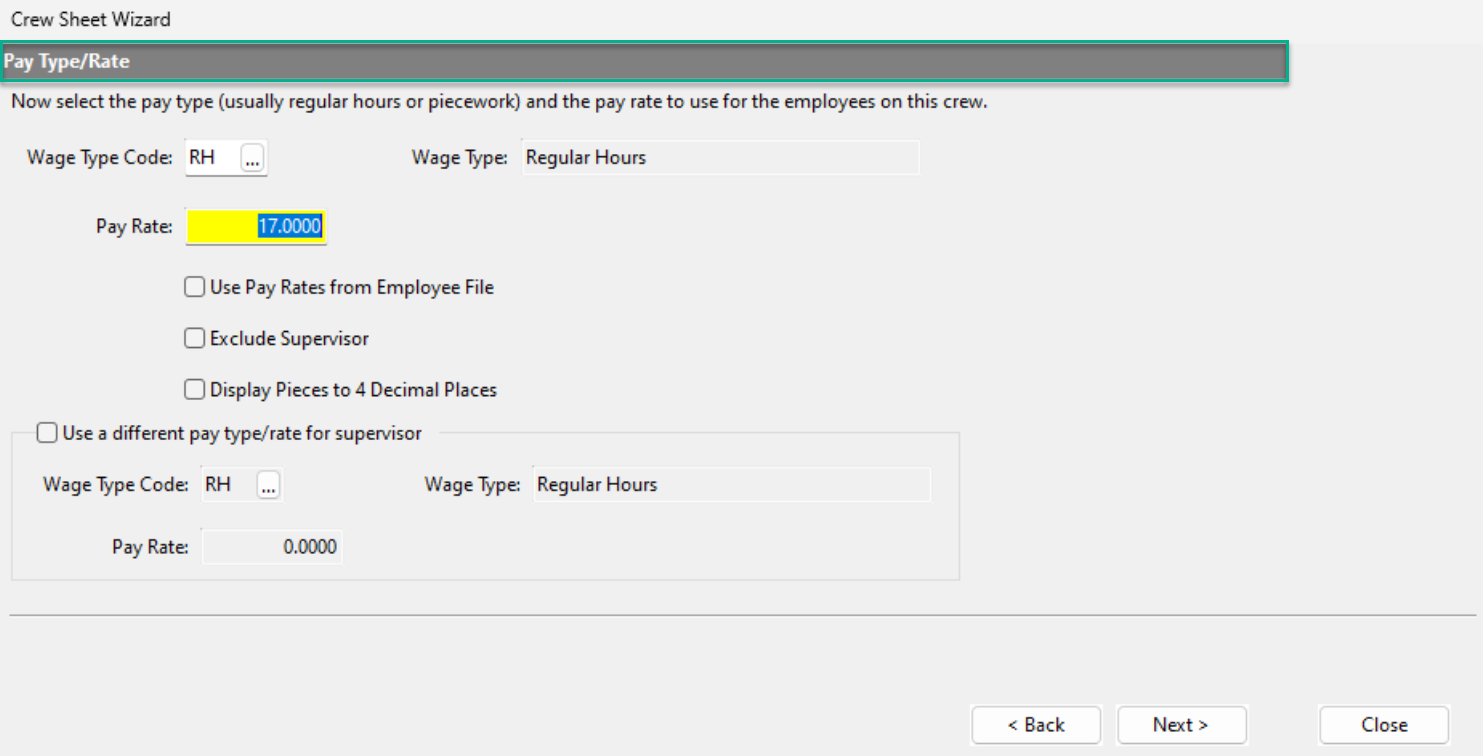
When Piecework is selected, you can enter one or two-piece rates:
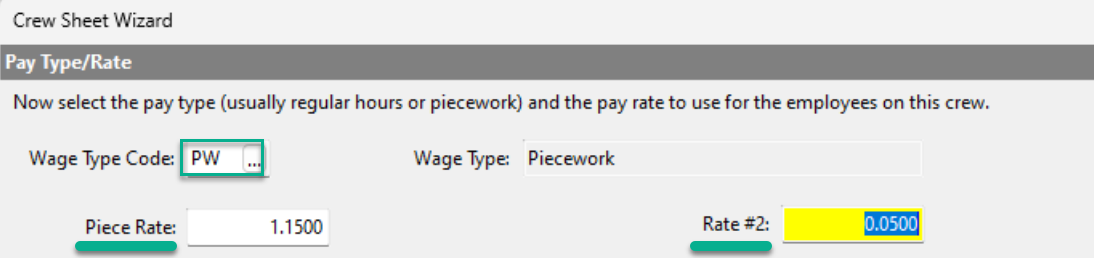
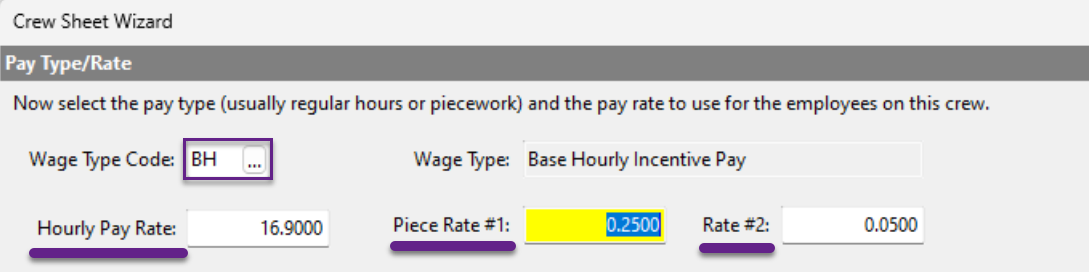
When entering a code that indicates you are doing a base hourly and incentive pay, entries for those rates will appear:
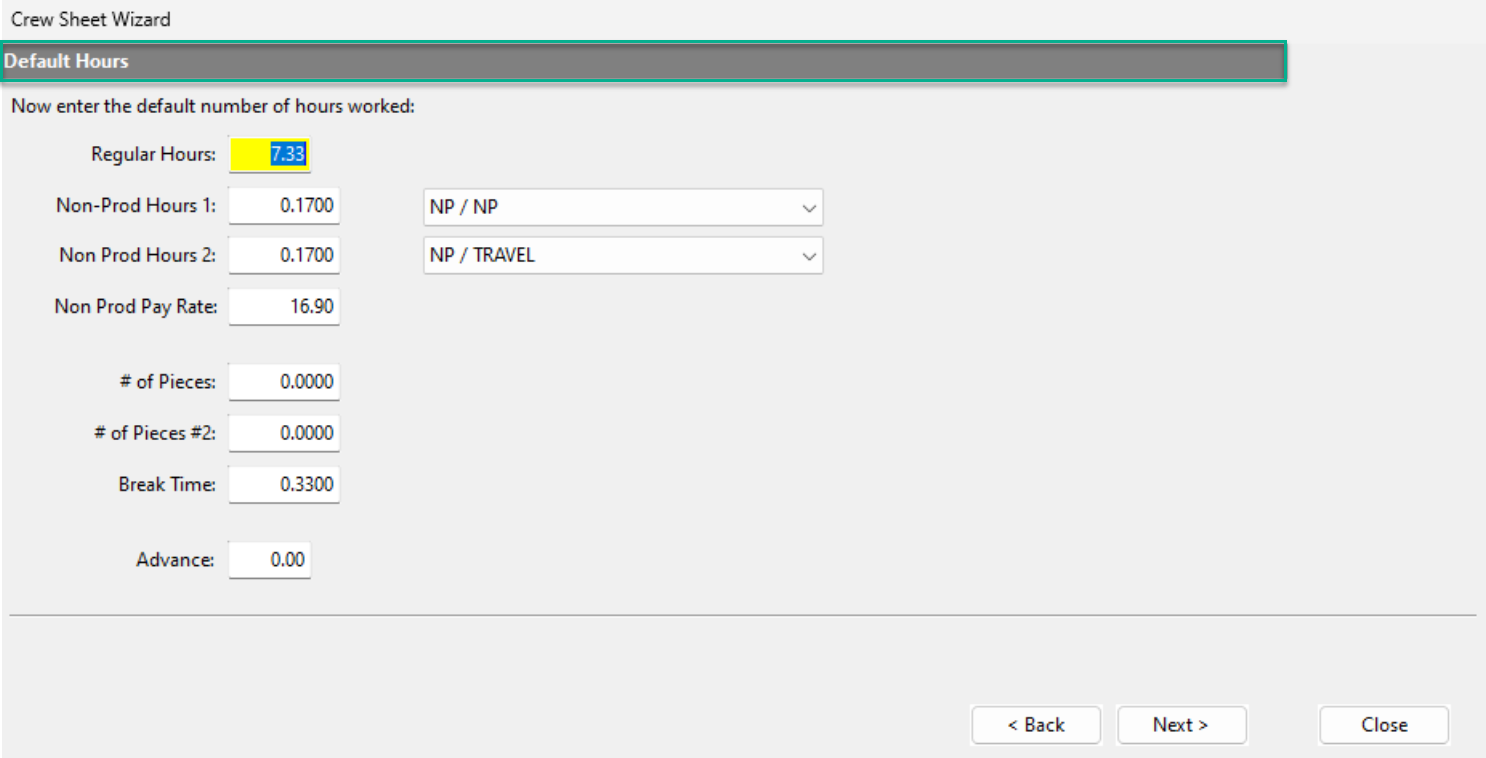
Page 4 - Default Hours: Entries for Daily Piecework
Setting up Non-Productive Definitions
See Heading: Set Up Non-Productive Time Definitions
Entering Hours & Pieces if entering a Custom List
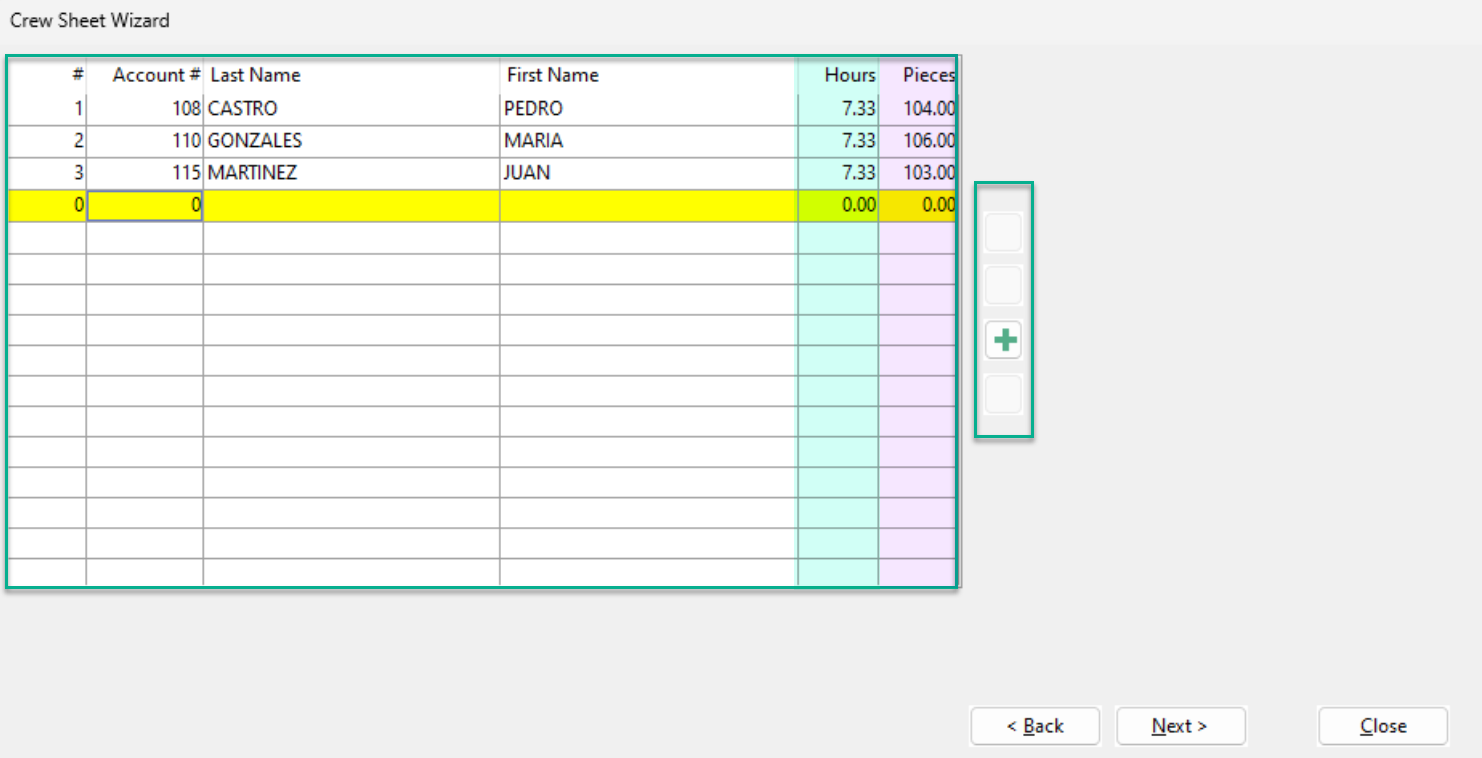
If you select Custom, as you enter the employee account numbers from your time sheet, you can also edit the hours and pieces.
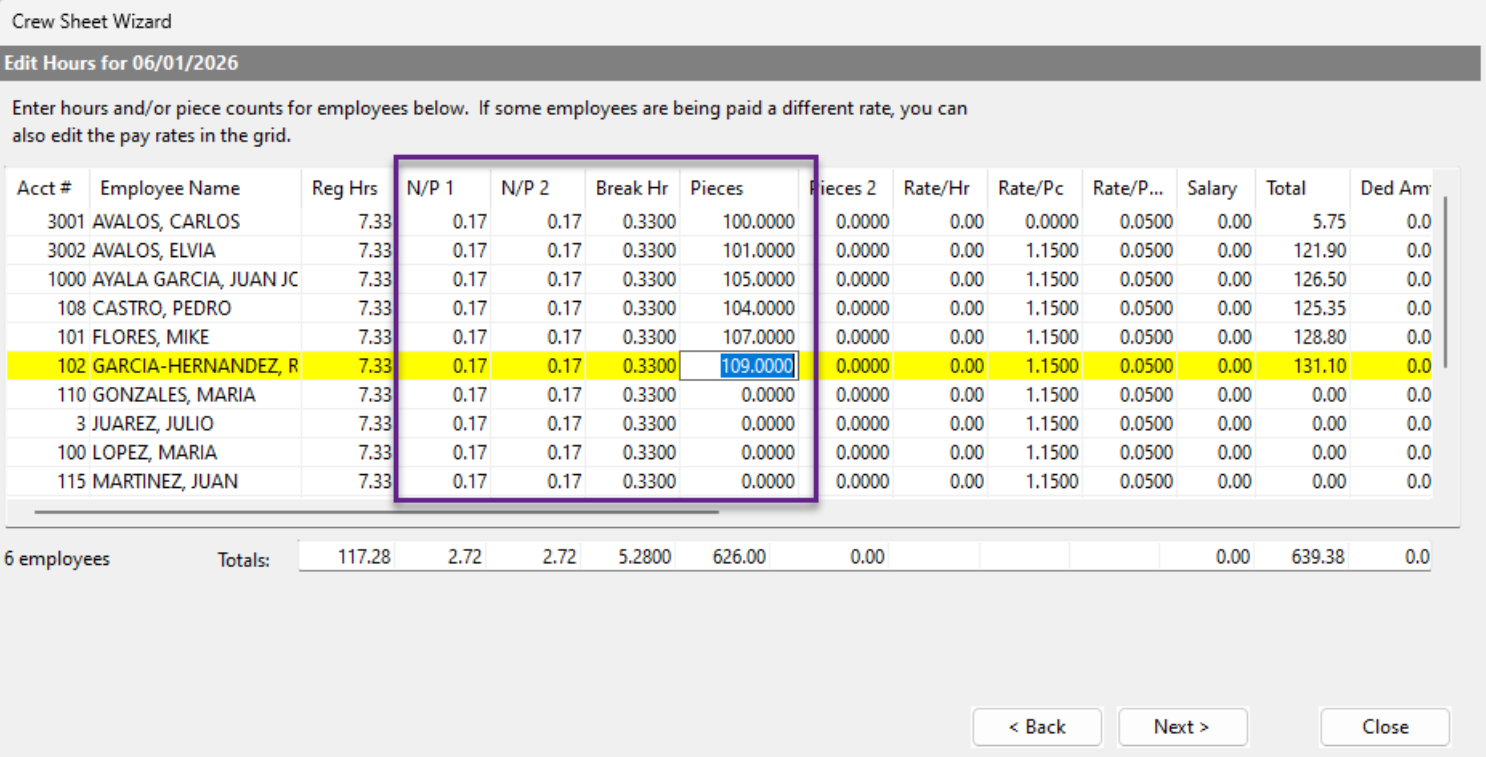
If you are using a pre-defined crew list, you can edit the entries on the grid view, along with non-productive and break time. If you are doing 2-piece rates, you can enter the second pieces in Pieces 2.
Entering Default Hours & Pieces for Weekly entries:
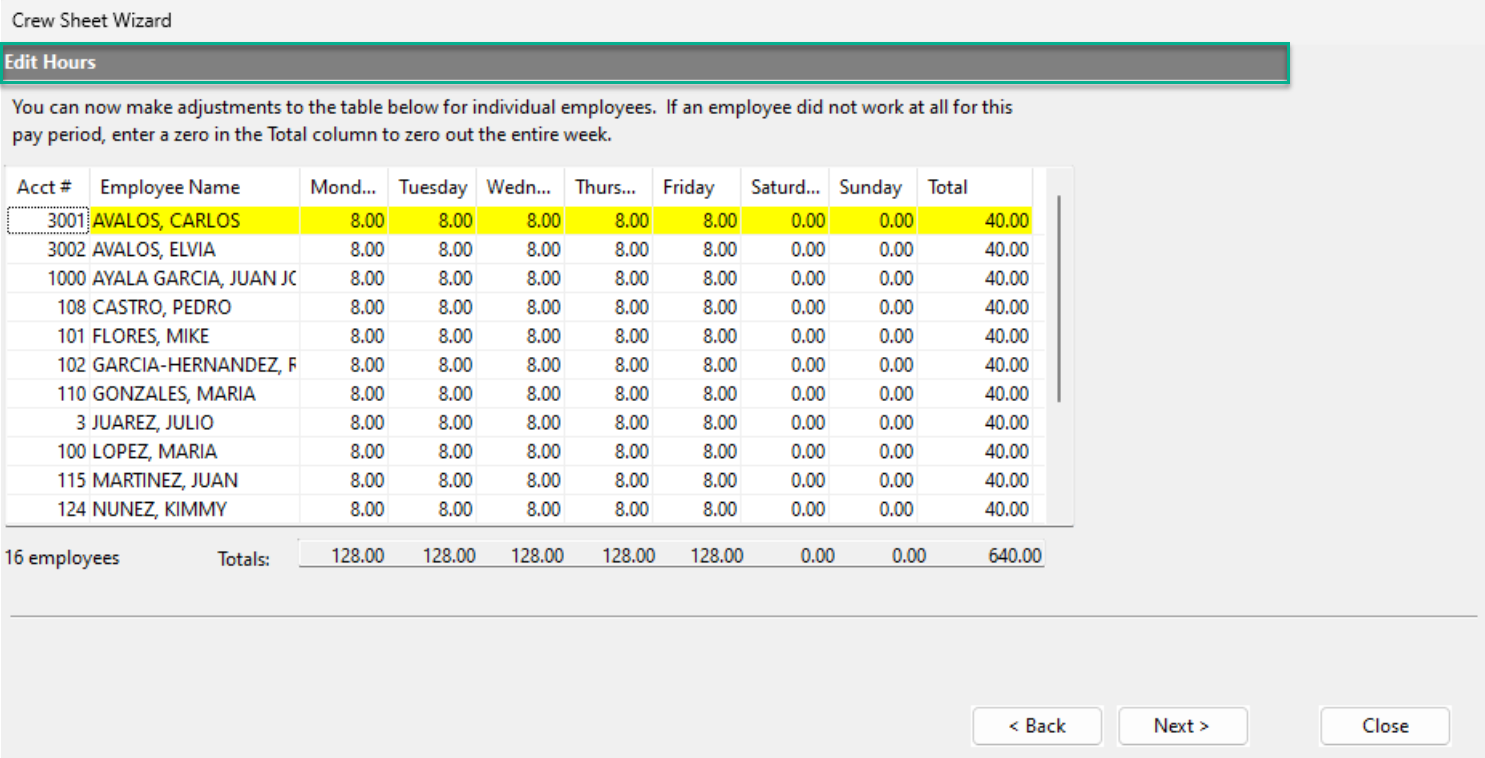
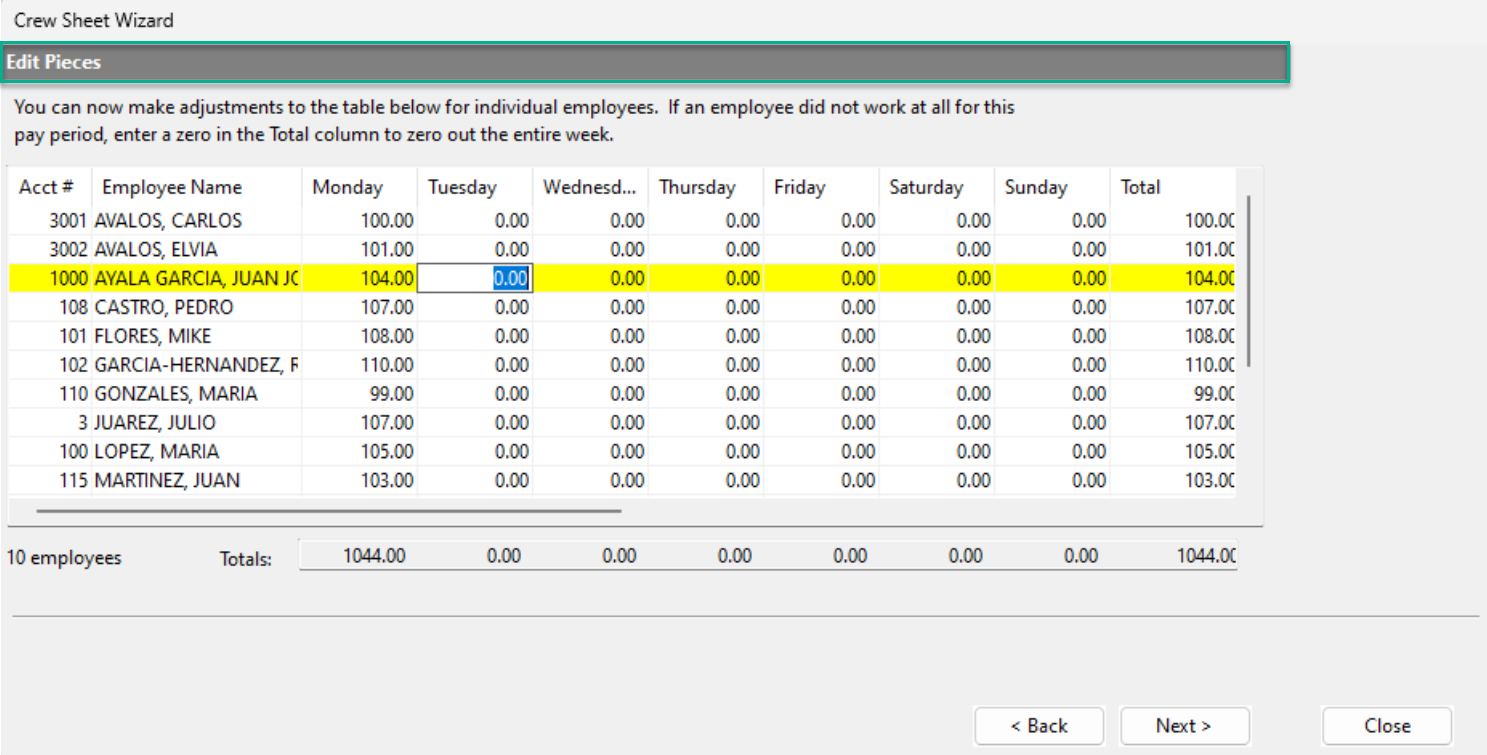
When entering piecework or base hourly & incentive pay for a weekly time sheet, you can enter defaults for the hours & pieces for each day of the week and then the following windows allow you to edit the Hours and Pieces for each employee.
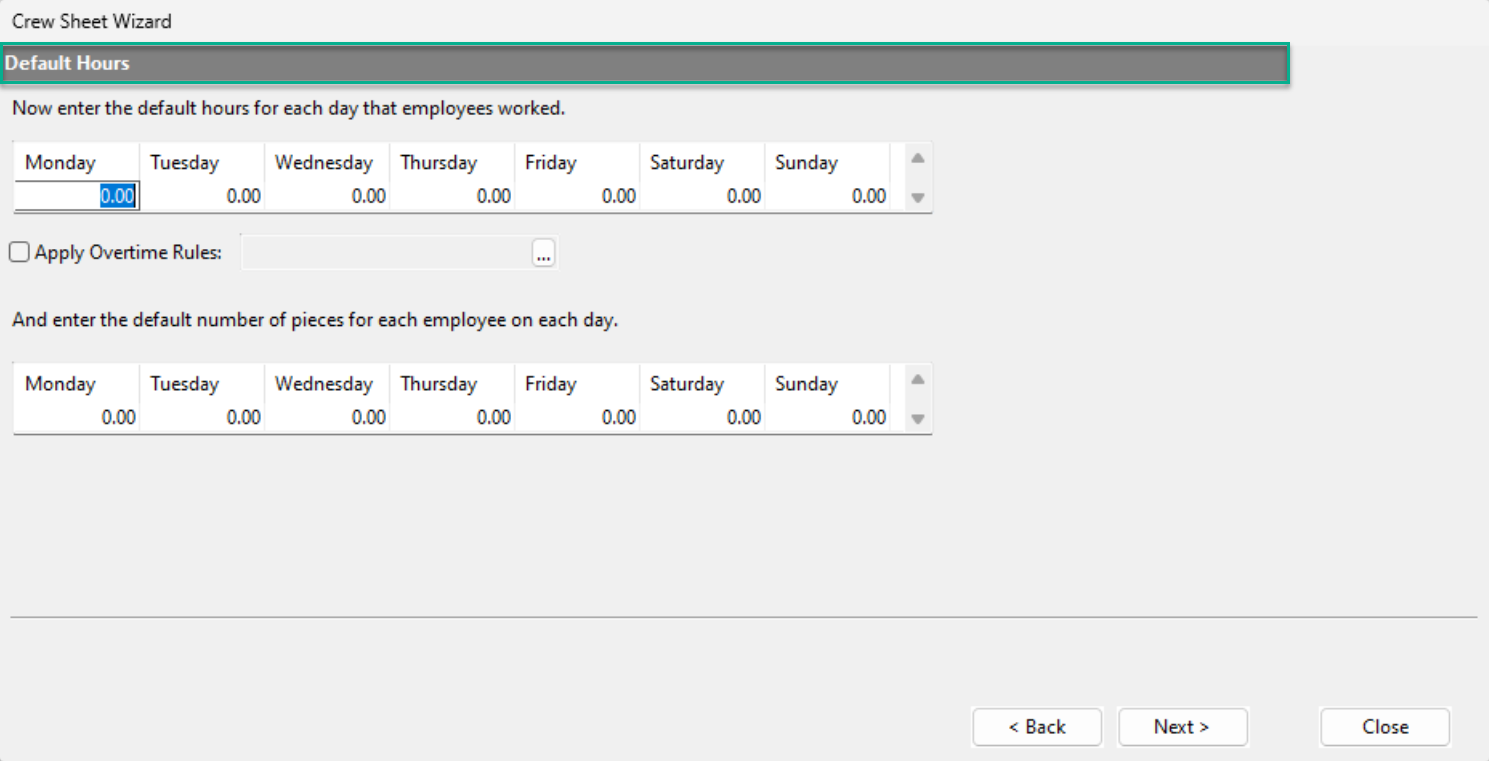
If you want to edit by day, you can use your down arrow to move down to the next employee. Or, you can use your tab key to move to the next day if editing by employee:
Edit Hours:
Edit Pieces:
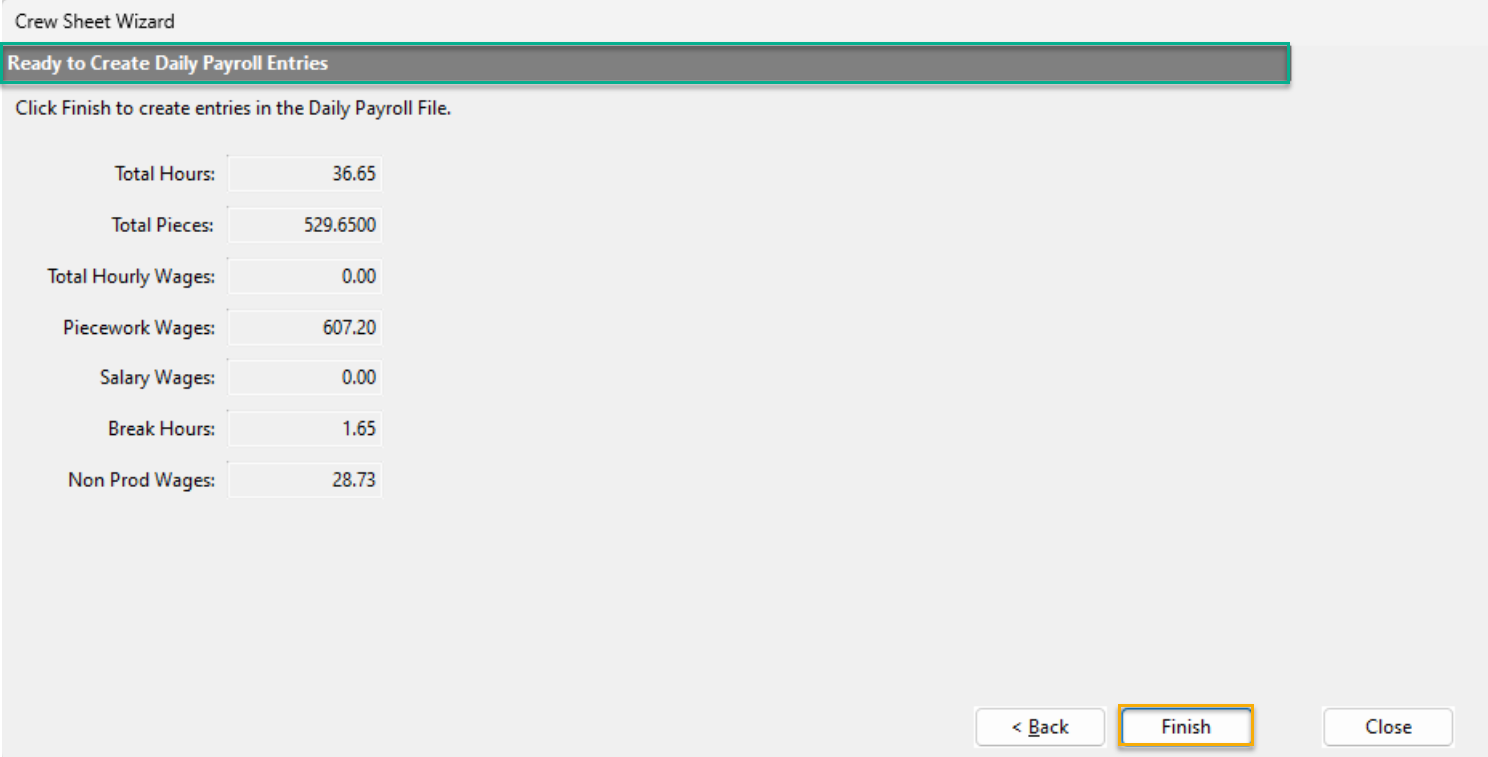
Ready to Create Daily Payroll Entries: Final Review
Review the totals for your entries and if you need to make any corrections you can use the Back button to return to the edit grid.
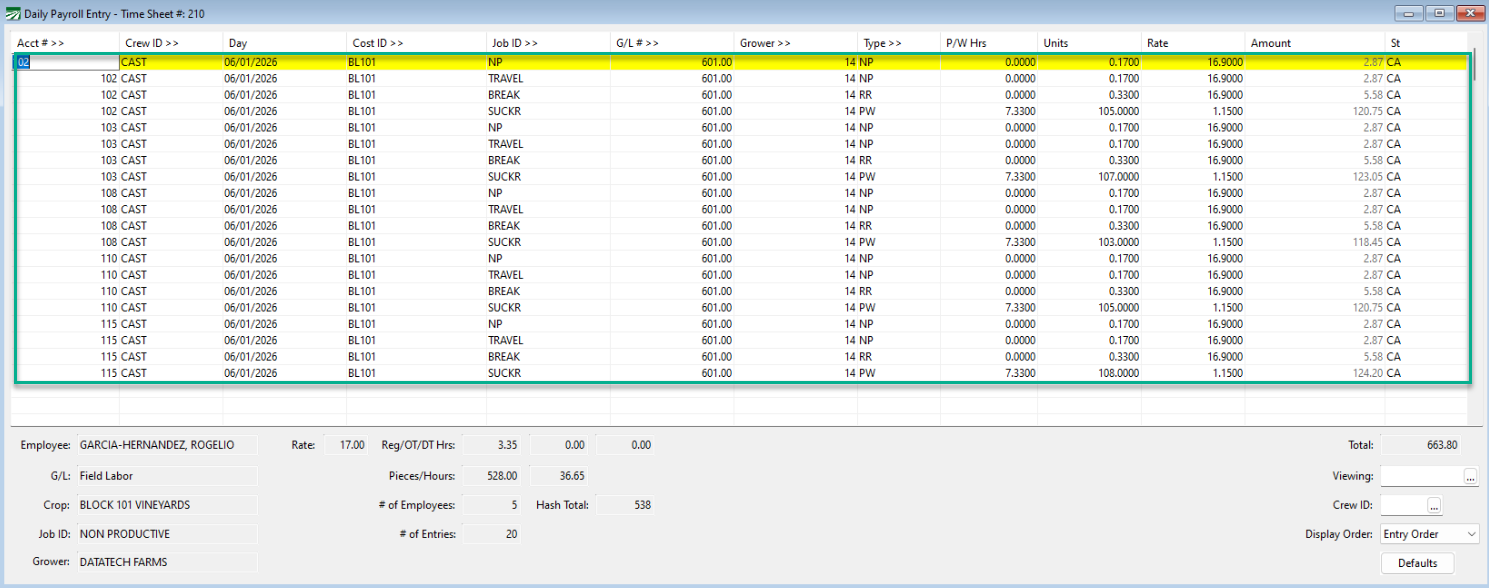
After clicking Finish, your lines will be created in the Daily Payroll window. They can still be edited/deleted as any other daily payroll entry:
"Other Nonproductive Time "
According to California Labor Code 226.2, "other nonproductive time" is defined as "time under the employer's control, exclusive of rest and recovery periods, that is not directly related to the activity being compensated on a piece-rate basis."
Example Examples of other nonproductive time include waiting in line to get clocked in, receiving tools or equipment, traveling between fields/jobs, or attending required meetings/training.
As shown below, Datatech Software enables you to record "other nonproductive time" seperately from piecework and rest recovery entries.
Set Up Non-Productive Time Definitions
Before using the Crew Sheet Wizard for Non-Productive time, you must set up your Non-Productive Time Definitions. Some customers choose to have one Non-Productive code they use for everything. Others may choose to have specific Non-Productive codes set up for exercise, travel time, safety meetings, etc...
In Daily Payroll Entry, right-click in the grid and select Breaks > Define Rest & Recovery Time.
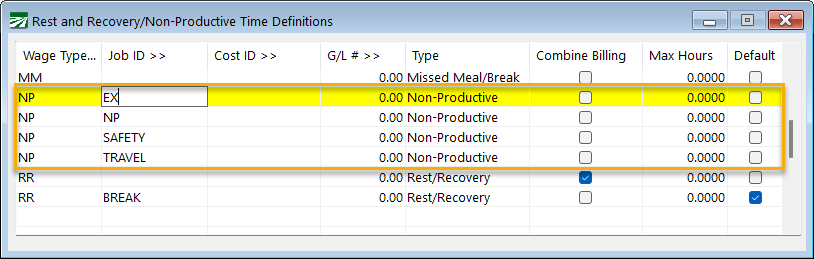
Enter a Wage Type, Job ID. In the Type column, set this line to Non-Productive. Anything you want to select while using the Crew Sheet Wizard will need to be set up here first.
Example Wage Type: NP, Job ID: Travel, Type: Non-Productive.
Crew Sheet Wizard
The following entries will depend on what modules you have enabled, you may not have every entry below.
Crew Information
-
When using the Crew Sheet Wizard, you must start by selecting a crew. Employees do not have to be assigned to the crew you select, they can be added during the Crew Sheet Wizard process.
Note If you are using crew numbers, you will need to set up your Crews first.
-
Enter your Cost Center or crop for the piecework lines.
-
Enter the Job ID.
-
Enter the Labor G/L. This will automatically be entered if the Job ID was set up with a default general ledger number.
-
If you are a labor contractor, enter your Grower #.
-
We recommend using Crew Sheet #s. The crew sheet number you use acts as a unique identifier for the crew sheet. That way if you are looking at your payroll records and you have a question, you can tie it back to a crew sheet number to find it in your paper records.
-
Farming operations can enter a Crop Year.
-
If multi-state is enabled, you must enter the State.
Pay Period Dates
-
Select Daily for the type of crew sheet. To do piecework plus non-productive time, you must select Daily.
Tip If you have a weekly sheet and need to now enter the next day, you will reuse the time sheet number when starting the Crew Sheet Wizard again. Instead of advancing the crew sheet number, reenter the same crew sheet number you just used for Day 1. Now when you select the Custom option on the Employee Order page, the employees from that time sheet number will automatically be entered in the grid. The amounts will need to be updated for the work done on Day 2.
-
Select your first day.
Pay Type / Rate
-
Enter your Wage Type Code.
-
Enter the Piece Rate. You can also enter a second rate. This is used if, in addition to their base rate, employees are paid an additional rate for whatever they produce over a certain amount. You can use this also with the base hourly and incentive pay wage types. Some of the other options on this section only apply to the hourly wage type and wouldn't apply to piecework.
-
If you are paying your supervisor a different pay rate you can enter an alternate Wage Type Code and Pay Rate for them.
Default Hours
Now enter all of your hours.
-
Enter Regular Hours.
-
Enter Non-Prod Hours 1. The drop-down has the combinations of wage type and job codes we set up on the Definition table. Select the wage type and job code you are going to apply to the non-productive time. You can do up to two different entries for non-productive time.
-
Enter your Non-Prod Pay Rate.
-
If you have a default number of pieces, enter that on # of Pieces, or you can leave it blank.
-
Enter your Break Time. You can either use this 'Breaks' option or leave this entry blank and go back and use the regular 'Breaks' option. It can be done either way.
-
Advance is used for customers that are on the boarder of CA, AZ, and NM where they are using daily advances. This entry will not be used by most customers.
Employee Order
You will need to decide how you will enter employees.
-
Alphabetic / Account #: If you use printed time sheets from our crew sheets, you can select whether they were printed in Alphabetic or Account # order. If there were employees that were written into the printed crew sheet, make sure to select Check this box if other employees were added to the crew sheet by hand.
-
Custom: Allows you to look up and enter in employees that are not in a predefined crew.
-
When you select the Custom option, it will take you to an empty grid where you can enter employees by Account # (or press F2 for the Employee Lookup).
-
In the grid you will also add the Pieces for each employee you add.
-
-
Click Next, in the
Edit Hours for (Date Entered)
-
At the bottom of the grid you can review Total hours, non-productive hours, break hours, and pieces.
-
Information in this window can be edited. For example, if Pieces were entered incorrectly, they can be adjusted.
Ready to Create Daily Payroll Entries
Once totals are verified, click Finish.
Daily Payroll Entry - Time Sheet #...
You will return to the Daily Payroll Entry window with this time sheet entered. The three lines will now be created for each employee, Non-Productive, Rest & Recovery, and Piecework.
-
You will need to run the Print Batch Report for all Rest & Recovery, Overtime, etc... calculations to be made.
Tip If you have a weekly sheet and need to now enter the next day, you will reuse the time sheet number when starting the Crew Sheet Wizard again. Instead of advancing the crew sheet number, reenter the same crew sheet number you just used for Day 1. Now when you select the Custom option on the Employee Order page, the employees from that time sheet number will automatically be entered in the grid. The amounts will need to be updated for the work done on Day 2.