Sick Pay Plan Setup
Setting Up a Sick Pay Plan
Go to Sick Pay > Sick Pay Plan Setup
Go to Payroll > Sick Pay Setup/Maintenance > Sick Pay Plan Setup.

Plan ID
This is a unique ID for this plan. Once entered, you cannot change it. You can use a maximum of four alphanumeric characters.
Description
Enter a description of the plan, for your own use. As you can see from the example, in the description we have identified the type of plan (accrual) and hours worked per day.
State
Enter the two-letter abbreviation for the state. This is optional if you only have employees in a single state. If you have employees that perform work in multiple states, this entry will determine whether or not employees accrue sick pay depending on the state in which they work.
When an employee works in one or more different states and the sick pay plan uses the Accrual Method, the program will only accrue sick pay time on checks that are issued in the state that matches the sick pay plan’s state.
If you leave the State entry blank, then the program will accrue wages on checks issued in any state.
If you do enter a state, then you can also check the Accrue Sick Pay on Out of State Wages box to accrue hours on checks issued in any state.
Accrue Sick Pay on out of State Wages
Select this box if an employee is set up with a sick pay plan assigned to a certain state and he will be paid sick pay on wages earned outside of that state.
The determining factor for payment of sick pay by state is the state for “State Income Tax”, as entered on the employees’ check, where an employee is a multi-state employee.
State Starting Date
This entry should only be used when you have multistate employees and you are setting up Sick Pay Plans for each state in which they work. The date entered should be the date Sick Pay became a legal requirement in that particular state.
Warning Do not enter the Plan Year date or the date the Sick Pay Plan became effective. If you do, the program will not calculate Sick Pay accrual for any employees prior to that date.
If you do not have multistate employees, this entry should be left blank.
Method
Select Accrual or Lump Sum Pre-Funded for the method of determining sick pay hours.
See the Lump Sum Method (also known as front-loading) and Accrual Method Sections following this one for more information.
Accrual Settings
The Accrual Settings tab is for Accrual plans. If you are setting up a Lump Sum plan, leave these settings blank.
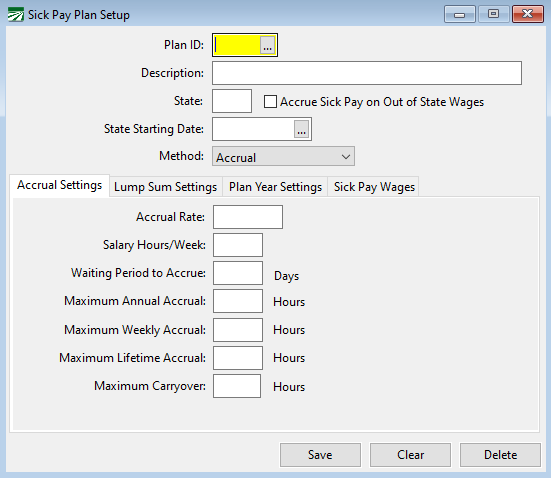
Accrual Rate
If the method is accrual, enter the accrual rate as a decimal.
Do not enter a rate if you are using the lump sum method.
See the Accrual Section immediately following this one for more information.
Note Do not enter a rate if you are using the lump sum method.
Salary Hours/Week:
This entry is used for salary employees that do not have their hours tracked elsewhere. The program will use these hours to determine the accrued sick pay for each week they work. But only when the employee is using a wage type that has “Salary” as its base wage type.
Enter the average number of hours they are credited for each week worked. For example, this may be 40 hours.
If you have salaried employees that regularly work more hours per week, you will need to set up a sick pay plan that defines their default hours per week.
There are states that require tracking hours for salaried employees (Oregon and Washington). If that is the case, you would probably have your employees set to the “Piecework” base wage type and their piecework hours would be entered on their payroll checks. The “Salary Hours/Week” entry is for the Salary base wage type only.
Waiting Period to Accrue (Days)
California, Arizona, Oregon, and Washington do not allow a waiting period to start the accrual of sick pay, so this should be left blank (0).
Maximum Annual Accrual (Hours Accrued)
Each state’s law provides that an employer may cap the number of sick pay hours accrued per year at a certain amount. If you wish to provide a higher cap, you may. Enter that number here. More information can be found in the Accrual Method section following this one.
This is required to use the accrual method. Also, do not forget to include this in your company’s written policy.
Maximum Weekly Accrual
The maximum weekly accrual applies a limit to the accrual of each check. Currently only Michigan has a weekly accrual max option of 1 hour per week.
Maximum Lifetime Accrual
The maximum lifetime accrual is used to cap the accrual when it reaches a lifetime limit.
Maximum Carryover
The maximum carryover applies to the Employee Plan or Fixed Year carryover.
Lump Sum Settings
This tab is only for Lump Sum plans.
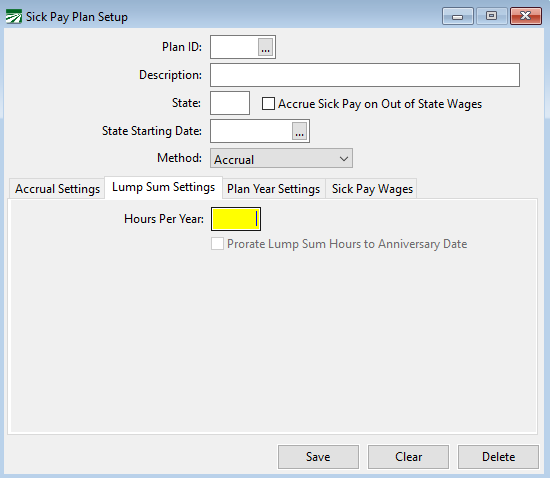
Hours Per Year
Enter the number of Sick Pay Hours the employee may take each year.
Prorate Lump Sum Hours to Anniversary Date
This check box is used in conjunction with the fixed anniversary date option.
Select this box to prorate the paid sick pay for any employee hired after the fixed anniversary date; this will prorate any sick pay given through the lump sum method. Proration is based on the number of days in the year.
Example You enter a fixed date of 1/1/2024 and use the lump sum method to load everyone with 40 hours. Then you hire someone on 9/15/24. They will be given 11.8 hours of Sick Pay on their first paycheck. Here is the calculation:
From 9/15/24 to 12/31/24 is 108 days.
40 hours of Sick Pay divided by 365 days is .1095 hours.
.1095 hours multiplied by 108 days is 11.8 hours.
Plan Year Settings
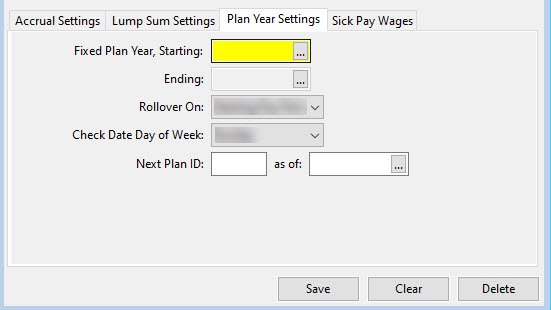
If you would like to use a fixed anniversary date instead of the employee’s hire date as the anniversary date, enter the date desired in this box. However, this date will not apply to employees hired after that date. In that case, the employee’s hired date will be used. Then, the program will update that date the next time the fixed date passes.
Example You set 1/1/2024 as your fixed date, but you hire someone on 7/1/2024. That employee’s sick pay plan will start on 7/1/2024, and then will roll over on 1/1/2025.
For more information on fixed anniversary dates, see the section entitled Sick Pay Anniversary Update.
In addition, if a fixed date is used, you may be able to prorate your sick pay plan. For more information on this, see the Prorate Lump Sum Hours to Anniversary Date prompt above.
Rollover On:/Check Date of Week
The Rollover is the point in which the system will advance the employees plan year, carry-over balances if applicable, and reset the current year sick pay paid. This can be based on Pay Period Starting, Pay Period Ending, or Check Date.
Depending on the date you have selected, the rollover will happen after that date has passed.
Example You have selected Pay Period Start Date and an employee’s start date is 02/01/2024. The rollover will occur when a check is entered with a pay period starting on or after 02/01/2025.
If using the Check Date option, you will be prompted for the day of the week you date checks. The program uses this to determine the rollover date during the payroll check entry/create checks process.
Next Plan ID
This entry should only be used if you are changing all of your employees from one plan to another. For example, your company may have a policy change requiring that employees be changed from an accrual Sick Pay Plan to a lump sum Sick Pay Plan.
Sick Pay Wages
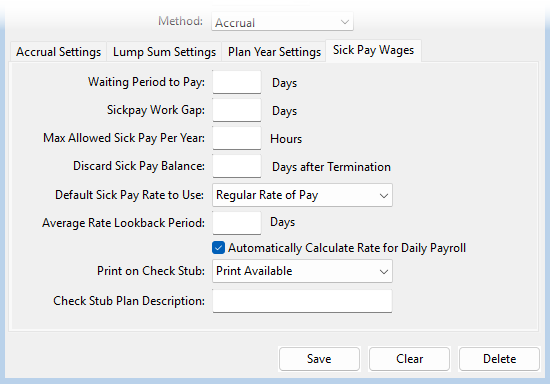
Waiting Period to Pay (Days)
Each states’ law allows you to have a waiting period before the employee may begin using sick pay. This begins the day employment starts. Each state determines their own waiting period. For now, most states use 90 days, but this is subject to your own state’s laws.
This entry allows the program to calculate the date on which the employee may begin using the accrued sick pay and prevents the payment of sick pay before that date. That date will appear in the Date Available entry under the Benefits tab of the employee file.
Sick Pay Work Gap
This entry controls the work gap allowed when fulfilling waiting periods. If someone stops working for equal to or longer than this entry, their available date will be pushed back by that amount of time they were not working.
Example An employee has a 90-day waiting period and a 14-day work pay gap. He works 4 weeks and then misses 20 days of work. His available date will then be 20 days later than it was originally, or 110 days after his start date. This is because he missed work longer than his Sick Pay Work Gap.
If our example above missed 13 days or less, his available date would have remained the same. He would have been able to use his sick pay at 90 days instead of 110.
Max Allowed Sick Pay per Year (Hours Used)
Each state has a different Usage Cap for sick pay. This is how many hours an employee can USE of their sick pay. This is not the same as the Accrual cap discussed previously. Typically, employees can accrue more time than they can actually use in one year. If you wish to provide a higher cap, you may.
Discard Sick Pay Balance (Days after Termination)
Each state’s law provides that an employee who is laid off then returns within a certain time-period (varies by state) must have any unused sick pay accrual reinstated. If they return after that period, the accrual is discarded. This is handled automatically during the check entry or rehire process. Be sure your are familiar with your state's specific requirements.
Default Sick Pay Rate to Use
This drop-down menu controls the default way the program will calculate the sick pay rate for this plan.
Find more on this topic in the Rate of Pay for Sick Pay section.
Average Rate Lookback Period
This entry controls how far back the program looks when calculating pay rates based on the lookback method. Find more on this method in the Rate of Pay for Sick Pay section.
This entry will vary by state. Some states do not use the lookback method; others look back over a different length of time. Consult the Sick Pay Requirements Table, online resources, or a legal professional for more information pertaining to your state.
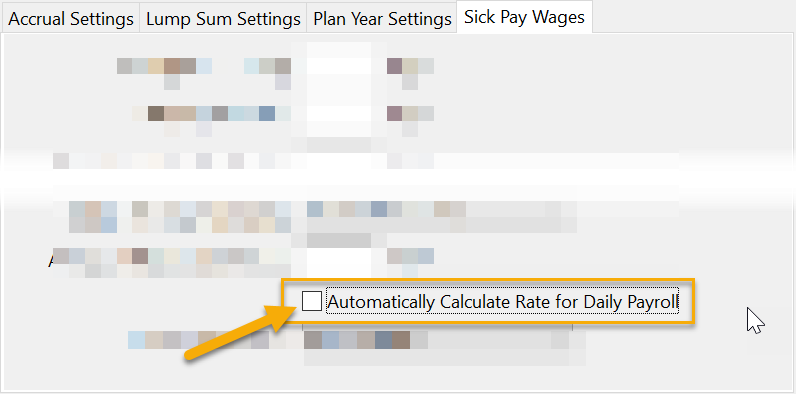
Automatically Calculate Rate for Daily Payroll
When you select this box, the program will automatically calculate and apply the correct sick pay rate. This is done when the Daily Payroll Batch Report is used to create checks.
Print on Check Stub
This drop-down controls what information prints on the check stub and where it is printed. Some states require this information to be printed on each check.
There are five different options for this:
-
Print Accrued/Available/Paid,
-
Print Available,
-
Print Available and Accrued,
-
Print Available and Paid,
-
and Everything.
The first four options listed will print this info below the YTD Totals on the left side of the check stub.
The Everything option will print the available, accrued, paid amounts, anniversary date, and other plan information, on the right side of the check stub.
Note For Washington employees, the Print Everything option will print the current checks' accrual amount. Also, if sick pay is not available yet but there has been a plan year rollover, the check will show the prior year accrued balance, YTD, the current check's accrual, and the total accrued.
Check Stub Plan Description
If you want a description of the plan (i.e. Sick Pay, PTO, etc.) to appear on the check stub and check voucher, enter it here.
Usage Cap vs Accrual Cap
The previous section mentioned an accrual cap that can be used when dealing with sick pay. As mentioned previously, this limits the amount an employee can accrue. In other words, how many sick pay hours an employee can stock up within one year.
There is, however, another cap that employers need to keep in mind. This is the usage cap. (This was mentioned briefly when discussing the Sick Pay Plan Setup window.) A usage cap limits the amount an employee can actually use within one year. This correlates to the Maximum Allowed Sick Pay per Year entry in the Sick Pay Plan Setup window.
It is important to remember that the accrual cap and usage cap are two different figures.
Many employers wonder why an employee can accrue more than they can actually use in one year. This is done so when the next year comes around, the employee will already have sick pay accrued that he can use right from the start. They can then use it before needing to accrue more sick pay.
If your state requires Sick Pay, be sure you are familiar with their standards regarding what the usage cap may be.
Rate of Pay for Sick Pay
Each state that requires Sick Pay has a different way of calculating what rate should be used. Settings within Datatech’s Software can be adjusted according to each states' requirements.
The information below provides general guidance on adjusting those settings. Therefore, it is important that you be familiar with your states' specific requirements for calculating the Sick Pay rate of pay.
Setting the Default Rate of Pay
The Default Sick Pay Rate to Use drop-down menu (Sick Pay Plan Setup > Sick Pay Wages tab) controls which calculation the program will automatically choose for determining the rate of pay for Sick Pay.
The Default Sick Pay Rate to Use drop-down menu has four options:
-
Lookback Period: The average hourly rate for the lookback period will be the default rate.
-
Regular Rate of Pay: The regular rate of pay for the current check will be used for the default rate.
-
Higher: The higher of the two rates (Lookback Period or Regular Rate of Pay) will be selected as the default.
-
Lower: The lower of the two rates (Lookback Period or Regular Rate of Pay) will be selected as the default.
Once the default method has been defined, the program will automatically calculate the Sick Pay rate of pay when using the Daily Payroll Batch Report or during Batch Check Entry.
Using the Daily Payroll Batch Report to Calculate the Sick Pay Rate of Pay
The Daily Payroll Batch Report can calculate the sick pay rate when this report is used to create checks from Daily Payroll Entry. The rate will not be updated until payroll checks have been created.
If you do not want the Daily Payroll Batch Report to automatically calculate the sick pay rate, a setting in the Sick Pay Plan Setup allows you to turn this off. Deselect the box Automatically Calculate Rate for Daily Payroll under the Sick Pay Wages tab.
Calculating the Sick Pay Rate of Pay During Batch Check Entry
In the Batch Payroll Check Entry window (Payroll > Checks > Check Entry), press Ctrl + R to open the Calculate Sick Pay Rate window, which will automatically make two calculations:
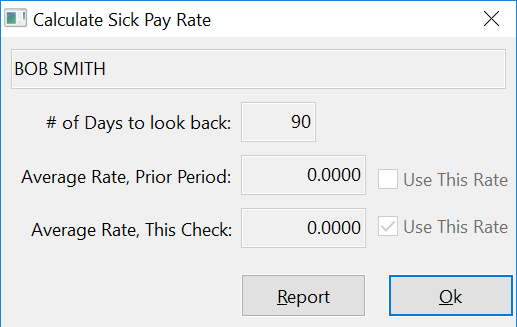
Select Use This Rate next to the rate that you want to use, then click Ok. That rate will be entered for you on the line item that you are currently on. This will calculate the employee’s current rate and the average rate for that pay period. The Calculate Sick Pay Rate window will then automatically select one of these rates to use based on settings in the Sick Pay Plan Setup.