Batch Payroll Check Entry
Batch Check Entry vs. Daily Payroll Entry
There are two different ways to enter your weekly payroll information. The method that you use will depend on your payroll requirements.
-
Batch Check Entry: With the Batch Check Entry window, you enter the wage information for each employee one at a time. This is most suitable if each employee has their own time card where they have recorded the work performed.
-
Daily Payroll Entry: The Daily Payroll Entry window is much more suited to crew payrolls, where typically the hours and/or pieces for each employee in the crew is listed, and each crew sheet covers one day
-
Set up any new employee accounts.
-
Enter payroll checks on the Batch Payroll Check Entry window.
-
Print the Payroll Batch Report. Check for entry errors and correct them.
-
Note If any checks are damaged and need to be reprinted, use the Reprint Checks option. Checks must be reprinted before the Payroll Journal is printed and updated.
-
Optional Reports:
-
Print the current Batch Payroll Journal. Update the general ledger if the report is ok. This will post the transactions to the general ledger, and checks will then show up on the Checkbook Register window.
-
If you are using the Labor Contractor option, print your Grower Labor Reports.
-
Issue checks for tax deposits as required by your federal and state deposit schedules.
Entering Individual Checks
The Batch Payroll Check window allows you to enter all the information required for each employee's check.
Go to Payroll > Checks > Check Entry.

Account #
Enter the employee account # or click on the look up button (or press [F4]) for a look up list of employees.
To bring up an employee account by the employees name key, social security number, or control number, simply hit enter on the account number field and advance to field of choice.
Name Key
If the employee’s account numbered is entered the name key will appear automatically you should hit enter past this field.
If the name key is incorrect press [F4] to get a look up list of employees.
Social Security #
If the employee’s account number or name key is entered the social security number will appear automatically. If the account brought up is incorrect you may press [F4] in this field to get a look up list of employees.
Control #
The program will automatically assign a control number to the check entry, so if this is a new check, leave this field blank.
If you are looking for a check previously entered to edit enter the control # and hit [F9], press [F4], or click on the look up button for a look up list of check entries.
Pay Period Starting and Ending
Enter the starting date for the pay period. The ending date will be calculated automatically by the program based on the Pay Cycle setting on the employee account.
Gross Wages
You now enter the gross wages for this employee. You may enter multiple lines of data to pay the employee for any combination of, hourly, overtime, piecework, etc., or to charge the employee's wages to different crops or fields.
Day
If you are entering payroll by day, which will print the hours by day on the payroll check stub, enter the first two digits of the day, i.e., Monday = MO, Tuesday = TU, etc. You can also use the day of the month, entered as number.
If you are not paying by day leave this field blank.
Cost ID
Enter the cost ID number to which the payroll wages will be expensed to, press [F4], or click on the ‘Cost ID’ heading to get a look up list of cost centers.
Year
If this is a direct crop expense (which means that you have entered a cost center), you must also enter the Crop Year. This allows you to keep track of direct crop expenses by crop year rather than calendar or fiscal year. Enter the full four digit year, i.e., "2003", "2004". Leave this entry blank if this is not a direct crop expense.
Job ID
Enter the job number for which the employee worked, press [F4], or click on the ‘Job’ heading for a look up list of Jobs.
General Ledger #
Enter the General Ledger number the wages are to be expensed to, press [F4], or click on the ‘G/L#’ tab for a look up list of General Ledger numbers. If you have entered a default General Ledger number in the employee's profile it will automatically appear here.
In any event, the General Ledger number used must be defined in the Worker’s Comp. Rates Table for the proper tracking of payroll tax expense and worker's compensation expense accruals.
Grower #
Labor contractors may enter the account number of the grower that the employee worked for in this column. The grower # will be used to group wages together for the grower labor reports and for billing purposes. (This column is not enabled for The Farmer's Office.)
Press [F4] or click on the Grower column heading to get a lookup list of growers.
Type of Wages
If the wage employee’s wage type is set up in the employee’s profile then it will automatically appear here. If not enter the wage type, press [F4], or click on the ‘Type’ heading for a look up list of wage types.
Piecework Hours
If you are entering piecework for this employee, enter the number of hours the employee worked for minimum wage calculation.
If the employee is being paid hourly, leave this field blank.
The screen will display the minimum wage total based on the number of hours worked. If the piecework wages do not meet minimum wage, the program will alert you when the check is saved, you can then tell the system to add a line to meet the minimum wage.
Hours/Units
Enter the number of hours worked, or units if you are paying piecework.
Rate
If this employee has a pay rate in his file, the rate will automatically appear. If not, enter the pay rate.
If you are paying an employee overtime or double-time, enter the normal rate of pay for the employee. The program will figure the amount of overtime or double-time based on the pay type you have selected.
X (Multiplier)
This column displays the multiplier factor from the pay type file, normally 1.0 for regular hours, 1.5 for overtime, and 2.0 for double-time. The pay rate that you entered in the rate column is multiplied by this number to calculate the total for this line.
This column is optional and may be turned off by deselecting the "Show Multiplier" check box on the Program Setup window.
Amount
The program will automatically calculate the total wage amount for this line.
EQ Units
If enabled, this column allows you to enter the units (typically hours) to charge for equipment usage. This can be useful for instance in situations where you need to pay the employee for more hours than the equipment needs to be charged to the field.
Equipment
If you want the program to record a charge out for equipment usage enter the Equipment ID number, press [F4], or click on the ‘Equip. #’ heading to get a look up list of equipment.
Rate
Enter the cost of usage per hour.
The program will calculate the total cost of usage and will create a memo entry transaction to appear on crop reports.
The check entry screen allows you to enter up to two Equipment usage’s per line on each payroll check.
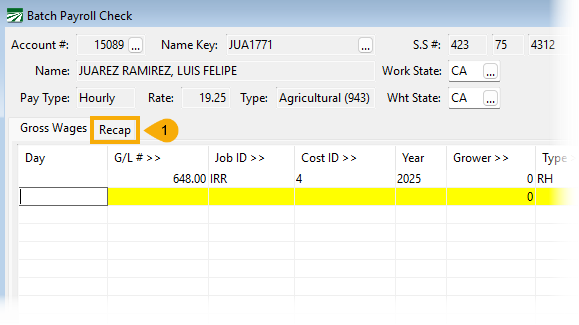
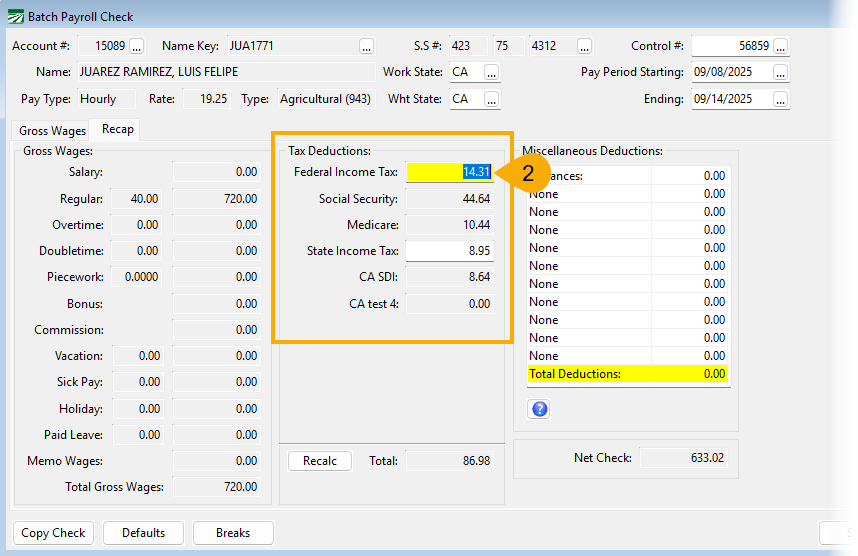
Batch Check Recap Tab
Once you have entered the gross wage information, you can click on the Recap tab to see the gross wage totals, tax deductions, miscellaneous deductions, and the net check amount.

Gross wages are listed by wage type on the left, tax deductions are listed in the middle, and miscellaneous deductions are listed on the right side.
You can manually adjust tax deductions and any miscellaneous deductions that are set up for the employee. If an employee does not have a miscellaneous deduction type set up, the entry will be disabled and labeled “None”.
Tip To see an explanation of how federal and state tax withholding is calculated on a check, press [F12] while in the Federal Income Tax entry or State Income Tax entry.
Making Changes to Gross Wages or Deductions
As you make changes to either the gross wages (by editing or adding line items) or to the deductions, the net check will be updated accordingly.
If all deductions are correct, click Save or press [Ctrl]+[S] to save the payroll check entry.
Editing Deductions Based on Percentage
If an employee has a deduction set up that is based on a percentage, you cannot edit the deduction without changing the calculation method. This is because the program will always recalculate the deduction amount when the check is saved.
If you need to change the calculated amount to a minimum or maximum amount, you should enter these amounts on the employee account and the program will automatically use them. Otherwise, you can temporarily change the deduction method to “Flat” on the employee account. This will allow you to edit the deduction amount on the check.
An employee has deductions that exceed their wages, how do I remove the deductions?
Example An employee earns $40.00 for the week, but their deduction is automatically set to take out $60.00.
In order to remove the automatic deduction for this week, you will need to open the Batch Payroll Check window.
-
Go to Employees > Checks > Check Entry.
-
Open the employee’s account.
-
Click on the Recap tab.
-
In the Miscellaneous Deductions grid, delete the deduction amount you need removed from this specific check and click Save. For example, the employee’s 401(k) deduction is $60.00. Simply delete the $60.00 amount from the grid.
-
Now you can print the employee’s check for this week without the deduction.
Note If the deduction is percentage based, you will need to follow the instructions above to edit this deduction.
Batch Check Entry Default Settings
While entering batch payroll checks, you can make several default settings which will speed up the entry of the checks. Click Defaults at the bottom of the window, and this dialog will appear:

If you enter anything on this dialog window, it will be used as a default value when you are entering payroll check information. For instance, if you payroll some employees for pruning, and they all worked in the same field for the same hourly rate, you could set the G/L # to your pruning wage expense account, the cost ID to the field they were working in, the pay type to RH (Regular Hours), and enter the rate they are being paid.
Click Ok to save the default settings, or click Cancel to ignore any changes you have made.
Using the “Add Breaks” Feature in Batch Payroll Entry
There is a feature on the Batch Payroll Check window used for automatically adding line items for breaks that employees take. This feature is accessed using the Breaks button on the Batch Payroll Check screen. This option allows you to enter the total time the employee worked without having to subtract out the break time when entering the hours and manually entering the break time on separate lines.
This feature is extremely similar to the “Add Breaks” feature of Daily Payroll, but they differ in some key ways. If you are looking for information on that tool, see the section: The “Add Breaks” Feature in Daily Payroll Entry|topic=The "Add Breaks" Feature in Daily Payroll Entry
To determine if you would like to use this feature, let’s see an example of how this works. Here is a check that was entered where the employee worked on four separate days:

Based on the hours worked, the employee should have taken one break on the first day (23rd) and two breaks on the other days.
Clicking Breaks at the bottom of the window will activate a popup menu with three options:

When you select the Add Break Line Items option, line items for breaks will then automatically be entered and calculated. As seen in the following screenshot:

By entering the total time that the employee worked on each day, the program can consult a table that tells it how much break time the employee is due based on the hours worked; you will need to set up that table yourself based on your company’s break policies (see the example below). The program then deducts the break time due to the employee from each of the days and creates a new line with the break time.
Day-by-day, here is what happens:
1/23/2017
The employee worked 5 hours, and is due one break. A break line is created for 10 minutes (.1667) using the BR wage type, and the 5 hours is changed to 4.8333. (Remember that if an employee has any piecework wages in the pay period, all breaks must be paid at the average hourly pay rate according to AB 1513. That is why the breaks time is subtracted from the hourly wages and paid separately for this day.)
1/24/2017
The employee worked 10 hours earning piece wages, so the employee should have a total of two breaks. The piecework hours amount is reduced from 10 to 9.6667, and a break line is added for 20 minutes (.3333).
1/25/2017
The employee worked a total of 9 hours earning piece wages at two different rates. Again, 20 minutes of break time is due for the total hours worked. The program takes the break time out of the line with most number of hours, so the line for 5 hours is reduced to 4.6667 and a break line is added for this day for 20 minutes (.3333). The piecework line for four hours is not changed at all.
1/26/2017
On this day, the employee didn’t make minimum wage. Before the program can determine the employee’s average hourly pay rate, it must perform the minimum wage verification and add in any needed minimum wage adjustments. That is why the MW line is added on this day for $22.67. As on the other days, the break time while earning piecework wages is 20 minutes, and this is subtracted from the total of eight hours worked on this day.
So now that you see how this feature works, you may decide to use it. If so, continue on to the Setting Up the “Breaks” Feature for Batch Payroll Entry section.
Break Time Setup
To create the break lines, the program needs to know two things:
-
How much break time should be paid to employees.
-
What the break line items should look like.
To set up the table defining how much break time employees should get, click Breaks > Setup Break Time.

When this table is first accessed, no data will be entered. The Break Time is calculated per hour as a decimal. So, as seen in the example above, a 10 minute break is entered as .1667 (60 x .1667 = 10 minutes). You will need to set up the hours worked and break time amounts according to your companies break time policies. For instance, if you give employees fifteen minute breaks, you would enter .25 and .50 instead of .1667 and .3333 as shown in the example above.
When creating the break lines, the program simply looks up how much time the employee worked in the Hours Worked column of the break table. If the employees worked at least the number of hours that you entered in this column, then the employee is due the number of regular and overtime breaks entered in the 2nd and 3rd columns.
Customizing How “Break” Line Items Look
The program also must know what a break line should look like. This can include what wage type, job code, cost center and G/L # should be used on the break lines. This is handled by the Default check box on the Rest and Recovery/Non-Productive Time Definitions table:

This table lets you define what you Rest and Recovery line items look like in terms of the wage type, job code, cost center and G/L # used on the line item. It has been used by the Daily Payroll options that update the pay rates for rest and recovery lines. The Default check box needs to be selected on a single line to tell the program what template it should use to create the break lines. If you have separate wage types for overtime or double time breaks, then you should select the Default check box on the line to use for those breaks.
In our example, the break lines are simply set up to use the BR (regular breaks) or BP (overtime breaks, which was not used because there was no overtime). Because this table does not specify a Job ID, Cost ID, or G/L # to use on break lines, when the break lines are create the same Job ID, Cost ID an G/L # entered on the original lines are used for the break lines.
The Default check box only applies to lines items that are set to Rest/Recovery. It will not have any effect if you select it on a line that is set to Non-Productive time.
The example above is very simple, there are only two lines in the table. In some cases though, customers have multiple Rest and Recovery entries in this table. There may be different wage types or phases used for regular breaks vs. heat illness prevention breaks, or there may be other definitions set up for breaks for other reasons. In those cases, having the Default check box allows you to tell the program what you want the breaks lines to look like when you have multiple entries.
Recalculating the Rest and Recovery Pay Rate
After adding the break lines, any further edits to the check line items may change the employee’s average hourly pay rate. If this happens, click Breaksagain and select the Calculate R&R Pay Rate option. The program will recalculate the employees average hourly rate and update the break lines accordingly.
Editing Hours After Adding Break Lines
If you change any hours on piecework or regular hour line items after you have created the break lines, just remember that you are not editing the total hours worked anymore. Once the break lines have been created, the hours left on the line items will be the time spent working exclusive of breaks.
Suppose you discover an entry error where you entered 8.5 hours instead of 9.25 hours after you have created the break lines. After a break line for twenty minutes has been created, you will have 8.1667 on the original line item. Do not change this to 9.25 to correct your error! Instead you will need to subtract the break time from the total time worked and enter that number. Since 9.25 – .3333 = 8.9167, the line item should have 8.9167.
In some cases, editing the number of hours might change the amount of break time due to an employee. If that happens, you can use the Add Break Line Items option again to recalculate the break time on the check. The total time worked by the employee will remain the same, but the break time may be adjusted up or down depending on whether the hours were increased or decreased.
Entering A Check With A Missed Meal or Break
Note Before entering a check for a missed meal or break, see the topic: Setup for Paying Missed Meals & Breaks.
When you are ready to pay an employee for a missed meal or break, follow these steps. In this example, the employee was not able to take their meal break. You can enter checks through Daily Payroll Entry or Batch Payroll Check Entry.
Batch Check Entry For Missed Meal/Break
-
Go to Payroll > Checks > Check Entry.
-
After entering the line item for the employee's workday, add an additional line for the missed meal/break.
Do not enter a number in the P/W Hours column.
Enter a 1 or 2 in the Units column depending on whether you are paying the employee one hour for the missed meal/break or two hours for both a missed meal and a missed break in California.
In other states you may need to pay the employee for different amounts of time. For instance, to pay a 30-minute penalty, enter .5 for the Units. -
Make sure to enter the Wage Type set up for missed meals/breaks.
-
Click Breaks and select Calculate R&R Pay Rate. This will update the rate for the missing meal or break with the regular rate of pay.

Daily Payroll Entry For Missed Meal/Break
-
Go to Payroll > Daily Payroll Entry.
-
Enter the header information, Account #, Pay Period Dates, etc.
-
After entering the line item for the employee's work day(s), add an additional line for the missed meal/break.
-
Make sure to enter the Wage Type set up for missed meals/breaks.
-
You will need to temporarily enter a rate. This will be re-calculated with the regular rate of pay in step 6.
-
Once you are finished entering the lines for the check, right-click anywhere on this window and go to Reports > Print Batch Report.

-
On the Daily Payroll Batch Report window, enter your starting/ending dates along with any other needed information.

-
Select Calculate Rest and Recovery Pay Rate. Then, under the Rest & Recovery Pay Rate section:
-
California employers would then select Regular Rate of Pay.
-
Washington employers would select Ave. Hourly Piece Rate.
-
Note If you are paying straight hourly wages and do not have separate break lines but you do have missed meal/break payments, you still need to select this box. The same calculation is used for both the rest and recovery pay rate and the missed meal/break period pay rate. Selecting this box activates that calculation and will update the missed meal period lines with this rate.
-
Click Preview. You will now see the regular rate of pay that has been calculated for the missed meal.
Using the Tool Tip
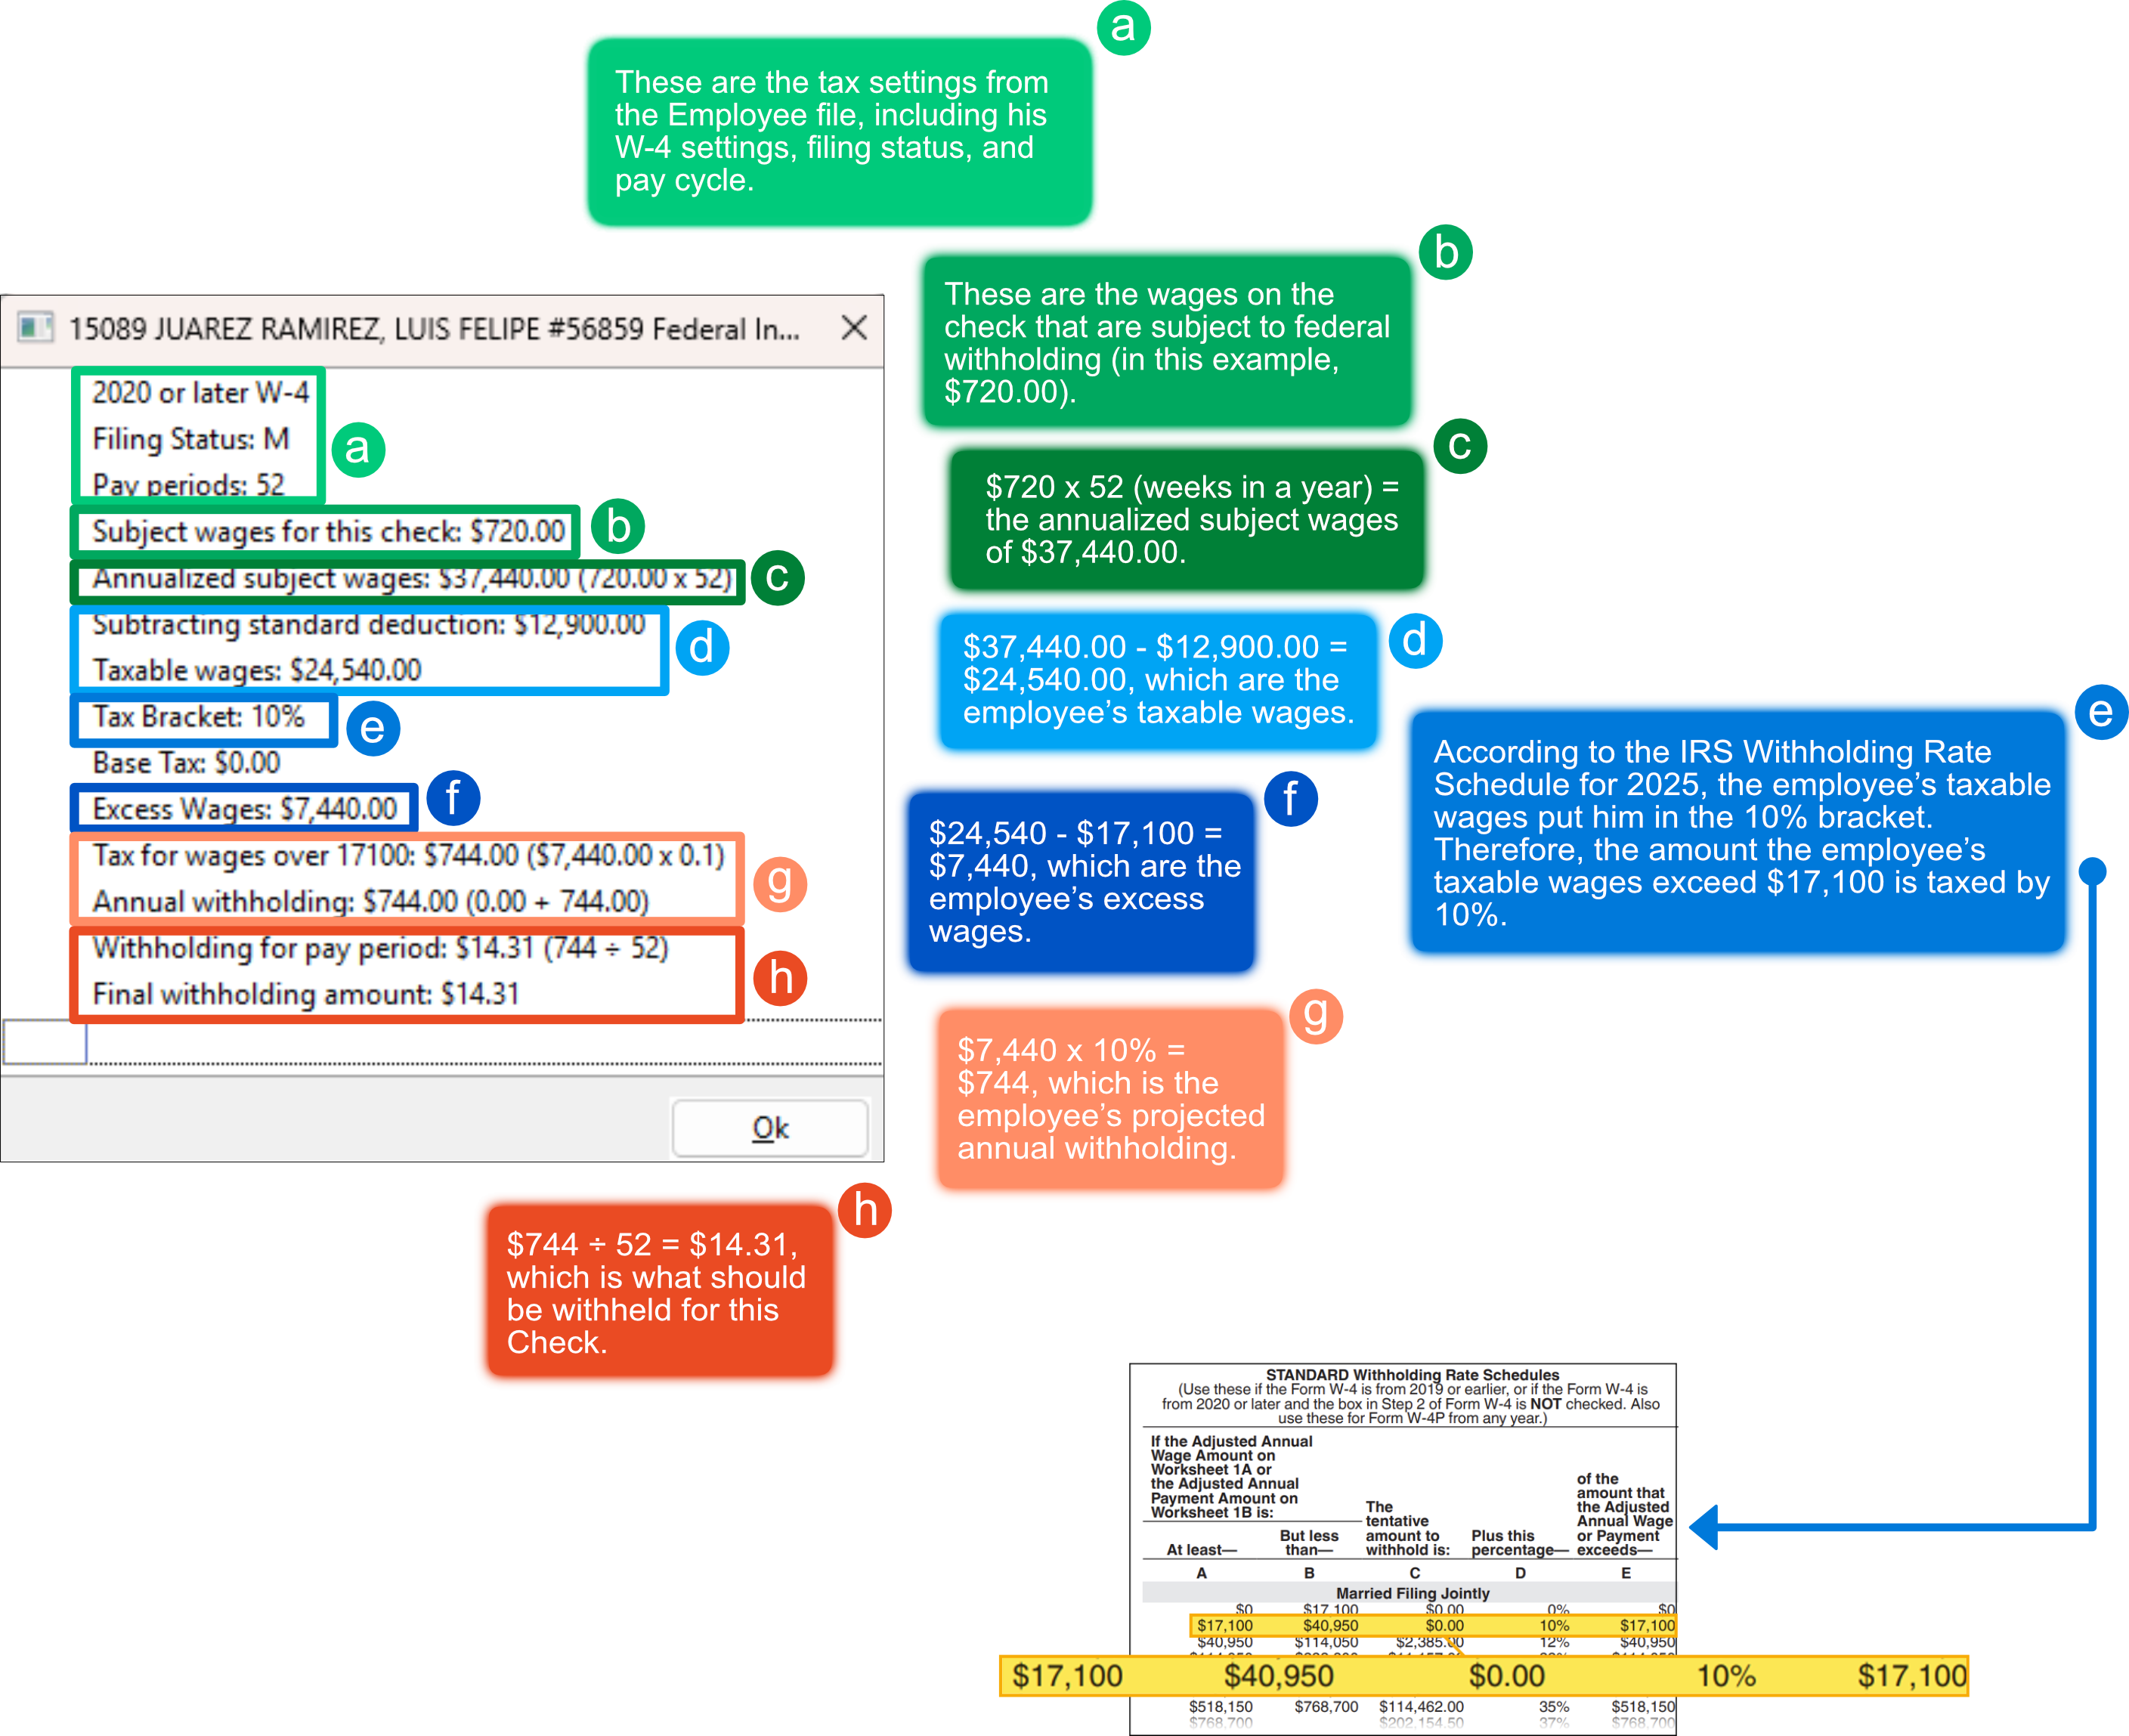
While still in the Batch Payroll Check entry window, you can see how an employee's federal withholding was calculated before the check has been printed. To see the calculations, do the following:
-
After entering the check, click the Recap tab.
-
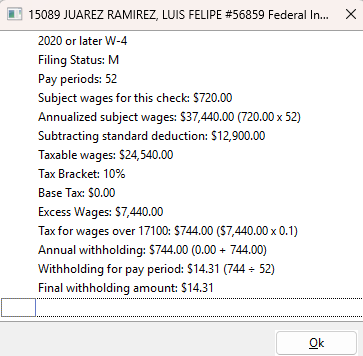
Under the Tax Deductions column, you will see the amount being withheld for federal income tax on the check (in this example, the amount is $14.31). Click into the Federal Income Tax entry and then press the F12 key.
-
After pressing the F12 key, the following window will open showing how the amount of $14.31 was calculated:
-
Below is a detailed explanation of the federal withholding calculations on the check.