Invoice Entry
Invoice Entry
The Enter/Edit Customer Invoice window has several uses. If you are using the Order Entry system, orders which have shipped may be billed. If you are not using the Order Entry system, you can enter new invoices, returns, or credit memos. You can edit invoices which have not been finalized. Trouble codes can be entered on loads with problems. Finalized invoices may be viewed and/or reversed and rebilled.
Invoicing Shipped Orders
Once an order has been shipped, it can be invoiced. When you enter the order # on the Enter/Edit Customer Invoice window, the order information will be displayed, and the transaction type will be changed from Order to Invoice. Once a shipped order has been saved on the Invoicing window, it cannot be viewed or edited from the Order Entry window.
Entering New Invoices
This window is also used to enter new invoices, credit memos, and returns. If you are using The Broker’s Office without the Inventory option, this window is where you will enter all new invoices.
Entering Credit Memos
Credit memos are entered on this window just like a normal invoice. The only difference is you will select Credit Memo as the Transaction Type. It is not necessary to enter to enter negative quantities or negative prices on a credit memo. The program will automatically create a negative total when Credit Memo is selected as the transaction type.
A credit memo is normally entered using the original invoice number plus a decimal extension. For instance, if a credit memo is entered for invoice #1001, you would enter 1001.01 for the invoice number on the credit memo. If multiple credit memos are needed, you can use 1001.02, etc.
Go to Receivables > Invoicing > Invoice Entry.
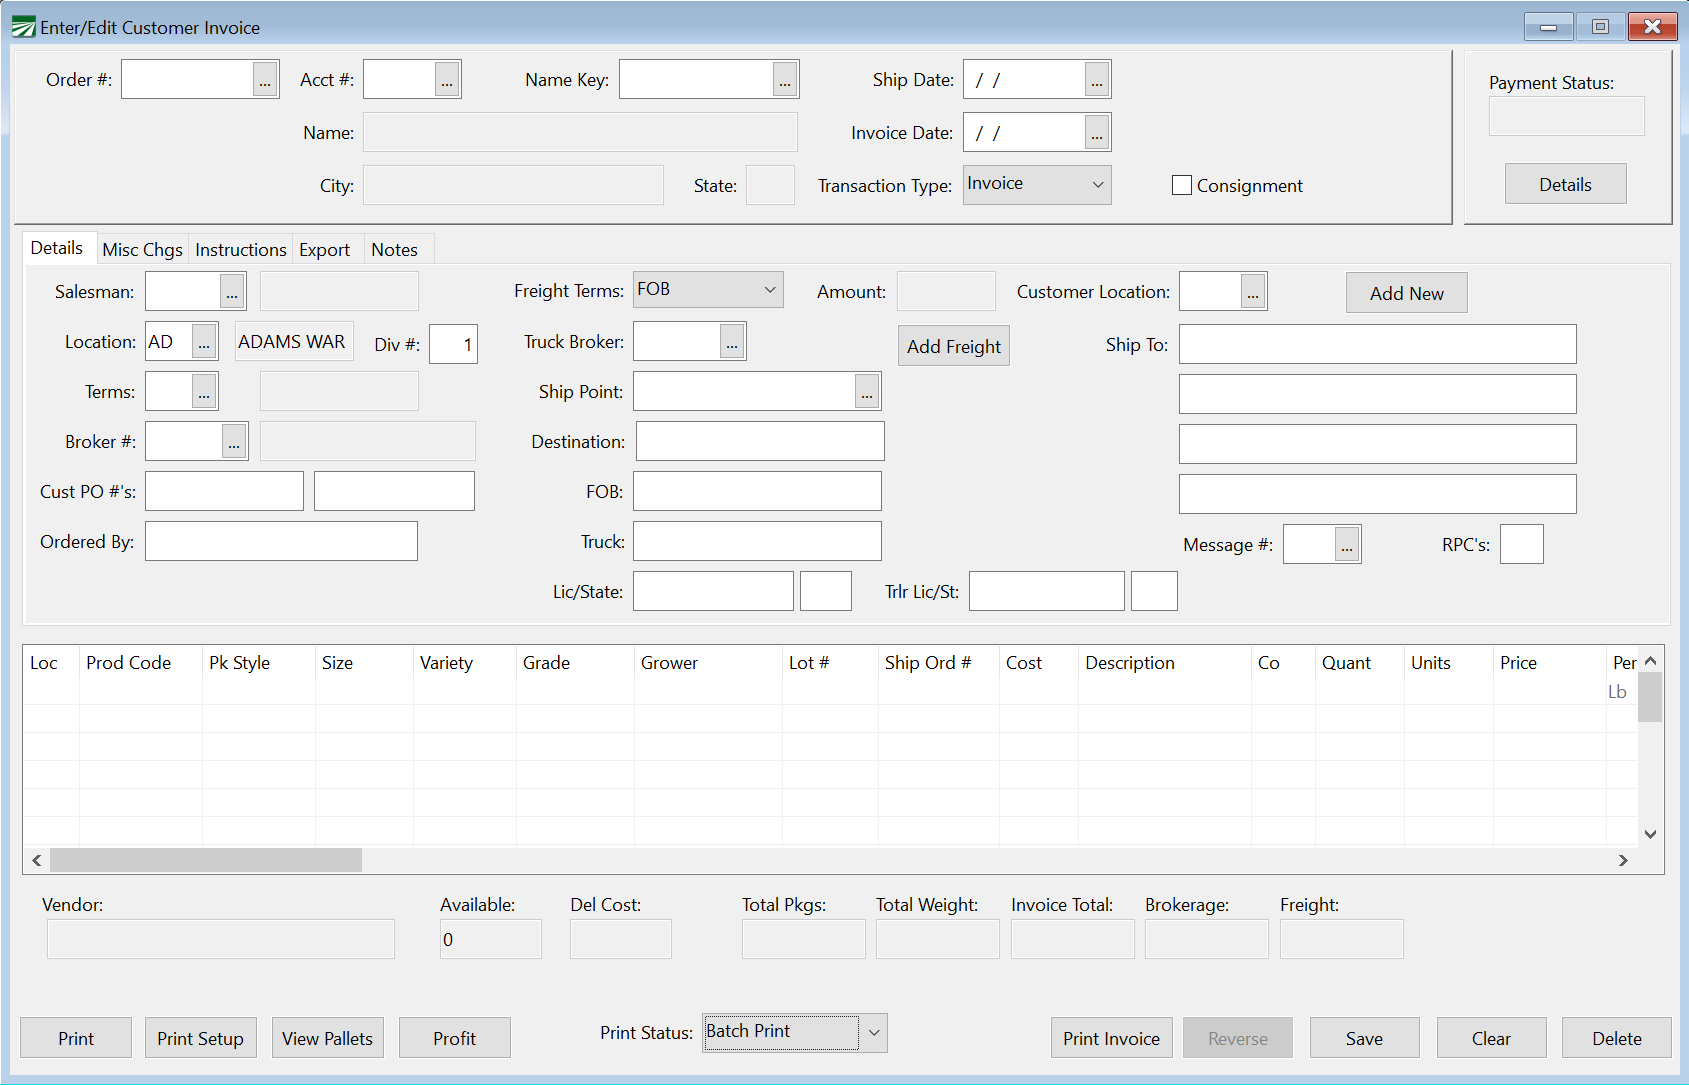
Order #
The order number may be assigned automatically by the program, or you can assign your own order numbers. (The Receivables tab page on the Program Setup option has a checkbox called “Automatically Number Invoices” which controls this.)
If the automatic numbering is turned off, you must enter an order number here. If the program is set to automatically number orders, you can leave the Order # entry blank.
Account # / Name Key
Select the customer account for this order by entering either the account number or the name key. You can click on the lookup button  or press [F4] to select an account from the customer lookup.
Invoice Date
Enter the date the order was taken.
Ship Date
Enter the date the order was shipped, or is scheduled to ship if the order has not been shipped yet.
Transaction Type
The transaction type will default to Invoice on a new entry or when you are billing a shipped order. Other transaction types include:
Return: This is used when product has been returned. Quantities will be added back into inventory.
Credit Memo: A credit memo is used for price adjustments. Inventory balances are not affected by credit memos. On a credit memo, you do not need to enter a negative on the price, the program will automatically calculate a negative total.
Debit Memo: Like a credit memo, a debit memo is used to adjust prices, but instead of calculating a negative total, it calculates a positive total. A debit memo can be used to reverse a credit memo.
Consignment
Select this option if the invoice is a consignment. This allows you to print an invoice with a zero total without finalizing it.
Payment Status
In this box, you can see the payment status, whether that’s PAID, UNPAID, or UNBILLED. The details button below it will open a window in which you can see the specifics of the payment.
Print Invoice
Click Print Invoice to preview and finalize the invoice.
Note If you have the Finalize Invoice Without Printing option turned on in your Shipper Setup, you will not see a preview and the invoice will be finalized when you click Print Invoice.
-
On the invoice, select the Message you set up for emails.
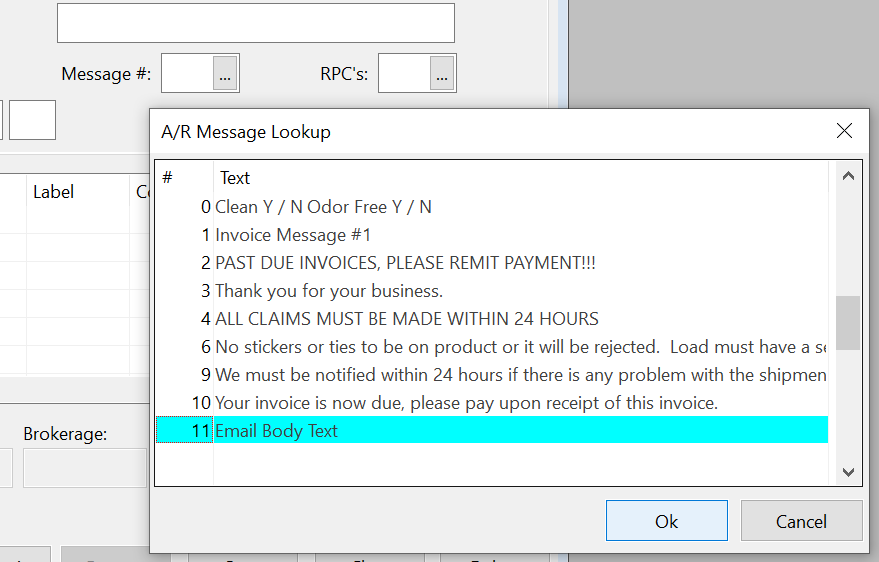
Note If you would like the same message to be automatically used each time, go to Program Setup > Receivables > Invoice Printing and select the Message # for Invoices.
You can also assign message numbers by customer. Go to Receivables > Customers > AR Settings. The program will automatically use the message you assign here when printing invoices for that customer.
In these cases, the message number will not show in the Message entry on the Enter/Edit Customer Invoice window, but it will print on the invoice. Preview invoices to ensure your message is printing correctly.
-
Click Print Invoice.
-
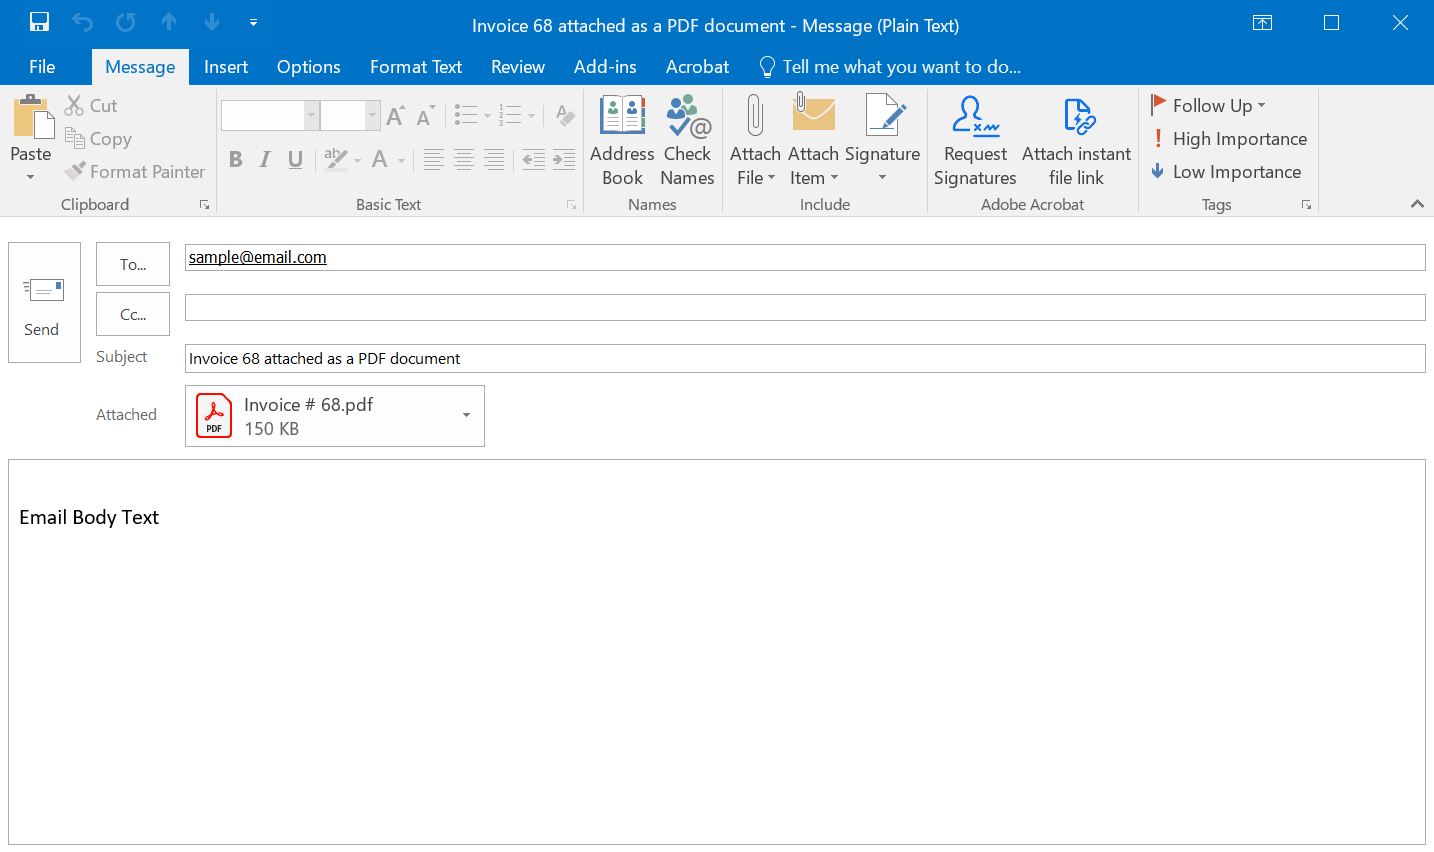
On the Print Proofs and Invoices window, select the Email/Fax Single Invoice box.
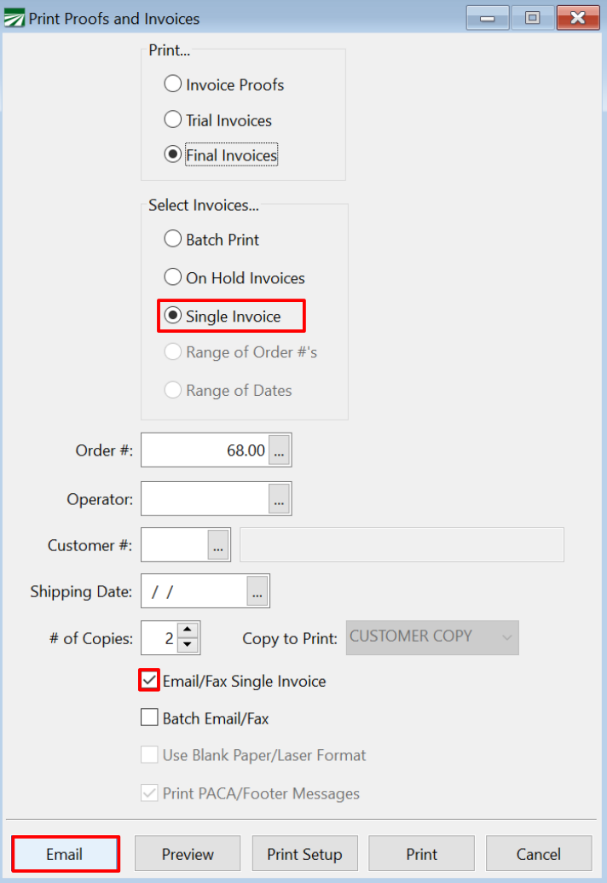
-
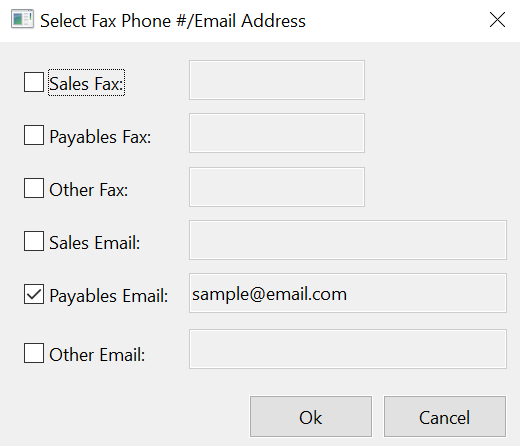
Click Email and the following window will open. You can select from the various fax numbers and email address for this customer. There is also an option to select Other Email and enter an additional email. Then click Ok.
-
The email will automatically populate with the information entered in your selected message for this invoice.
-
Open the attached PDF to review before sending.
The Windows printing system is normally bypassed when printing invoices on continuous forms on dot matrix printers. This is so that the printer’s built in fonts are used instead of the Windows fonts, which allows the printer to print at full speed.
Because the Windows printing system is not used, you need to specify which printer invoices are printed on. The Forms Printer option on the Tools menu is used to do this.
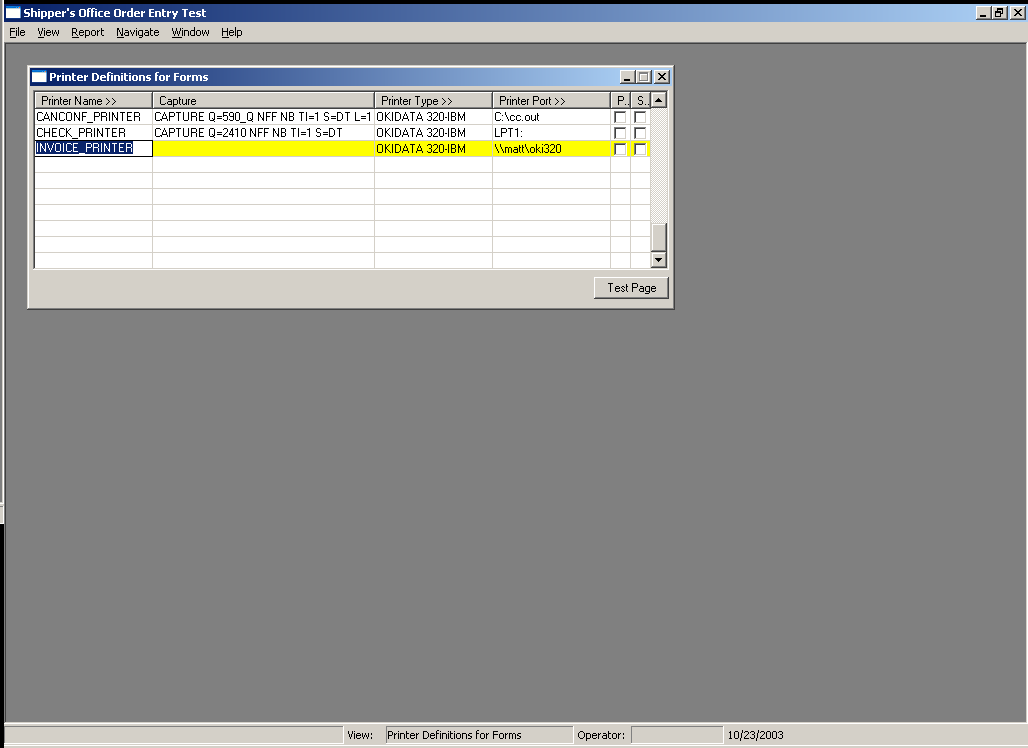
Printer Name
Add an entry with the printer name “INVOICE_PRINTER”. The program looks specifically for this entry when printing final invoices to determine the printer to use.
Capture
If you are using a Novell network and invoices are printed on a shared printer, enter the capture command to use to redirect an LPT port to the shared printer.
Printer Type
Press [F4] to select the printer codes to use (most printers use either the Epson FX, Epson LQ, or IBM Proprinter codes).
Enter the printer port (e.g. LPT1, LPT2, LPT3) or the UNC path to the shared network printer where invoices will be printed.
Page Printer / Spool Printouts Checkboxes
Leave these checkboxes deselected; they are not used by the invoice printing feature.
Details
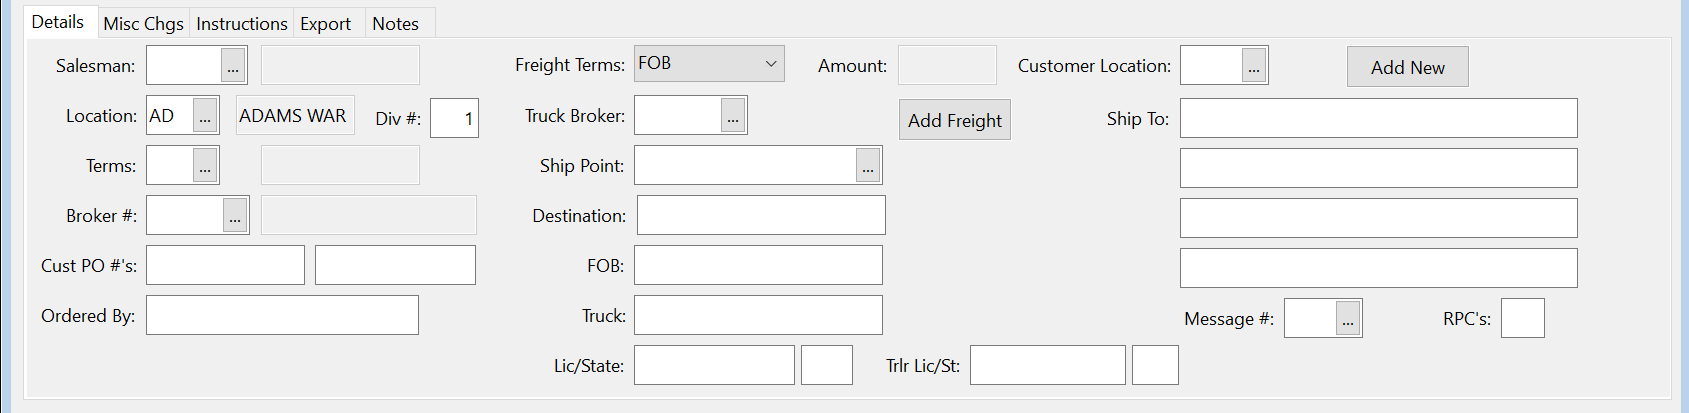
Salesman
Enter the salesman number here. The salesman name will appear to the right.
Location
Enter the warehouse location from which this invoice will be taken.
Division #
Enter the division number for this sale. By using divisions, you can group sales together and track total income by division. For instance, you might use different divisions for sales that are made from different locations. Sales for each location can be posted to different income accounts in the general ledger, which means your Profit or Loss reports can give you a breakdown of total income by location.
Terms
Most of the time, all customers have the same terms. If necessary, you can set up different terms (“Net 7 Days”, “Net 10 days”, etc.) and use different terms for different customers.
The program will default to the terms set up on the customer account. Or, if you only have one terms definition set up, the program will always use that terms entry.
Broker #
If there is a broker for this order, enter the broker’s account number here (broker accounts are set up in the accounts payable vendor file). The program will allow you to enter an amount for brokerage (per package) on each line item.
Cust #
If the customer has a purchase order number, enter it here. This entry may be required if the “ # Required” box is checked on the customer’s account. A second entry is available if you need to track two P.O. numbers.
Ordered By
Enter the name of the person who placed the order.
Freight Terms
Select either FOB or Delivered for the freight terms.
Freight Amount/Allocate
When you select Delivered for the freight terms, you can enter the total freight amount here. As you enter the line items, you can enter the freight amount for each line (if you have already calculated what the amounts should be).
Or, you can skip the freight amount entry on each line item. Then when you have entered all line items, click on the Allocate button next to the Freight Amount entry. The program will calculate the freight amount for each line item. This calculation will be based either on the gross weight, package count, or pallet count. The freight allocation method is determined by a setting on the Order Entry tab of the Shipper Setup window.
Once an invoice has been finalized, freight amounts may not be changed without reversing and rebilling, if you are using the Shipper’s Office. If you are using The Broker’s Office, you may edit freight amounts after finalizing, if you set the “Edit Freight on Finalized Invoices” in the Shipper Setup screen.
If you edit a freight amount on a finalized invoice where the freight bill has already been sent to accounts payable, a change in the freight amount WILL NOT update the payable invoice.
Truck Broker
Enter the vendor account number for the company that you will be paying the freight bill to. The vendor account may be edited on a finalized invoice, but only until the freight bill has been processed and updated to accounts payable. At the point the vendor account may not be changed.
Ship Point
The shipping point (city and state) will be automatically entered for you. Change it if necessary. (The default value for the shipping point is set on the Order Entry page of the Shipper Program Setup option.) The shipping point is printed on the bill of lading.
FOB
Enter the FOB point or destination of the load. Normally this is the shipping point if freight is FOB, destination if freight is Delivered.
Truck
Enter the truck name here.
License
Enter the license # of the truck.
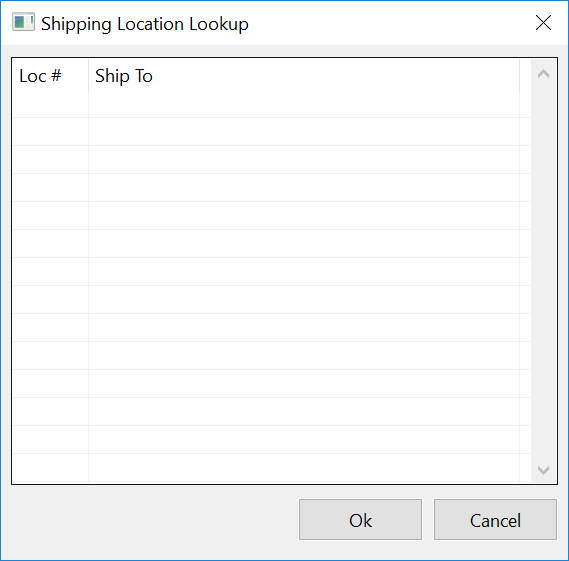
Customer Location
Each customer account has a default customer location of 1, which is “SAME”. If you have entered different ship to address for the customer account, you can enter the ship to location number here, or click on the lookup button or press [F4] to get a list of shipping locations to choose from.
Ship To
Enter the mailing address that the order will be sent to. This will automatically be filled in with the defaults put in the customer’s file. However, this can be overwritten if the order is to be sent to a different address.
Message #
If you want a specific message to print on this invoice, enter the message number here. This message will print in addition to the footer and PACA messages entered on the Shipper Setup window.
See Topic: Messages
RPC’s
See Topic: Set Up RPC's
Misc Chgs
Enter information related to the use of a temperature recorder on this page. If there is no temperature recorder, you do not need to enter anything.
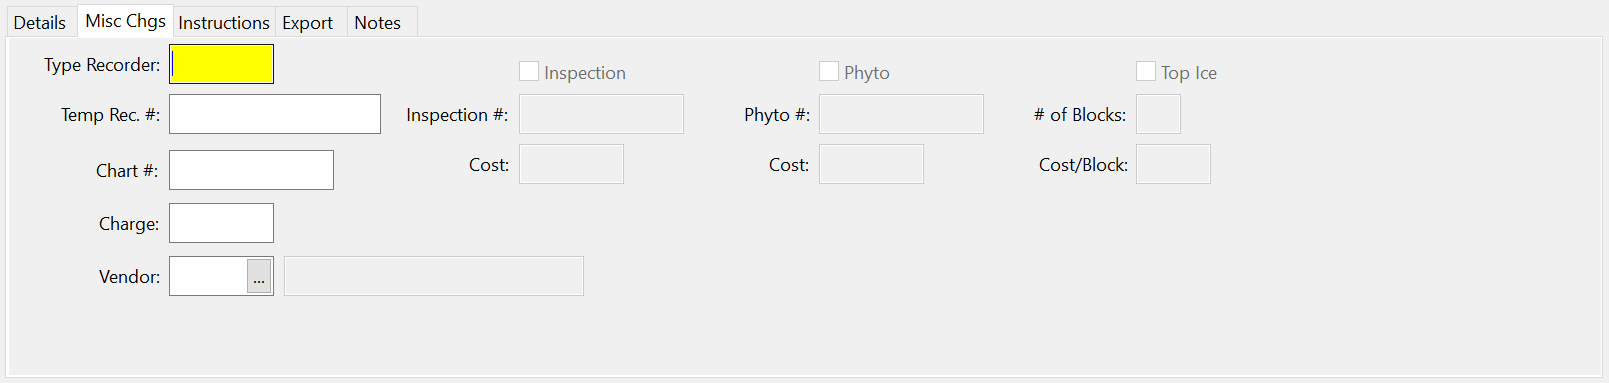
Type Recorder
Enter the type of temperature recorder.
Temp Rec #
Enter the temperature recorder number here.
Chart #
Enter the chart number.
Charge
Enter the amount to charge for the temperature recorder.
Vendor
Enter the account number for the vendor supplying the temperature recorder.
Instructions
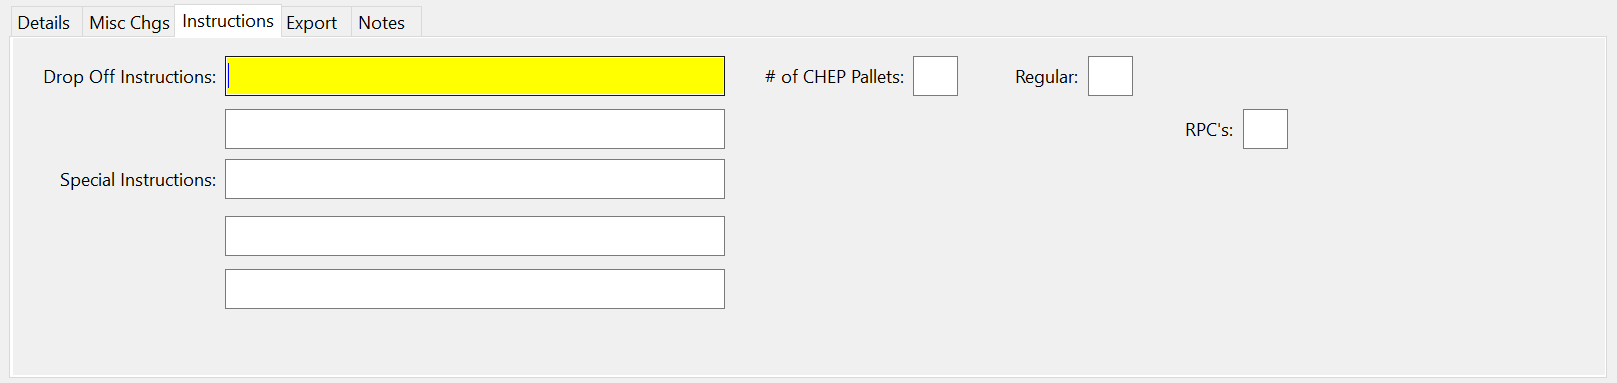
Drop Off Instructions
Enter the drop off instructions for this invoice. This is an optional entry.
Special Instructions
If there are any extra instructions, you can add them here. This is also an optional entry.
RPC’s
See Topic: Set Up RPC's
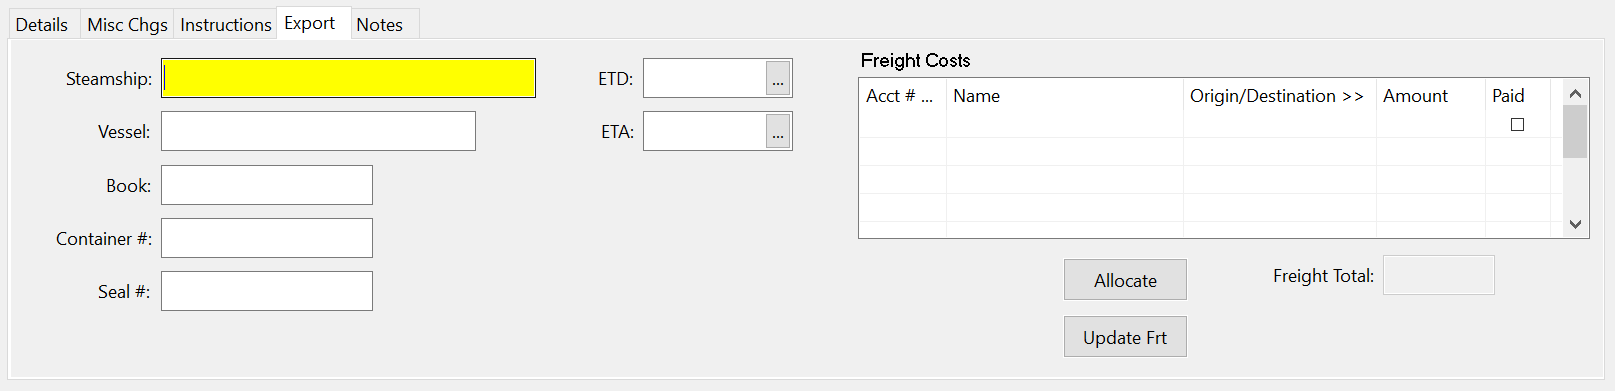
Export
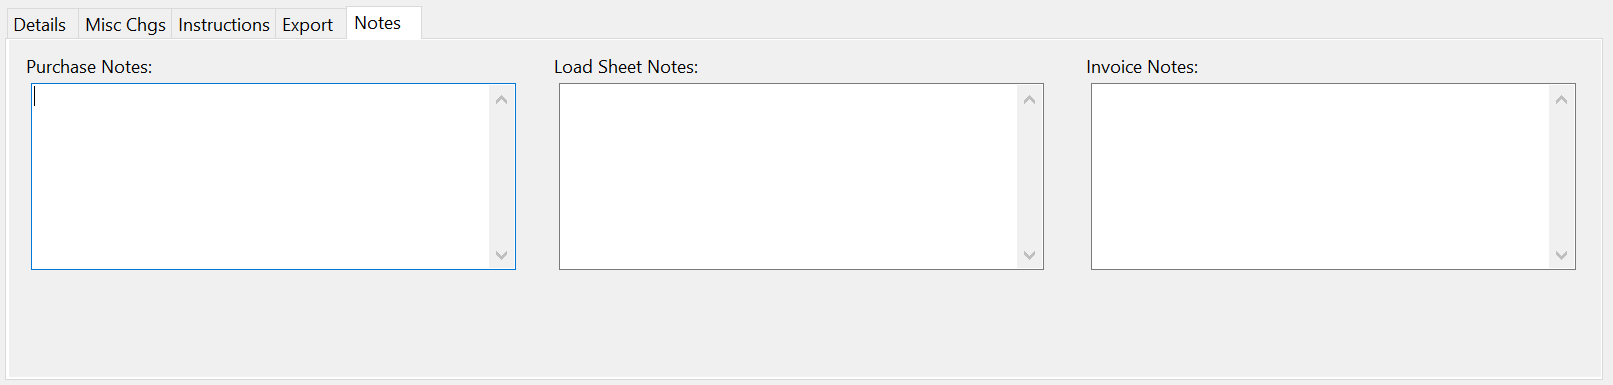
Notes
Line Item Entry
When you are entering a new invoice, as soon as you complete the top portion of the invoice or use the mouse to click on the line-item grid, the information in the top part of the window will be saved and an order number will be assigned.
The actual columns that you will see depend on settings enabled on the Shipper Setup window on the Order Entry tab. Some entries are not needed by some companies, so you may not see some of the columns listed below.
Create Line Items from Receives
After entering all items being purchased on the receive, you can automatically create and add those items to an order. The receive must be issued to a shipper vendor account, and have a status of Direct Shipment in the Delivery Method entry.
When you enter a receive, take note of the receive number.
Go to Receivables > Invoicing > Invoice Entry.
1. Start an invoice by entering a customer and associated header information.
2. Click into the first line on the grid and press CTRL+1.
3. A popup window will appear asking you which receive you want to copy over to this order. Either enter the receive number in the Rec Tag # entry or search for it using the look up.
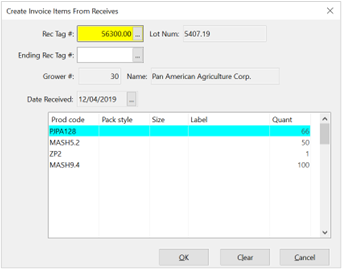
4. Once you have chosen the receive, the bottom grid will list all the items in that receive. If this is correct, click Ok. The program then adds all those items to the invoice automatically.
Entering Line Items

Loc
The location column will appear if the multi-location inventory option has been turned on in the Shipper Program Setup. The default location number entered in the Shipper Program setup will appear here automatically. Enter the warehouse number that the product is being shipped from here.
Prod Code
Enter the product code. Use [F4] to get a lookup of product codes, or one of the inventory lookups to select a product code.
Pack Style / Size
If your copy of The Shipper’s Office is configured to use a separate pack style and size in addition to the product code, you will need to enter these items also.
Use [F4] to get a selection list of valid pack styles and sizes for the product code that you have entered.
For miscellaneous charges, a pack style and size are not required.
Grower
Enter either the grower account number (if you are selling grower product) or the vendor account number (if this is a buy/sell or purchase lot sale). You can press [F4] to get a lookup of vendor accounts.
For produce brokers, this column will be titled “Ship #” (since you are not selling grower product).
The vendor or grower name will be display below the line item entry after you enter the account #.
The Shipper Setup window has a setting to use the grower name key instead of the account number. If this option has been enabled, the column will be titled “Grower” instead of “Grow #” (“Shipper” instead of “Ship #” for produce brokers).
#
For grower product, enter the lot number for the product sold. If you are using the lot inventory/lot grower accounting system, you must enter a valid lot #.
For a buy/sell sales, you may use the lot number entry for inventory tracking purposes.
Ship Ord #
For buy/sell sales, enter the vendor’s invoice number here. When the vendor invoice is entered through the Produce Purchases window, the program will be able to find the sales for that invoice.
Cost
For buy/sell sales, enter the cost paid here.
Description
The description for the product will be displayed in this column.
Label
The label will automatically be entered, or you can override the default if necessary.
Quant
Enter the number of packages sold here.
Units
The units column allows you to enter an additional quantity for billing purposes. For instance, if you are selling watermelons by the pound, you would enter the number of bins in the Quant column and the pounds in the Units column.
The Units column is also used for billing miscellaneous charges. This keeps any quantities for miscellaneous charges out of the total package count.
Price
Enter the price per package here. This will be multiplied by the Quantity or the Units (if entered) to get a total for this line.
Precool
Enter the amount to bill for precooling here. Precooling is always multiplied by the quantity.
Cust Price
If enabled, this column will show the total of the price and precooling entries. This is a display-only field.
Brok
If there was a broker on this invoice, enter the per package amount for brokerage. (The brokerage amount should be included in the price you entered for the line.) If there is no broker for this invoice, the
Frght
If you selected Delivered for the Freight Terms, enter the freight cost per package in this column. You can also enter the total freight in the top section of the invoice entry window and click on the Allocate button to automatically calculate the freight cost per package on each line of the invoice.
Salesman #
When this column is turned on, you will be able to enter a different salesperson number for each line on the invoice. This can be used if different salespeople may take orders from a customer that all go on one invoice. In this situation, the sales will be credited to the salesperson entered on each line item instead of the salesperson # entered in the top section of the invoice.
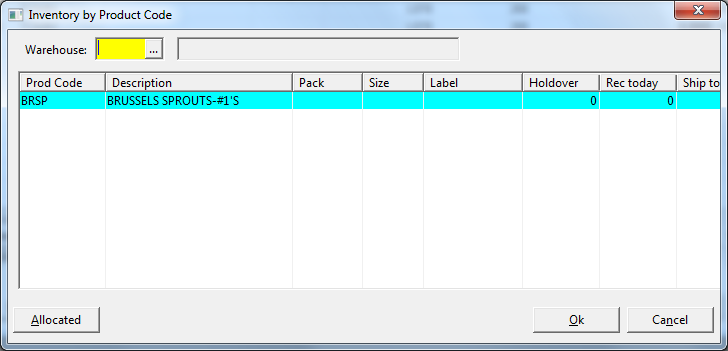
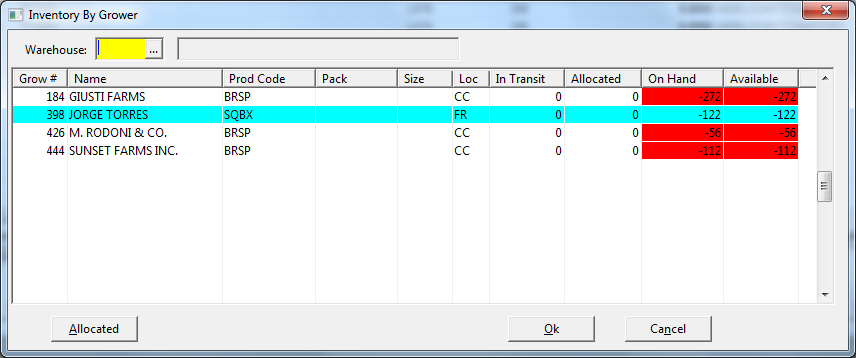
Checking Inventory Balances
When entering line items, you can check inventory balances by using the inventory lookups and select the product code and/or grower and/or lot number from the inventory lookup.
To access the master inventory balance lookup (totals by product code) press [F11]. This lookup will show the quantities in transit, allocated (ordered but not shipped yet), balance on hand and balance available to sell for each product code (and pack style and size, if applicable).
To view inventory balances by product code and grower, press [F12]. This lookup displays the amount available for each grower and product code.
To view inventory balances by lot number, press Ctrl+L.
Printing the Load Sheet
Once you have entered all of the necessary information, you can print a “Pickup” Load Sheet for the order by clicking on the Print button in the lower left corner of the Invoice Entry window. This Load Sheet is designed for situations where the trucker will be picking up the produce from other shippers, so it there are some differences with the Load Sheet that prints from the Order Entry window, which is designed for shipments originating from your own warehouse.
-
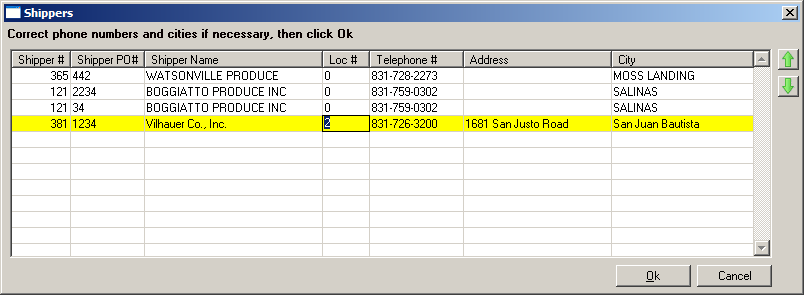
First, the Invoice Load Sheet will group product by shipper, and print a heading above the product that includes the shipper name, city, address (if entered), phone #, and order #.
-
In addition, before the Load Sheet is printed, the program will display a dialog that lists the shippers and allows you to edit the telephone numbers and city for each combination of shipper/order number. This is done so that if you are buying produce from shippers who have multiple warehouses in different cities, you can specify which location the product needs to be picked up from. The information you enter on this dialog will be printed on the Load Sheet.
Before the Load Sheet is printed, the following window will appear for you to review and edit if necessary the information that will be printed for each shipper:

You can make corrections to the telephone number and city on this window before printing the Load Sheet. If you have a specific route or pickup order that you want the trucker to use, the buttons on the right can be used to reorder the shippers in the list by moving the currently selected line up or down. You can also hold down the Alt key while pressing the up or down arrow keys to move the current line up or down. The Load Sheet will print the shippers in the same order that they are shown on the screen.
If you want to have the warehouse address printed on the Load Sheet, you can also type it in. You can also set up a list of shipping locations for each vendor account on the Vendor Entry window. When you have set up shipping locations, you can press [F4] on the shipper list to get a lookup list where you can select which location to pick up the produce from:
The information on the grid will change according to the shipping location you have selected:
New location information can also be entered and saved from the Shipper List. In the example above, entering “4” for the Location # and entering the phone #, address and city for another warehouse would add that to the Shipping Location list for the Vilhauer Co. vendor account.
The Print menu also has an option to email the Load Sheet. By default, the program will address the email message to the email address on the truck broker vendor account. If you have the Load Sheet set to preview instead of print directly to the printer, another way to send the Load Sheet via email is by clicking on the email button in the Print Preview window.
Once an Order is Shipped
Just as on the Order Entry window, you can print a passing (Notification of Shipment) and/or fax the passing to your customer. Click on the Print button and select either the Print Passing or Fax Passing option.
If produce is being sold to a customer in , you may also need to print the Canadian Confirmation of Sale form. Currently this must be printed on preprinted forms on a dot matrix printer. (Future versions will print the form and fill it out on blank legal size paper.)
Reversing Invoices
An invoice that has been finalized may be reversed. A reversal is simply a return which is created automatically for you by copying the original invoice. Unlike a return, however, a reversal will not appear on a grower statement.
The reversing entry will be assigned the original invoice number plus .01. If the invoice is also rebilled, the rebilled invoice will be assigned the original invoice number plus .02.
However, if these invoice numbers have already been used, the program will skip to the next available number.
To reverse and rebill an invoice that has been finalized, first enter the order number, and the invoice information will be displayed. Then click on the Reverse button. The following window will appear:
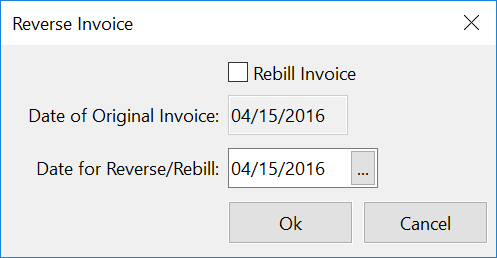
Rebill Invoice
If the invoice you are reversing has no payments, you have the option of rebilling or not rebilling it.
If the invoice that you want to reverse has a payment, you will need to rebill it. The program will transfer the payment from the original invoice to the rebilled invoice.
Date for Reverse/Rebill
Normally the return that is created should have the same invoice date as the original invoice. If for some reason you want to use a different date, enter it here. If you are rebilling the invoice, the rebill will also use this date.
Click on the Ok button to reverse the invoice. If you are also rebilling the invoice, the rebill will then be displayed in the invoice entry window and you can then edit it.
Click Cancel if you decide not to reverse the invoice.
When the reversal and rebill entries are created, they are both unfinalized. This means that they will be printed with other invoices in the current batch (both proofs and finals). They must be printed as finals to post to the sales journal and update your accounting totals.