Work In Progress Accounting
The Work in Progress option allows you to defer recognizing expenses by posting all expenses into a Crops In Ground/Work In Progress account in the Assets section of the General Ledger Chart of Accounts. Expenses can be recognized at a later date (such as when a field is harvested or when income is received) by running a report to post all or a portion of the expenses to the actual expense accounts. Doing so credits the Crops In Ground/Work in Progress account for those same amounts.
This section is meant to cover all aspects of WIP Accounting, whether you are switching over your accounting method, getting started for the first time, or converting over from another accounting software.
Key Concepts
You can have both regular Costs Centers (where expenses are immediately recognized) and WIP Cost Centers (where expenses are deferred). However, you will need to indicate in the program which Cost Centers are WIP Cost Centers.
All expenses for WIP Cost Centers go into one (or more) Crops In Ground accounts. At some point these expenses must be pulled out of Crops In Ground account(s) and posted to the correct expense categories. The key to this is the Job ID that is entered on each transaction. The Job ID tells the program where the ultimate expense account destination is for that transaction. That means that each Job ID can only point to one G/L expense account.
If you are currently recognizing expenses immediately, a conversion process is going to be needed to switch to a WIP system. Depending on how you have been using the software, this may involve changes to your Job IDs, chart of accounts, setting up WIP balance(s), and converting existing expense transactions to the WIP method.
The WIP G/L Account(s)
At a minimum you need a “Work in Progress” account in your chart of accounts in the Assets section. This may also be referred to as “Crops in Ground” or you may have your own terminology. (The two terms may be used interchangeably in these instructions.) This account is where all of your expenses will sit until you are ready to expense them. The expensing process will credit Crops in Ground and debit the various expense accounts.
It is possible to use multiple Crops in Ground accounts. There are three methods for doing this, depending on your requirements.
If you are using only one G/L Account, normally it will be entered for the WIP G/L # on all of your Job ID’s. However, it is not necessary to use the same WIP G/L # on all Job ID’s. If the way your Job ID’s are set up provides a natural division for using multiple Crops in Ground accounts, you may have different WIP G/L #’s entered for your various Job ID’s.
Another method of setting up multiple Crops in Ground accounts is by Commodity. For instance, a farming operation that grows both vegetables and strawberries might have a separate Crops in Ground account for each. In the Commodity/Variety table, you can enter the WIP G/L # for each commodity. For this method to work, you must enter a WIP G/L # for each commodity - unless you have some commodities that are used on Cost Centers that are not WIP Cost Centers. Additionally, in the Job ID set up you would not enter a WIP G/L #. If a WIP G/L # is entered in the Job ID file, then it will take precedence over the WIP G/L # defined by the Commodity file.
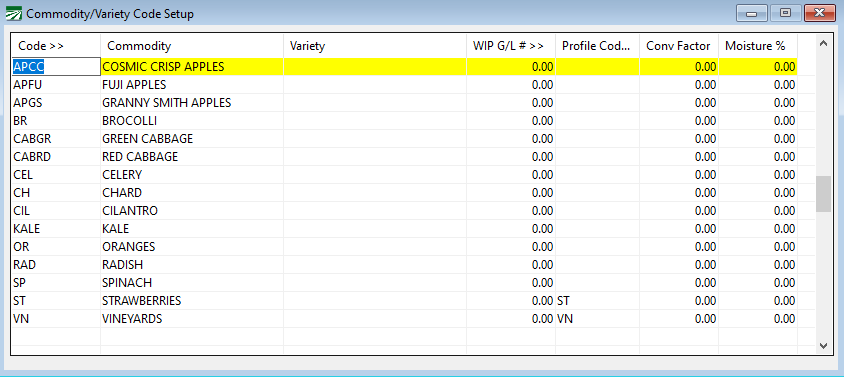
This method allows you to use the same Job ID for different commodities even though they may be posting to different WIP G/L accounts. Otherwise it would be necessary to set up a complete set of Job ID’s to use with each commodity, resulting in multiple duplicate entries.
The third method for specifying a WIP G/L # is based on location. A large farming operation that is spread across multiple ranches/locations may want to have multiple Crops in Ground accounts for each location. In this case, the WIP G/L # will be assigned to each individual Cost Center. As was the case in the second method noted above, the WIP G/L # should not be assigned to the individual Job ID’s; doing so will override the WIP G/L # specified by the Cost Center.
Transaction Entry Modifications
Together the Cost Center and the Job ID that you enter on payroll and payables transactions determine which General Ledger account is used as a default. This required a change to the order of the columns on transaction entries. Previously, The Farmer’s Office had a setting that allowed you to swap the ordering of the Job ID and the G/L # columns (or turn off the Job ID column entirely if Job IDs were not being used). No matter which option you selected, the Cost Center entry was always after these two entries. For WIP accounting, it would not work to have the user enter the G/L # before the cost center has been entered.
An option has been added to this setting that will place the Cost Center ID (and Crop Year) columns first, then the Job ID and the G/L # columns. This is located under Tools > Program Setup > Farm.
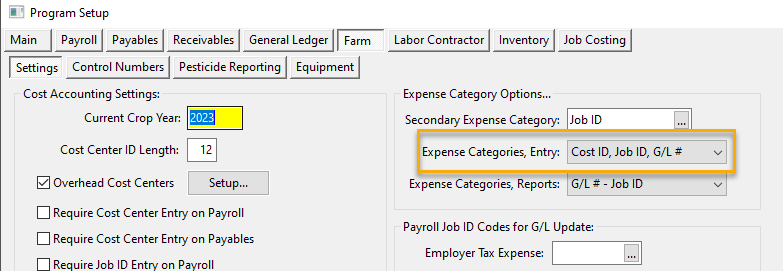
This setting will affect the Daily Payroll Entry, Batch Payroll Check, Direct Expense Vendor Check, Vendor Invoice, Farm Deposits, Miscellaneous Charge, Inventory Transaction, and Cost Accounting Transaction windows. Two examples are shown below:
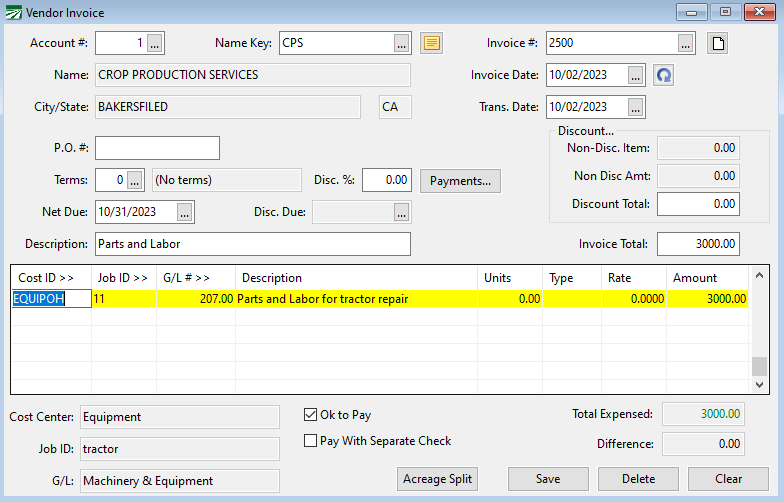
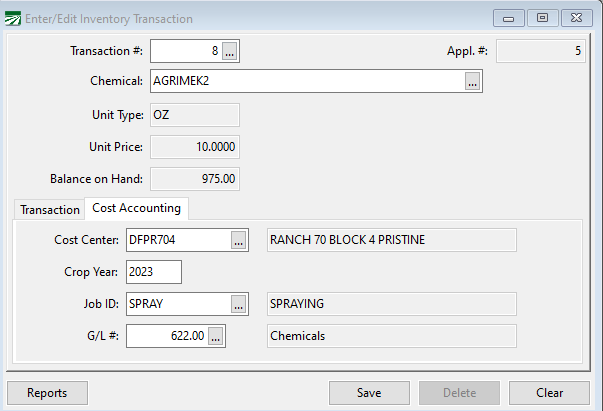
Now when you enter payroll, payables or inventory transactions, the program is able to determine the correct G/L # to use based on whether the cost center is a WIP cost center or not.
WIP Cost Center Features
A setting has been added to the Crop Cost Center file for Work In Progress.
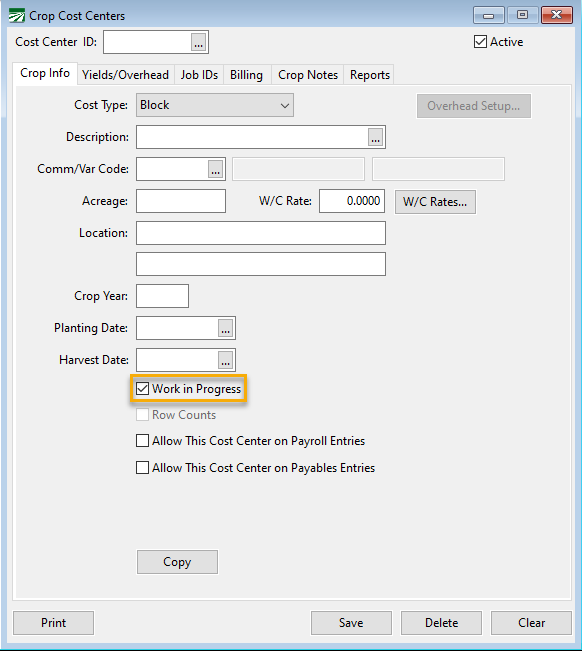
When a Cost Center has the Work in Progress box selected, the system will use the WIP G/L # defined on the Job ID instead of the expense G/L # as the default G/L #. You can edit the WIP G/L # for existing Cost Centers, and when you set up new Cost Center be sure to select the right WIP status for that Cost Center.
For instance, you might have both row crops where you use WIP accounting and permanent crops (vines/trees) where you do not. Or you may have overhead Cost Centers where you put expenses that should stay on the expense side of your financial statements.
An option has been added for quickly editing the WIP status as well as a few other items in the Cost Center file. When you are on the Crop Cost Centers window, press the [F12] key and the following window will open:
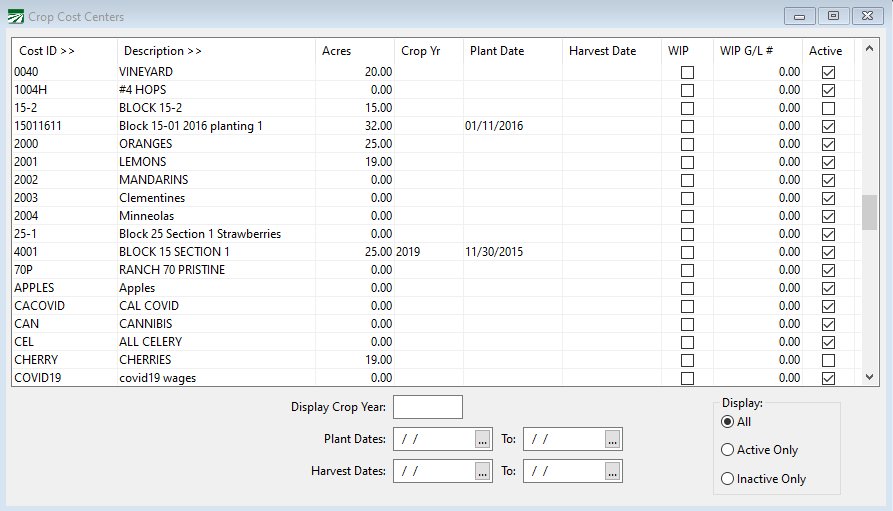
Using this window you can quickly edit the WIP status on all Cost Centers (as well as the information in any of the other columns). At the bottom of the window are entries where you can select which Cost Centers will appear in the grid by entering a Crop Year, Plant and Harvest Date ranges, and selecting All/Active/Inactive Cost Centers.
If you are doing location-based Crops in Ground G/L accounts, you can also use this window to enter the appropriate WIP G/L # for each Cost Center.
WIP Job ID Conversion
Part of the conversion to a WIP method of expensing involves creating new Job ID for combinations of Job IDs and G/L accounts that have been used in the past or may be used in the future (of course, you can always set up new Job IDs as you go along). The reason for this is that under a WIP system, all expenses get placed into one General Ledger account in the Assets section. When it is time to expense a field, the program will use the Job ID on the transactions to determine what the correct accounts are for posting the expenses. This means that each Job ID must now be associated with only one general ledger expense account. Otherwise the program has no way of determining what dollar amounts should be posted to which expense accounts.
In the accompanying list of Job IDs, all of the various general ledger accounts used in combination with each Job ID have been highlighted. (Ignore the 99999.00 accounts in this list; these are transactions from Famous that do not affect the WIP setup.)
-
Determine which Job ID’s are WIP Job ID’s. There may be Job ID’s you only use with overhead, equipment or other non-WIP Cost Centers.
All Job ID’s that will be used on WIP Cost Centers must have a G/L # entered for the WIP G/L #. A WIP G/L # on a Job ID that is not used for WIP Cost Centers will not have any effect. To set up the same WIP G/L # on all Job ID’s, enter your WIP G/L # in the Job ID Setup window and press F12 to copy this to all other Job ID’s.
-
For WIP Job ID’s, if there is only one G/L # used with that Job ID, nothing needs to be done, although you may want to change the Job ID ID to be consistent with your other Job IDs. Exception: if you have a Job ID that only has contract labor, and you might in the future have your own employees perform that task, you may want to set up the Labor and Tax overhead Job IDs as described below.
-
For Job ID’s that are used with multiple G/L #’s, individual Job ID’s need to be created for each G/L #. We suggest using the original Job ID and adding 1 or two letters to it for each new Job ID that needs to be created. Labor Job ID’s need to have a Payroll O/H Job ID selected.
-
Where there was once one Job ID (and thus one total that prints on your crop reports) there will now be multiple Job ID’s, and multiple totals for each of the new “sub-Job ID’s”. This will result in more detail than you had before. You can use the Groups feature to combine the new Job ID’s that will be used and get the same “subtotal level” for your expenses as before.
In addition to setting up and assigning group IDs for the new Job ID’s, groups will need to be set up for all Job ID’s. So while you may only have one Job ID for Utilities (because it is only used with one G/L #) you do need to have a group set up for Utilities so that it will still print correctly on the cost accounting reports. -
There is already a series of Job IDs set up for the payroll tax overhead in the 400’s. You can renumber these Job IDs to use them for the overhead Job IDs.
Job ID Conversion Example
Job ID 100 is set up for Planting. It is used with five different General Ledger accounts. Start by creating a new group 100 for Planting:

Job ID 400 is the Planting Burden Job ID:
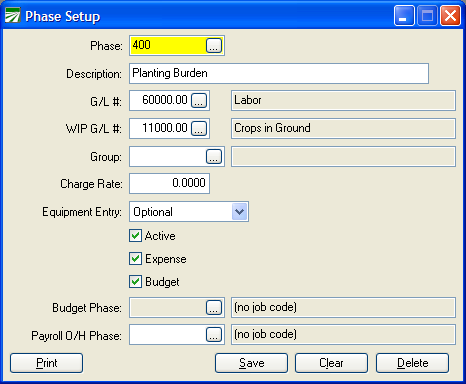
Currently this Job ID is not used for anything. We are going to “cannibalize” it though, because we do need a Job ID for the payroll tax overhead. Instead of setting an entirely new Job ID up, this one can be used. Change the Job ID ID from 400 to 100T, assign to group 100, and save it. Next enter a new planting Job ID for labor, under “100L”:
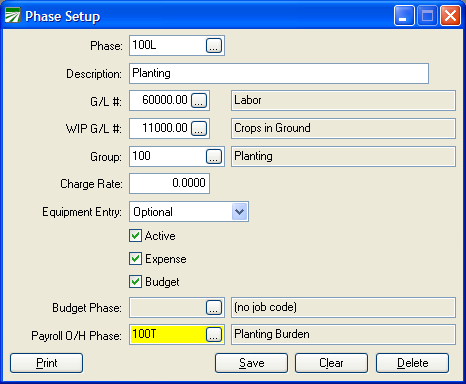
The Job ID ID is “100L” (to indicate planting labor), the expense G/L # is 60000 (the Labor account), the Job ID is assigned to group “100” and “100T” is entered for the Payroll O/H Job ID at the bottom. Next, enter new Job IDs for the other G/L numbers that are used with the Planting Job ID. The final list of replacement Job IDs for the original “100” Job ID looks like this:
|
Job ID ID |
Description |
Exp. G/L # |
WIP G/L # |
Group |
Payroll O/H |
Active |
|---|---|---|---|---|---|---|
|
100 |
Planting (original Job ID) |
60000.00 |
N/A |
100 |
|
N |
|
100C |
Planting, Contract Labor |
60200.00 |
11000.00 |
100 |
|
Y |
|
100F |
Planting, Fertilizer |
60800.00 |
11000.00 |
100 |
|
Y |
|
100L |
Planting, Labor |
60000.00 |
11000.00 |
100 |
100T |
Y |
|
100S |
Planting, Outside Service |
62600.00 |
11000.00 |
100 |
|
Y |
|
100T |
Planting, Payroll Taxes |
61800.00 |
11000.00 |
100 |
|
Y |
Note that the labor Job ID 100L (the only one used with payroll) is the only one that needs the Payroll O/H Job ID entered. When the Payroll Journal is updated to the General Ledger, the report will post all of the labor for planting under 100L (what you entered on the check entry window) and the payroll tax expense transactions that is generated will be posted under the 100T Job ID. In both cases, the program posts to 11000.00. When the expense are finally generated, the program will pull the labor out of 11000.00 and expense it to 60000.00, and pull the payroll taxes out of 11000.00 and expense it to 61800.00.
The original Job ID “100” can also be assigned to group “100” and should be inactivated, so that it won’t be used on future entries. (It needs to be retained because it was used on prior year entries.) By assigning the original Job ID to the new group that you have set up, you retain the ability to compare expenses from a prior crop year to another because for both groups you can “roll up” the expenses to the group level, and included everything whether it was originally expensed to the old Job ID under different G/L numbers, or to the new Job IDs using the WIP system.
Also, you do not need to enter a WIP G/L # on the original Job ID. During the conversion process for setting up your new Job IDs, if a transaction is posted to a WIP cost center using one of your old Job IDs that does not have a WIP G/L #, the program will continue to use the expense G/L # default as it always has. This can be corrected later by running the WIP Conversion report.
Of course if you post a transaction to a WIP cost center using one of the new Job IDs, the WIP G/L # that you enter will be used as a default.
How to Discover Job ID and G/L # Combinations
To find out which Job IDs and G/L accounts have been used together on past transactions, use the Cost Accounting Export option to export transactions to Excel. Once in Excel create a pivot table from the exported data, placing the Job ID and G/L # in the row fields area, and the Amount in the data items area. The following screen shots show how to create the pivot table.
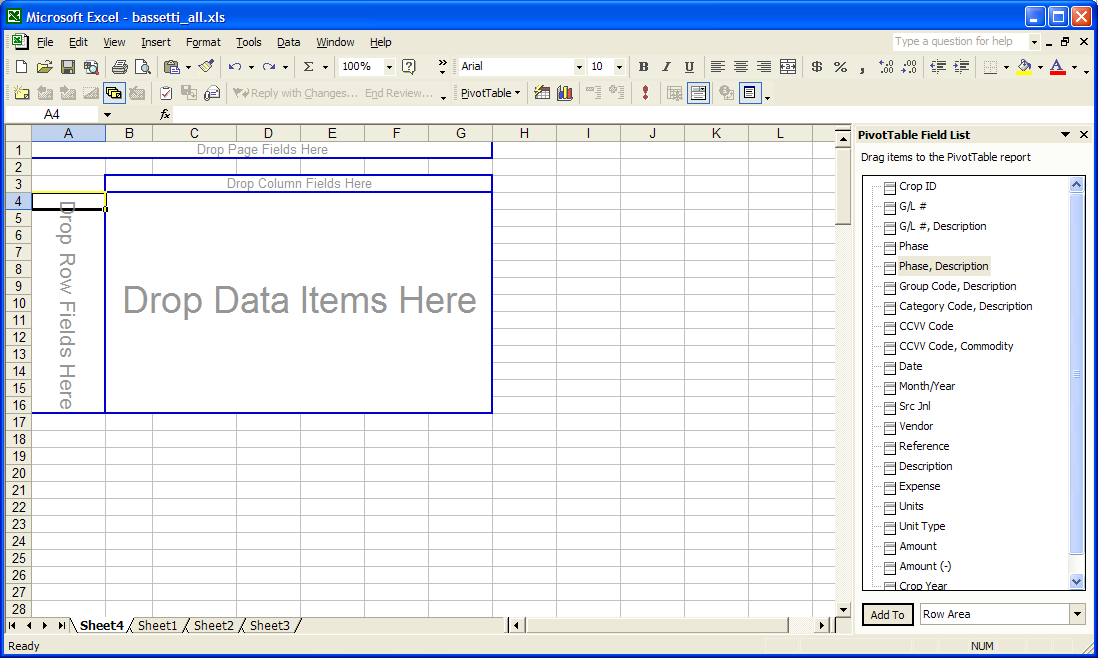
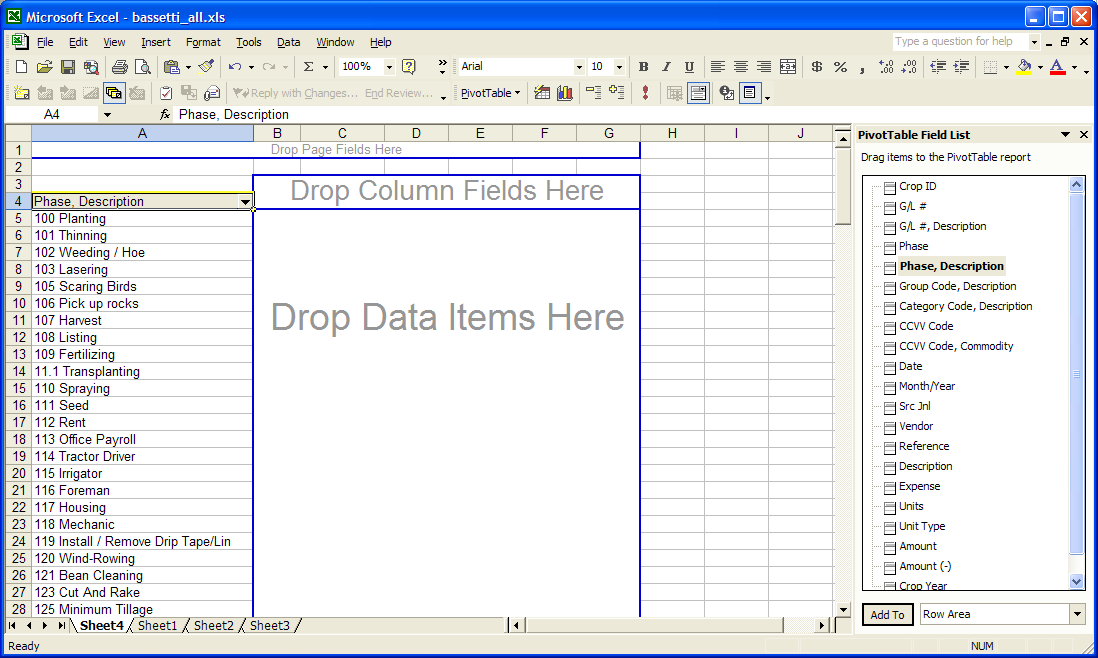
First, drag and drop the Job ID, Description field to the Row Fields area:
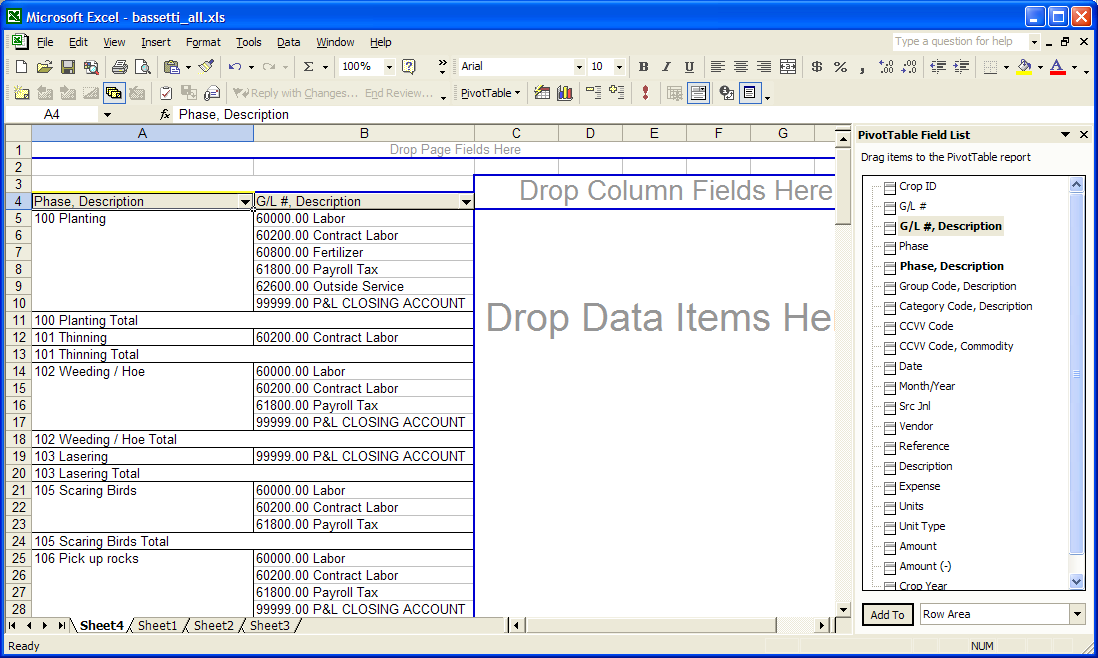
Next, drag and drop the G/L #, Description to the Row Fields area (drop it just to the left of the blue line separating the Job ID ID/Descriptions from the Data Items area):
Finally, drag the Amount field from the list of fields to the Data Items Area:

You can now print a copy of this sheet to get a list of all of the G/L numbers that were used with each Job ID.
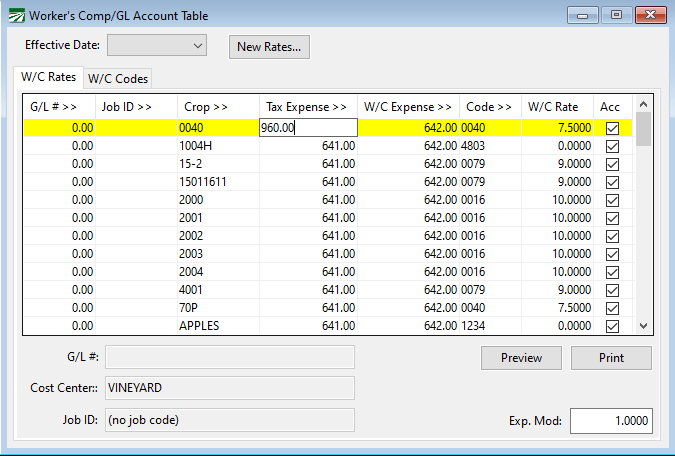
The Worker’s Comp/GL Account Table is not only used to determine the Worker’s Comp rate, but also to determine the General Ledger account to post payroll overhead items: payroll tax and Worker’s Comp expenses (if Worker’s Comp is accrued).
If you have been expensing payroll tax and/or Workers Comp, your Worker’s Comp table will need to be changed from the expense account(s) to your crops in ground account.
To access the table, go to Payroll > Setup > Worker’s Comp Table.
You should review your Worker’s Comp table prior to making any modifications to it. If you have Worker’s Comp classifications that post to different General Ledger accounts, make a note of these, or print a copy of the table for reference. For instance, you might have office workers or shed employees that have the payroll overhead posted to different accounts. You may not want this type of labor to be handled through the WIP G/L account.
If you Worker’s Comp table has a lot of entries, there is a shortcut for modifying all of the entries at once. Enter the WIP G/L # for the Tax Expense and the W/C Expense accounts on one line and save it, as shown above. With this line highlighted, press Ctrl + G to copy these accounts to all of the other lines in the table. Once that is done, you can go back to entries in the table that should not be posted to the WIP G/L # and change them back. (There will typically be fewer lines where you need to do this than lines where you need the WIP G/L # applied.)
You will need to determine a date to start the WIP method of expensing. This can be the start of a fiscal year, or the starting date of a month.
A balance for the current value of the Crops in Ground at that point needs to be determined. This balance can be posted to your Crops in Ground account and offset to a P&L account (essentially moving the expenses that have been recorded so far for the crops in ground from the expense side of the P&L to the Assets section of the Balance Sheet). This can be done with a manual journal transaction.
Posting WIP Entries from the Harvest Log
A new checkbox has been added to the Harvest Log window to indicate whether or not the WIP entries have been generated or not:
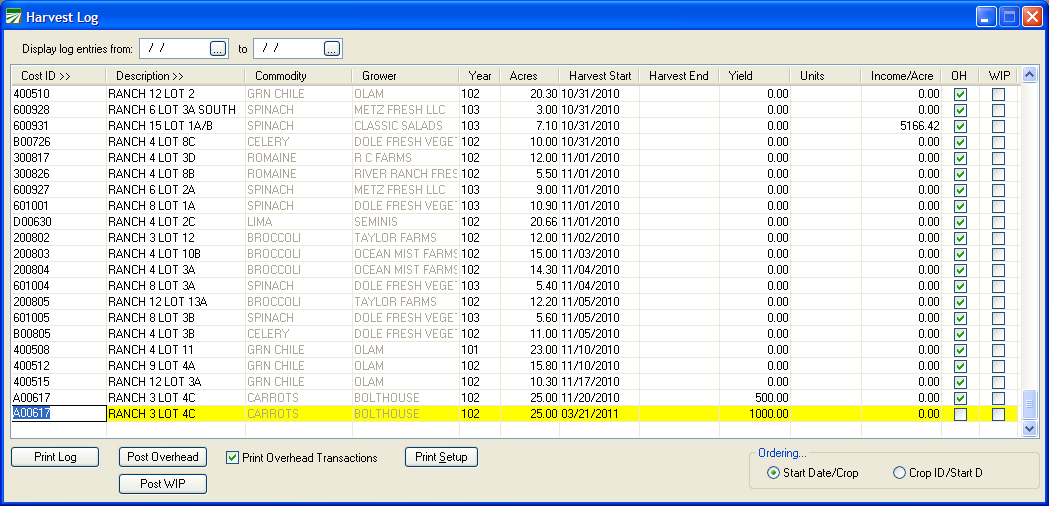
To post WIP entries for a field that has been harvested, highlight the entry in the Harvest Log window and click on the Post WIP button at the bottom of the window. This will open the WIP Posting window, select the Cost Center automatically, and generate the WIP entries.