Checkbook Register
All vendor checks, deposits, transfers, voids and miscellaneous transactions are entered from the main Checkbook Register window. Go to Payables > Checkbook.

You can click on any of the buttons at the bottom of the window to open any of the transaction entry windows. These are the types of transactions you may enter:
Expense Check
Direct expense checks allow you to enter, expense, and print a check all in one step. Direct expense checks are not used for vendor invoices that you've previously entered. For more information, see topic: Direct Expense Checks.
Payables Check
Payables checks are used to pay vendor invoices you have previously entered. For more information, see topic: Payables Checks.
Deposit
Use this to enter all deposits, including crop income and any other miscellaneous receipts or payments you receive. For more information, see topic: Deposits.
Transfer
If you have multiple bank accounts and transfer funds between them, use this option. For more information, see topic: Transfers.
Void
Use this to record checks that have already been entered as voided or to enter checks that are damaged, no good, or are not used for any reason. For more information, see topic: Void Vendor Checks.
Miscellaneous
Use this for bank charges, ATM withdrawals, POS/debit transactions, or other types of transactions that don't fit into the categories listed above. For more information, see topic: Miscellaneous Charges.
Misc. Payables
This type of transaction can be used to record payments for vendor invoices that are made via ACH, wire transfers, or other electronic means. For more information, see topic: Miscellaneous Payable Transactions.
Editing an Existing Transaction
If you need to make changes to a transaction, or simply want to view it, you can either double click on the transaction, or press [Enter] when it is highlighted.
Note You can view payroll checks and deposits entered through accounts receivable, but they cannot be edited.
Popup Menu
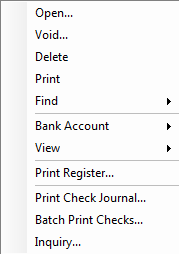
Right clicking on a specific line in the Checkbook Register will bring up a context menu with additional options and shortcuts. For instance, there is Void option that will bring up the Void Check window for either vendor checks or payroll checks. Or use the Delete option if you want to delete the entry entirely. You can also quickly reprint a copy of a check by selecting the Print option. Some of these options are not available for all transactions types, for instance, you can't delete or reprint a payroll check from the popup menu. You also cannot delete a deposit entry that was generated from the Accounts Receivable system.
Two columns can be turned on or off, depending your preference: the running balance and a checkbox column indicating whether or not a transaction has been cleared in the Bank Reconcilement window. A checkbox will appear next to these options in the popup menu to indicate whether the column is currently displayed.
The Bank Account sub-menu has options to change the bank account that is currently displayed, set up a new bank account, change the next check number, and update the bank balance. There's also an option to turn off the automatic updating of the bank balance. Turning this off can improve performance if you are entering a number of transactions which are back dated and there are a large number of transactions that need to have the running balance updated. When you are done entering transactions, you can manually update the bank balance and turn the automatic update back on.
Also, you can select the type of transactions that you want to view. Normally, all transaction types are displayed. But if you are looking for a particular deposit for instance, it may be helpful to display only deposits to make it easier to find. Use the View sub-menu to select which type of transactions to display.
Note When viewing only certain types of transactions, the running balance column does not really show a running balance because there are transactions missing. Instead, the amount in the running balance is really the ending balance after each transactions listed.)
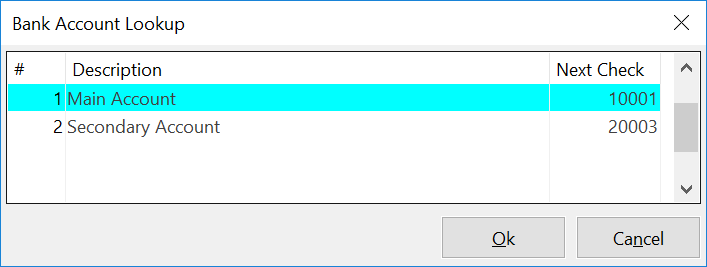
Switching to Another Bank Account
The Checkbook Register will display the default payables checking account when it is first opened. You can change the bank account that is displayed by clicking on the Bank # entry at the top of the window. You can type in the bank account to display, press [F4] or click on the lookup button to get the selection list:
Updating the Bank Balance
In the normal course of operation, the program will automatically update your running bank balance displayed in the rightmost column. In some cases however, you might need to manually instruct the program to recalculate the bank balance. If you notice that the bank balance does not appear correct, you can click on the running bank balance column heading. The following window will appear:

Enter a date to recalculate your bank balance from.
Finding a Specific Check # or Date
If you need to find a certain check #, or are looking for a transaction on a specific date, there is a quicker way to find it than just visually scanning the checkbook register. You can just type in the check number and the following window will pop up:

(If you are looking for a transaction on a specific date, just press the space bar, then press [Tab], and enter the date.)
When you click Ok, the program will search for the check number or date you entered and display it. If an exact match is not found (for instance, you are looking for a check you're not sure you entered, and it doesn't show up) then the closest match will be displayed.
Check Register Report
The Check Register is a list of all transactions in the selected bank account, including vendor checks, transfers, miscellaneous charges, payroll checks and deposits. The list includes the Date, Check Number, Vendor Name, Check Amount, and the Ending Bank Balance.
This is a useful report when tracking bank account balances and reconciling bank statements. It can be printed at any time, and you can select either a starting and ending date or a starting and ending check number.
A summary of totals by transaction type (vendor checks, payroll checks, transfers, deposits, etc) will be listed at the end of the report.
The following window will open when you click Print on the Checkbook Register window:
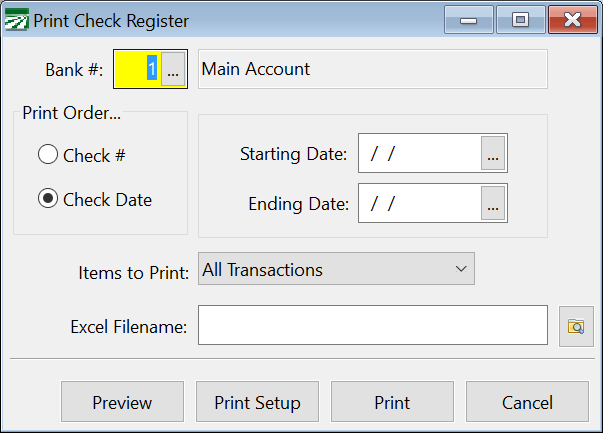
Bank #
Enter the bank account number that you want to print the report for. Press [F4] or click on the lookup button to get the bank account selection list.
Print Order
Select either Check # or Check Date. Depending on your selection, the appropriate box to the right will be activated.
Starting Check /Ending Check
When printing in check # order, enter the starting and ending check numbers here. Note that this type of report will generally not include deposits, transfers, or miscellaneous charges if they do not fall within the range of check numbers you enter.
Starting Date /Ending Date
When printing in check date order, enter the starting and ending dates here.
Items to Print
From the drop-down menu, select whether you want to print All Transactions or a specific type of transaction (i.e. vendor checks, payroll checks, etc.).
Excel Filename
To export the Checkbook Register Report as an Excel file, enter the filename and then click the browse button to select a location to where the file will be saved.