Daily Payroll Batch Report
The Daily Payroll Batch Report lists the gross wages, tax and miscellaneous deductions, and the net check amount for each employee. You may print this report for any pay period date range; if there are entries in the Daily Payroll file that are outside the pay period that you specify, those entries will not be included on the report.
This report is almost identical to the Batch Payroll Report in terms of the layout and information printed. In addition to generating a report with all of the check information, this option can also be used to create checks. This is a new feature that has been added for 2016 that provides improved performance over the older stand-alone Create Checks option.
There are multiple ways to open the Daily Payroll Batch Report window:
-
Payroll > Daily Payroll Entry > Daily Payroll Batch Report.
-
If you already have the Daily Payroll entry window opened, you can right click on the grid and then select Reports > Print Batch Report.
-
The shortcut key Ctrl+B will also work from the Daily Payroll Entry window.
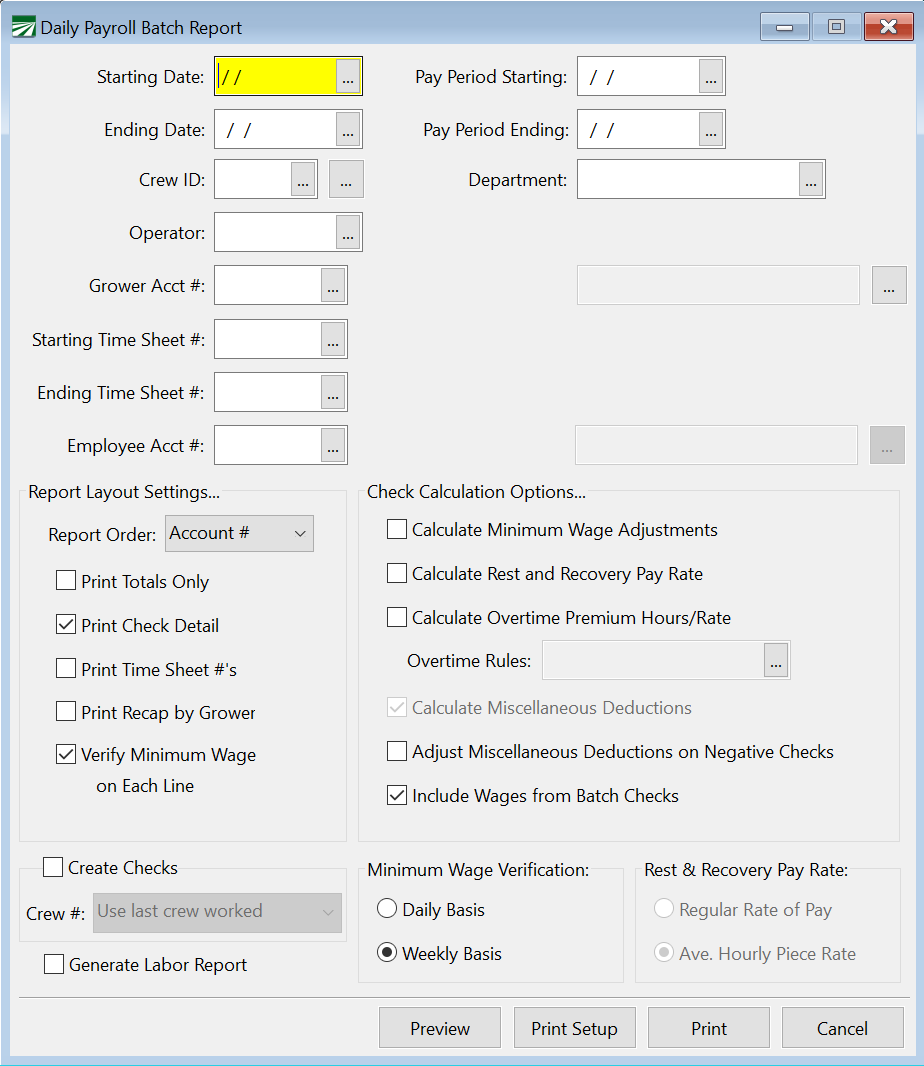
Daily Payroll Selection Settings
Starting Date / Ending Date
Select the entries to include on the checks. Any entries in the Daily Payroll file outside this date range will not be included.
Pay Period Starting / Pay Period Ending
This setting allows you to select a different pay period for your checks than the dates used to select the entries. This makes it possible to add back pay/missed pay items from prior pay periods while retaining the current pay period on the check that is created.
For example, what if you are doing payroll for the pay period of 12/7/20-12/13/20, but also have back pay from 12/1/20?
You would enter the starting and ending dates as 12/1/20-12/13/20, then the pay period as 12/7/20-12/13/20. This will create checks with the back pay, while maintaining your current pay period.
The Pay Period should always correspond to the current pay period the employee is being paid for, wheather it is weekly, biweekly, etc. But the starting and ending dates for selecting the daily payroll entries can be more expansive to include back pay entries when needed.
Note There may be instances when employees have a biweekly pay period and a check already exists in the batch that has pay period dates that are different from what is used on the Daily Payroll Batch Report. When this is the case, the program bases the application of biweekly overtime rules on the pay period dates entered in the Daily Payroll Batch Report window. Click here for more information about applying overtime rules.
Crew ID
If you only want employees on a specific crew printed, enter the crew number here. Otherwise, leave this entry blank to print all crews.
You can also select multiple crews by clicking the button to the far right of the Crew ID entry. Select your crews and click Ok. The entry will then show ‘Mult’.

Department
You can enter a department description or select the department from the lookup to print a report that includes only the employees assigned to a specific department. Otherwise, leave this entry blank to include all employees.
Operator
If you have multiple users entering daily payroll information, you can print a separate report for each user by entering their user name here. Otherwise, leave this entry blank to print all daily payroll entries regardless of who entered them.
Grower Acct #
If you want to print a report that includes only entries for a single grower, enter the grower's account number here or use the lookup to select a grower account. If you leave this entry blank, the report will include entries for all growers.
To select multiple grower accounts, click the Multi-Select button to the right side of the Grower Acct # entry.

Starting Time Sheet # / Ending Time Sheet #
You can enter starting and ending time sheet numbers to include only the entries for those time sheets. Otherwise, leave these entries blank to include entries for all time sheets.
Employee Account Number
You can print a report for a single employee by selecting the account here.
To select multiple employees at once, click the Multi-Select button to the right side of the Employee Acct # entry.

Report Layout Settings
Report Order
Select the order you want employees to be listed on the report. When you select crew # order, if an employee worked on multiple crews, the check will be listed under the last crew # that the employee worked under.
Print Totals Only
If this box is selected, the report will not print each individual checks. Only the totals for the entire report and the summary totals will be printed.
Print Check Detail
If this box is selected, the total wages and deduction amounts will be printed for each check, but the line items will not be printed.
Print Time Sheet Numbers
If this box is checked, the report will print the time sheet numbers to the right of the amount for each line item. If this box is not checked, then the Crew # will be printed in that position.
Print Recap by Grower
When this box is checked, the summary totals that print after the main report will be grouped and subtotaled by grower account.
Verify Minimum Wage on Each Line
When this box is selected, the report will check each line item by itself to see if the employee made minimum wage. If the employee did not make minimum wage on that line, an asterisk will be printed next to the amount.
Note This option does not affect the minimum wage verification at all. Amounts on some line items may make up for shortfalls on other line items, which will affect the total minimum wage adjustment that is needed.
Check Calculation Options
Calculate Minimum Wage Adjustments
When this box is selected, the program will perform a verification for all piecework wages to make sure that employees are paid at the minimum legal hourly rate. Any wages that have been entered that are subject to a guaranteed minimum hourly rate will also be checked. The report will create and print adjustment line items to bring employee pay up to the legal minimum or guaranteed minimum hourly rates.
When the Create Checks box is selected, this box will be checked automatically.
Calculate Rest and Recovery Pay Rate
When this box is selected, a regular rate of pay calculation will be performed and applied to any wages paid for rest an recovery periods. The calculation will be performed according to the Rest & Recovery Pay Rate option that is selected in the bottom right corner of the window.
Note A semi-monthly pay period is not the same as a Bi-weekly pay period.
Semi-monthly is two checks a month (usually 15-16 day pay periods) = 24 checks a year.
Bi-weekly is a check every two weeks (14 day pay periods) = 26 checks a year.
The state doesn’t specifically mention bi-weekly, but is clear in other sections that the breaks have to be paid based on the weekly average, not pay period. This means if your pay period is bi-weekly, the program will calculate and adjust the rates separately for each week
Calculate Overtime Premium Hours/Rate
When this box is selected, you must select one of the overtime rules to apply to checks. The overtime rules will be used to determine how many hours of overtime each employee is due, and one or more overtime premium lines will be created to pay employees for their overtime hours.
Note When issuing a correction on Overtime Premium through the Daily Payroll Batch Report, this box should not be selected. Doing so would delete the Overtime Premium lines since there are no other wages.
Additionally, the Daily Payroll Batch Report can calculate overtime payments to employees for certain types of bonuses, including:
Flat Sum Bonuses paid for a single pay period. The regular rate of pay is calculated and paid separately from regular overtime payments per California rules based on the regular (straight) hours worked by the employee, rather than the total hours worked by the employee.
Production Bonuses paid at the end of the season. The regular rate of pay is calculated based on the total hours worked during the bonus period. Overtime is paid based on this rate for any overtime hours worked during the bonus period.
Flat Sum Bonuses paid at the end of the season. The regular rate of pay is calculated based on the total regular (straight) hours worked during the bonus period and additional overtime is paid based on this rate for any overtime hours worked during the bonus period.
Note Paying overtime for bonuses requires setting up additional wage types and defining the wage types to use in the overtime rules.
Calculate Miscellaneous Deductions
This box is normally selected and disabled. A security setting allows it to be enabled on an operator by operator basis. In some situations, you may need to deselect this box. For instance, if you are issuing correcting checks, you may not want normally scheduled deductions to be taken out (because those amounts were already taken out of the employees regular checks).
Adjust Miscellaneous Deductions on Negative Checks
If an employee has more miscellaneous deductions than wages after taxes, the net check amount may be negative. In this situation, the program will not print a check for negative wages and the check will be left in the batch after you print your payroll checks. When this option is checked, the program will adjust the amounts of the miscellaneous deductions, starting with the first deduction until the net check amount comes out to zero.
A zero check can be processed by the Print Payroll Checks option, so using this option will keep the check from being left in the batch.
Include Wages From Batch Checks
Each employee may only have one check in the payroll batch at a given time. If an employee has a check in the batch when this report is run, and this box is checked, then the entries that are already in the batch will be included on this report along with the entries from the Daily Payroll file. This will provide an accurate total of the employees check for when checks are created, because the entries in the Daily Payroll file will be combined with the entries that are sitting in the batch.
If you deselect this box, then the report will only include information from the Daily Payroll file. You may want this in some situations where you are comparing totals on this report to the totals on the Daily Payroll entry window or form other daily payroll reports, which do not include any information from the current check batch.
Minimum Wage Verification
Select either Daily or Weekly. Wages will be added up for the period selected and adjustments if needed will be generated either for each day or for the entire week.
The Weekly option may result in adjustments being create with smaller amounts than the Daily option. This is because wages that exceed the minimum wage on one day could offset a shortfall on another day.
When the Daily option is selected, wages are added up separately for each day and checked to see if the employee made minimum wage for each day.
Rest & Recovery Rate of Pay
Select either Regular Rate of Pay (for California) or Average Hourly Piece Rate (for Washington state).
Create Checks Options
Create Checks
When this box is selected, the report will delete the entries from the daily payroll file and create entries in the Batch Payroll Check file. Any necessary minimum wage adjustments, pay rate adjustments for sick pay, rest and recovery, and overtime premium wages will be added to employees checks that are created.
Since the report can perform several calculations in one operation, you should find this more efficient than running individual reports to determine rest and recovery pay rates, overtime premiums, etc. and using the stand-alone Create Checks option.
Note When this option is selected, the program also automatically saves a PDF copy of the report in the Reports > PR > CreatedChecks folder under the data folder.
Crew #
Each payroll check created is assigned to a crew number. This crew number determines which crew the check prints out with when you print checks in crew number order (and by extension, which crew number the check prints on the Check Signoff Sheet). This setting controls which crew number will be assigned to the batch check entry that is created. There are four options available:
Always use employee crew #: This option will always use the crew # that the employee account is assigned to on the employee setup window.
Use first crew worked: This option will use the first crew # that the employee worked on in the pay period.
Use last crew worked: This option will use the last crew # that the employe worked on in the pay period.
Use employee crew # or last crew worked: This option will use the crew # that the employee account is assigned to, unless the employee is not assigned to a crew. In that case, the program will use the last crew # that the employee worked on for the check.
Generate Labor Report
Select this box to create entries in the Grower Labor Report file based on the information that appears on the report.
This can be used in place of the Generate Labor Report option that is available on the right click menu of the Daily Payroll Entry window. This way is faster and the batch report’s built in calculations for overtime premium, rest & recovery pay rate, and sick pay rates will all be factored into the entries created in the Grower Labor Report.
Creating Check Exceptions
The stand along Create Checks option will generate an exception report in several cases. The Daily Payroll Batch Report will generate a similar exception report, but it will simply add the exception information to the end of the main report document. Check the Preview window for exception information if you previewed the report. If you preview the report and then close the Preview window, the exception information will be lost.
Exception information includes the following:
-
Sick Pay Payment errors
-
A list of the employees and amounts required for minimum wage adjustments.
-
Employees that have deductions that are set to “Adjust Each Check”.
-
Employees that have zero or negative net check amounts.