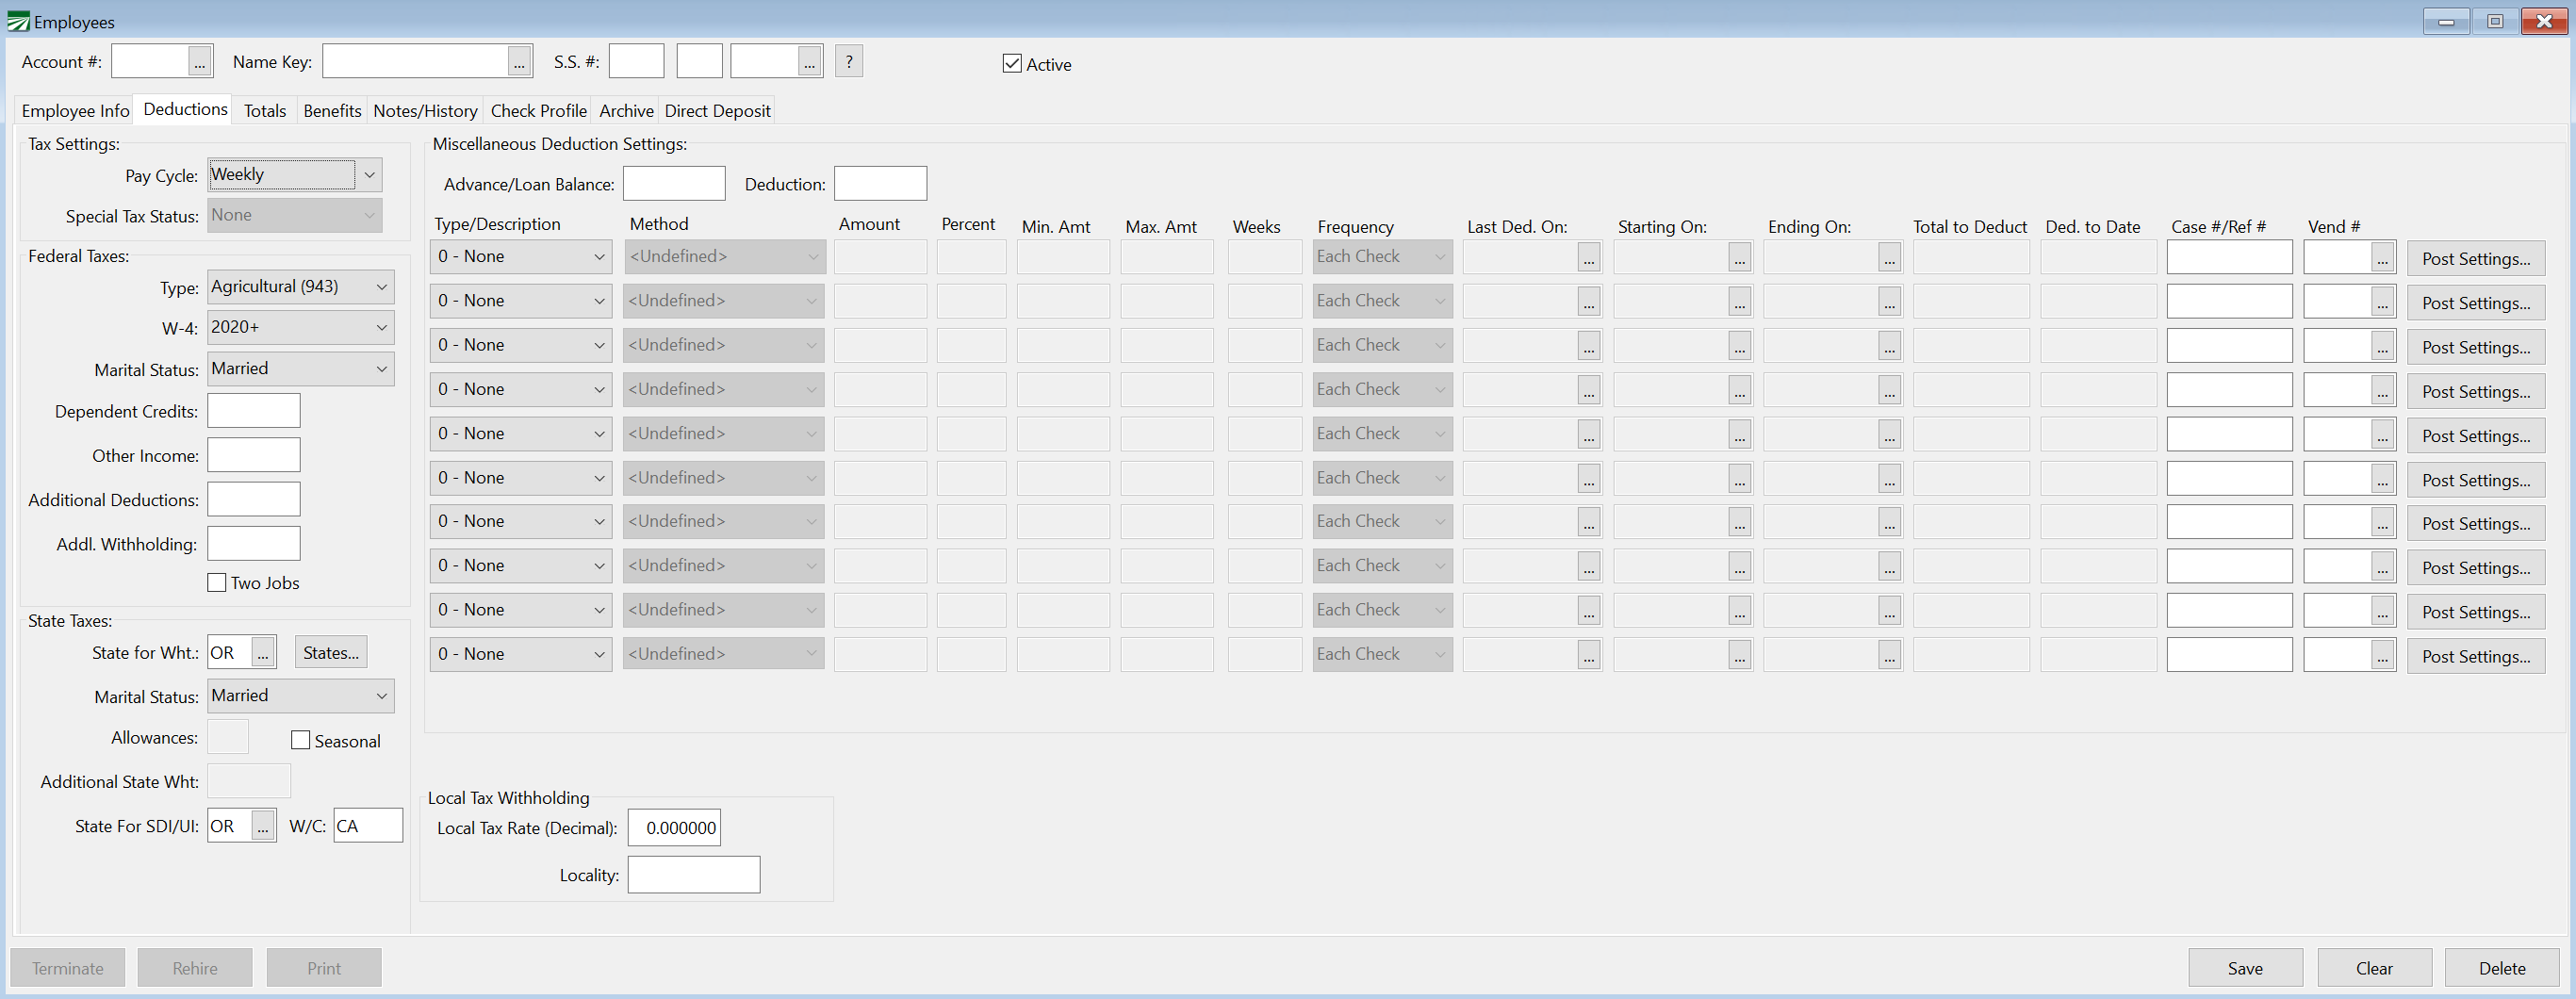
Deductions Tab
Setting Up Deductions
This tab page contains the settings for calculating federal and state tax deductions as well as miscellaneous deductions (for advances, child support, health insurance, garnishments, etc.)
Go to Payroll > Employees > Deductions tab.
Tax Settings
Pay Cycle
Select Weekly, Daily, Biweekly, Monthly or Semimonthly.
Special Tax Status
If the employer is a sole proprietorship, and this employee is either a child or spouse of the owner, select the Child or Spouse here. When set to Child, SDI, FICA, and Medicare are not withheld. When set to Spouse, SDI is not withheld. The unemployment taxes (SUI and FUI for the employer) are not calculated for both the child and spouse settings.
The default for this setting is "None".
Note If you do not have your company type set to Sole Proprietorship in the Program Setup, this entry will be disabled.
Federal Taxes
Type
Select either Agricultural (943) or Regular (941). This setting determines whether the employee will appear on the quarterly report (941) or the annual report for agricultural workers (943).
W-4
This entry corresponds to the old “Need W-4” checkbox that was on the Employee Info page. We have changed this entry to be one of four values:
2019/Prior: This option will need to be selected for employees hired before 2020 who are still using a 2019 W-4/prior. When you select this option, the program will display entries for the allowances and additional withholding.
W-4 Needed: The program will display this option on any employee account where you had selected the Need W-4 box. This indicates the employee has not provided a completed W-4 form to you.
2020+: This setting indicates the employee provided a completed W-4 from 2020 or later. When you select this option, the program will display entries for the four-dollar amounts and the Two Jobs checkbox.
Exempt: This setting should be used when the employee provided a completed 2020 or newer W-4 and indicated that they are exempt from federal withholding on line 4d of the W-4.
Marital Status
Select either Head of Household, Married, or Single. This is what the program will use to determine which withholding table to use for federal income taxes.
Dependent Credits
(Step 3): This will likely be the most commonly used amount for employees with children under 17. The employee will multiply the number of qualifying children by $2,000 and enter the dollar amount. Other dependents qualify for a $500 credit.
Other Income
(Step 4a): If the employee has other income that doesn’t have any tax withheld, the employee can enter the dollar amount of that income (or an estimate of the total other income) here. When calculating withholding amounts, the program will add other income to the employee’s wages to determine the total taxable income.
Additional Deductions
(Step 4b): If the employee will have itemized deductions, the employee can enter the total itemized deductions over the standard deduction here. The program will deduct this amount from the employee’s taxable income before calculating the withholding tax.
Additional Withholding
(Step 4c): Enter dollar amounts for additional federal withholding tax. This is the same as the additional withholding amount from the older W-4 form. The program will add this amount to the withholding amount it calculates based on the employees wages, dependent credits, other income and other deductions.
Two Jobs
Select this box if the employee selected that box in Step 2.
State Taxes
State for Withholding
Enter the state for calculating state income taxes. In general, this is the state of which an employee is a resident.
If you have the multi-state payroll option and the employee works in different states, the employee may be subject to state income tax withholding in those states. The income tax withholding will be determined based on the state in which the employee is working in. If the employee is working in a state that does not have an income tax, then the program will withhold state income tax for the state for withholding designated in the employee file.
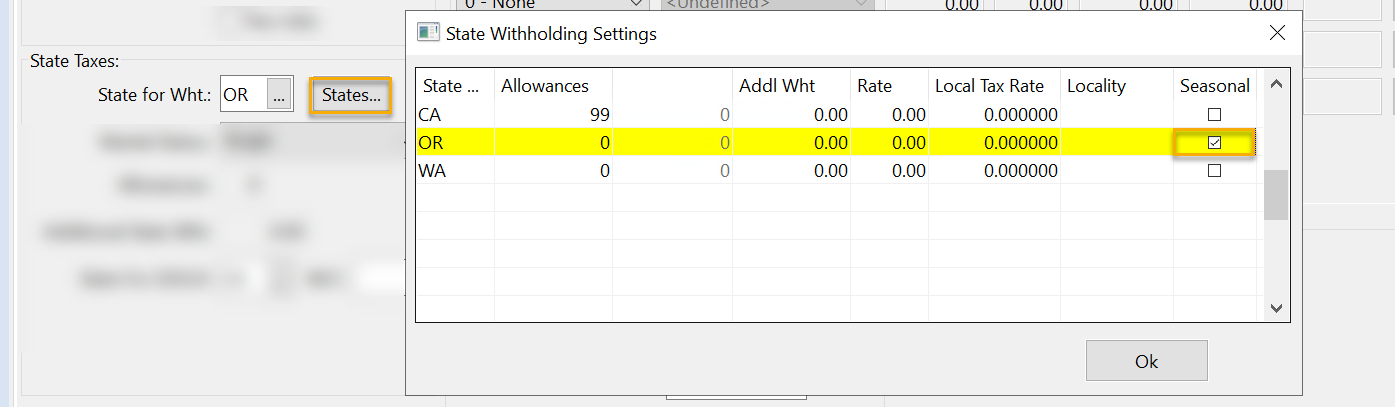
States
If you are a multi-state employer and the employee is a seasonal worker, you must mark them as seasonal in the specific state where they work. To do this, click States, then in the State Withholding Settings window that opens, and select Seasonal for the applicable state.
State Marital Status
Select either Head of Household, Married, or Single. This is used to determine which withholding table to use for state income taxes.
Exemptions
Enter the number of allowances claimed for state income tax purposes from the W-4 and/or equivalent state form (e.g. the DE 4 for California).
Additional Withholding
Enter dollar amounts for additional state withholding tax.
State Rate
For Arizona, enter the withholding rate for this employee. (This is a percentage of the federal income tax withheld.) For other states, this entry is disabled (the regular tax tables will be used for other states).
State For SDI/UI
Enter the state for the Disability Insurance and Unemployment Insurance. If you are a multi-state employer, it is possible that this state will be different than the state for withholding. (For California, see the EDD 231-D fact sheet for more information on determining the state for UI.)
State for W/C
Enter the state for worker's comp here. This entry will be available when the multi-state payroll option is enabled.
Note This entry was added because some states' payroll deductions are based on the worker's comp policy that covers the employees, e.g. the L&I deduction in Washington and the WBF deduction in Oregon.
State Taxes Washington
The following options will only appear when Washington State is selected.
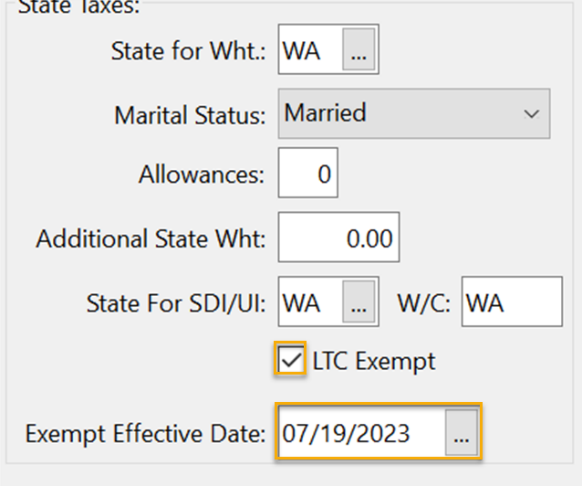
LTC Exempt (Washington State only)
Select this box if the employee has received an exemption from the Washington Long Term Care Tax.
Exempt Effective Date (Washington State only)
Enter the ‘effective as of’ date for the LTC exemption found on the exemption letter issued by the ESD. Normally this will be the first date of the quarter following the quarter in which the exemption is granted.
The program will continue withholding the LTC tax until the effective date is within the current payroll quarter.
When the effective date is in the current quarter and LTC tax has already been withheld, the program will refund any LTC tax withheld in the current quarter on the employee’s next check. This may be the case if the ESD is slow processing exemptions and issues a date with a retroactive date or an employee doesn’t provide you with the letter before the effective date.
The program cannot refund LTC tax withheld in a prior quarter.
Fed. Allowances/State Exemptions
Enter the number of allowances claimed for federal and state income tax purposes from the W-4 and/or equivalent state form (e.g. the DE 4 for California).
One trick that some customers have used in the past to withhold a fixed amount from each check is to enter 99 in the federal allowances entry and the total amount the employee wants withheld from each check in the Additional Withholding entry. The 99 allowances ensures that no tax is calculated as a result of the standard tax table calculations. This results in the program simply using the additional withholding amount for federal withholding.
This type of workaround can still work with the new W-4 settings. For instance, you might first determine the annual income tax withholding amount for an employee. Then enter an amount greater than that in the dependent credit entry to zero out the annual federal income tax liability calculation. Then enter the amount you want withheld in the Additional Withholding entry as before.
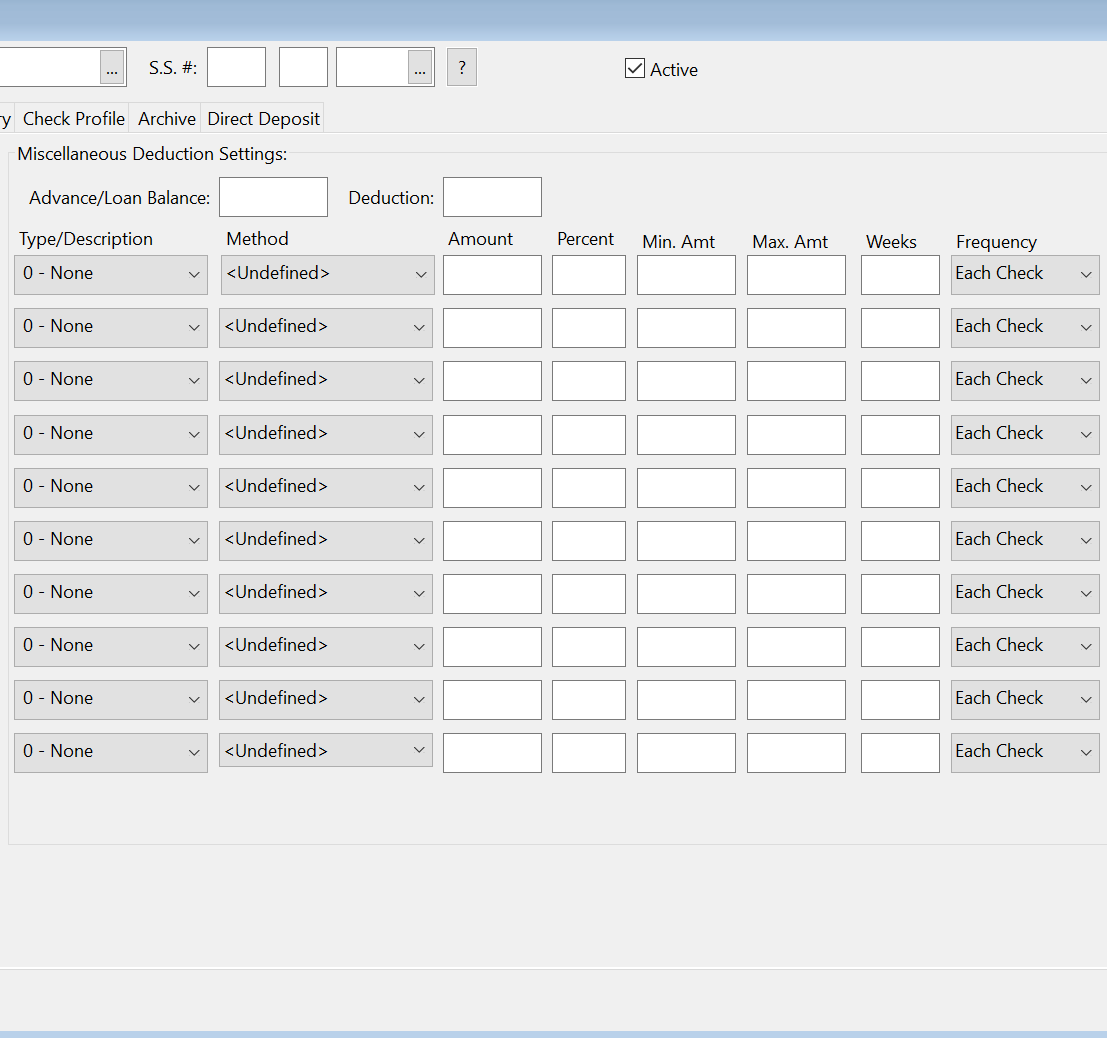
Miscellaneous Deductions
In this section, you can set up deductions for advances, loans, child support, withholding, health insurance, 125(c) and 401(k) plans, or any other non-tax deduction. The first two entries are used for advances/loans, and then ten entries are provided for user defined miscellaneous deductions.
Advance/Loan Balance
This is the current balance of the employee's loan. Normally you do not need to edit this, but you can manually set up a balance (for instance, if you gave the employee cash).
Deduction
This amount will be taken out of each of the employee's checks until the current loan balance is zero. (The loan balance is updated each time a check for this employee is printed.)
You can override the deduction amount for advances on the check entry window.
User Defined Deductions
Up to ten different miscellaneous (non-tax) deductions may be set up for each employee. These deductions may include garnishments such as child support, health insurance, etc. Deduction types are set up under the Miscellaneous Deductions option.
As soon as a check is entered, the miscellaneous deduction information on the employee account is used to calculate the deductions for that check. Editing the information on the employee account after a check has been created will not change the deductions that have already been calculated for that check. For instance, if you notice a deduction on a check that should not be taken, deleting the deduction amount from the employee setup will not remove it from check as well. The check needs to be edited through the Batch Check Entry window. Likewise, it you add a deduction on an employee account, that deduction will not be added to a payroll check that has already been entered. It will be necessary to delete the check and re-enter it.
Type/Description
Select the type of deduction. You can have up to 99 different deduction types. Deduction types are set up in the Miscellaneous Deduction window.
Method
Select the method to use for this deduction from one of the available options:
Flat Rate: A set amount is deducted on each check. You will enter the deduction amount in the Amount column. During check entry, you can override the amount you have entered here if needed.
Adjust Each Check: Similar to the Flat Rate option, but the program will remind you to adjust the amount of the deduction before you finish entering the check.
Percent of Gross: This setting will calculate the deduction as a percentage of the gross wages.
Percent of Net: This setting will calculate the deduction amount as a percentage of the net wages (gross wages less tax withholdings).
Percent of Net (-Misc): This setting will calculate the deduction amount as a percentage of the net wages less any previous miscellaneous deductions. This can be useful in a situation where you have two child support orders, and the second one must be calculated as a percentage of the net wages less the first order.
It can also be used in situations where a deduction is based on the employee’s disposable income, which may be calculated after taking out certain deductions. In this situation you must set up any miscellaneous deductions that are factored into the disposable income calculation first, then add the deduction using this method immediately after.
Per Hour: Enter the amount to deduct per hour worked in the Amount column.
Percent of IRA Wages: This option will calculate the deduction based on the total wages on the employee check that are used to calculate the employer’s contribution to an IRA/401(k) plan. If you have some wage types set up for mileage, meal(s) or other types of reimbursements, these wage types will not have this setting enabled so that the employee deduction amount calculation will not include these in the total wages.
Percent of Union Wages: This option may be used by labor contractors with employees that may or may not work under a union. This is normally determined by which grower(s) they are working for. A union checkbox on the grower setup window indicates the union status for each grower. The Calculate Union Deductions Report must be run to calculate the union deduction amounts before checks are printed.
Flat w/Percent Gr Cap: This option will deduct a flat amount unless the specified percentage of the employee’s gross wages is less, in which case the program will deduct the lower amount based on the percentage.
Flat w/Percent Disp Cap: This option will deduct a flat amount unless the specified percentage of the employee’s disposable wages is less, in which case the program will deduct the lower amount based on the percentage. (Disposable wages are calculated as described above in the Percent of Net (-Misc) description.)
Flat W/Percent Net Cap: This option will deduct a flat amount unless the specified percentage of the employee’s net wages is less, in which case the program will deduct the lower amount based on the percentage.
Custom: This option is not used at this time.
Amount
If you specify a Flat Rate for the Method, enter the amount here. If the amount may vary from check to check, you can leave this blank, and manually enter the amount on each check.
Percent
If you specify either a percentage of the gross or net check amounts, enter the percentage here.
Min Amt / Max Amt
For deductions that are calculated based on a percentage, you can enter a minimum amount and/or a maximum amount to withhold.
Weeks
This entry can be used to control which weeks of the month each deduction is taken. The pay period ending date is normally used to determine which week a check falls in. You can also base the week number determination on the check date. The Week of Month Calc Basis setting located under Tools > Program Setup > Payroll > Settings controls the logic used for the week ending date determination.
A week ending date from the 1st to the 7th is week one; from the 8th to the 14th is week two; from the 15th to the 21st is week three; from the 22nd to the 28th is week four, and from the 29th to the 31st is week five.
If this entry is blank, the deduction will be taken on each of the employee's checks.
If you have a deduction that you want to be taken out twice a month, you could enter "13" or "24" to take the deduction out just on those weeks. Or, if you have a total amount for the month that needs to be deducted and you have split it into four amounts, you can enter "1234" and the deduction will not be taken out on checks with an ending date from the 29th to the 31st (the fifth week).
This setting is only recommended to be used with employees that have a weekly or biweekly pay period. Other types of pay periods may not work well with the week number logic.
Keep in mind that if an employee doesn’t receive a check during a pay period when a deduction would normally be taken, the program may not take the deduction out on the next check.
Frequency
The Frequency setting controls how often a deduction is taken. The default setting is “Each Check” which means the deduction will be withheld on each check. The other settings are:
One Time: This will deduct the amount on the employee’s next check. After that, the program will not deduct it again unless the Last Deducted On date is cleared.
Weekly: This will deduct the amount each week. If the employee receives more than one check per week, then the deduction will only be taken out on the first check that the employees receives in the week.
Biweekly: This will deduct the amount every other week when the employee is receiving a weekly check. (Note: If the employee’s pay cycle is Biweekly, it is not necessary to select Biweekly for the Frequency.)
Monthly: The deduction will be taken out one per month.
Annually: The deduction will be taken out one per year.
Note Combining the Weeks and Frequency settings should be done carefully.
User Defined Deductions Continued…
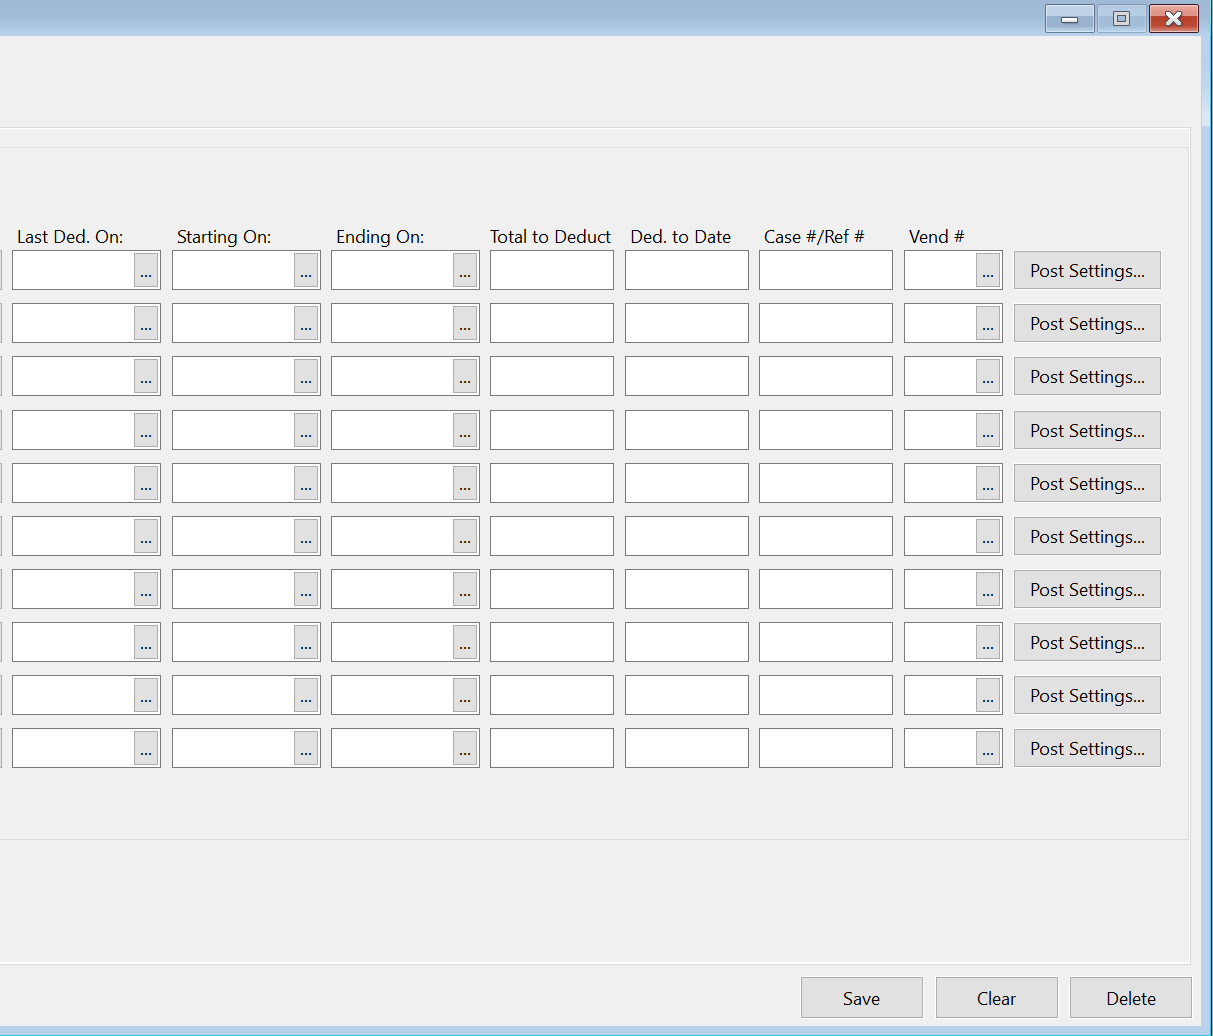
Last Ded. On
The program will automatically keep track of the Last Deducted On date. It is the week ending date for the last check where the deduction was taken out.
Starting On / Ending On
You can add dates for specific deductions to begin and end.
The program will not take a deduction from an employee's check until the week ending date is after the deduction starting date.
When an ending date is entered for a deduction, the program will stop withholding the amount on the employee’s check if the week ending date for the check is after the ending date.
Total to Deduct
The Total to Deduct allows you to enter the total that needs to be deducted. This would be used for a deduction like Income Tax Garnishment that has a total amount to be withheld.
Ded. to Date
This field will display the total amount that has been withheld for this deduction. The program uses this amount and the Total to Deduct amount to keep track of when to stop making deductions.
Note This amount is not a year-to-date amount, but a total that has been deducted since the deduction was started. The program will only keep a total in this entry if you have entered an amount for the Total to Deduct.
Case # / Ref #
Enter the case number or reference number for a garnishment order (such as for child support or back taxes).
Vend #
Enter the vendor account number that you need to remit withholding amounts to. You can press [F4] or click on the lookup button to select an account from the vendor lookup list.
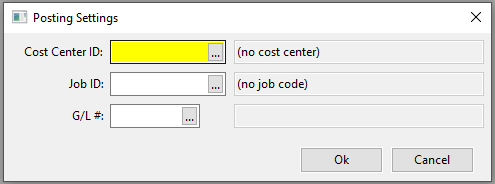
Post Settings
If you want to use a Cost Center, Job ID or G/L number in conjunction with a deduction, enter it here or use the look-up to select it.
When these are entered, the Payroll Journal will use this information when posting to the General Ledger instead of the Cost Center and G/L number on the Miscellaneous Payroll Deduction setup.
Loan
If you advance wages to employees, the program can keep track of each employee's loan balance, and a current deduction per check. This deduction will be taken out of the employees check until the loan is paid off.
Old vs. New W-4
This example will cover the changes made to the withholding calculations so you know what to expect when employees fill out the new form.
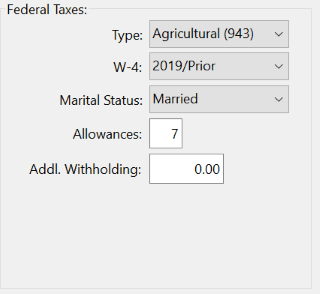
Example #1: 2019 W-4
In this example, the employee is married with one child. On the 2019 W-4 Personal Allowances Worksheet, the employee enters 1 for lines A, B, D and 4 for line E. This is a total of seven exemptions:
On the Batch Check Entry, after entering a payroll check with $914 in wages, the program determines that $12.20 should be withheld for federal income tax:

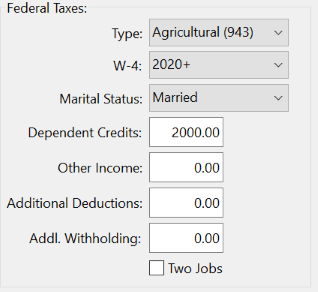
Example #2: 2020 W-4
What happens when the same employee fills out a 2020 W-4? In this case, the employee will enter $2,000 on line 3 for the child tax credit and check the Married box for the filing status. This is what the employee settings will look like:
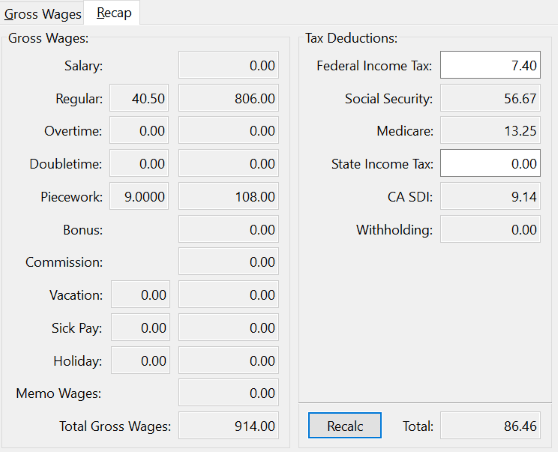
On the Batch Payroll Check window, when the same wages of $914 are entered for the employee, the program calculates a deduction of $7.40:
At this point you might be wondering what is going on. Which is the correct amount to withhold for this employee:
$12.20 or $7.40?
The answer is both amounts are correct. But one amount is more accurate than the other.
To see which amount is more accurate, you actually have to do this employee’s tax return. (If you don’t like doing your own taxes, you may want to skip this part.)
We will assume that the employee earns $914/week resulting in total wages for the year of $47,528 (line 1 on the 1040).
The employee only has a standard deduction of $24,400 (because he is married). Line 11a on the 1040 is $24,400.
Taxable income (line 11b) is $23,128 ($47,528-$24,400).
Tax on that amount (line 12b) is $2,387 (see page 65 of the 1040 instructions).
The employee has one child eligible for the child tax credit, so $2,000 goes on line 13b.
Line 14 is $387 ($2,387-$2,000).
There are no other taxes, so the total tax on line 16 is $387.
Dividing $387 by 52 weeks in the year, we get $7.44.
Based on the 2020 W-4, having $7.40 withheld from each check means the employee will have been slightly under withheld during the course of the year and owe $2.08 at the end of the year. That means the $7.40 withholding amount is much closer to the actual amount the employee owes than the $12.20 amount.
Having $12.20 withheld per check with the settings from the 2019 W-4 means that the employee will have had more withheld than they owe when they file their taxes. This will result in a refund of about $247. The reason that more is withheld with the 2019 W-4 is that the exemption method of adjusting taxable wages is much less precise than using actual dollar amounts.
A note about rounding: By default, the program has always rounded the withholding amount to the nearest ten cents. You can now change the rounding setting in the federal tax rate file to round to the nearest cent. If you do this, the program will actually withhold $7.45 per check. Other options are available to round up or down to the nearest whole dollar or to always round up to the nearest whole dollar.
The Short Answer
Withholding calculations made using the 2020 W-4 are more accurate than calculations made using the 2019/prior W-4’s. Employees that fill out a new W-4 should see their withholding adjusted to more closely match what they owe at the end of the year, provided:
The wages an employee earns each week are relatively consistent.
The employee works the entire year.
How do I know the withholding amounts are correct?
Publication 15-T from the IRS has the instructions for calculating withholding amounts on page 5, with tables to use on page 6. (The draft version available now includes tables with 2019 tax rates.) You can follow the steps on page 5 to calculate the amounts and verify the amounts calculated by the program.
Please do not call Datatech Customer Support to confirm whether specific withholding amounts are correct.
If you think a withholding amount is not correct, first use the new Deduction Explainer feature. Click on the Federal Withholding entry on the Recap tab page of the Batch Payroll Check Entry window and press [F12]. A window similar to the following will open with an explanation of how the program arrived at the withholding amount:
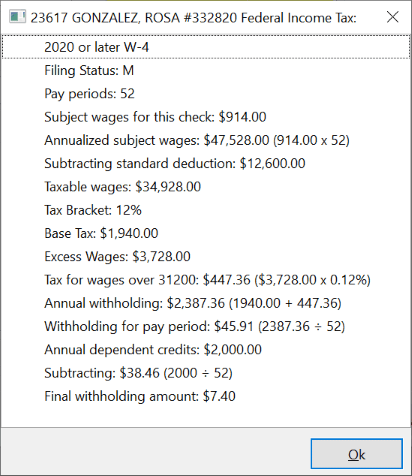
You can press Ctrl+C to copy the information in the window to clipboard. If you think a calculation is incorrect, this may help you in comparing what the program is doing to the worksheet in Publication 15-T.
If you verify that a withholding amount is not correct, Datatech Support personnel will need the information from the Deduction Explainer window to assist you in troubleshooting the issue. Use Ctrl+C to copy the information to the clipboard and paste it into an email when contacting Datatech Customer Support.
Local Tax Withholding
Note These entries work in connection with the entries on the State Tax Rates > Local Tax Settings tab > Local Tax Settings. You will need to select the Use Local or State Rate From Employee File box in order to use these entries.

Local Tax Rate (Decimal)
If you are using a Local Tax Rate for this employee, enter it as a decimal.
Locality
Enter the locality for this rate.