Daily Payroll Entry
Batch Check Entry vs. Daily Payroll Entry
There are two different ways to enter your weekly payroll information. The method that you use will depend on your payroll requirements.
-
Batch Check Entry: With the Batch Check Entry window, you enter the wage information for each employee one at a time. This is most suitable if each employee has their own time card where they have recorded the work performed.
-
Daily Payroll Entry: The Daily Payroll Entry window is much more suited to crew payrolls, where typically the hours and/or pieces for each employee in the crew is listed, and each crew sheet covers one day.
Employee Loan Checks
If you advance or loan money to employee that is subsequently paid back through deduction from their paychecks, the program can print checks for the loans, track the outstanding loan balance for each employee, and take deductions from the employees' checks until the loan is paid off.
After the Fact Checks
The After the Fact Check Entry window is used for entering payroll history. Normally it is only used when you first start using the program, to get employee totals caught up to date.
1. Set up any new employee accounts.
2. Enter time/crew sheets as you receive them on the Daily Payroll Entry window.
** Data Collection Users - Import Payroll Data
3. CA & WA users with piecework – Add Breaks.
4. Print all reports as required to check your entries:
-
Daily Payroll Report by Entry or Time Sheet to review entries.
-
Daily Payroll Batch Report to review all entries by employee for the pay period (includes deductions).
-
If needed – Custom Daily Payroll report to review by Crop, Job, Department or other ordering format.
5. Create Checks – Use the Daily Payroll Batch Report reviewed in Step 2. Select options to:
-
Calculate Minimum Wage Adjustments.
-
Calculate Rest & Recovery Report Pay Rates.
-
Calculate Overtime Premium.
6. Print Checks.
Note If any checks are damaged and need to be reprinted, use the Reprint Checks option.
7. Optional Reports:
8. Print the current batch Payroll Journal. Update the general ledger if the report is ok.
9. If you are using the Labor Contractor option, print your Grower Labor Reports & Invoices.
10. Issue checks for tax deposits as required by your federal and state deposit schedules.
Daily Payroll Entry Overview
The Daily Payroll program is designed to provide a fast, easy to use way of entering payroll on a daily basis. This program uses a different workflow than the check entry program, and entries that are made with this program cannot be edited with the check entry program.
This program is well suited to entry of harvest payroll. Employee wage information can be entered in any order, from daily crew or harvest sheets. At the end of the week, check records are then created, and checks are printed.
Payroll can be entered for more than one pay period at a time, and at the time of check generation you specify the days you wish to pay.
To open the Daily Payroll Entry window, go to Payroll > Daily Payroll Entry > Daily Payroll Entry. You can also click the Clock icon on the tool bar to open this window.
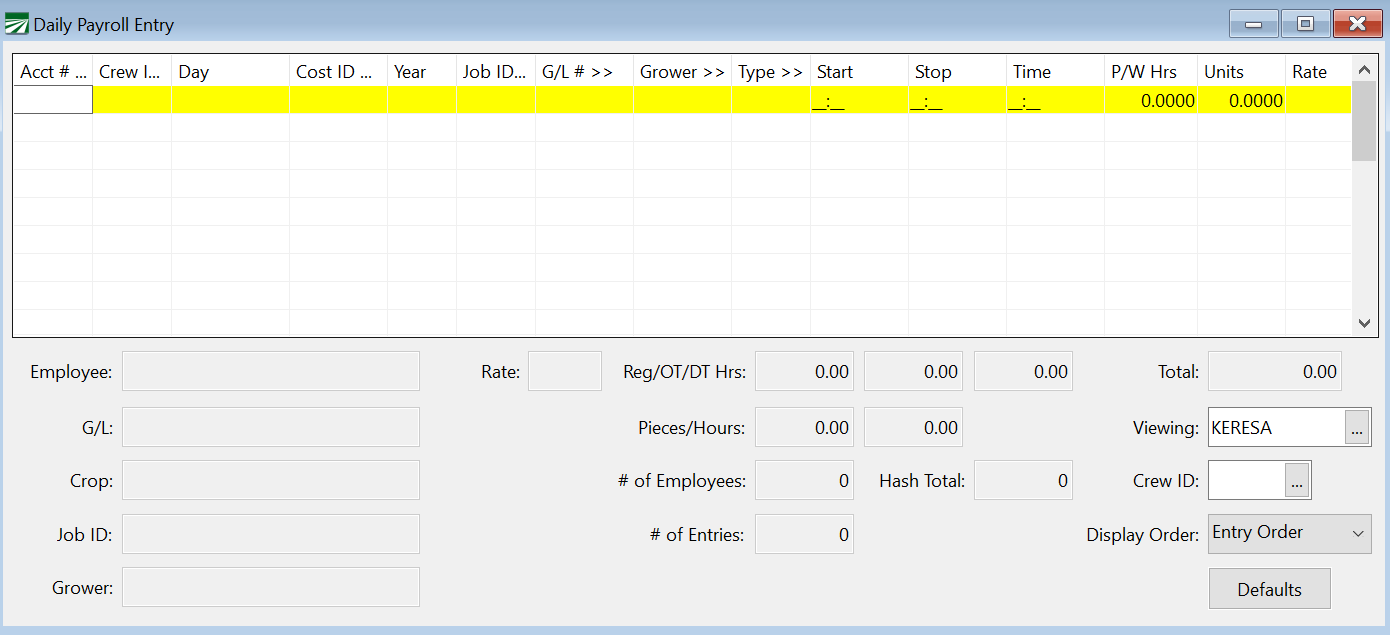
All daily payroll information is entered into this table.
If all entries will be using the same Crew, General Ledger #, Cost Center, Wage Type, Hours, Units, or Rates, you can set up defaults that will automatically enter these on each line to speed up the daily entry process. Click Defaults at the bottom of the window to set the defaults.
As you make entries on the Daily Payroll Entry window, the total gross wages will be displayed at the bottom right corner.
Acct #
Enter the Employee’s Account #, press [F4], or click on the Acct #: heading for a look up list of employees.
Crew ID
Enter the crew number the employee worked in.
Day
Enter the date in MM/DD/YYYY format. (When checks are generated, the day of the month will be used for Day entry.)
Cost ID (Crop ID)
Enter the cost ID that the wages will be expensed to, press [F4], or click on the Cost ID heading to get a look up list of the Cost Centers. By default, the program will repeat the cost center from the previous line, although you can turn off this behavior in the Defaults dialog.
Year
For farm cost accounting, if this is a direct crop expense (which means that you have entered a cost center), you must also enter the Crop Year. This allows you to keep track of direct crop expenses by crop year rather than calendar or fiscal year.
The current crop year, from either the Program Setup window or the Cost Center Setup window, will be entered here automatically. If you need to use a different year, enter the full four-digit year, i.e., "2005", "2006", etc.
This entry will be skipped if you did not enter a cost center. Also, this column will not appear for labor contractors.
Job ID
Enter the Job ID number, press [F4], or click the Job heading for a look up list of Job ID’s.
G/L #
Enter the general ledger the wages will be expensed to, press [F4], or click on the G/L # heading for a look up list of general ledger numbers.
Grower #
Labor contractors may enter the account number of the grower that the employee worked for in this column. The grower # will be used to group wages together for the grower labor reports and for billing purposes. (This column is not enabled for The Farmer's Office 2000.)
Press [F4] or click on the Grower column heading to get a lookup list of growers.
Type
The wage type will be automatically entered for you, either based on the wage type selected on the Defaults dialog or based on the employee's default pay type. If you need to select a different wage type (for instance, you need to enter overtime for an employee that normally receives hourly wages), enter the wage type, press [F4], or click on the Type heading for a look up list of wage types.
Note If you will be importing payroll data from a third party into the program, see Import Payroll Data for more information regarding what wage type should be used so that Overtime Premium is properly calculated.
Start / Stop / Time
This option allows you to allocate overtime premium to the payroll entries that occurred after the overtime threshold. This means you can allocate overtime to hours worked specifically during the overtime period (i.e., hours worked beyond the daily or weekly hour limit). To enable this entries, see Set Up Start / Stop Time for Daily Payroll.
This option allows the program to determine the order in which multiple lines on the same day were worked, applying overtime or double-time premiums to the last lines worked.
Note The Custom Batch Report and Labor Analysis Reports now have options to print Start, Stop, and Total Time entries.
See topic: Set Up Start / Time
P/W Hours
If this employee is being paid by piecework, enter the number of hours worked. For non-piecework wages, this entry will be skipped automatically.
Units
Enter the units of piecework, or the number of hours worked if being paid hourly.
Rate
Enter the rate per piece, or if paid hourly enter the rate per hour. If you are entering overtime or double-time hours, enter the regular hourly rate. Do not enter the time-and-a-half or double-time rate. The program will automatically multiply the rate you enter here by 1.5 or 2.0 according to the pay type entered.
A default rate will be entered for you automatically, according to the following rules:
-
If you have entered a default rate to use on the Defaults dialog, this rate will be used.
-
If this line is entered with a Salary or Hourly wage type, then the default rate from the employee's account will be used (assuming the employee's default pay type is also Salary or Hourly).
-
If the Pay Rate table has an entry which matches this line, the rate from the pay rate table will be used.
-
If this line is entered with a Piecework wage type, and the employee's default pay type is Piecework, then the default rate from the employee's account will be used.
After each line is completed, the system will automatically advance to the next line for the next entry.
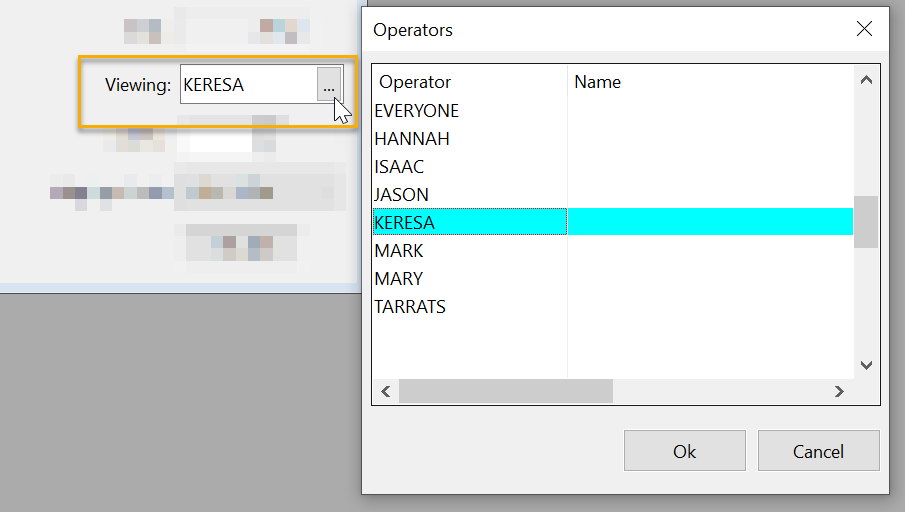
Viewing Other Users' Entries
This is only used for multi-user systems, where more than one person is entering payroll information at the same time.
By default, when you open the Daily Payroll window, you only see the entries that you have made. You can click on the Viewing entry at the bottom right, and enter another user's name and their entries will be displayed. (Your entries will disappear.) Clear the name in the Viewing entry and entries for all operators will be displayed.
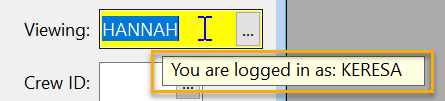
If you move the mouse pointer over the Viewing: entry, a tooltip will appear showing the username that you logged into the program with. This is useful at times because you may sit down at another computer with the program already loaded and you may want to check the name used to log into the program.
You should not enter new lines when you are viewing someone else’s entries. As soon as you finish entering new lines or click on another line, the grid will be refreshed. The program checks each entry that is displayed to make sure the username for those entries matches the username entered at the bottom of the window. The entries you just made will disappear because they were saved with your operator’s name, but you are currently viewing another operator’s entries. The entries are still in the Daily Payroll file. To view them, just enter your operator name in the Viewing entry.
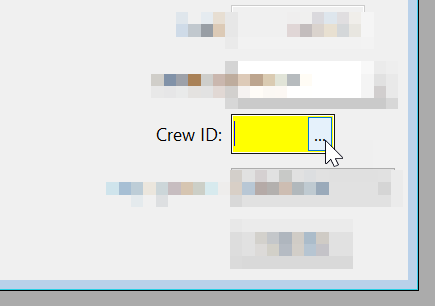
View a Single Crew
To view a single crew, enter a Crew ID in the bottom right corner. Only entries for that crew will be displayed. The crew number that you enter will also be entered as the default crew number on new entries.
If you are viewing one crew and you save entries using a different crew number, those entries will disappear when the display is refreshed. This is similar to the situation described in the previous section, where you enter new lines while viewing entries for a different operator and those entries disappear when the display is refreshed.
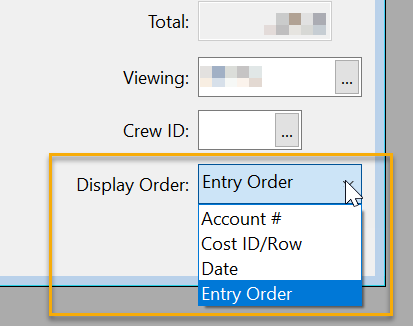
Display Order
You can display Daily Payroll entries by Date, Account #, Entry Order, or Cost ID/Row order. The Display Order setting is located at the bottom right of the window.
Entering Start Time in Daily Payroll
If you are using the Start Time option, follow these steps for entering payroll lines:

1. Enter the first line with the desired Cost ID and Start Time.
2. Then, because there is no end time entered, you will need to enter the hours as Units. (If you are using the Stop Time feature, then just enter the Stop Times and the program will enter the hours worked.)
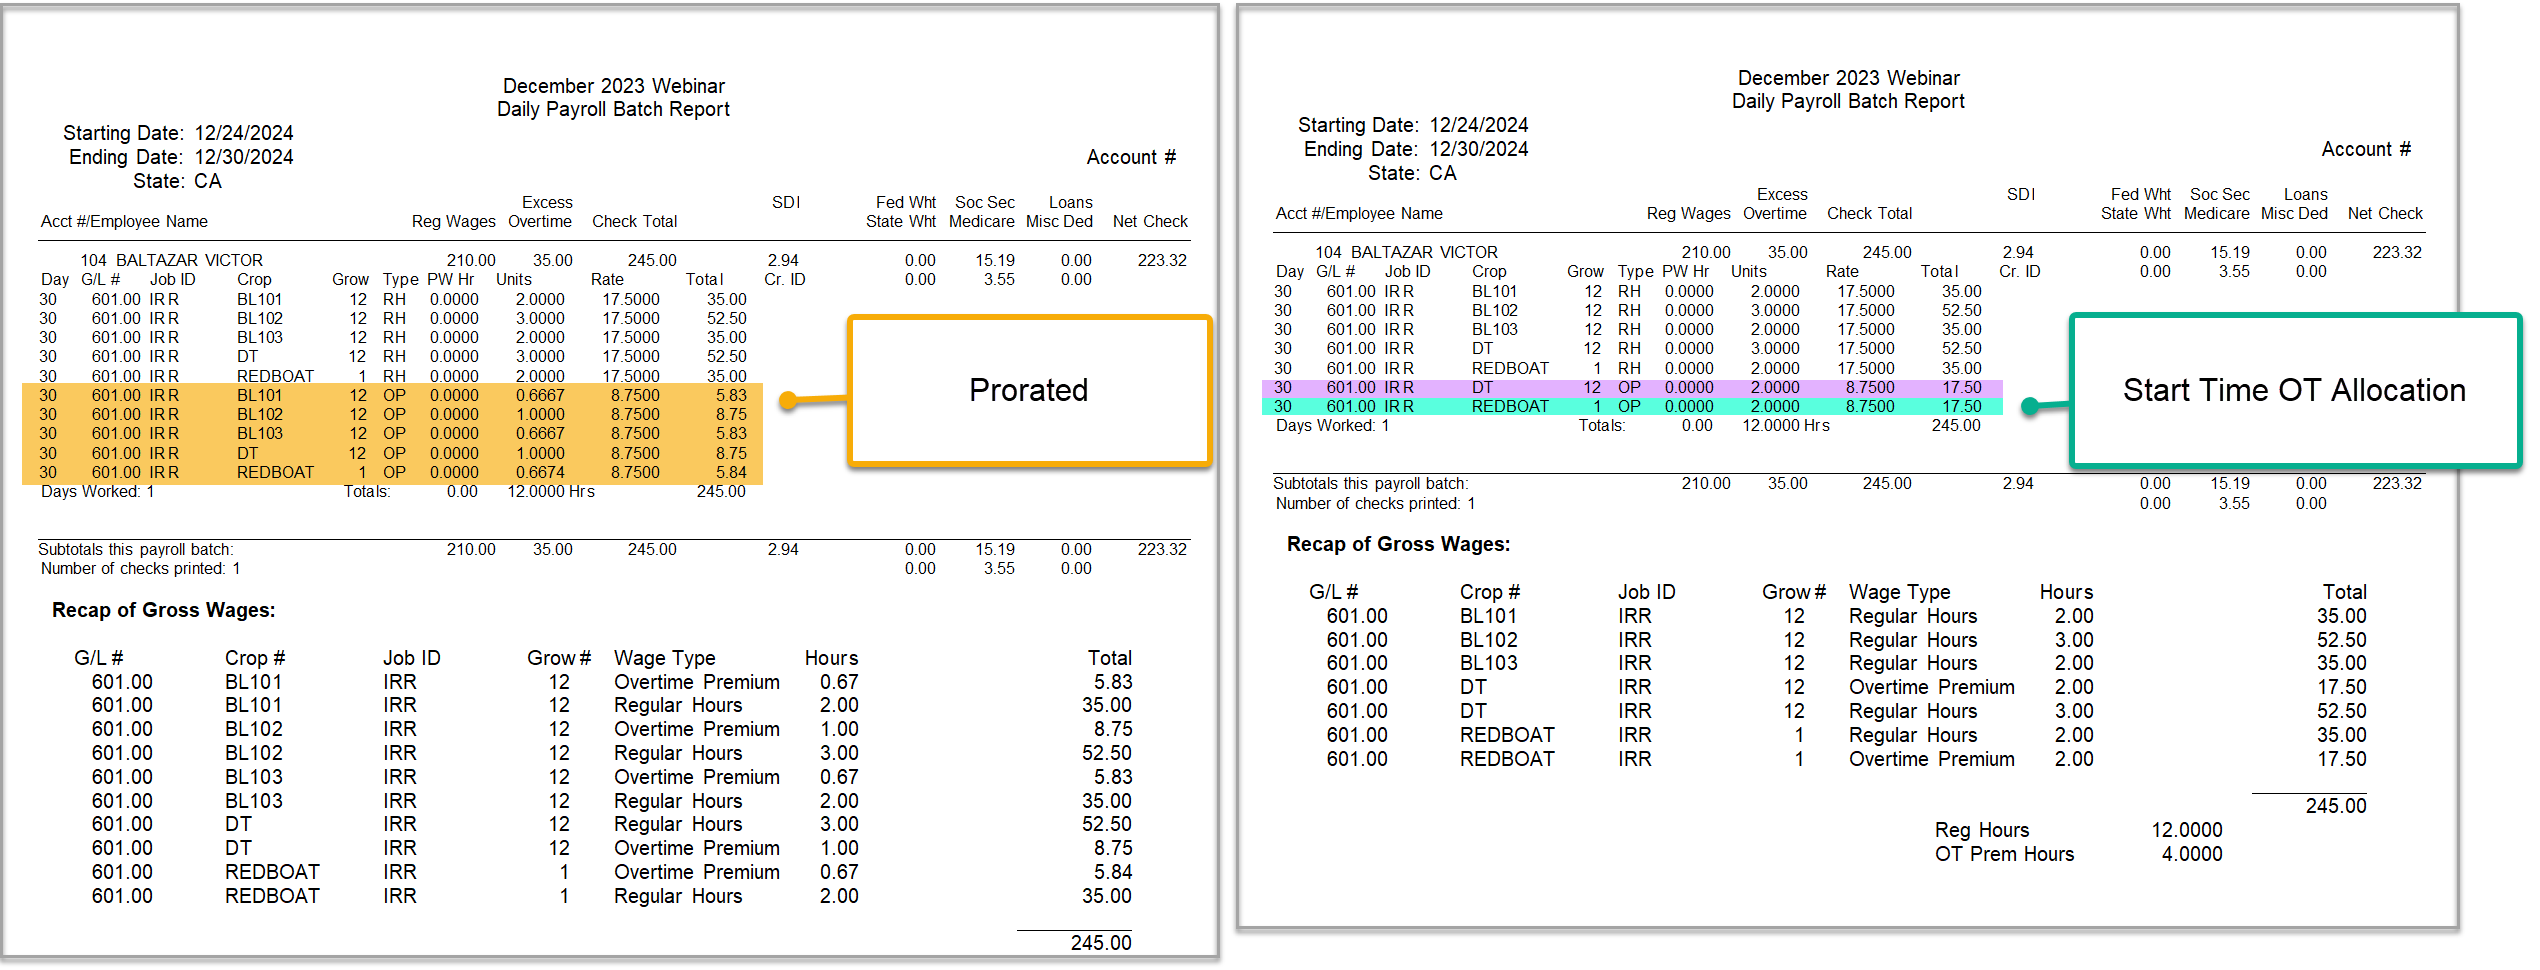
3. Once all lines are entered, right-click and select Reports > Print Batch Report. Select the Overtime Rules set up for Start Time.
Example Here is an example of using the Start Time overtime allocation.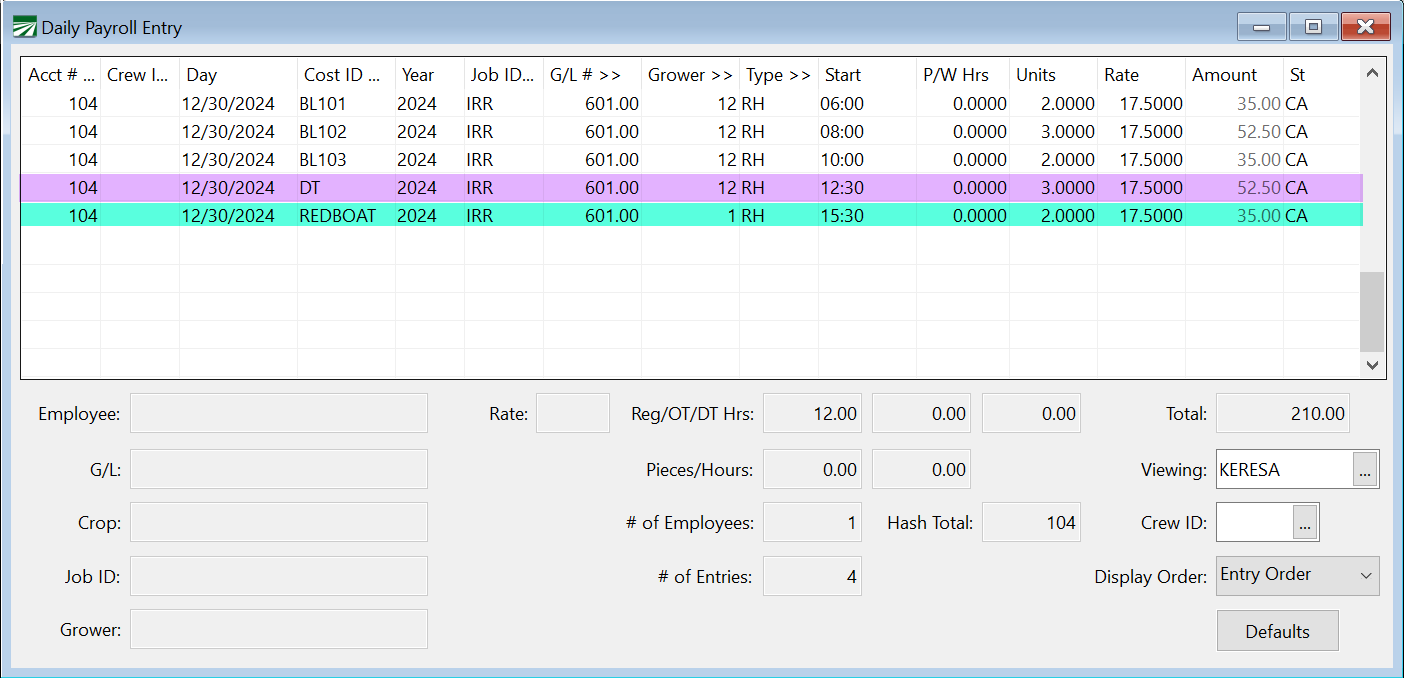
Both reports are using the same time entered. The report on the right shows how the program applied overtime premiums to the last lines worked.